Exchange SQL And IIS- P113 pptx
Bạn đang xem bản rút gọn của tài liệu. Xem và tải ngay bản đầy đủ của tài liệu tại đây (260.08 KB, 5 trang )
High Availability for Exchange 2007 Mailbox Servers • Chapter 8 537
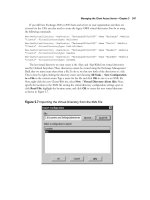
Figure 8.61 Security Permissions to the Majority Node Set File Share
Quorum Folder
5. Back on EDFS07 or EDFS08, we now need to set the Majority Node Set Private Property
attribute to point to the fi le share we just created. We do so by opening a command
prompt, then issuing the command Cluster res “Majority Node Set” /priv
MNSFileShare=\\EDFS03\MNS_FSQ_E2K7CCR.
538 Chapter 8 • High Availability for Exchange 2007 Mailbox Servers
You will get a warning that all properties were stored but not all changes will take effect until
the next time the resource is brought online, just as is shown in Figure 8.62.
Figure 8.62 Confi guring the Majority Node Set on EDFS07
SOME INDEPENDENT ADVICE
In a couple of the CCR-based cluster deployments I’ve done, I have gotten an error
message similar to the following when running the command Cluster res “Majority
Node Set” /priv MNSFileShare=\\EDFS03\MNS_FSQ_E2K7CCR:
Too many command line parameters have been specifi ed for this option.
See “CLUSTER RESOURCE /?” for correct syntax
Should you experience this error, too, you should be able to get going using the
following command syntax instead:
Cluster <ClusterName> res “Majority Node Set” /priv MNSFileShare=UNCPath
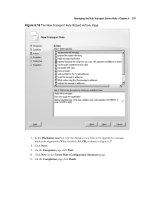
6. To force all changes to take effect, we will move the cluster group from one node to the
other (taking the cluster group offl ine and online again). Do this using the command
Cluster Group “Cluster Group” /Move. When you have done so, you will see that
the cluster group is now online on E2K7Node2, as shown in Figure 8.63.
NOTE
Make sure to replace the server name so that it matches the name of the Hub
Transport server in your environment.
High Availability for Exchange 2007 Mailbox Servers • Chapter 8 539
7. Now let’s verify that the 7Priv property is set correctly. This can be done by issuing the
command Cluster Res “Majority Node Set” /Priv.
As you can see in Figure 8.64, this property has been set correctly for the purposes of
our example.
Figure 8.63 Moving the Cluster Group from One Node to the Other
Figure 8.64 Verifying That the Property of /Priv Is Set Correctly
540 Chapter 8 • High Availability for Exchange 2007 Mailbox Servers
Confi guring the Transport Dumpster
When deploying a CCR-based cluster in your environment, an important step is to enable the
Transport Dumpster on the Hub Transport server.
The Transport Dumpster is a new feature of the Exchange 2007 Hub Transport server that can
submit recently delivered mail after an unscheduled outage. For an e-mail message to be able to be
retained in the Transport Dumpster, at least one of the message recipients must have his or her
mailbox located on a CCR-based mailbox cluster server, because the Transport Dumpster works only
with mailboxes located on a CCR-based mailbox server cluster. As mentioned earlier in this chapter,
with CCR the replication of mailbox data from the active node to the passive node is asynchronous,
which means that the passive node will always lag behind the passive node (although not by much).
This means that should a failure of the active node occur, there’s a chance that not all transaction
log fi les will have been replicated to the passive node before this happens. This is where the Transport
Dumpster comes into the picture. It can resubmit recently delivered mail and thereby constitute for
the majority of the changes in the database(s). When a failure of the active node results in a lossy
failover to the passive node, the cluster mailbox server will ask all the Hub Transport servers in the
site to redeliver any lost mail.
NOTE
Should any of the messages that are being resubmitted to the cluster mailbox server
be duplicates, the store is intelligent enough to discard any duplicates it fi nds.
The Transport Dumpster is enabled by default; you can see the default confi gured settings by
running the Get-TransportConfi g CMDlet.
Microsoft recommends that you confi gure the MaxDumpsterSizePerStorageGroup parameter, which
specifi es the maximum size of the Transport Dumpster queue for each storage group to a size that is
1.25 times the size of the maximum message that can be sent. For example, if the maximum size for
messages is 10 megabytes (MB), you should confi gure the MaxDumpsterSizePerStorageGroup parameter
with a value of 12.5 MB. In addition, Microsoft recommends that you confi gure the
MaxDumpsterTime parameter, which specifi es how long an e-mail message should remain in the
Transport Dumpster queue, to a value of 07.00:00:00, which is seven days. This amount of time is
suffi cient to allow for an extended outage to occur without loss of e-mail. When you use the
Transport Dumpster feature, additional disk space is needed on the Hub Transport server to host
the Transport Dumpster queues. The amount of storage space required is roughly equal to the value
of MaxDumpsterSizePerStorageGroup multiplied by the number of storage groups.
High Availability for Exchange 2007 Mailbox Servers • Chapter 8 541
You use the Set-TransportConfi g CMDlet to enable and confi gure the Transport Dumpster. So,
for example, to confi gure the maximum size of the dumpster per storage group to 25 MB with a
dumpster life of 10 days, you would need to run the command Set-TransportConfi g -MaxDumpsterSize
PerStorageGroup 25MB -MaxDumpsterTime 10.00:00:00.
To see the MaxDumpsterSizePerStorageGroup and MaxDumpsterTime confi guration settings, you
can type Get-TransportConfi g, as shown in Figure 8.65.
Figure 8.65 Transport Confi guration Settings
Installing Exchange 2007 on the Active Node
It’s time to install the Exchange Server 2007 binaries on each node. We’ll start with EDFS07,
which is the active node. To do so:
1. Double-click Setup.exe on the network share or the DVD media containing the
Exchange 2007 setup fi les.
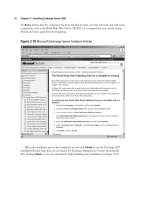
2. The Exchange Server 2007 Installation Wizard splash screen will launch, and as you
can see in Figure 8.66, Step 1: Install .NET Framework 2.0, Step 2: Install Microsoft
Management Console (MMC), and Step 3: Install Windows PowerShell have already
been completed.