Exchange SQL And IIS- P118 pptx
Bạn đang xem bản rút gọn của tài liệu. Xem và tải ngay bản đầy đủ của tài liệu tại đây (446.47 KB, 5 trang )
562 Chapter 8 • High Availability for Exchange 2007 Mailbox Servers
Installing the Necessary Windows Components
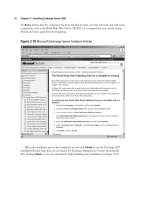
Before we move on and try to install the Exchange Server 2007 Beta 2 bits, we need to make sure
that the required Windows components have been installed. All types of Exchange Server 2007
installations (no matter what server role we’re talking about) need the Microsoft .NET
Framework 2.0 component installed.
Figure 8.86 Changing the Cluster Role for the Private Network
NOTE
If you have installed Windows Server 2003 Enterprise Edition with Service Pack 1
on the nodes, you need to download the Microsoft .NET Framework Version 2.0
Redistributable Package (x86), since it’s only a standard Windows component for
Windows Server 2003 R2.
High Availability for Exchange 2007 Mailbox Servers • Chapter 8 563
Since we’re installing the Mailbox Server role in the cluster, we also need to install the following
IIS 6.0 components:
■
Enable network COM+ access
■
Internet Information Services
■
World Wide Web Service
NOTE
Remember to install these components on both cluster nodes.
Installing Exchange Server 2007 on the
Active Node
It’s time to install the Exchange Server 2007 binaries on each node. Let’s start with EDFS09. We’ll do
this using the GUI, so do the following:
1. Navigate to the network share or DVD media that contains the Exchange 207 binaries, and
double-click Setup.exe.
2. On the Exchange 2007 Setup splash screen, click Step 4: Install Microsoft Exchange.
Then click Next. Accept the License Agreement and then click Next once again.
Decide whether you want to enable error reporting or not (it’s a good idea to enable this
functionality since the Exchange Product Group will receive any obscure errors you should
experience in your cluster setup), then click Next.
3. Now select Custom Exchange Server Installation, then click Next.
4. Check Active Clustered Mailbox Role and click Next.
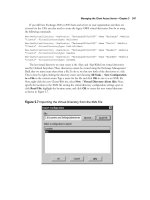
5. Now select Single Copy Cluster, then specify a name for the mailbox server (the name
you want your Outlook clients to connect to) and a unique IP address on your public
network. Finally, specify the path for the clustered mailbox server database fi les (the virtual
shared database disk you created earlier), then click Next (see Figure 8.87).
NOTE
To set the path for the clustered mailbox server database fi les, it’s important that the
cluster group containing the shared disks is owned by EDFS09. The reason for this is
that you aren’t allowed to use the shared disks if the cluster group is currently
owned by EDFS10.
564 Chapter 8 • High Availability for Exchange 2007 Mailbox Servers
Figure 8.87 Specifying the Name and IP Address of the Clustered Mailbox Server
6. Let the readiness check complete, and if no issues are found, click Next to begin the
installation.
7. The Exchange Server 2007 Installation Wizard will now copy the needed Exchange fi les,
install and confi gure the Mailbox role, then create and confi gure the clustered mailbox server
resources locally and create the object in Active Directory. When each step has been completed,
clear the Exit Setup and open Exchange System Manager check box, then click Finish.
We don’t want to open the EMC just yet; we’ll install Exchange on the second node fi rst.
8. Log on to EDFS10 with a domain admin account and perform the same steps we did
in installing Exchange Server 2007 on EDFS09. The only difference is that you should
check Passive Clustered Mailbox Role instead of Active Clustered Mailbox Role.
High Availability for Exchange 2007 Mailbox Servers • Chapter 8 565
When you have installed the Exchange Clustered Mailbox Role on the second node, we can
move on to the next section, where we verify that the functionality of the clustered mailbox server
works as expected.
Testing the Functionality of the
Single Copy Cluster
It’s time to verify that our Exchange 2007 clustered mailbox server is working as expected. Let’s fi rst
open the Cluster Administrator and check whether the respective Exchange Resources have been
created. If you take a look at Figure 8.88, it looks good; we have both nodes listed in the left pane
and all Exchange resources have been created and are currently owned by EDFS09.
Figure 8.88 Listing All Exchange Cluster Resources in the Cluster Administrator
If you look closer at Figure 8.88, though, you can see that two cluster groups exist: one
containing the cluster IP, name, and the shared disks, and one created by Exchange 2007 setup
containing the Exchange Information Store, System Attendant, Storage Groups, and Database
instances as well as the Exchange virtual server IP address and network name. WE recommend that
you move all shared resources from the cluster group to the MailboxServer2 group (or whatever you
called it); otherwise, you will have problems mounting the database when moving the clustered
mailbox server from one node to the other (which we’ll do in just a moment).
566 Chapter 8 • High Availability for Exchange 2007 Mailbox Servers
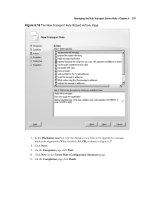
In addition, if you have assigned a shared disk specifi cally for the transaction log fi les, remember
to change the path for these fi les. You can do so by selecting the respective storage group under
Server Confi guration | Mailbox node in the EMC, then click the Move Storage Group link
in the Action pane. In the Move Storage Group Wizard, change the path for the log fi les to the L:
drive or whatever drive you assigned them.
Now try to open the EMS by clicking Start | All Programs | Microsoft Exchange Server
2007 | Exchange Management Shell on one of the nodes, then type Get-ClusteredMailboxSer
verStatus. As you can see in Figure 8.89, the status of the clustered mailbox server is Online, and
EDFS09 is currently the active node. This just keeps getting better and better, doesn’t it?
Figure 8.89 Verifying That the Cluster Is Online
Now that we have verifi ed that the clustered mailbox server is online, let’s try to move the
Exchange resources from node one to node two using the Move-ClusteredMailboxServer CMDlet. In the
test environment we’re using, we do so by issuing the command Move-ClusteredMailboxServer -Identity:
MailboxServer2 -TargetMachine:EDFS10 -MoveComment:“Testing the Move Clustered Mailbox functionality!”.
You’re then asked to confi rm this action. Type Ye s , then press Enter (see Figure 8.90). After a
while the clustered mailbox resources will be moved to the second node.
Figure 8.90 Moving the Clustered Mailbox Resources to the Second Node