Tự học iLife - p 10 ppsx
Bạn đang xem bản rút gọn của tài liệu. Xem và tải ngay bản đầy đủ của tài liệu tại đây (4.25 MB, 10 trang )
73
WORKING WITH iPHOTO ‘09
Organizing Photos
chapter
4
44
55
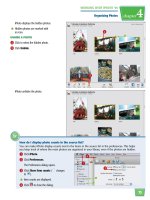
How do I display photo counts in the source list?
You can make iPhoto display counts next to the items in the source list in the preferences. This helps
you keep track of where the most photos are organized in your library, even if the photos are hidden.
1 Click iPhoto.
2 Click Preferences.
The Preferences dialog opens.
3 Click Show item counts ( changes
to ).
●
Item counts are displayed.
4 Click to close the dialog.
iPhoto unhides the photo.
iPhoto displays the hidden photos.
●
Hidden photos are marked with
an icon.
UNHIDE A PHOTO
4 Click to select the hidden photo.
5 Click Unhide.
44
33
11
74
C
o
v
e
r
e
d
B
r
i
d
g
e
F
e
s
t
i
v
a
l
S
e
p
t
e
m
b
e
r
1
2
,
2
0
0
9
9
-
1
2
-
0
9
,
9
:
0
5
A
.
M
.
9
-
1
2
-
0
9
,
9
:
0
2
A
.
M
.
9
-
1
2
-
0
9
,
9
:
0
3
A
.
M
.
9
-
1
2
-
0
9
,
9
:
0
5
A
.
M
.
9
-
1
2
-
0
9
,
9
:
0
4
A
.
M
.
9
-
1
2
-
0
9
,
9
:
1
0
A
.
M
.
9
-
1
2
-
0
9
,
9
:
1
5
A
.
M
.
9
-
1
2
-
0
9
,
9
:
2
0
A
.
M
.
9
-
1
2
-
0
9
,
9
:
1
3
A
.
M
.
9
-
1
2
-
0
9
,
9
:
1
6
A
.
M
.
33
11
iPhoto moves the photo to the
trash.
3 Click Trash to view photos in the
trash.
MOVE A PHOTO TO THE TRASH
1 Click to select the photo to delete.
2 Press
Delete
.
Delete a Photo
You can delete a photo when you are sure you do
not need it. Deleting is done in two steps. First
the photo is moved to the iPhoto trash, where it
can be recovered. Then the trash is emptied,
which removes the photo from the library.
If you originally imported a photo from another location on your
computer, deleting the photo from iPhoto does not delete the
photo from its other location.
Delete
a Photo
75
WORKING WITH iPHOTO ‘09
Organizing Photos
chapter
4
55
44
66
How do I delete
an event?
Click Events to
display the event
thumbnails and
then select an
event. Select
Photos and then
Move to Trash.
iPhoto deletes the
event and moves the photos to the trash.
How do I delete an album,
book, calendar, card, or
slideshow?
You can delete albums and
keepsake projects listed in the
source list by selecting them
and then pressing
Delete
.
iPhoto displays a dialog letting
you confirm the deletion. Once
these items are deleted they
cannot be retrieved.
iPhoto prompts you to confirm the
deletion.
6 Click OK to delete the photos in
the trash.
●
To recover a photo, select it, click
Photos, and then click Restore
to Photo Library.
EMPTY THE TRASH
4 Click iPhoto.
5 Click Empty iPhoto Trash.
Winter
Vacation
WinterWinter
VacationVacation
December 2008
1
11
12
2
3
4
5
13
1
1
Send
Send
Xmas Cards
Xmas Cards
Send
Xmas Cards
27
2
27
27
2
27
27
27
27
Family
Family
Photo
Photo
Family
Photo
Ryan’s
Ryan’s
B’day
B’day
Ryan’s
B’day
Book
Book
Club
Club
Book
Club
Office
Office
Part y
Party
Office
Part y
7
9
14
21
28
29
30
31
22
23
24
26
25
15
17
18
19
2
Christmas
Christmas
Christmas
31
31
31
31
31
31
31
31
1
31
1
1
New
New
Yea r ’s
Year’s
Part y
Party
New
Yea r ’s
Part y
76
11
22
33
EDIT
EDIT
EDIT
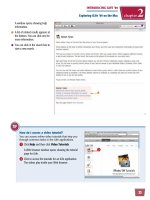
iPhoto opens the edit view.
●
Click a thumbnail to edit other
photos in your library. Which
thumbnails appear depend on the
source list selection when you
entered edit view.
●
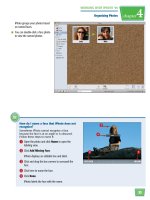
You can click to enter the
edit view in full screen.
3 Click and drag the slider to zoom
in or out on the photo.
1 Click a photo thumbnail.
2 Click Edit.
Use the Edit View
Edit view allows you to apply various commands to
change the orientation, lighting, and coloring of
your photos. You can crop and rotate photos,
improve photos that are over- or underexposed, and
brighten the colors in photos that look washed out.
Use the
Edit View
77
55
44
66
22
11
WORKING WITH iPHOTO ‘09
Editing Photos
chapter
5
How do I undo all the commands that I have
applied in the edit view?
You can revert your photo to its state when it first entered
the edit view.
1 Click Photos.
2 Click Revert to Previous.
iPhoto reverts the photo.
iPhoto applies the command.
In this example, the photo is
rotated.
Note: To undo the command, click Edit and
then Undo.
6 Click Done to exit edit view.
iPhoto zooms the photo and the
Navigation window appears.
●
You can click and drag to view a
different part of the photo.
4 Click to close the window.
5 Click an edit command.
78
iPhoto
LIBRARY
RECENT
Done
Events
Photos
Faces
Places
Vacation
Farm pics
Country
Scenic
ALBUMS
SLIDES
11
22
●
iPhoto rotates the photo 90
degrees counterclockwise.
You can click Rotate again to turn
the photo another 90 degrees.
●
To undo the rotation, click Edit
and then Undo.
Note: You can also rotate a photo using the same
button in the edit view. See “Use the Edit View” for
details.
USING THE ROTATE BUTTON
1 Click a photo thumbnail.
2 Click Rotate.
Rotate a Photo
You can rotate a photo to change its orientation.
A landscape-oriented photo can be changed to
portrait, and vice versa.
A landscape photo has the longest side oriented horizontally,
whereas a portrait photo has the longest side oriented vertically.
Rotate
a Photo
79
33
11
22
44
22
33
WORKING WITH iPHOTO ‘09
Editing Photos
chapter
5
How do I straighten a photo?
You can fix a tilted photo by rotating it up to 10
degrees to either side. This can be helpful for fixing
scanned content.
1 Enter the edit view. See “Use the Edit View” for details.
2 Click Straighten.
The straighten guidelines appear.
3 Click and drag the slider to straighten the photo.
4 Click Done to exit the edit view.
●
iPhoto rotates the photo 90
degrees.
Note: To undo the rotation, click Edit and
then Undo.
USING THE MENU COMMAND
1 Click a photo thumbnail.
2 Click Photos.
3 Click Rotate Clockwise or
Rotate Counter Clockwise.
80
HOW
TO
C
R
O
P
H
OW
TO
CR
O
P
C
R
C
C
C
R
C
C
RR
22
44
33
55
iPhoto adjusts the crop box.
5 Click Apply to perform the crop.
●
You can click Cancel to close the
tool without cropping.
1 Select a photo and open the edit
view.
Note: See “Use the Edit View” for details.
2 Click Crop.
iPhoto displays the Crop tool.
3 Click and drag a side to adjust the
vertical or horizontal dimension.
4 Click and drag a corner to adjust
both dimensions at once.
Crop a Photo
You can crop a photo to remove unneeded space
on the sides. By cropping, you can remove
unwanted background elements or reposition the
subject in the photo.
Crop a
Photo
81
66
22
11
WORKING WITH iPHOTO ‘09
Editing Photos
chapter
5
How do I constrain my cropping to
fixed dimensions?
You can select the Constrain option to crop
your photo to a fixed height and width ratio.
You might want to do this if you are printing
the photo to fit a certain-sized frame.
1 In the Crop tool, click Constrain
( changes to ).
2 Click the Constrain and select the
dimensions.
3 Repeat the steps in this task to crop your
photo.
●
iPhoto adjusts the dimensions of the Crop
tool and keeps the height and width the same
relative sizes if you adjust either of them.
iPhoto crops the photo.
6 Click Done to exit the edit view.
82
BEFOREBEFORE
BEFOREBEFORE
BEFORE
AFTERAFTER
AFTERAFTER
AFTER
22
33
iPhoto applies the enhancement.
●
To undo the enhancement, click
Edit and then Undo.
3 Click Done to exit edit view.
1 Select a photo and open the edit
view.
Note: See “Use the Edit View” for details.
2 Click Enhance.
Enhance a Photo
You can quickly improve a photo that is too dark
or too light with the Enhance tool. You click
the tool and iPhoto makes automatic
adjustments to the photo.
To make more controlled adjustments, see “Adjust Lighting in a
Photo” or “Adjust Colors in a Photo.”
Enhance
a Photo