Tự học iLife - p 13 pps
Bạn đang xem bản rút gọn của tài liệu. Xem và tải ngay bản đầy đủ của tài liệu tại đây (4.22 MB, 10 trang )
103
77
!!
00
99
11
22
WORKING WITH iPHOTO ‘09
Sharing Photos
chapter
6
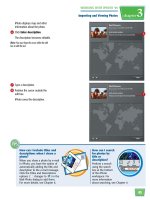
How do I view my shared Flickr photos from iPhoto?
When you upload photos to Flickr, iPhoto creates a new Flickr photo album in the source list. Follow these
steps to view the photos online:
1 In the source list, click the name of
the Flickr album.
The album photos appear.
2 Click the Flickr Web address button
for the album.
A Web browser opens to display
the photos.
9 Select who can view your photos.
You can select Anyone to make
the photos public.
0 Select a photo size to upload.
! Click Publish.
iPhoto uploads the photos to your
Flickr account.
An access page appears.
For iPhoto and other applications
to interact with Flickr, you must
allow them access to your
account.
7 Click OK, I’ll Allow It.
A confirmation page appears.
8 Return to iPhoto from the Web
browser. You can click iPhoto on
the Dock.
104
44
11
33
22
11
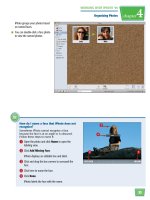
The first time you create an
instant slideshow, the slideshow
dialog appears.
3 Click Themes.
4 Click to select a presentation style.
1 -click to select the photos for
the slideshow.
●
You can also select an Event,
Places or Faces group, or album.
2 Click Slideshow.
Create an Instant Slideshow
You can quickly create a slideshow in iPhoto with
a custom theme, music, and transitions. You can
then display the slideshow in full-screen mode
to automatically cycle through the photos.
To have more control of your slideshow options, see “Create a
Slideshow Project.”
Create an
Instant Slideshow
105
88
77
55
66
44
33
22
11
WORKING WITH iPHOTO ‘09
Sharing Photos
chapter
6
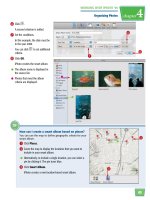
How can I add background music to a
slideshow?
1 In the slideshow dialog, click Music.
2 You can click the Source menu to choose music
from sample music, iTunes, GarageBand, and
other sources on your Mac.
3 Click to select a background song.
●
You can click to play the song.
4 Click Play.
iPhoto plays the slideshow with background
music.
iPhoto plays the slideshow.
9 Move your cursor.
iPhoto displays the slideshow
controls.
●
You can click here to navigate the
slideshow.
●
You can click here to open the
slideshow Themes, Music, and
Settings options.
●
You can click here to exit the
slideshow.
5 Click Settings.
6 Click to select the slide duration
(
changes to ).
●
If your slideshow has music, you
can sync the slide duration to the
music ( changes to ).
See the tip below to add music.
7 Select your other slideshow
settings ( changes to ).
8 Click Play.
106
11
55
44
22
33
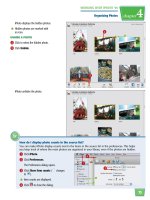
3 Click Slideshow.
4 Type a name for the slideshow.
5 Click Create.
1 -click to select the photos for
the slideshow.
●
You can also select an Event,
Places or Faces group, or album.
2 Click .
Create a Slideshow Project
You can create a custom slideshow project that
allows you to add a theme, transitions, and
music and also order your slides. You can export
the project as a separate movie file when you
are finished. A slideshow project appears in the
source list so you can play or edit it later.
Create a
Slideshow Project
107
66
77
88
33
11
22
WORKING WITH iPHOTO ‘09
Sharing Photos
chapter
6
How do I export slideshow?
You can export your slideshow
project to a QuickTime movie file that
you can use on an iPod, Apple TV,
and other devices.
1 Click Export.
The Export Your Slideshow dialog
opens.
2 Click one or more sizes based on
how you want to use the movie
( changes to ).
●
You can click Custom Export to
select the QuickTime format, specify
frame rate and compression, and other advanced settings.
3 Click Export to create your movie.
●
iPhoto adds the slideshow to the
source list.
6 Click and drag the thumbnails to
rearrange the slide order.
●
The first slide shows the slideshow
name. You can double-click the
name to edit it.
7 Click here to select the theme,
music, and other settings. For
more details, see “Create an
Instant Slideshow.”
●
You can click Preview to preview
the slideshow in the project
window.
8 Click Play.
iPhoto plays the slideshow at full
screen.
108
my photos
11
66
77
55
44
11
22
33
5 Select a hardcover, softcover, or
wire-bound format.
6 Click a theme to choose the colors
and layout for your book.
●
Example pages appear here.
7 Click Choose.
8 If a dialog about adding photos
appears, click OK.
1 -click to select the photos for
the book.
●
You can also select an Event,
Places or Faces group, or album.
2 Click .
3 Click Book in the dialog that
appears.
4 Type a name for the book.
Create a Book
You can create a photo book that showcases the images
from a vacation, party, or other event. You can
customize the book with a number of colorful themes
and page layouts. iPhoto can even create a map page to
display where photos were taken. See “Create a Travel
Map in a Book” for details.
You can purchase a printed version of the book through Apple’s printing
services.
Create
a Book
109
99
00
## $$
!!
@@
33
22
WORKING WITH iPHOTO ‘09
Sharing Photos
chapter
6
How do I edit text on a page?
Most book themes, such as Picture Book and Travel
Book, include title and caption text. You can edit
the text and change the font to suit your liking.
1 View a page with text.
2 Click the text.
The text becomes editable.
3 Type your title or caption.
●
You can click Settings to change the style and size
of the text.
! Click the Page View button ( )
to view the pages as thumbnails.
@ Click a page that you want to
redesign.
# Click here to change the page
background or layout.
$ When you are finished
customizing the pages, click Buy
Book.
iPhoto prompts you for your
Apple account information for
purchasing the book.
●
The book name appears in the
source list.
●
Thumbnails of the selected photos
appear here.
●
Book pages appear here.
9 Click and drag a thumbnail to add
a photo to a page.
●
You can click Autoflow to add all
the photos in order automatically.
0 Click the arrows to view other
pages in the book, to which you
can then add photos.
110
44
66
22
55
iPhoto adds a map to the page.
●
If your book photos include place
information, iPhoto automatically
adds the places.
5 Click the map to edit it.
An edit dialog appears.
6 Type a title for the map.
●
You can click plus to add a place.
●
You can select a place and then
click minus to remove it.
1 Create a photo book.
Note: See “Create a Book” for details.
2 Click to select the page to which
you want to add a map.
3 Click Layout.
4 In the menu that appears, click
Map and then the map icon.
Create a Travel Map in a Book
You can create a map page in an iPhoto book
that illustrates the locations of your book
photos. You can edit the places on the map and
even connect them to show a journey.
For more about associating your photos with places, see Chapter 4.
Create a Travel
Map in a Book
111
77
11
WORKING WITH iPHOTO ‘09
Sharing Photos
chapter
6
How do I edit the places on my map?
Follow these steps:
1 -click a place on the map.
A menu appears.
●
Click to delete the place.
●
Click to move the label. This is helpful if labels on the map
overlap.
●
You can click other commands to change other aspects of the
map.
●
You can -click a line to make changes to it.
7 To connect the places in the order
they are listed, click Show lines
(
changes to ).
●
iPhoto connects the places.
●
You can click and drag the places
in the list to reorder them.
112
44
@@
99
88
!!
00
22
66
33
1111
55
8 Select when to start the calendar.
9 Select the number of months in
the calendar.
0 Select a country to display
national holidays or None to
display none.
! If you use iCal, you can import
iCal data into your calendar.
@ Click OK.
1 -click to select the photos for
the calendar.
●
You can also select an Event,
Places, or Faces group, or album.
2 Click .
3 Click Calendar in the dialog that
appears.
4 Type a name for the calendar.
5 Click to select a theme.
6 Click Choose.
7 If a dialog about adding photos
appears, click OK.
Create a Calendar
You can create a calendar that features photos
from your iPhoto library. You can customize the
pages with a colorful theme and add one or more
photos to each month. iPhoto can also
automatically add national holidays or information
from your iCal calendar to the dates.
You can purchase a printed version of the calendar through Apple’s
printing services.
Create a
Calendar