Tự học iLife - p 14 pps
Bạn đang xem bản rút gọn của tài liệu. Xem và tải ngay bản đầy đủ của tài liệu tại đây (3.45 MB, 10 trang )
113
^^
**
##
&&
%%
((
$$
22
33
11
WORKING WITH iPHOTO ‘09
Sharing Photos
chapter
6
How do I edit a date in a calendar?
You can edit a date to add or change the text of a
birthday, holiday, or other event.
1 Double-click a date in the calendar.
The date opens in a separate dialog.
2 Type to add or edit the date text.
3 Click to save the changes and close the dialog.
●
The calendar name appears in the source
list.
●
Thumbnails of the selected photos appear
here.
●
Calendar pages appear here.
# Click and drag a thumbnail to add a photo
to a page.
●
You can click Autoflow to add all the
photos in order automatically.
$ Click can click placeholder text on the pages
to add text to your calendar.
% Click the arrows to view other pages in the
calendar, to which you can then add photos.
^ Click to select a calendar page whose layout
you want to edit.
& Click Layout.
* In the menus that appear, click a layout.
iPhoto applies the layout to the page.
( When you are finished customizing the
pages, click Buy Calendar.
iPhoto prompts you for your Apple account
information for purchasing the book.
114
house.jpeg
33
44
55
11
22
66
The Export Photos dialog appears.
4 Select a file type.
iPhoto allows you to export to
three common formats: JPEG,
TIFF, or PNG. You can also export
photos as they were originally
imported or as their current file
type in iPhoto.
5 If you are exporting to JPEG, select
a quality.
6 If you are exporting to JPEG or
TIFF, you can click to include
descriptive information in the files
( changes to ).
1 Select the photos, Event, Places or
Faces group, or album you want
to export.
2 Click File.
3 Click Export.
Export Photos
You can save photos from iPhoto to separate
files so you can open them in another application
or on a non-Mac computer. You can control the
file format, image size, and file names used for
the export.
Export
Photos
115
77
00
88
99
!!
WORKING WITH iPHOTO ‘09
Sharing Photos
chapter
6
How do I send photos
to iDVD for use in a
DVD project?
Select photos, an Event, a
Places or Faces group, or
an album. Click Share and
then iDVD. iDVD opens and
the photos are added to a new project. If
iDVD is already open, the photos are
added to the current project. See Part VI
of this book for more about iDVD.
How do I send photos to iWeb for
use on a Web page?
Select photos, an Event, Places or Faces
group, or an album. Click Share and
then iWeb. From the submenu that
appears, select Photo Page to place the
photos on a photo page template or Blog
to place the photos on a blog template. iWeb
opens and the photos are added to the template. See Part
V of this book for more about iWeb.
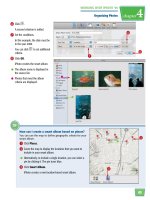
0 Select where to save the files.
! Click OK.
iPhoto saves the files.
After the export is complete, you
can view the files in the Finder.
7 Click a size.
You can select a setting other than
Full Size to decrease file size.
Choosing this also decreases the
image quality.
8 Click a file name.
●
If you select Sequential, you can
specify a prefix to be placed
before the number.
9 Click Export.
116
Pictures
Pictures
Pictures
Backups
Backups
Backups
F
l
o
w
e
r
S
h
o
w
33
55
11
22
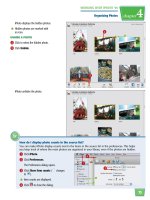
iPhoto prompts you to insert a
disc.
4 Insert a blank, recordable CD or
DVD into your disc drive.
5 Click OK.
1 Select the photos, Event, Places or
Faces group, or album you want
to burn to a disc.
2 Click Share.
3 Click Burn.
Burn to a Disc
You can write your image files from iPhoto to a
CD or DVD for archiving or to give to a friend.
This process creates a disc that can be viewed only
in iPhoto.
Burn to
a Disc
117
66
77
88
WORKING WITH iPHOTO ‘09
Sharing Photos
chapter
6
How do I set a photo as
the desktop picture on
my Mac?
Select the photo to use in
the photo library. Click
Share and then Set
Desktop. iPhoto sets the
photo as the desktop picture
on your Mac. You can reset the
desktop picture by clicking the Apple menu,
System Preferences, and then Desktop & Screen
Saver.
How do I burn a disc to be
used in applications other
than iPhoto or on a
Windows PC?
First export your photos
from iPhoto. See “Export
Photos” for details. Then
switch from iPhoto to the
Finder. In the Finder, insert a
blank, recordable CD or DVD into your Mac and
drag the folder containing your exported files to
the icon for the disc.
iPhoto displays a Burn Disc dialog.
8 Click Burn.
iPhoto writes the selected photos
to the disc.
●
You can click Eject to eject the
disc without burning the photos.
●
You can click Cancel to close the
dialog without burning the photos.
●
iPhoto reads the disc and displays
summary information.
6 Type a title for the disc.
7 Click Burn.
Power
PC
PC
PC
part
I
I
III
I
I
III
I
I
III
Working with iMovie ’09
This part of the book covers
the iMovie ’09 video editor,
which lets you author
professional-looking movies
on your Mac. You can
assemble clips shot with
your tape-based or memory-
based camcorder and
combine them with still
photos, transitions, special
effects, and more. When you
are finished, you can share
your work by burning it to
disc in iDVD or uploading it
online.
I
I
II
I
I
II
I
I
II
Chapter 7: Importing and Organizing
Movies 120
Chapter 8: Editing Movies 136
Chapter 9: Adding Audio to Movies 166
Chapter 10: Adding Special Effects
to Movies 178
Chapter 11: Sharing a Movie 200
120
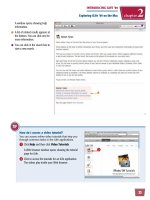
Event Browser
iMovie organizes video clips into
events based on the time they
were created. You can select an
event in the event library to display
the associated clips. See “Import
Video from Your Computer” for
more information.
Project Browser
You build a movie by selecting
clips in the event browser and then
adding them to your project, which
is built using the project browser.
Here, you can rearrange the clips,
add special effects, preview your
movie, and more. See Chapter 8
for more about creating a project.
Viewer
When you play a clip from the
event browser or project browser,
the clip appears in the viewer. You
can also view clips in full-screen
mode. See “View a Clip at Full
Screen” for details.
iMovie enables you to import and organize video clips taken with a camcorder, digital camera,
or other device. You can then assemble the clips into professional-looking movies that have
transitions, background music, special effects, and more. Take a moment to familiarize
yourself with the iMovie workspace.
Understanding the
iMovie Workspace
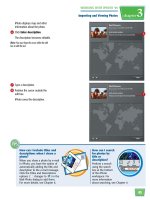
Content
Browsers
You can click
here to open
panes for adding
music, still
photos, text
overlays, and
more to your
project. Chapter
10 goes into
detail about
these features.
Play Project
You can click
here to view the
clips in your
project plus any
special effects
you have added.
Play Event Clips
You can click here to play a video
clip from your event library to help
decide how to use it in your
project.
Evaluate Clips
You can click buttons to mark clips
in your library as favorites if you
want to use them later, or reject
clips to unclutter your workspace.
See the tasks in this chapter to find
out more.
Adjust Thumbnails
You can click and drag sliders to
display more or fewer thumbnails
in the event and project browsers.
121
Importing and Organizing Movies
chapter
7
Taped-based Camcorder
iMovie can import video content captured on
videotape from miniDV and Digital-8 camcorders. You
can connect your camcorder to your Mac using a
FireWire cable. You can operate the camera while it is
connected using the iMovie controls and then capture
the content as the camera plays it. If you have an
older camcorder that does not include a FireWire
connection, you may have to purchase extra hardware
to capture your recordings.
Memory-based Camcorder
Newer camcorders capture video content on
miniDVDs or flash-based or miniature hard drives
instead of on traditional tape. iMovie can import video
from those as well. These memory-based cameras are
advantageous in that you can preview clips quickly
because the camera can access the clips directly like a
computer accesses files, instead of having to scan
through a tape from start to finish. Memory-based
camcorders connect using a USB cable.
Importing and Organizing Movies
WORKING WITH iMOVIE ’09
In order to edit your video clips into an award-winning movie, you must first acquire them.
Get Video to
Use in iMovie
35
35
55
55
M
a
n
s
f
e
l
d
M
a
n
s
f
e
l
d
Digital Still Camera
Nowadays, many digital cameras that take still photos
can also record video. You can download both still
photos and video clips from such cameras into
iPhoto. iMovie can access those iPhoto video clips in
the event library. See “Import Video from Your
Computer” for details. For more about iPhoto, see
Part II of this book.
Web Cam
If your Mac has an iSight camera, or you have a
FireWire-based Web camera connected to your Mac,
you can capture video to use in iMovie. Click Open
Camera Import Window (
) to select the camera
and then use the Capture and Stop commands to
record video clips.
122
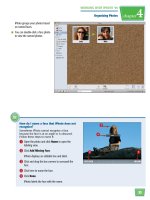
22
44
2 If Manual is not selected, click to
select it.
3 Use the controls to play the movie
to where you want to begin
recording.
●
You can click to rewind.
●
You can click to fast-forward.
●
You can click to stop.
●
You can click to play.
4 Click Import.
1 Turn your tape-based camcorder
on and connect it to your Mac.
Connect the camera using a
FireWire cable.
Note: Make sure your camcorder is switched to
VTR, VCR, or Play mode. The terminology may vary
depending on the model of your camcorder.
The import window opens.
●
If the import window does not
open, click File and then Import
from Camera to open it.
●
To import all the video on the
camcorder, select Automatic and
then click Import.
Import Video from a Tape-based Camcorder
You can connect a tape-based camcorder to
your Mac and import video into iMovie as the
camcorder plays. iMovie saves the video clips
as digital files that you can then assemble into
professional-looking movies.
For details about connecting your specific camcorder, see the
documentation that came with the device.
Import Video from a
Tape-based Camcorder