Tự học iLife - p 22 pps
Bạn đang xem bản rút gọn của tài liệu. Xem và tải ngay bản đầy đủ của tài liệu tại đây (4.22 MB, 10 trang )
193
WORKING WITH iMOVIE ’09
Adding Special Effects to Movies
chapter
10
11
22
66
88
77
99
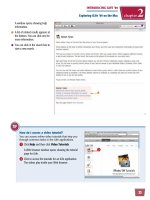
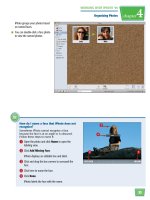
How do I add a cutaway effect?
A cutaway is similar to a picture-in-picture effect except that the
added clip takes up the entire screen. You can use a cutaway to
show a person’s response to action in the scene or to cover up
imperfect footage. You must have the Advanced Tools turned on
in iMovie’s preferences to add a cutaway.
1 Click and drag the selection you want to use as the cutaway onto a
clip in the project.
2 Click Cutaway in the menu that appears.
iMovie adds a cutaway to the project.
iMovie inserts the clip.
●
The inserted clip appears as a
thumbnail above the other clip.
7 In the viewer, click and drag the
middle of the embedded clip to
change its position.
8 Click and drag a corner to change
its size.
9 Click Done to save the changes.
●
You can select the embedded
clip and press to
preview it.
6 Click Picture in Picture in the
menu that appears.
194
22
44
55
33
66
11
San Francisco
San Francisco
San Francisco
Rome
Rome
Rome
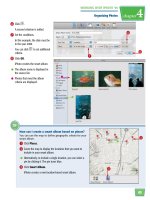
The Choose City or Airport dialog
appears.
4 Type a city or airport code.
iMovie displays results for the
search term.
5 Click a result to select it as a start
location.
●
You can optionally edit the label
so it shows a different location, a
landmark, or a person’s name.
6 Click OK to return to the
Inspector.
1 Click to view the maps and
backgrounds browser.
iMovie displays globe maps and
flat maps for adding to your
project.
2 Click and drag a map to between
clips in your project.
iMovie adds the map to your
project and the Inspector opens.
3 Click the Start Location button.
Add an Animated Travel Map
You can add a map to a travel-oriented project
that shows starting and ending locations on
the map. When you play the map, an animation
connects the two locations. iMovie includes a
database with thousands of geographic
locations to help you illustrate places featured
in your movie.
Add an Animated
Travel Map
195
WORKING WITH iMOVIE ’09
Adding Special Effects to Movies
chapter
10
11
22
33
99
8877
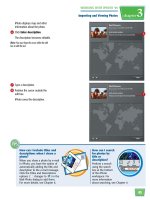
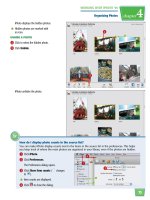
Can I show a world map without
displaying a specific location?
iMovie features several flat world maps
without locations in the maps and
backgrounds browser.
1 Click and drag a flat map from the third
row in the browser to your project.
iMovie adds a map without locations to
your project.
2 Position the cursor over the map and
double-click the crop icon ( ) to open the
Crop tool.
3 Click and drag the green and red boxes to
adjust the Ken Burns effect, which is the
panning and zooming that takes place
when the map appears. For more about
the Ken Burns effect, see Chapter 8.
To feature a map that shows just a
single location, skip to step 9.
7 Click to include an end location
( changes to ).
8 Click here and repeat steps 4 to 6
to select an end location.
9 Click Done to save the new map.
●
You can click the map and press
to preview the
animated map.
196
44
22
11
33
F
INIS
HFINISH
F
INIS
H
FINISH
2 Add the background on which you
want your subjects to appear to
your project.
Note: The background can be a video or a still
photo. For more about adding still photos to a
project, see Chapter 8.
3 Select the green-screen clip.
4 Click and drag the selection onto
the background.
1 Create a clip of your subjects
against a solid green backdrop.
Note: You can buy green fabric from a video
production supply store. The color used for this
technique is called chroma key green.
Add a Green-Screen Effect
You can capture action in front of a green-
colored backdrop and then use iMovie’s tools
to replace the backdrop with another image.
You can use the effect to place people in
famous locations, next to interesting animals,
or against illustrated backgrounds.
The green-screen feature is one of the iMovie advanced tools.
To turn on the advanced tools, see “Add a Picture-In-Picture
Effect.”
Add a Green-Screen
Effect
197
WORKING WITH iMOVIE ’09
Adding Special Effects to Movies
chapter
10
55
66
77
How can I subtract the final frame
to improve the green-screen effect?
When shooting a clip, you can have the
subjects move out of the frame at the
end so that only the green backdrop is
shown. You can then have iMovie
analyze that final frame to improve the
quality of the effect. Double-click a
green-screen clip in the project browser
to open the Inspector. Then select
Subtract last frame (
changes to )
to apply the setting.
How can I use cropping to
improve the green-screen effect?
You can crop the subject in the clip to
lessen the chance that unwanted
artifacts appear around it, which can
happen when the green backdrop is
not perfectly solid. Click to select the
green-screen clip in the project
browser. iMovie displays the clip in the
viewer. Click and drag the crop handles (
) in the viewer to
isolate just the subject of the clip and anywhere else the subject
moves during the segment.
iMovie adds the clip as a green-
screen clip, which appears above
the background in the project
browser.
6 Click to select the green-screen
clip.
7 Click to preview the
effect in the viewer.
The green backdrop is
automatically removed from
around the subjects.
5 In the menu that appears, click
Green Screen.
198
11
33
44
22
Keywords
iMovie adds the keyword to the
clip.
●
You can click multiple check boxes
to add multiple keywords to a clip.
●
Clips with keywords are marked
with a blue line.
●
To remove a keyword, select a clip
and click here ( changes to ).
●
To add a new keyword to the list,
type the term and press .
ADD A KEYWORD TO A CLIP
1 In the event browser, click and
drag to select the clip to which
you want to add a keyword.
You can apply keywords to an
entire clip or just part of a clip.
2 Click to open the keywords
panel.
The keywords panel opens.
3 Click Inspector.
4 Click to add a keyword to the
selection ( changes to ).
Organize Clips Using Keywords
You can assign keywords to describe the subject
matter, location, and other characteristics of your
clips. Then you can filter clips in the event browser
by keywords to pull up the content you need for
your projects.
The keywords feature is one of the iMovie advanced tools. To turn on
the advanced tools, see “Add a Picture-In-Picture Effect.”
Organize Clips
Using Keywords
199
WORKING WITH iMOVIE ’09
Adding Special Effects to Movies
chapter
10
11
22
33
How do I apply more criteria in the Keyword Filter?
Follow these steps:
A green icon ( ) means a clip must have that keyword to be
displayed.
●
Click a keyword name to toggle the green icon on and off.
A red icon ( ) means a clip must not have that keyword to be
displayed.
●
Click to toggle the red icon on and off.
●
Clicking Any displays clips that meet any of the criteria.
●
Clicking All displays clips that meet all of the criteria.
FIND BY KEYWORDS
1 Click in the event library to select
a collection of videos.
2 Click .
The Keyword Filter pane appears.
3 Click a keyword.
●
appears next to the
keyword.
●
iMovie filters the clips, showing
only the clips that have been
assigned that keyword.
●
You can click to toggle the filter
on and off.
200
33
44
55
11
22
4 Type a name for the file.
5 Select the location where to save
the file.
1 Open the project that you want to
save.
2 Click Share.
3 Click Export Movie.
Save a Movie to Your Computer
You can save the clips, titles, transitions, and
other content that you have assembled in a
project as a single movie file on your computer.
You can then play the movie on your computer,
upload it to a Web site, or back it up to a
CD-ROM or DVD.
Save a Movie to
Your Computer
201
chapter
11
66
77
Sharing a Movie
WORKING WITH iMOVIE ’09
In what file format does iMovie
save my exported movies?
When using the Export Movie
command, the file format depends on
the size.
●
Selecting Tiny in the export options
saves a 3GP file, which is a type of
MPEG-4 format devised especially for
mobile devices.
●
Selecting Mobile, Medium, or Large
saves a regular MPEG-4 (.m4v) file.
Note: To save your movie in a variety of other formats,
see the tip in “Publish a Movie to a MobileMe Gallery.”
iMovie saves the project as a
movie file.
●
You can click Cancel to stop the
export.
6 Click a size to export based on
how you want to use the movie
(
changes to ).
●
iMovie shows the devices and
applications for which each size is
appropriate.
7 Click Export.
202
44
77
55
66
88
22
33
5 Type a title and description. These
will appear on the movie page at
your MobileMe account.
6 Select the sizes to publish
( changes to ). Viewers
can choose from a size depending
on their connection speed.
7 Select a privacy setting.
8 Click Publish.
1 Sign in to your MobileMe account.
2 Open the project that you want to
publish.
3 Click Share.
4 Click MobileMe Gallery.
Publish a Movie to a MobileMe Gallery
You can publish your movie to your MobileMe
gallery. You can then send your friends and
family a Web address where they can access the
movie on MobileMe.
To use this feature, you must have a MobileMe account. See
Chapter 2 for details.
Publish a Movie to a
MobileMe Gallery