Tự học iLife - p 26 ppsx
Bạn đang xem bản rút gọn của tài liệu. Xem và tải ngay bản đầy đủ của tài liệu tại đây (3.27 MB, 10 trang )
233
WORKING WITH GARAGEBAND ’09
Editing and Mixing Music
chapter
12
55
66
How do I edit notes as
music notation?
In the track editor, click
Score (
●
) to view the region
as music notation. You can
click and drag notes to
rearrange them just as you
can in piano roll view. Right-
clicking in score view
displays a menu for adding
different types of notes.
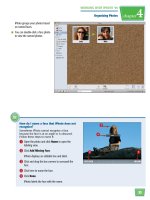
How do I add, copy, or delete
a note?
To add a note, -click in the
editor. You can then click and
drag the note to adjust its pitch,
position, and duration. To copy a
note,
-click it and then drag.
To delete a note, click to select it
and then press
Delete
.
CHANGE THE NOTE DURATION
6 Click and drag the right edge of a
note to the left or right.
GarageBand changes the how
long the note is played.
●
You can click and drag the slider
to change the velocity, or
loudness, of a selected note.
CHANGE WHEN A NOTE IS
PLAYED
5 Click and drag a note left or right.
GarageBand changes the position
of the note in the song.
234
22
44
33
11
C
E
cho
Echo
Reverb
Reverb
Dist
orDistort
SOUND EFFECTS
SOUND EFFECTS
SOUND EFFECTS
●
You can click to turn off an effect
( changes to ). You can
click it again to turn it back on.
3 Click an empty box.
A menu appears.
4 Click an effect name.
1 Double-click a track.
●
GarageBand opens the info pane
for the track.
2 Click Edit.
The effects are shown.
Add an Effect
You can apply echo, reverberation, distortion,
and dozens of other special effects to tracks.
You can fine-tune the effect settings or layer
multiple effects to get the sound you want.
Add an
Effect
235
33
22
44
55
44
WORKING WITH GARAGEBAND ’09
Editing and Mixing Music
chapter
12
55
66
88
99
77
How do I apply effects to all the tracks in a project at
once?
Follow these steps to use the Master Track settings:
1 Click to show the Track Info pane.
2 Click Master Track.
The Master Track settings appear.
3 Click Edit.
4 Select from menus in the Track Effects and Master Effects areas to
apply effects to the entire project.
5 Click to turn an effect on ( ) or off ( ).
7 Double-click the effect icon.
The effect settings appear.
8 Adjust the settings to customize
the effect.
9 Click to close the settings.
GarageBand applies the effect to
the track.
●
GarageBand adds the effect.
5 Click here.
A menu of effect presets appears.
6 Choose a preset to customize the
effect.
236
22
55
66
33
44
77
11
The Magic GarageBand window
appears.
Note: It may take a moment to display the
window and load the instruments.
5 Click the Play button ( ).
GarageBand plays the song.
6 Click an instrument.
●
The current instrument type is
highlighted.
7 Click another instrument type.
1 Click File and then click New.
The GarageBand window appears.
2 Click Magic GarageBand.
3 Click a genre.
●
You can position your cursor over
a genre and click Preview to hear
an example of a song.
4 Click Choose.
Create a Magic GarageBand Song
You can use the Magic GarageBand feature to
quickly record a song using a set of virtual
instruments in one of nine genres. After you
customize the instruments to get the sound you
want, GarageBand builds the song and opens it
in the editing interface.
Magic GarageBand can be useful when you are new to GarageBand
and want to create a song to experiment with. You can also use it to
quickly create background music for other iLife projects.
Create a Magic
GarageBand Song
237
88
11
22
33
WORKING WITH GARAGEBAND ’09
Recording Music
chapter
13
How do I record my own instrument
along with a Magic GarageBand
song?
1 In the Magic GarageBand window, click
here to select My Instrument.
2 Click here to select the instrument you
will record with.
3 Click here to customize the instrument.
4 Click the Record button ( ), and the
song plays.
5 Play your instrument along with the song to add accompaniment. For details about
setting up an instrument to record with, see the other tasks in this chapter. Click the
Record button ( ) to stop recording.
●
Each instrument has a separate
track.
●
If you configured a My Instrument
for the song, it appears as an
empty track. See the tip below for
details.
9 Click the Play button ( ) to
play the song.
●
GarageBand changes the
instrument type and plays it in the
song.
●
You can click here to remove the
selected instrument from the
band.
8 When you are satisfied with the
sound, click Open in
GarageBand.
GarageBand creates the song and
opens it in the project timeline.
238
22
33
11
55
44
●
GarageBand creates a new electric
guitar track.
Note: You can also create a new project and select
Electric Guitar as the project type to create this
type of track. See Chapter 12 for details about
setting up a project.
4 Click here and select a guitar
preset.
5 Click the amp image.
1 Click the Add Track button
( ).
2 Click Electric Guitar
( changes to ).
3 Click Create.
Set Up an Electric Guitar Track
You can set up an electric guitar track that
includes amp and stompbox effects. After
creating the track, you can plug your electric
guitar into your computer and record music
using the settings.
See “Record an Instrument” for more about recording music for a
track.
Set Up an
Electric Guitar Track
239
88
66
99
77
WORKING WITH GARAGEBAND ’09
Recording Music
chapter
13
How do I connect an electric guitar to my computer?
You can connect your guitar through several common input ports:
●
Audio Input Port: If your computer has a built-in audio input port, you can
connect an electric guitar to the port using an adapter cable. Be sure to set the
Input Source to Built-In Input in the amp settings. To access this setting, open
the Track Info pane, select the picture of the amp, and then click Edit.
●
USB or FireWire Port: For a better quality recording, you can connect an audio
interface to a USB or FireWire port on your computer. Then you can connect your
electric guitar to the audio interface. To activate a connected audio interface, click GarageBand,
Preferences, and then Audio/MIDI. Choose the name of the audio interface from the Audio Input menu.
Also choose the audio interface from the Input Source menu located in the Track Info pane for the guitar.
The stompbox settings appear.
9 Click and drag up and down over
a stompbox control to adjust it.
0 To adjust other stompboxes on
the stage, repeat steps 8 to 9.
GarageBand adjusts the sound of
the electric guitar track.
●
You can click to close the
Track Info pane.
The amp settings appear.
6 Position your cursor over the amp
and then click an arrow to cycle
through the available amp types.
7 Click and drag up and down over
an amp control to adjust it.
8 Click a stompbox.
240
22
44
3311
66
55
The amp settings appear.
4 Click here to select a different
model of amp.
5 Click the slider to adjust the
master echo.
6 Click the slider to adjust the
master reverb.
1 Double-click an electric guitar
track.
Note: See “Set Up an Electric Guitar Track” to
create one.
The Track Info pane appears.
2 Click the amp.
3 Click Edit.
Customize an Amp
You can customize the settings for your electric
guitar amplifier, also called an amp, to get the
sound you want. GarageBand features amp models
that mimic the sound of classic setups, such as
Blackface Combo and Vintage Stack.
In the real world, you plug an electric guitar into an amp to boost the
instrument’s loudness and modify its sound.
Customize
an Amp
241
77
88
99
22
WORKING WITH GARAGEBAND ’09
Recording Music
chapter
13
How do I turn my amp effects off?
You can deselect the bypass check box to turn off the amp
effects.
1 Follow steps 1 to 3 above to open the amp settings.
2 Click the bypass check box ( changes to ).
GarageBand turns off the amp effects for the electric guitar track.
You can click the check box again to turn the effects back on.
7 Click here to choose where the
guitar is plugged into on your
computer.
8 Click here to select a monitor
setting.
You can click Off to not play the
guitar through the computer
speakers.
You can click On with Feedback
Protection to hear the guitar but
guard against its sound feeding
back into the input.
You can click On to have the
guitar play without protecting
against the possible echo effect.
9 Click and drag the slider to adjust
the recording level of the electric
guitar.
0 Click Done.
GarageBand adjusts the amp
settings.
●
You can click to close the
Track Info pane.
242
44
22
11 33
A set of stompboxes appears.
4 Click and drag a stompbox to an
empty position on the stage.
1 Double-click an electric guitar
track.
Note: See “Set Up an Electric Guitar Track” to
create one.
The Track Info pane appears.
2 Click a stompbox.
3 Click Edit.
Arrange Stompboxes
You can add and remove stompboxes from your
electric guitar track to control the special effects
applied by GarageBand. In the real world,
stompboxes are foot-activated devices connected
between your guitar and amp that customize the
sound of a guitar.
Arrange
Stompboxes