Adobe Flash chuyên nghiệp - p 25 docx
Bạn đang xem bản rút gọn của tài liệu. Xem và tải ngay bản đầy đủ của tài liệu tại đây (5.33 MB, 10 trang )
ptg
adobe fLash professIonaL Cs5 CLassroom In a book 231
Creating the animation in a movie clip symbol
Your button symbols in this interactive restaurant guide already contain a movie
clip symbol of a gray information box in their Over states. You will edit each movie
clip symbol to add an animation inside it.
1 In the Library panel, expand the restaurant previews folder. Double-click the
movie clip symbol icon for gabel loffel over info.
Flash puts you in symbol-editing mode for the movie clip symbol called gabel
loffel over info.
2 Select all the visual elements on the Stage (Ctrl/Command+A).
3 Right-click/Ctrl-click and choose Create Motion Tween.
4 In the dialog box that appears asking for confirmation to convert the selection
to a symbol, click OK.
Flash creates a Tween layer and adds one second worth of frames to the movie
clip Timeline.
Download from Library of Wow! ebook
ptg
232 LESSON 6 Creating Interactive Navigation
5 Drag the end of the tween span back so the Timeline only has 10 frames.
6 Move the playhead to frame 1 and select the instance on the Stage.
7 In the Properties inspector, select Alpha from the Style pull-down menu in the
Color Effect section and set the Alpha slider to 0%.
e instance on the Stage becomes totally transparent.
8 Move the playhead to the end of the tween span at frame 10.
9 Select the transparent instance on the Stage.
10 In the Properties inspector, set the Alpha slider to 100%.
Flash creates a smooth transition between the transparent and opaque instance
in the 10 frame tween span.
11 Insert a new layer and rename it actions.
12 Insert a new keyframe in the last frame (frame 10) of the actions layer.
13 Open the Actions panel (Window > Actions) and enter stop(); in the Script
pane.
Adding the stop action in the last frame ensures that the fade-in effect only
plays once.
14 Exit symbol-editing mode by clicking the Scene 1 button above the Stage.
15 Choose Control > Test Movie > in Flash
Professional.
When your mouse cursor hovers over the first
restaurant button, the gray information box
fades in. e motion tween inside the movie clip
symbol plays the fade-in effect, and the movie
clip symbol is placed in the Over state of the
button symbol.
16 Create identical motion tweens for the other
gray information box movie clips so that all the
restaurant buttons are animated.
Note: If you want
an animated button to
repeat its animation,
leave out the stop
command at the end
of the movie clip’s
Timeline.
Download from Library of Wow! ebook
ptg
adobe fLash professIonaL Cs5 CLassroom In a book 233
Review Questions
1 How and where do you add ActionScript code?
2 How do you name an instance, and why is it necessary?
3 How can you label frames, and when is it useful?
4 What is a function?
5 What is an event? What is an event listener?
6 How do you create an animated button?
Review Answers
1 ActionScript code resides in keyframes on the Timeline. Keyframes that contain
ActionScript are indicated by a small lowercase “a”. You add ActionScript through the
Actions panel. Choose Window > Actions, or select a keyframe and click the ActionScript
panel icon in the Properties inspector, or right-click/Ctrl-click and select Actions. You enter
code directly in the Script pane in the Actions panel, or you can select commands from the
categories in the Actions toolbox. You can also add ActionScript through the Code Snippets
panel. Select an instance on the Stage, choose an interaction in the Code Snippets panel, and
then click the Add to Current Frame button.
2 To name an instance, select it on the Stage, and then type in the Instance Name field in the
Properties inspector. You need to name an instance to reference it in ActionScript.
3 To label a frame, select a keyframe on the Timeline, and then type a name in the Frame Label
box in the Properties inspector. You can label frames in Flash to make it easier to reference
frames in ActionScript and to give you more flexibility. If you want to change the destination
of a
gotoAndStop or gotoAndPlay command, you can move the label rather than having to
locate every reference to the frame number in the script.
4 A function is a group of statements that you can refer to by name. Using a function makes it
possible to run the same set of statements without having to type them repeatedly into the
same script. When an event is detected, a function is executed in response.
5 An event is an occurrence that is initiated by a button click, a key press, or any number of
inputs that Flash can detect and respond to. An event listener, also called an event handler, is
a function that is executed in response to specific events.
6 Animated buttons display an animation in the Up, Over, or Down keyframes. To create an
animated button, make an animation inside a movie clip symbol, and then place that movie
clip symbol inside the Up, Over, or Down keyframes of a button symbol. When one of those
button keyframes is displayed, the animation in the movie clip plays.
Download from Library of Wow! ebook
ptg
234
7
USING TEXT
Lesson Overview
In this lesson, you’ll learn how to do the following:
• Add and edit text on the Stage
• Apply style and formatting options to text
• Create text with multiple columns
• Create text that wraps around objects
• Add hyperlinks to text
• Use editable text for user input
• Dynamically change text content
• Embed fonts and understand device fonts
• Load external text
is lesson will take approximately two and a half hours to complete. If
needed, remove the previous lesson folder from your hard drive and copy
the Lesson07 folder onto it.
Download from Library of Wow! ebook
ptg
235
Words are integral to any Flash site. Learn how to use
the new Text Layout Format to create titles, sophis-
ticated layouts, and dynamic text content that can
change to suit diff erent situations.
Download from Library of Wow! ebook
ptg
236 LESSON 7 Using Text
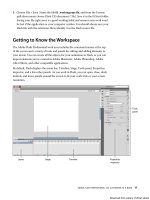
Getting Started
To begin, view the finished project to see the different kinds of text elements that
you’ll create in this lesson.
1 Double-click the 07End.swf file in the Lesson07/07End folder to play the
animation.
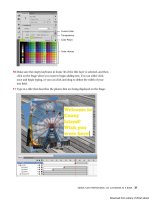
e finished project is an interactive realtor site for the fictional city of
Meridien, whose restaurant guide you completed in the previous lesson.
Viewers can read about the featured property and its neighborhood or figure
out how much they can afford to pay every month using the mortgage calculator
at the bottom right. Enter a new rate, a new value for the percent down, and
click the Calculate button to display the estimated monthly payment.
2 Close the 07End.swf file.
3 Double-click the 07Start.fla file in the Lesson07/07Start folder to open the initial
project file in Flash.
Download from Library of Wow! ebook
ptg
adobe fLash professionaL Cs5 CLassroom in a book 237
e Stage already includes some simple design elements to divide the space,
with several assets already created and stored in the Library panel.
4 Choose File > Save As. Name the file 07_workingcopy.fla and save it in the
07Start folder. Saving a working copy ensures that the original start file will be
available if you want to start over.
Understanding TLF Text
Flash Professional CS5 introduces a way of working
with text that is different and much more powerful
from previous versions. Flash uses a feature called
Text Layout Format (TLF). When you choose the
Text tool
( ) in the Tools panel to add text to the
Stage, you must choose either TLF Text or Classic Text.
Choose TLF Text when you want to use more sophisticated controls for text
formatting such as multiple columns or wrap-around text. You’ll learn many of the
features unique to TLF Text in this lesson. Choose Classic Text when you don’t
need that degree of layout control or if you need to target an older version of the
Flash Player.
TLF Text depends on a specific external ActionScript library to function properly.
When you test a movie or publish a movie that contains TLF Text, an additional
Text Layout SWZ file
( ) is created next to your SWF file. e SWZ file is the
external ActionScript library that supports TLF Text.
Download from Library of Wow! ebook
ptg
238 LESSON 7 Using Text
When a SWF file that contains TLF Text is playing from the Web, the SWF looks
for the library in a couple of different locations. e SWF looks for the library on
the local computer it is playing on, where the library is usually cached from normal
Internet usage. e SWF also looks on Adobe.com for the library file, and if that
fails, looks in the same directory as the SWF.
You should always keep the SWZ file with your SWF file so the TLF Text features
work properly when you test your movies locally. You should also have the SWZ
file accompany your SWF file when you upload it to your Web server, just to
be safe.
Merging the TLF Text library
If you don’t want to maintain the separate SWZ file, you can merge the required
ActionScript library with your SWF file. However, doing so adds significantly to the
size of your published SWF file and is not recommended.
1 Choose File > Publish Settings. Click the Flash tab and choose Settings for
ActionScript 3.0. You can also click the Edit button next to ActionScript
settings in the Properties inspector.
e Advanced ActionScript 3.0 Settings dialog box opens.
2 Click on the Library path tab.
Download from Library of Wow! ebook
ptg
adobe fLash professionaL Cs5 CLassroom in a book 239
3 Click the arrow next to the textLayout.swc listing in the display window.
e arrow points downward, expanding the information about the TLF Text
feature. Note that the Link Type shows that the file uses a runtime shared
library, and the URL for the library is on Adobe.com.
Download from Library of Wow! ebook
ptg
240 LESSON 7 Using Text
4 In the Runtime Shared Library Settings section, choose Merged into code for
the Default linkage.
e Link Type changes to Merged into code.
e current Flash file will merge the TLF Text ActionScript library into the
published SWF if you click OK to accept these settings. For the project in this
lesson, do not merge the code. Click Cancel to leave the default setting, Link
Type as a Runtime Shared Library.
Adding Simple Text
You’ll start by adding simple, single lines of text for display. Add text to the Stage
with the Text tool in the Tools panel. When you add text, whether TLF Text or
Classic Text, the text remains fully editable. So at any point after you create your
text, you can return to it and change it or any of its properties, such as its color,
font, size, or alignment.
As with other Flash elements, it’s best to separate text on its own layer to keep your
layers organized. Having text on its own layer also makes it easy to select, move, or
edit your text without disturbing the items in the layers below or above it.
Adding the titles
You’ll add titles to various sections of the realtor site and learn about the different
formatting and style options.
1 Select the banner layer and click the New Layer button. Rename it text.
Note: You can break
apart text (Modify >
Break Apart) to convert
each letter into separate
drawing objects whose
stroke and fill you can
modify. However, once
broken apart, your
text will no longer be
editable.
Download from Library of Wow! ebook