Adobe Flash chuyên nghiệp - p 3 potx
Bạn đang xem bản rút gọn của tài liệu. Xem và tải ngay bản đầy đủ của tài liệu tại đây (5.38 MB, 10 trang )
ptg
Adobe fLAsh professionAL Cs5 CLAssroom in A book 11
5 Choose File > Save. Name the file 01_workingcopy.fla, and from the Format
pull-down menu choose Flash CS5 document (*.fla). Save it in the 01Start folder.
Saving your file right away is a good working habit and ensures your work won’t
be lost if the application or your computer crashes. You should always save your
Flash file with the extension .fla to identify it as the Flash source file.
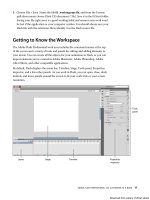
Getting to Know the Workspace
e Adobe Flash Professional work area includes the command menus at the top
of the screen and a variety of tools and panels for editing and adding elements to
your movie. You can create all the objects for your animation in Flash, or you can
import elements you’ve created in Adobe Illustrator, Adobe Photoshop, Adobe
After Effects, and other compatible applications.
By default, Flash displays the menu bar, Timeline, Stage, Tools panel, Properties
inspector, and a few other panels. As you work in Flash, you can open, close, dock,
undock, and move panels around the screen to fit your work style or your screen
resolution.
Tools
panel
Layers TimelineStage Properties
inspector
Download from Library of Wow! ebook
ptg
12 LESSON 1 Getting Acquainted
Choosing a new workspace
Flash also provides a few preset panel arrangements that may better suit the needs
of particular users. e various workspace arrangements are listed in a pull-down
menu at the top right of the Flash workspace or in the top menu under Window >
Workspace.
1 Click the Essentials button at the top
right of the Flash workspace and choose
a new workspace.
e various panels are rearranged and
resized according to their importance
to the particular user. For example, the
Animator and Designer workspaces
put the Timeline at the top for easy and
frequent access.
2 If you’ve moved some of the panels around and want to return to one of the
prearranged workspaces, choose Window > Workspace > Reset and the name of
the preset workspace.
3 To return to the default workspace, choose Window > Workspace > Essentials.
In this Classroom in a Book, we’ll be using the Essentials workspace.
Saving your workspace
If you find an arrangement of panels comfortable for your style of work, you can
save the custom workspace to return to it at a later date.
1 Click the Workspace button at the top-right corner of the Flash workspace and
choose New Workspace.
e New Workspace dialog box appears.
2 Enter a name for your new workspace. Click OK.
e current arrangement of panels is saved. Your workspace is added to the
options in the Workspace pull-down menu, which you can access at any time.
Download from Library of Wow! ebook
ptg
Adobe fLAsh professionAL Cs5 CLAssroom in A book 13
About the Stage
e big white rectangle in the middle of your screen is called the Stage. As with a
theater stage, the Stage in Flash is the area that viewers see when a movie is playing.
It contains the text, images, and video that appear on the screen. Move elements on
and off the Stage to move them in and out of view. You can use the rulers (View >
Rulers) or grids (View > Grid > Show Grid) to help you position items on the Stage.
Additionally, you can use the Align panel and other tools you’ll learn about in the
lessons in this book.
By default, you’ll see the gray area off the Stage where you can place elements that
won’t be visible to your audience. e gray area is called the Pasteboard. To just
see the Stage, choose View > Pasteboard to deselect the option. For now, leave the
option selected.
To scale the Stage so that it fits completely
in the application window, choose View >
Magnification > Fit in Window. You can also
choose different magnification view options
from the pop-up menu just above the Stage.
changing the Stage properties
You’ll first want to set the color and the dimensions of the Stage. ese options are
available in the Properties inspector, which is the vertical panel just to the right of
the Stage.
1 At the bottom of the Properties inspector, note that the dimensions of the
current Stage are set at 550 x 400 pixels. Click the Edit button.
e Document Settings dialog box appears.
Download from Library of Wow! ebook
ptg
14 LESSON 1 Getting Acquainted
2 In the Width and Height boxes, enter new pixel dimensions. Enter 800 for the
Width and 600 for the Height.
3 Click the Background color button and choose a new color for the Stage.
Choose dark gray (#333333).
4 Click OK. Your Stage is now a different dimension and color. You can also
change the Stage color by clicking the Stage button directly in the Properties
inspector. You can change the Stage properties at any time.
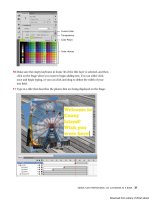
Working with the Library Panel
e Library panel is accessible from a tab just to the right of the Properties inspec-
tor. e Library panel is where you store and organize symbols created in Flash,
as well as imported files, including bitmaps, graphics, sound files, and video clips.
Symbols are often-used graphics used for animation and for interactivity.
About the Library panel
e Library panel lets you organize library items in folders, see how often an item is
used in a document, and sort items by type. When you import items into Flash, you
can import them directly onto the Stage or into the library. However, any item you
import onto the Stage is also added to the library, as are any symbols you create.
You can then easily access the items to add them to the Stage again, edit them, or
see their properties.
To display the Library panel, choose Window > Library, or press Ctrl+L (Windows)
or Command+L (Mac).
Note: You’ll learn
much more about
symbols in Lesson 3.
Download from Library of Wow! ebook
ptg
Adobe fLAsh professionAL Cs5 CLAssroom in A book 15
Importing an item to the Library panel
Often, you’ll be creating graphics directly with Flash’s drawing tools and saving
them as symbols, which are stored in the library. Other times you’ll be importing
media such as JPEG images or MP3 sound files, which are also stored in the library.
In this lesson, you’ll import several JPEG images into the library to be used in the
animation.
1 Choose File > Import > Import to Library. In the Open dialog box, select the
background.jpg file in the Lesson01/01Start folder, and click Open.
2 Flash imports the selected JPEG image and places it in the Library panel.
3 Continue importing photo1.jpg, photo2.jpg, and photo3.jpg from the 01Start
folder. Don’t import the last image, photo4.jpg. You’ll use that image later in
this lesson.
You can also hold down the Shift key to select multiple files and import all of
them at once.
4 e Library panel displays all the imported JPEG images with their filenames
and a thumbnail preview. ese images are now available to be used in your
Flash document.
Download from Library of Wow! ebook
ptg
16 LESSON 1 Getting Acquainted
Adding an item from the Library panel to the Stage
To use an imported image, simply drag it from the Library panel onto the Stage.
1 Choose Window > Library to open the Library panel if it isn’t already open.
2 Select the background.jpg item in the Library panel.
3 Drag the background.jpg item onto the Stage and place it approximately in the
center of the Stage.
Understanding the Timeline
e Timeline is located below the Stage. Like films, Flash documents measure time
in frames. As the movie plays, the playhead, shown as a red vertical line, advances
through the frames in the Timeline. You can change the content on the Stage for
different frames. To display a frame’s content on the Stage, move the playhead to
that frame in the Timeline.
At the bottom of the Timeline, Flash indicates the selected frame number, the cur-
rent frame rate (how many frames play per second), and the time that has elapsed
so far in the movie.
e Timeline also contains layers, which help you organize the artwork in your
document. ink of layers as multiple film strips stacked on top of each other. Each
layer contains a different image that appears on the Stage, and you can draw and
edit objects on one layer without affecting objects on another layer. e layers are
stacked in the order in which they overlap each other, so that objects on the bottom
Download from Library of Wow! ebook
ptg
Adobe fLAsh professionAL Cs5 CLAssroom in A book 17
layer in the Timeline are on the bottom of the stack on the Stage. You can hide,
show, lock, or unlock layers. Each layer’s frames are unique, but you can drag them
to a new location on the same layer or copy or move them to another layer.
Renaming a layer
It’s a good idea to separate your content on different layers and name each layer to
indicate its contents so that you can easily find the layer you need later.
1 Select the existing layer in the Timeline.
2 Double-click the name of the layer to rename it and type background.
3 Click outside the name box to apply the new name.
4 Click the dot below the lock icon to lock the layer. Locking a layer prevents you
from accidentally making changes to it.
Adding a layer
A new Flash document contains only one layer, but you can add as many layers as
you need. Objects in the top layers will overlap objects in the bottom layers.
1 Select the background layer in the Timeline.
Download from Library of Wow! ebook
ptg
18 LESSON 1 Getting Acquainted
2 Choose Insert > Timeline > Layer. You can also click the New Layer button
below the Timeline. A new layer appears above the background layer.
3 Double-click the new layer to rename it and type photo1. Click outside the
name box to apply the new name.
Your Timeline now has two layers. e background layer contains the
background photo, and the newly created photo1 layer above it is empty.
4 Select the top layer called photo1.
5 Choose Window > Library to open the Library panel if it isn’t already open.
6 Drag the library item called photo1.jpg from the library on to the Stage.
e photo1 JPEG appears on the Stage and overlaps the background JPEG.
Download from Library of Wow! ebook
ptg
Adobe fLAsh professionAL Cs5 CLAssroom in A book 19
7 Choose Insert > Timeline > Layer or click the New Layer button ( ) below the
Timeline to add a third layer.
8 Rename the third layer photo2.
Working with Layers
If you don’t want a layer, you can easily delete it by selecting it and then clicking
the Delete button below the Timeline.
If you want to rearrange your layers, simply click and drag any layer to move it to a
new position in the layer stack.
Inserting frames
So far, you have a background photo and another overlapping photo on the Stage,
but your entire animation exists for only a single frame. To create more time on the
Timeline, you must add additional frames.
1 Select frame 48 in the background layer.
Download from Library of Wow! ebook
ptg
20 LESSON 1 Getting Acquainted
2 Choose Insert > Timeline > Frame (F5). You can also right-click (Windows) or
Ctrl-click (Mac) and choose Insert Frame from the context menu that pops up.
Flash adds frames in the background layer up to the selected point, frame 48.
3 Select frame 48 in the photo1 layer.
4 Choose Insert > Timeline > Frame (F5). You can also right-click/Ctrl-click and
choose Insert Frame from the context menu.
Flash adds frames in the photo1 layer up to the selected point, frame 48.
5 Select frame 48 in the photo2 layer and insert frames on this layer.
You now have three layers, all with 48 frames on the Timeline. Since the frame rate
of your Flash document is 24 frames per second, your current animation lasts two
seconds.
Selecting Multiple Frames
Just as you can hold down the Shift key to select multiple files on your desktop, you
can hold down the Shift key to select multiple frames on the Flash Timeline. If you
have several layers and want to insert frames into all of them, hold down the Shift
key and click on the point at which you want to add frames in all of your layers.
Then choose Insert > Timeline > Frame.
Download from Library of Wow! ebook