Adobe Flash chuyên nghiệp - p 4 ppt
Bạn đang xem bản rút gọn của tài liệu. Xem và tải ngay bản đầy đủ của tài liệu tại đây (5.62 MB, 10 trang )
ptg
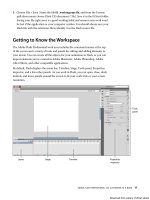
Adobe fLAsh professionAL Cs5 CLAssroom in A book 21
creating a keyframe
A keyframe indicates a change in content on the Stage. Keyframes are indicated on
the Timeline as a circle. An empty circle means there is nothing in that particular
layer at that particular time. A filled-in black circle means there is something in
that particular layer at that particular time. e background layer, for example,
contains a filled keyframe (black circle) in the first frame. e photo1 layer also
contains a filled keyframe in its first frame. Both layers contain photos. e photo2
layer, however, contains an empty keyframe in the first frame, indicating that it is
currently empty.
You’ll insert a keyframe in the photo2 layer at the point in time when you want the
next photo to appear.
1 Select frame 24 on the photo2 layer. As you select a frame, Flash displays the
frame number beneath the Timeline.
2 Choose Insert > Timeline > Keyframe (F6).
A new keyframe, indicated by an empty circle, appears in the photo2 layer in
frame 24.
3 Select the new keyframe at frame 24 in the photo2 layer.
4 Drag the photo2.jpg item from your library onto the Stage.
e empty circle at frame 24 becomes filled, indicating there is now a change in
the photo2 layer. At frame 24, your photo appears on the Stage. You can click
and drag the red playhead from the top of the Timeline to “scrub,” or show
what’s happening on the Stage at any point along the Timeline. You’ll see that
the background photo and photo1 remain on the Stage throughout the Timeline
but photo2 appears only at frame 24.
Download from Library of Wow! ebook
ptg
22 LESSON 1 Getting Acquainted
Understanding frames and keyframes is essential for mastering Flash. Be sure you
understand how the photo2 layer contains 48 frames with 2 keyframes—an empty
keyframe at frame 1 and a filled keyframe at frame 24.
Moving a keyframe
If you want your photo2.jpg to appear later or earlier, you need to move the key-
frame in which it appears later or earlier along the Timeline. You can easily move
any keyframe along the Timeline by simply selecting it and then dragging it to a
new position.
1 Select the keyframe in frame 24 on the photo2 layer.
2 Move your mouse cursor slightly, and you’ll see a box icon appear near your
cursor indicating that you can reposition the keyframe.
Download from Library of Wow! ebook
ptg
Adobe fLAsh professionAL Cs5 CLAssroom in A book 23
3 Click and drag the keyframe to frame 12 in the photo2 layer.
e photo2.jpg now appears on the Stage much earlier in the animation.
Removing Keyframes
If you want to remove a keyframe, do not press the Delete key! Doing so will delete
the contents of that keyframe on the Stage. Instead, select the keyframe and choose
Modify > Timeline > Clear Keyframe (Shift+F6). Your keyframe will be removed from
the Timeline.
Organizing Layers in a Timeline
At this point, your working Flash file has only three layers: a background layer, a
photo1 layer, and a photo2 layer. You’ll be adding additional layers for this project,
and like most other projects, you’ll end up having to manage multiple layers. Layer
folders help you group related layers to keep your Timeline organized and manage-
able, just like you make folders for related documents on your desktop. Although it
may take some time to create the folders, you’ll save time later because you’ll know
exactly where to look for a specific layer.
Creating layer folders
For this project, you’ll continue to add layers for additional photos, and you’ll place
those layers in a layer folder.
1 Select the photo2 layer and click the New Layer button (
).
2 Name the layer photo3.
3 Insert a keyframe at frame 24.
Download from Library of Wow! ebook
ptg
24 LESSON 1 Getting Acquainted
4 Drag the photo3.jpg from the library onto the Stage.
You now have four layers. e top three contain photos of scenes from Coney
Island that appear at different keyframes.
5 Select the photo3 layer and click the New Folder icon ( ).
A new layer folder appears above the photo3 layer.
6 Name the folder photos.
Download from Library of Wow! ebook
ptg
Adobe fLAsh professionAL Cs5 CLAssroom in A book 25
Adding layers to layer folders
Now you’ll add the photo layers to the photo folder. As you arrange layers, remem-
ber that Flash displays the layers in the order in which they appear in the Timeline,
with the top layer at the front and the bottom layer at the back.
1 Drag the photo1 layer into the photo folder.
Notice how the bold line indicates the destination of your layer. When a layer is
placed inside a folder, the layer name is indented.
2 Drag the photo2 layer into the photo folder.
3 Drag the photo3 layer into the photo folder.
All three photo layers should be in the photo folder.
You can collapse the folder by clicking the arrow. Expand the folder by clicking
the arrow again. Be aware that if you delete a layer folder, you delete all the layers
inside that folder as well.
Changing the appearance of the Timeline
You can adjust the Timeline’s appearance to accom-
modate your workflow. When you want to see more
layers, select Short from the Frame View pop-up
menu in the upper-right corner of the Timeline.
e Short option decreases the height of frame cell
rows. e Preview and Preview in Context options
display thumbnail versions of the contents of your
keyframes in the Timeline.
You can also change the width of the frame cells by selecting Tiny, Small, Normal,
Medium, or Large.
Download from Library of Wow! ebook
ptg
26 LESSON 1 Getting Acquainted
Using the Properties Inspector
e Properties inspector gives you quick access to the attributes you’re most likely
to need. What appears in the Properties inspector depends on what you’ve selected.
For example, if nothing is selected, the Properties inspector includes options for
the general Flash document including changing the Stage color or dimensions; if an
object on the Stage is selected, the Properties inspector shows its x and y coordi-
nates and its width and height, among other information. You’ll use the Properties
inspector to move your photos on the Stage.
Positioning an object on the Stage
You’ll begin by moving the photos with the Properties inspector. You’ll also use the
Transform panel to rotate the photos.
1 At frame 1 of the Timeline, select the photo1.jpg that you dragged onto the
Stage in the photo1 layer. A blue outline indicates that the object is selected.
2 In the Properties inspector, type 50 for the X value and 50 for the Y value. Press
Enter/Return to apply the values. You can also click and drag your mouse cursor
over the X and Y values to change their positions. e photo moves to the left
side of the Stage.
Note: If the Properties inspector is not open, choose Window > Properties, or press Ctrl/
Command+F3.
Download from Library of Wow! ebook
ptg
Adobe fLAsh professionAL Cs5 CLAssroom in A book 27
e X and Y values are measured on the Stage from the top-left corner.
X begins at 0 and increases to the right, and Y begins at 0 and increases
downward. e registration point for imported photos is at the top-left corner.
3 Choose Window > Transform to open the Transform panel.
4 In the Transform panel, select Rotate, and type -12 in the Rotate box, or click and
drag over the value to change the rotation. Press Enter/Return to apply the value.
e selected photo on the Stage rotates 12 degrees counterclockwise.
5 Select frame 12 of the photo2 layer. Now click on the photo2.jpg on the Stage.
6 Use the Properties inspector and Transform panel to position and rotate the
second photo in an interesting way. Use X=80, Y=50, and a Rotate of 6 to give it
some contrast with the first photo.
Download from Library of Wow! ebook
ptg
28 LESSON 1 Getting Acquainted
Working with Panels
Just about everything you do in Flash involves a
panel. In this lesson, you use the Library panel,
Tools panel, Properties inspector, Transform
panel, History panel, and the Timeline. In later les-
sons, you’ll use the Actions panel, the Color panel,
the Motion panel, and other panels that let you
control various aspects of your project. Because
panels are such an integral part of the Flash work-
space, it pays to know how to manage them.
To open any panel in Flash, choose its name from
the Window menu. In a few cases, you may need
to choose the panel from a submenu, such as
Window > Other Panels > History.
By default, the Properties inspector, Library panel,
and Tools panel appear together at the right of
the screen; the Timeline and Motion Editor are at
the bottom; and the Stage is on the top. However,
you can move a panel to any position that is
convenient for you.
• To undock a panel from the right side of the
screen, drag it by its tab to a new location.
• To dock a panel, drag it by its tab into the
dock at a new position on the screen. You
can drag it to the top, bottom, or in between
other panels. A blue highlight indicates where
you can dock a panel.
• To group a panel with another, drag its tab
onto the other panel’s tab.
• To move a panel group, drag the group by its dark gray top bar.
You also have the option of displaying most of the panels as icons to save space but still maintain quick access.
Click the upper-right arrows to collapse the panels to icons. Click the arrows again to expand the panels.
Download from Library of Wow! ebook
ptg
Adobe fLAsh professionAL Cs5 CLAssroom in A book 29
7 Select frame 24 in the photo3 layer. Now click on the photo3.jpg on the Stage.
8 Use the Properties inspector and Transform panel to position and rotate the
third photo in an interesting way. Use X=120, Y=55, and a Rotate of –2 to give
it some contrast with the other photos.
Using the Tools Panel
e Tools panel—the long, narrow panel on the far right side of the work area—
contains selection tools, drawing and type tools, painting and editing tools, naviga-
tion tools, and tool options. You’ll use the Tools panels frequently to switch from
the Selection tool to the Text tool to a drawing tool. When you select a tool, check
the options area at the bottom of the panel for more options and other settings
appropriate for your task.
Selecting and using a tool
When you select a tool, the options available at the bottom of the Tools panel and
the Properties inspector change. For example, when you select the Rectangle tool,
the Object Drawing mode and Snap To Objects options appear. When you select
the Zoom tool, the Enlarge and Reduce options appear.
e Tools panel contains too many tools to display all at once. Some tools are
arranged in groups in the Tools panel; only the tool you last selected from a group
is displayed. A small triangle in the lower-right corner of the tool’s button indicates
there are other tools in the group. Click and hold the icon for the visible tool to see
the other tools available, and then select one from the pop-up menu.
Note: When images
are scaled or rotated in
Flash, they may appear
jagged. You can smooth
them out by double-
clicking the bitmap icon
in the Library panel. In
the Bitmap Properties
dialog box that appears,
select the Allow
Smoothing option.
Download from Library of Wow! ebook
ptg
30 LESSON 1 Getting Acquainted
You’ll use the Text tool to add a title to your animation.
1 Select the top layer in the Timeline, and then click the New Layer button.
2 Name the new layer text.
3 Lock the other layers below it so you don’t accidentally move anything into
them.
4 In the Timeline, move the playhead to frame 36 and select frame 36 in the text
layer.
5 Choose Insert > Timeline > Keyframe (F6) to insert a new keyframe at frame 36
in the text layer.
You will create text to appear at frame 36 in this layer.
6 In the Tools panel, select the Text tool, which is indicated by
the large capital letter T.
7 In the Properties inspector, choose Classic Text from the pull-
down menu. Choose Static Text from the pull-down menu that
appears below.
Classic Text is a mode for adding simple text that doesn’t
require sophisticated options such as multiple columns or wrapping around
other objects. Static Text is the option for any text that is used for display
purposes. Dynamic and Input Text are special text options for more interactive
purposes and can be controlled with ActionScript. You’ll learn about more
advanced text options in Lesson 7.
8 Select a font and size in the Properties inspector. Your computer may not have
the same fonts as those shown in this lesson, but choose one that is close in
appearance.
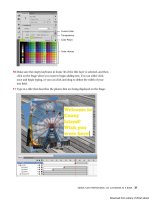
9 Click the colored square in the Properties inspector to choose a text color. You
can click on the color wheel at the upper right to access the Adobe Color Picker,
or you can change the Alpha percentage at the upper right, which determines
the level of transparency.
Download from Library of Wow! ebook