Giải pháp thiết kế web động với PHP - p 11 pps
Bạn đang xem bản rút gọn của tài liệu. Xem và tải ngay bản đầy đủ của tài liệu tại đây (741.17 KB, 10 trang )
LIGHTENING YOUR WORKLOAD WITH INCLUDES
81
filenames, get out of them immediately. Spaces are not allowed in URLs, which is why most
web design software replaces spaces with %20. You can get around this problem, though, by
using an underscore.
Change the filename of contact.php to contact_us.php.
8. Amend the code in title.inc.php like this:
<?php
$title = basename($_SERVER['SCRIPT_FILENAME'], '.php');
$title = str_replace('_', ' ', $title);
$title = ucwords($title);
The middle line uses a function called str_replace() to look for every underscore and
replace it with a space. The function takes three arguments: the character(s) you want to
replace, the replacement character(s), and the string you to change.
You can also use
str_replace()
to remove character(s) by using an empty string (a pair of quotes
with nothing between them) as the second argument. This replaces the string in the first argument
with nothing, effectively removing it.
Instead of ucfirst(), the final line of code uses the related function ucwords(), which gives
each word an initial cap.
9. Save title.inc.php, and load the renamed contact_us.php into a browser. Figure 4-7
shows the result.
Figure 4-7. The underscore has been removed, and both words have been given initial caps.
10. Change the name of the file back to contact.php, and reload the file into a browser. The script
in title.inc.php still works. There are no underscores to replace, so str_replace() leaves
the value of $title untouched, and ucwords() converts the first letter to uppercase, even
though theres only one word.
11. The home page of the Japan Journey site is called index.php. As Figure 4-8 shows, applying
the current solution to this page doesnt seem quite right.
CHAPTER 4
82
Figure 4-8. Generating the page title from index.php produces an unsatisfactory result.
There are two solutions: either dont apply this technique to such pages or use a conditional
statement (an if statement) to handle special cases. For instance, to display Home instead
of Index, amend the code in title.inc.php like this:
<?php
$title = basename($_SERVER['SCRIPT_FILENAME'], '.php');
$title = str_replace('_', ' ', $title);
if ($title == 'index') {
$title = 'home';
}
$title = ucwords($title);
The first line of the conditional statement uses two equal signs to check the value of $title.
The following line uses a single equal sign to assign the new value to $title. If the page is
called anything other than index.php, the line inside the curly braces is ignored, and $title
keeps its original value.
PHP is case-sensitive, so this solution works only if “index” is all lowercase. To do a case-insensitive
comparison, change the fourth line of the preceding code like this:
if (strtolower($title) == 'index') {
The function
strtolower()
converts a string to lowercase—hence its name—and is frequently used
to make case-insensitive comparisons. The conversion to lowercase is not permanent, because
strtolower($title)
isnt assigned to a variable; its only used to make the comparison. To make a
change permanent, you need to assign the result back to a variable as in the final line, when
ucwords($title)
is assigned back to
$title
.
To convert a string to uppercase, use
strtoupper()
.
12. Save title.inc.php, and reload index.php into a browser. The page title now looks more
natural, as shown in Figure 4-9.
Download from Wow! eBook <www.wowebook.com>
LIGHTENING YOUR WORKLOAD WITH INCLUDES
83
Figure 4-9. The conditional statement changes the title on index.php to Home.
13. Navigate back to contact.php, and youll see that the page title is still derived correctly from
the page name.
14. Theres one final refinement you should make. The PHP code inside the <title> tag relies on
the existence of the variable $title, which wont be set if theres a problem with the include
file. Before attempting to display the contents of a variable that comes from an external
source, its always a good idea to check that it exists, using a function called isset(). Wrap
the echo command inside a conditional statement, and test for the variables existence like
this:
<title>Japan Journey<?php if (isset($title)) {echo "—{$title}";}
?></title>
If $title doesnt exist, the rest of the code is ignored, leaving the default site title, Japan
Journey.
You can check your code against title.inc.php and an updated version of index.php in
index_03.php in the ch04 folder.
Creating pages with changing content
So far, youve used PHP to generate different output depending on the pages filename. The next two
solutions generate content that changes independently of the filename: a copyright notice that updates
the year automatically on January 1 and a random image generator.
PHP Solution 4-5: Automatically updating a copyright notice
At the moment, the copyright notice in footer.inc.php contains only static HTML. This PHP solution
shows how to use the date() function to generate the current year automatically. The code also specifies
the first year of copyright and uses a conditional statement to determine whether the current year is
different. If it is, both years are displayed.
Continue working with the files from PHP Solution 4-4. Alternatively, use index_03.php and
footer.inc_01.php from the ch04 folder, and remove the numbers from the filenames. If using the files
from the ch04 folder, make sure you have copies of title.inc.php and menu.inc.php in the includes
folder.
CHAPTER 4
84
1. Open footer.inc.php. It contains the following HTML:
<div id="footer">
<p>© 2006–2010 David Powers</p>
</div>
The – between the dates is the numeric entity for an en dash.
2. The advantage of using an include file is that you can update the copyright notice throughout
the site by changing this one file. However, it would be much more efficient to increment the
year automatically, doing away with the need for updates altogether.
The PHP date() function takes care of that very neatly. Change the code in the paragraph like
this:
<p>© 2006–<?php echo date('Y'); ?> David Powers</p>
This replaces the second date and displays the current year using four digits. Make sure you
pass an uppercase Y as the argument to date().
3. Save footer.inc.php and load index.php into a browser. The copyright notice at the foot of
the page should look the same as before—unless, of course, youre reading this in 2011 or
later, in which case the current year will be displayed.
Like most copyright notices, this covers a range of years, indicating when a site was first
launched. Since the first date is in the past, it can be hard-coded. But what if youre creating a
new website? You dont want to have to break away from the New Year revelries just to update
the copyright notice. There needs to be a better way. Thanks to PHP, you can party to your
hearts content on New Years Eve.
4. To display a range of years, you need to know the start year and the current year. If both years
are the same, display only the current year; if theyre different, display both with an en dash
between them. Its a simple if. . .else situation. Change the code in the paragraph in
footer.inc.php like this:
<p>©
<?php
$startYear = 2006;
$thisYear = date('Y');
if ($startYear == $thisYear) {
echo $startYear;
} else {
echo "{$startYear}–{$thisYear}";
}
?>
David Powers</p>
As in PHP Solution 4-4, Ive used curly braces around the variables in the else clause
because theyre in a double-quoted string that contains no whitespace.
5. Save footer.inc.php, and reload index.php in a browser. The copyright notice should look
the same as before.
LIGHTENING YOUR WORKLOAD WITH INCLUDES
85
6. Change the argument passed to the date() function to a lowercase y like this:
$thisYear = date('y');
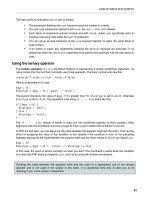
7. Save footer.inc.php, and click the Reload button in your browser. The second year is
displayed using only the last two digits, as shown in the following screenshot:
This should serve as a reminder that PHP is case-sensitive. Uppercase Y and lowercase y produce
different results with the
date()
function. Forgetting about case sensitivity is one of the most
common causes of errors in PHP.
8. Change the argument passed to date() back to an uppercase Y. Set the value of $startYear
to the current year, and reload the page. This time, you should see only the current year
displayed.
You now have a fully automated copyright notice. The finished code is in footer.inc_02.php
in the ch04 folder.
PHP Solution 4-6: Displaying a random image
Displaying a random image is very easy. All you need is a list of available images, which you store in an
indexed array (see “Creating arrays” in Chapter 3). Since indexed arrays are numbered from 0, you can
select one of the images by generating a random number between 0 and one less than the length of the
array. All accomplished in a few lines of code . . .
Continue using the same files. Alternatively, use index_03.php from the ch04 folder and rename it
index.php. Since index_03.php uses title.inc.php, menu.inc.php, and footer.inc.php, make
sure all three files are in your includes folder. The images are already in the images folder.
1. Create a blank PHP page in the includes folder, and name it random_image.php. Insert the
following code (its also in random_image_01.php in the ch04 folder):
<?php
$images = array('kinkakuji', 'maiko', 'maiko_phone', 'monk', 'fountains',
'ryoanji', 'menu', 'basin');
$i = rand(0, count($images)-1);
$selectedImage = "images/{$images[$i]}.jpg";
This is the complete script: an array of image names minus the .jpg filename extension
(theres no need to repeat shared information—theyre all JPEG), a random number generator,
and a string that builds the correct pathname for the selected file.
To generate a random number within a range, you pass the minimum and maximum numbers as
arguments to the function rand(). Since there are eight images in the array, you need a
CHAPTER 4
86
number between 0 and 7. The simple way to do this would be to use rand(0, 7)—simple, but
inefficient. Every time you change the $images array, you need to count how many elements
it contains and change the maximum number passed to rand().
Its much easier to get PHP to count them for you, and thats exactly what the count()
function does: it counts the number of elements in an array. You need a number one less than
the number of elements in the array, so the second argument passed to rand() becomes
count($images)-1, and the result is stored in $i.
The random number is used in the final line to build the correct pathname for the selected file.
The variable $images[$i] is embedded in a double-quoted string with no whitespace
separating it from surrounding characters, so its enclosed in curly braces. Arrays start at 0,
so if the random number is 1, $selectedImage is images/maiko.jpg.
If youre new to PHP, you may find it difficult to understand code like this:
$i = rand(0, count($images)-1);
All thats happening is that the second argument passed to rand() is an expression rather
than a number. If it makes it easier for you to follow, rewrite the code like this:
$numImages = count($images); // $numImages is 8
$max = $numImages – 1; // $max is 7
$i = rand(0, $max); // $i = rand(0, 7)
2. Open index.php, and include random_image.php by inserting the command in the same code
block as title.inc.php like this:
<?php include('./includes/title.inc.php');
include('./includes/random_image.php'); ?>
Since random_image.php doesnt send any direct output to the browser, its safe to put it
above the DOCTYPE.
3. Scroll down inside index.php, and locate the code that displays the image in the
maincontent <div>. It looks like this:
<div id="pictureWrapper">
<img src="images/basin.jpg" alt="Water basin at Ryoanji temple"
width="350" height="237" class="picBorder">
</div>
Instead of using images/basin.jpg as a fixed image, replace it with $selectedImage. All the
images have different dimensions, so delete the width and height attributes, and use a
generic alt attribute. The code in step 3 should now look like this:
<div id="pictureWrapper">
<img src="<?php echo $selectedImage; ?>" alt="Random image"
class="picBorder">
</div>
LIGHTENING YOUR WORKLOAD WITH INCLUDES
87
4. Save both random_image.php and index.php, and load index.php into a browser. The image
should now be chosen at random. Click the Reload button in your browser, and you should see
a variety of images, as shown in Figure 4-10.
Figure 4-10. Storing image filenames in an indexed array makes it easy to display a random image.
You can check your code against index_04.php and random_image_01.php in the ch04
folder.
This is a simple and effective way of displaying a random image, but it would be much better if you could
add a caption and set the width and height for different sized images dynamically.
PHP Solution 4-7: Adding a caption to the random image
This solution uses a multidimensional array—or an array of arrays—to store the filename and caption for
each image. If you find the concept of a multidimensional array difficult to understand in abstract terms,
think of it as a large box with a lot of envelopes inside, and inside each envelope are the photos and
captions. The box is the top-level array, and the envelopes inside are the subarrays.
CHAPTER 4
88
The images are different sizes, but PHP conveniently provides a function called getimagesize(). Guess
what it does.
This PHP solution builds on the previous one, so continue working with the same files.
1. Open random_image.php, and change the code like this:
<?php
$images = array(
array('file' => 'kinkakuji',
'caption' => 'The Golden Pavilion in Kyoto'),
array('file' => 'maiko',
'caption' => 'Maiko—trainee geishas in Kyoto'),
array('file' => 'maiko_phone',
'caption' => 'Every maiko should have one—a mobile, of course'),
array('file' => 'monk',
'caption' => 'Monk begging for alms in Kyoto'),
array('file' => 'fountains',
'caption' => 'Fountains in central Tokyo'),
array('file' => 'ryoanji',
'caption' => 'Autumn leaves at Ryoanji temple, Kyoto'),
array('file' => 'menu',
'caption' => 'Menu outside restaurant in Pontocho, Kyoto'),
array('file' => 'basin',
'caption' => 'Water basin at Ryoanji temple, Kyoto')
);
$i = rand(0, count($images)-1);
$selectedImage = "images/{$images[$i]['file']}.jpg";
$caption = $images[$i]['caption'];
Although the code looks complicated, its an ordinary indexed array that contains eight items,
each of which is an associative array containing definitions for 'file' and 'caption'. The
definition of the multidimensional array forms a single statement, so there are no semicolons
until line 19. The closing parenthesis on that line matches the opening one on line 2. All the
array elements in between are separated by commas. The deep indenting isnt necessary, but
it makes the code a lot easier to read.
The variable used to select the image also needs to be changed, because $images[$i] no
longer contains a string, but an array. To get the correct filename for the image, you need to
use $images[$i]['file']. The caption for the selected image is contained in
$images[$i]['caption'] and stored in a shorter variable.
2. You now need to amend the code in index.php to display the caption like this:
<div id="pictureWrapper">
<img src="<?php echo $selectedImage; ?>" alt="Random image"
class="picBorder">
<p id="caption"><?php echo $caption; ?></p>
</div>
LIGHTENING YOUR WORKLOAD WITH INCLUDES
89
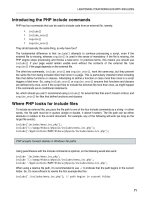
3. Save index.php and random_image.php, and load index.php into a browser. Most images
will look fine, but theres an ugly gap to the right of the image of the trainee geisha with a mobile
phone, as shown in Figure 4-11.
Figure 4-11. The long caption protrudes beyond the image and shifts it too far left.
4. Add the following code at the end of random_image.php:
if (file_exists($selectedImage) && is_readable($selectedImage)) {
$imageSize = getimagesize($selectedImage);
}
The if statement uses two functions, file_exists() and is_readable(), to make sure
$selectedImage not only exists but also that its accessible (it may be corrupted or have the
wrong permissions). These functions return Boolean values (true or false), so they can be
used directly as part of the conditional statement.
The single line inside the if statement uses the function getimagesize() to get the images
dimensions and stores them in $imageSize. Youll learn more about getimagesize() in
Chapter 8. At the moment, youre interested in the following two pieces of information:
• $imageSize[0]: The width of the image in pixels
• $imageSize[3]: A string containing the images height and width formatted for
inclusion in an <img> tag
5. First of all, lets fix the code in the <img> tag. Change it like this:
<img src="<?php echo $selectedImage; ?>" alt="Random image"
class="picBorder" <?php echo $imageSize[3]; ?>>
This inserts the correct width and height attributes inside the <img> tag.
CHAPTER 4
90
6. Although this sets the dimensions for the image, you still need to control the width of the
caption. You cant use PHP inside an external style sheet, but theres nothing stopping you
from creating a <style> block in the <head> of index.php. Insert the following code just
before the closing </head> tag.
<?php
if (isset($imageSize)) {
?>
<style>
#caption {
width: <?php echo $imageSize[0]; ?>px;
}
</style>
<?php } ?>
This code consists of only nine short lines, but its an odd mix of PHP and HTML. Lets start
with the first three lines and the final one. If you strip away the PHP tags and replace the HTML
<style> block with a comment, this is what you end up with:
if (isset($imageSize)) {
// do something if $imageSize has been set
}
In other words, if the variable $imageSize hasnt been set (defined), the PHP engine ignores
everything between the curly braces. It doesnt matter that most of the code between the
braces is HTML and CSS. If $imageSize hasnt been set, the PHP engine skips to the closing
brace, and the intervening code isnt sent to the browser.
Many inexperienced PHP coders wrongly believe that they need to use
echo
or
to create
HTML output inside a conditional statement. As long as the opening and closing braces match, you
can use PHP to hide or display sections of HTML like this. Its a lot neater and involves a lot less
typing than using
echo
all the time.
If $imageSize has been set, the <style> block is created, and $imageSize[0] is used to set
the correct width for the paragraph that contains the caption.
7. Save random_image.php and index.php, and reload index.php into a browser. Click the
Reload button until the image of the trainee geisha with the mobile phone appears. This time, it
should look like Figure 4-12. If you view the browsers source code, the style rule uses the
correct width for the image.