Giải pháp thiết kế web động với PHP - p 12 pptx
Bạn đang xem bản rút gọn của tài liệu. Xem và tải ngay bản đầy đủ của tài liệu tại đây (608.33 KB, 10 trang )
LIGHTENING YOUR WORKLOAD WITH INCLUDES
91
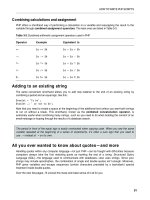
Figure 4-12. The ugly gap is removed by creating a style rule directly related to the image size.
If the caption still protrudes, make sure theres no gap between the closing PHP tag and
px
in the
<style>
block. CSS does not permit whitespace between the value and unit of measurement.
8. The code in random_image.php and the code you have just inserted prevent errors if the
selected image cant be found, but the code that displays the image is devoid of similar
checks. Temporarily change the name of one of the images, either in random_image.php or in
the images folder. Reload index.php several times. Eventually, you should see an error
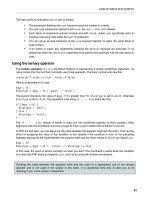
message like that in Figure 4-13. It looks very unprofessional.
Figure 4-13. An error in an include file can destroy the look of your page.
9. The conditional statement at the foot of random_image.php sets $imageSize only if the
selected image both exists and is readable, so if $imageSize has been set, you know its all
systems go. Add the opening and closing blocks of a conditional statement around the <div>
that displays the image in index.php like this:
<?php if (isset($imageSize)) { ?>
<div id="pictureWrapper">
CHAPTER 4
92
<img src="<?php echo $selectedImage; ?>" alt="Random image"
class="picBorder" <?php echo $imageSize[3]; ?> />
<p id="caption"><?php echo $caption; ?></p>
</div>
<?php } ?>
Images that exist will display normally, but youll avoid any embarrassing error messages in
case of a missing or corrupt file—a much more professional look. Dont forget to restore the
name of the image you changed in the previous step. You can check your code against
index_05.php and random_image_02.php in the ch04 folder.
Preventing errors with include files
Many hosting companies turn off error reporting for notices, so you probably wouldnt be aware of the
problem shown in Figure 4-13 if you did all your testing on your remote server. However, its important to
eliminate all errors before deploying PHP pages on the Internet. Just because you cant see the error
message, doesnt mean your page is OK.
Pages that use a server-side technology such as PHP deal with a lot of unknowns, so its wise to code
defensively, checking values before using them. This section describes measures you can take to
prevent and troubleshoot errors with include files.
Checking the existence of variables
The lesson that can be drawn from PHP Solution 4-7 is that you should always use isset() to verify the
existence of a variable that comes from an include file and wrap any code that uses it in a conditional
statement. In this particular case, you know theres no image to display if $imageSize doesnt exist, so
the pictureWrapper <div> is dropped. However, in other cases, you might be able to assign a default
value to the variable like this:
if (!isset($someVariable)) {
$someVariable =
default value
;
}
This uses the logical Not operator (see Table 3-6 in Chapter 3) to check if $someVariable has not been
set. If $someVariable doesnt exist, its assigned a default value, which can then be used later in your
script. If it does exist, the code inside the conditional statement is skipped, and the original value is used.
Checking whether a function or class has been defined
Include files are frequently used to define custom functions or classes. Attempting to use a function or
class that hasnt been defined triggers a fatal error. To check whether a function has been defined, pass
the name of the function as a string to function_exists(). When passing the name of the function to
function_exists(), omit the parentheses at the end of function name. For example, you check whether
a function called doubleIt() has been defined like this:
if (function_exists('doubleIt')) {
// use doubleIt()
}
Download from Wow! eBook <www.wowebook.com>
LIGHTENING YOUR WORKLOAD WITH INCLUDES
93
To check whether a class has been defined, use class_exists() in the same way, passing a string
containing the class name as the argument:
if (class_exists('MyClass')) {
// use MyClass
}
Assuming you want to use the function or class, a more practical approach is to use a conditional
statement to include the definition file if the function or class hasnt already been defined. For example, if
the definition for doubleIt() is in a file called utilities.inc.php:
if (!function_exists('doubleIt')) {
require_once('includes/utilities.inc.php');
}
Temporarily turning on error messages
Error messages are there to help the developer. Unfortunately, displaying them in a live website exposes
information that could be useful to an attacker, which is why its now common for hosting companies to
turn off the display of error messages. Depending on the nature of the error, all you might see when
accessing the page is a blank screen. This isnt very helpful when you need to find out whats wrong with a
page that worked perfectly in your local testing environment.
Fortunately, its easy to turn on the display of error messages temporarily for an individual page with
ini_set(), which can be used to override some directives in php.ini, the servers PHP configuration
file. Add the following code at the top of the page thats causing problems:
<?php ini_set('display_errors', '1'); ?>
Upload the file to your remote server, and reload the page in your browser. You should then be able to read
the error message onscreen. Fix the problem, and test the page again. If the page displays correctly,
remove the extra line of code.
If you still see a blank screen, it means theres a syntax error in your PHP code. Using
ini_set()
has no effect if theres a parse error.
The most common cause of errors is forgetting to upload the include file to your remote server. Even if you
have uploaded all the files, you might get an error message telling you that you dont have permission to
access an include file. This is likely to happen in the following circumstances:
• The server is running in safe mod e: If your hosting company is running PHP in a highly
restricted way, you will see a warning that a safe mode restriction is in effect. Run phpinfo(),
and check the value of safe_mode_include_dir in the Core section. All your include files
must be stored in this location. Adjust your site structure accordingly. Safe mode is scheduled
to be removed from the next major version of PHP, so this problem is less common.
CHAPTER 4
94
• The open_basedir directive has been set: The open_basedir directive restricts your
ability to include or open files. This should affect you only when the include file is outside your
web servers document root. The warning message produced by PHP lists the allowed path(s).
Move your include file to a permitted location, and adjust the path in the include command
accordingly.
Dealing with missing include files
Assuming your include files are working normally on your remote server, thats probably all the error
checking you need. However, if your remote server displays error messages, you should take steps to
suppress them in case an include file is accidentally deleted or corrupted.
A rather crude, but effective way is to use the PHP error control operator (@), which suppresses error
messages associated with the line of code in which its used. You place the error control operator either at
the beginning of the line or directly in front of the function or command that you think might generate an
error like this:
@ include('./includes/random_image.php');
The problem with the error control operator is that it hides errors, rather than working around them. Its only
one character, so its easy to forget you have used it. Consequently, you can waste a lot of time looking
for errors in the wrong part of your script. If you use the error control operator, the @ mark should be the
first thing you remove when troubleshooting a problem.
The other drawback is that you need to use the error control operator in every line that might generate an
error message, because it affects only the current line.
A better way of suppressing error messages in a live website is to turn off the display_errors directive
in the web servers configuration. The most effective way is to edit php.ini if your hosting company gives
you control over its settings. Alternatively, if your server runs on Apache and you have permission to
change the configuration with an .htaccess file, you should add the following command to the .htaccess
file in your server root folder:
php_flag display_errors Off
If neither option is available, add the following line at the top of any script that uses include files:
<?php ini_set('display_errors', '0'); ?>
All the techniques suggested so far only suppress error messages if an include file cant be found. If a
page would be meaningless without the include file, you should redirect the user to an error page if the
include file is missing.
One way to do so is to throw an exception like this:
$file = 'includes/menu.inc.php';
if (file_exists($file) && is_readable($file)) {
include($file);
} else {
throw new Exception("$file can't be found");
}
LIGHTENING YOUR WORKLOAD WITH INCLUDES
95
When using code that might throw an exception, you need to wrap it in a try block and create a catch
block to handle the exception (see “Handling Exceptions” in Chapter 3). The next PHP solution shows how
to do this.
PHP Solution 4-8: Redirecting when an include file cant be found
This PHP solution shows how to redirect users to a different page if an include file cant be found. If you
have designed and tested your site thoroughly, this technique should not be necessary on most pages
that use include files. However, this is by no means a pointless exercise. It demonstrates several
important features of PHP: how to throw and catch exceptions and how to redirect to another page. As
youll see from the following instructions, redirection isnt always straightforward. This PHP solution shows
how to overcome the most common problem.
Continue working with index.php from PHP Solution 4-7. Alternatively, use index_05.php from the ch04
folder.
1. Copy error.php from the ch04 folder to the site root. Dont update the links in the page if your
editing program prompts you to do so. This is a static page that contains a generic error
message and links back to the other pages.
2. Open index.php in your editing program. The navigation menu is the most indispensible
include file, so edit the include command in index.php like this:
$file = 'includes/menu.inc.php';
if (file_exists($file) && is_readable($file)) {
include($file);
} else {
throw new Exception("$file can't be found");
}
Storing the path of the include file in a variable like this avoids the need to retype it four times,
reducing the likelihood of spelling mistakes.
3. To redirect the user to another page, you use the header() function. However, redirection
doesnt work if any output has been sent to the browser before you call header(). Unless
theres a syntax error, the PHP engine normally processes a page from the top outputting the
HTML until it reaches a problem. This means that output will have already begun by the time the
PHP engine gets to this code. To prevent this from happening, start the try block before any
output is generated. (This actually wont work, but bear with me, because it demonstrates an
important point.)
Scroll to the top of the page, and edit the opening PHP code block like this:
<?php try {
include('./includes/title.inc.php');
include('./includes/random_image.php'); ?>
This opens the try block.
CHAPTER 4
96
4. Scroll down to the bottom of the page, and add the following code after the closing </html>
tag:
<?php } catch (Exception $e) {
header('Location: http://localhost/phpsols/error.php');
} ?>
This closes the try block and creates a catch block to handle the exception. The code in the
catch block uses header() to redirect the user to error.php.
The header() function is used to send any HTTP headers to the browser. It takes as its
argument a string containing the header and its value separated by a colon. In this case, it
uses the Location header to redirect the browser to the page specified by the URL following
the colon. Adjust the URL to match your own setup if necessary.
5. Save index.php, and test the page in a browser. It should display as normal.
6. Change the value of $file, the variable you created in step 2, to point to a nonexistent include
file, such as menu.php.
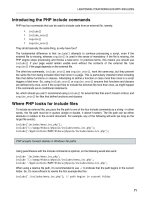
7. Save index.php, and reload it in your browser. Instead of being redirected to error.php,
youre likely to see the following message:
This error message is probably responsible for more heads being banged against keyboards
than any other. (I, too, bear the scars.) As mentioned earlier, the header() function cannot
be used if output has been sent to the browser. So, whats happened?
The answer is in the error message, but its not immediately obvious. It says the error
happened on line 54, which is where the header() function is called. What you really need to
know is where the output was generated. That information is buried here:
(output started at C:\xampp\htdocs\phpsols\index.php:9)
The number 9 after the colon is the line number. So, whats on line 9 of index.php?
LIGHTENING YOUR WORKLOAD WITH INCLUDES
97
As you can see from the preceding screenshot, line 9 uses echo to display the value of
$title. Because theres no error in the code up to this point, the PHP engine has already
output the HTML. Once that has happened, header() cant redirect the page. However, even
if you remove this line of PHP, the error message simply reports that output started on the next
line that contains a PHP block. Whats happening is that the web server is outputting all the
HTML following the DOCTYPE, but the PHP engine needs to process a PHP code block before it
can report a line number. This poses the problem of how to redirect a page after output has
been sent to the browser. Fortunately, PHP provides the answer by allowing you to store the
output in a buffer (the web servers memory).
8. Edit the code block at the top of index.php like this:
<?php ob_start();
try {
include('./includes/title.inc.php');
include('./includes/random_image.php'); ?>
The ob_start() function turns on output buffering, preventing any output from being sent to
the browser before the header() function is called.
9. The PHP engine automatically flushes the buffer at the end of the script, but its better to do so
explicitly. Edit the PHP code block at the foot of the page like this:
<?php } catch (Exception $e) {
ob_end_clean();
header('Location: http://localhost/phpsols/error.php');
}
ob_end_flush();
?>
Two different functions have been added here. When redirecting to another page, you dont
want the HTML stored in the buffer. So, inside the catch block, a call is made to
ob_end_clean(), which turns off the buffer and discards its contents.
However, if an exception isnt thrown, you want to display the contents of the buffer, so
ob_end_flush() is called at the end of the page after both the try and catch blocks. This
flushes the contents of the buffer and sends it to the browser.
10. Save index.php and reload it in a browser. This time, you should be redirected to the error
page:
CHAPTER 4
98
11. Change the value of $file back to includes/menu.inc.php, and save index.php. When
you click the Home link in the error page, index.php should display normally.
You can compare your code with index_06.php in the ch04 folder.
Redirecting the page when an error occurs improves the user experience, but you should also log the
error. Youll learn how to do that in Chapter 6.
Choosing where to locate your include files
A useful feature of PHP include files is they can be located anywhere, as long as the page with the include
command knows where to find them. Include files dont even need to be inside your web server root. This
means that you can protect include files that contain sensitive information, such as passwords, in a
private directory (folder) that cannot be accessed through a browser. So, if your hosting company
provides a storage area outside your server root, you should seriously consider locating some, if not all,
of your include files there.
An include command expects either a relative path or a fully qualified path. If neither is given, PHP
automatically looks in the include_path specified in your PHP configuration. The following section
explains how to change the folders PHP searches automatically for include files.
Adjusting your include_path
The advantage of locating include files in a folder specified in your web servers include_path is that you
dont need to worry about getting the relative or absolute path correct. All you need is the filename. This
can be very useful if you use a lot of includes or you have a site hierarchy several levels deep. There are
three ways to change the include_path:
• Edit the value in php.ini: If your hosting company gives you access to php.ini, this is the
best way to add a custom includes folder.
• Use .htaccess: If your remote web server runs on Apache and you are allowed to change the
configuration with an .htaccess file, this is a good alternative.
• Use set_include_path(): Use this only if the previous options are not available to you,
because it affects the include_path only for the current file.
The value of the include_path for your web server is listed in the Core section of the configuration details
when you run phpinfo(). It normally begins with a period, which indicates the current folder, and is
followed by the absolute path of each folder to be searched. On Linux and Mac OS X, each path is
separated by a colon. On Windows, the separator is a semicolon.
On a Linux or Mac server your existing include_path directive might look like this:
.:/php/PEAR
On a Windows server, the equivalent would look like this:
.;C:\php\PEAR
LIGHTENING YOUR WORKLOAD WITH INCLUDES
99
Editing the include_path in php.ini
In php.ini, locate the include_path directive. To add a folder called includes in your own site, add a
colon or semicolon—depending on your servers operating system—at the end of the existing value
followed by the absolute path to the includes folder.
On a Linux or Mac server, use a colon like this:
include_path=".:/php/PEAR:/home/mysite/public_html/includes"
On a Windows server, use a semicolon:
include_path=".;C:\php\PEAR;C:\sites\mysite\www\includes"
Using .htaccess to change the include_path
If you can use .htaccess to change the servers configuration, you can adjust the include_path on
Linux or Mac like this:
php_value include_path ".:/php/PEAR:/home/mysite/public_html/includes"
The command is the same on Windows, except that you separate the paths with a semicolon:
php_value include_path ".;C:\php\PEAR;C:\sites\mysite\www\includes"
Do not insert an equal sign between
include_path
and the list of path names. Because
.htaccess
overrides the default
include_path
, make sure you copy the existing value from
phpinfo()
and add
the new path to it.
If youre testing locally in XAMPP in a subfolder of the server root called phpsols, you can create an
.htaccess file for this book like this:
php_value include_path ".;C:\xampp\php\PEAR;C:\xampp\htdocs\phpsols\includes"
If youre testing locally in MAMP, the file should look like this:
php_value include_path ".:/Applications/MAMP/bin/php5.3/lib/php:/Applications/
MAMP/htdocs/phpsols/includes"
These values are correct at the time of this writing, but you should check the actual value of
include_path in your own setup and adjust the path accordingly if its different.
The best way to create an
.htaccess
file on your local computer is to use a dedicated web
development program, such as Dreamweaver or Zend Studio. If you create an
.htaccess
file in a
text editor on a Mac, it will disappear without trace in Finder. Mac OS X has the infuriating habit of
hiding files with filenames that begin with a dot. Dedicated web development programs are more
understanding.
CHAPTER 4
100
Using set_include_path()
Although set_include_path() affects only the current page, you can easily create a code snippet and
paste it into pages where you want to use it. PHP also makes it easy to get the existing include_path and
combine it with the new one in a platform-neutral way.
Store the new path in a variable and then combine it with the existing include path like this:
$includes_folder = '/home/mysite/public_html/includes';
set_include_path(get_include_path() . PATH_SEPARATOR . $includes_folder);
It looks as though three arguments are being passed to set_include_path(), but its only one, because
the three elements are joined by the concatenation operator (a period), not commas. As you can imagine,
get_include_path() gets the existing include_path. PATH_SEPARATOR is a PHP constant that
automatically inserts a colon or semicolon depending on the operating system. The result is a string that
contains both the original and new paths.
The problem with this approach is that the path to the new includes folder wont be the same on your
remote and local testing servers. Fortunately, you can fix that with a conditional statement. The
superglobal variable $_SERVER['HTTP_HOST'] contains the domain name of the website. So, if your
domain is www.example.com, you can set the correct path for each server like this:
if ($_SERVER['HTTP_HOST'] == 'www.example.com') {
$includes_folder = '/home/example/public_html/includes';
} else {
$includes_folder = 'C:/xampp/htdocs/phpsols/includes';
}
set_include_path(get_include_path() . PATH_SEPARATOR . $includes_folder);
Using set_include_path() is probably not worthwhile for small websites that dont use many include
files. Where it comes in really useful is if you use a third-party PHP library, such as Zend Framework
( or Symfony (www.symfony-project.org), which relies heavily on
include files.
Why cant I use site-root-relative links with PHP includes?
Well, you can and you cant. For the sake of clarity, Ill begin by explaining the distinction between links
relative to the document and to the site root. When you click a link to go to another page, the path in the
<a> tag tells the browser how to get from the current page to the next one. Most web authoring tools
specify the path relative to the current document. If the target page is in the same folder, just the filename
is used. If its one level higher than the current page, the filename is preceded by /. This is known as a
document-relative path or link. If you have a site with many levels of folders, this type of link can be
difficult to understand—at least for humans.
The other type of link always begins with a forward slash, which is shorthand for the site root. The
advantage of a site-root-relative pa th is that it doesnt matter how deep the current page is in the site
hierarchy, the forward slash at the beginning guarantees the web server will start looking from the top level
of the site. Although site-root-relative links are much easier to read, PHP include commands cant handle
them. You must use a document-relative path, an absolute path, or specify the includes folder in your
include_path directive.