Giải pháp thiết kế web động với PHP - p 17 pdf
Bạn đang xem bản rút gọn của tài liệu. Xem và tải ngay bản đầy đủ của tài liệu tại đây (614.94 KB, 10 trang )
141
Chapter 6
Uploading Files
PHPs ability to handle forms isnt restricted to text. It can also be used to upload files to a server. For
instance, you could build a real estate website for clients to upload pictures of their properties or a site for
all your friends and relatives to upload their holiday photos. However, just because you can do it, doesnt
necessarily mean that you should. Allowing others to upload material to your website could expose you to
all sorts of problems. You need to make sure that images are the right size, that theyre of suitable quality,
and that they dont contain any illegal material. You also need to ensure that uploads dont contain
malicious scripts. In other words, you need to protect your website just as carefully as your own
computer.
PHP makes it relatively simple to restrict the type and size of files accepted. What it cannot do is check
the suitability of the content. Think carefully about security measures, such as restricting uploads to
registered and trusted users by placing the upload form in a password-protected area.
Until you learn how to restrict access to pages with PHP in Chapters 9 and 17, use the PHP solutions in
this chapter only in a password-protected directory if deployed on a public website. Most hosting
companies provide simple password protection through the sites control panel.
The first part of this chapter is devoted to understanding the mechanics of file uploads, which will make it
easier to understand the code that follows. This is a fairly intense chapter, not a collection of quick
solutions. But by the end of the chapter, you will have built a PHP class capable of handling single and
multiple file uploads. You can then use the class in any form by writing only a few lines of code.
Youll learn about the following:
• Understanding the $_FILES array
• Restricting the size and type of uploads
• Preventing files from being overwritten
• Organizing uploads into specific folders
• Handling multiple uploads
CHAPTER 6
142
How PHP handles file uploads
The term “upload” means moving a file from one computer to another, but as far as PHP is concerned, all
thats happening is that a file is being moved from one location to another. This means you can test all the
scripts in this chapter on your local computer without the need to upload files to a remote server.
PHP supports file uploads by default, but hosting companies can restrict the size of uploads or disable
them altogether. Before going any further, its a good idea to check the settings on your remote server.
Checking whether your server supports uploads
All the information you need is displayed in the main PHP configuration page that you can display by
running phpinfo() on your remote server, as described in Chapter 2. Scroll down until you find
file_uploads in the Core section, as shown in the following screenshot.
If the Local Value is On, youre ready to go, but you should also check the other configuration settings
listed in Table 6-1.
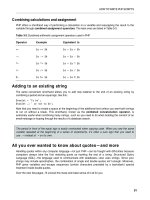
Table 6-1. PHP configuration settings that affect file uploads
Directive Default value Description
max_execution_time
30 The maximum number of seconds that a PHP script can run. If
the script takes longer, PHP generates a fatal error.
max_input_time
60 The maximum number of seconds that a PHP script is allowed to
parse the $_POST and $_GET arrays and file uploads. Very large
uploads are likely to run out of time.
post_max_size
8M The maximum permitted size of all $_POST data, including file
uploads. Although the default is 8MB, hosting companies may
impose a smaller limit.
Download from Wow! eBook <www.wowebook.com>
UPLOADING FILES
143
Directive Default value Description
upload_tmp_dir
This is where PHP stores uploaded files until your script moves
them to a permanent location. If no value is defined in php.ini,
PHP uses the system default temporary directory
(C:\Windows\Temp or /tmp on Mac/Linux).
upload_max_filesize
2M The maximum permitted size of a single upload file. Although the
default is 2MB, hosting companies may impose a smaller limit. A
number on its own indicates the number of bytes permitted. A
number followed by K indicates the number of kilobytes
permitted.
The default 8MB value of post_max_size includes the content of the $_POST array, so the total size of
files that can be uploaded simultaneously is less than 8MB, with no single file greater than 2MB. These
defaults can be changed by the server administrator, so its important to check the limits set by your
hosting company. If you exceed those limits, an otherwise perfect script will fail.
If the Local Value of file_uploads is Off, uploads have been disabled. There is nothing you can do
about it, other than ask your hosting company if it offers a package with file uploading enabled. Your only
alternatives are to move to a different host or to use a different solution, such as uploading files by FTP.
After using
phpinfo()
to check your remote servers settings, its a good idea to remove the script or
put it in a password-protected directory.
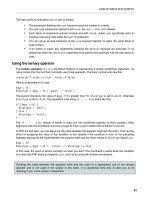
Adding a file upload field to a form
Adding a file upload field to an HTML form is easy. Just add enctype="multipart/form-data" to the
opening <form> tag, and set the type attribute of an <input> element to file. The following code is a
simple example of an upload form (its in file_upload_01.php in the ch06 folder):
<form action="" method="post" enctype="multipart/form-data" id="uploadImage">
<p>
<label for="image">Upload image:</label>
<input type="file" name="image" id="image">
</p>
<p>
<input type="submit" name="upload" id="upload" value="Upload">
</p>
</form>
Although this is standard HTML, how its rendered in a web page depends on the browser (see Figure 6-1).
Some browsers insert a text input field with a Browse button on the right. In older browsers, the text input
field is editable, but most modern browsers make it read-only or launch the operating systems file
navigation panel as soon as you click inside the field. Browsers that use the WebKit engine, such as
Safari and Google Chrome, display a Choose File button with a status message or name of the selected
CHAPTER 6
144
file on the right. These differences dont affect the operation of an upload form, but you need to take them
into account when designing the layout.
Figure 6-1. The look of a file input field depends on the browser.
Understanding the $_FILES array
What confuses many people is that their file seems to vanish after it has been uploaded. This is because
you cant refer to an uploaded file in the $_POST array in the same way as with text input. PHP transmits
the details of uploaded files in a separate superglobal array called, not unreasonably, $_FILES. Moreover,
files are uploaded to a temporary folder and are deleted unless you explicitly move them to the desired
location. Although this sounds like a nuisance, its done for a very good reason: you can subject the file to
security checks before accepting the upload.
Inspecting the $_FILES array
The best way to understand how the $_FILES array works is to see it in action. If you have installed a local
test environment, you can test everything on your computer. It works in exactly the same way as
uploading a file to a remote server.
1. Create a new folder called uploads in the phpsols site root. Create a new PHP file called
file_upload.php in the uploads folder, and insert the code from the previous section.
Alternatively, copy file_upload_01.php from the ch06 folder, and rename the file
file_upload.php.
2. Insert the following code right after the closing </form> tag (its also in
file_upload_02.php):
</form>
<pre>
<?php
if (isset($_POST['upload'])) {
print_r($_FILES);
UPLOADING FILES
145
}
?>
</pre>
</body>
This uses isset() to checks whether the $_POST array contains upload, the name attribute of
the submit button. If it does, you know the form has been submitted, so you can use
print_r() to inspect the $_FILES array. The <pre> tags make the output easier to read.
3. Save file_upload.php, and load it into a browser.
4. Click the Browse (or Choose File) button, and select a file on your hard disk. Click Open (or
Choose on a Mac) to close the file selection dialog box, and then click Upload. You should
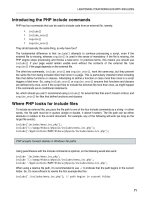
see something similar to Figure 6-2.
You can see that the $_FILES array is actually a multidimensional array—an array of arrays.
The top-level array contains just one element, which gets its key (or index) from the name
attribute of the file input field—in this case, image.
Figure 6-2. The $_FILES array contains the details of an uploaded file.
The image element contains another array (or subarray) that consists of five elements,
namely:
• name: The original name of the uploaded file
• type: The uploaded files MIME type
• tmp_name: The location of the uploaded file
• error: An integer indicating the status of the upload
• size: The size of the uploaded file in bytes
Dont waste time searching for the temporary file indicated by tmp_name: it wont be there. If
you dont save it immediately, PHP discards it.
5. Click Upload without selecting a file. The $_FILES array should look like Figure 6-3.
CHAPTER 6
146
Figure 6-3. The $_FILES array still exists when no file is uploaded.
An error level of 4 indicates that no file was uploaded; 0 means the upload succeeded. Table 6-
2 later in this chapter lists all the error codes.
6. Select a program file, and click the Upload button. In many cases, the form will happily try to
upload the program and display its type as application/zip or something similar. This is a
warning that its important to check the MIME type of uploaded files.
Establishing an upload directory
Another source of confusion is the question of permissions. An upload script that works perfectly locally
may confront you with a message like this when you transfer it to your remote server:
Warning: move_uploaded_file(/home/user/htdocs/testarea/kinkakuji.jpg)
[function.move-uploaded-file]: failed to open stream: Permission denied in
/home/user/htdocs/testarea/upload_test.php on line 3
Why is permission denied? Most hosting companies use Linux servers, which impose strict rules about
the ownership of files and directories. In most cases, PHP doesnt run in your name, but as the web
server—usually nobody or apache. Unless PHP has been configured to run in your name, you need to give
global access (chmod 777) to every directory to which you want to upload files.
Since 777 is the least secure setting, begin by testing uploads with a setting of 700. If that doesnt work,
try 770, and use 777 only as a last resort. The upload directory doesnt need to be within your site root. If
your hosting company gives you a private directory outside the site root, create a subdirectory for
uploads inside the private one. Alternatively, create a directory inside your site root, but dont link to it
from any web pages. Give it an innocuous name, such as lastyear.
Creating an upload folder for local testing on Windows
For the following exercises, I suggest you create a folder called upload_test at the top level of the C
drive. There are no permissions issues on Windows, so thats all that you need to do.
UPLOADING FILES
147
Creating an upload folder for local testing on Mac OS X
Mac users need to do a little more preparation, because file permissions are similar to Linux. Without
changing the permissions, youll be confronted with a screen like this:
1. Create a folder called upload_test within your home folder.
2. Select upload_test in Finder, and select File
➤ Get Info (Cmd-I) to open its Info panel.
3. In Sharing & Permissions, click the padlock icon at the bottom right to unlock the settings,
and change the setting for everyone from Read only to Read & Write, as shown in the
following screenshot.
In older versions of Mac OS X, Sharing & Permissions is called Ownership & Permissions,
and everyone is called Others.
4. Click the padlock icon again to preserve the new settings, and close the Info panel. Your
upload_test folder is now ready for use.
Uploading files
Before building the file upload class, its a good idea to create a simple file upload script to make sure that
your system handles uploads correctly.
CHAPTER 6
148
Moving the temporary file to the upload folder
The temporary version of an uploaded file has only a fleeting existence. If you dont do anything with the
file, its discarded immediately. You need to tell PHP where to move it and what to call it. You do this with
the move_uploaded_file() function, which takes the following two arguments:
• The name of the temporary file
• The full pathname of the files new location, including the filename itself
Obtaining the name of the temporary file itself is easy: its stored in the $_FILES array as tmp_name.
Because the second argument requires a full pathname, it gives you the opportunity to rename the file. For
the moment, lets keep things simple and use the original filename, which is stored in the $_FILES array as
name.
PHP Solution 6-1: Creating a basic file upload script
Continue working with the same file as in the previous exercise. Alternatively, use file_upload_03.php
from the ch06 folder. The final script for this PHP solution is in file_upload_04.php.
1. If you are using the file from the previous exercise, delete the code highlighted in bold between
the closing </form> and </body> tags:
</form>
<pre>
<?php
if (isset($_POST['upload'])) {
print_r($_FILES);
}
?>
</pre>
</body>
2. In addition to the automatic limits set in the PHP configuration (see Table 6-1), you can specify
a maximum size for an upload file in your HTML form. Add the following line highlighted in bold
immediately before the file input field:
<label for="image">Upload image:</label>
<input type="hidden" name="MAX_FILE_SIZE" value="<?php echo $max; ?>">
<input type="file" name="image" id="image">
This is a hidden form field, so it wont be displayed onscreen. However, its vital to place it
before the file input field; otherwise, it wont work . The name attribute, MAX_FILE_SIZE, is
fixed. The value attribute sets the maximum size of the upload file in bytes. Instead of
specifying a numeric value, I have used a variable, which needs to be defined next. This value
will also be used in the server-side validation of the file upload, so it makes sense to define it
once, avoiding the possibility of changing it in one place, but forgetting to change it elsewhere.
3. Define the value of $max in a PHP block above the DOCTYPE declaration like this:
<?php
// set the maximum upload size in bytes
UPLOADING FILES
149
$max = 51200;
?>
<!DOCTYPE HTML>
This sets the maximum upload size to 50kB (51,200 bytes).
4. The code that moves the uploaded file from its temporary location to its permanent one needs
to be run after the form has been submitted. Insert the following code in the PHP block you
have just created at the top of the page:
$max = 51200;
if (isset($_POST['upload'])) {
// define the path to the upload folder
$destination = '/
path
/
to
/upload_test/';
// move the file to the upload folder and rename it
move_uploaded_file($_FILES['image']['tmp_name'], $destination .
$_FILES['image']['name']);
}
?>
Although the code is quite short, theres a lot going on. The entire code block is enclosed in a
conditional statement that checks whether the Upload button has been clicked by checking
to see if its key is in the $_POST array.
The value of $destination depends on your operating system and the location of the upload
folder.
• If you are using Windows, and you created the upload_test folder at the top
level of the C drive, it should look like this:
$destination = 'C:/upload_test/';
Note that I have used forward slashes instead of the Windows convention of
backslashes. You can use either, but if you use backslashes, the final one
needs to be escaped by another backslash, like this (otherwise the backslash
escapes the quote):
$destination = 'C:\upload_test\\';
• On a Mac, if you created the upload_test folder in your home folder, it should
look like this (replace username with your Mac username):
$destination = '/Users/
username
/upload_test/';
• On a remote server, you need the fully qualified filepath as the second
argument. On Linux, it will probably be something like this:
$destination = '/home/user/private/upload_test/';
The final line inside the if statement moves the file with the move_uploaded_file()
function. Since $_FILES['image']['name'] contains the name of the original file, the
second argument, $destination . $_FILES['image']['name'], stores the uploaded file
under its original name inside the upload folder.
CHAPTER 6
150
You may come across scripts that use
copy()
instead of
move_uploaded_file()
. Without other
checks in place,
copy()
can expose your website to serious security risks. For example, a malicious
user could try to trick your script into copying files that it should not have access to, such as
password files. Always use
move_uploaded_file()
; its much more secure.
5. Save file_upload.php, and load it into your browser. Click the Browse or Choose File
button, and select a file from the images folder in the phpsols site. If you choose one from
elsewhere, make sure its less than 50kB. Click Open (Choose on a Mac) to display the
filename in the form. In browsers that display a file input field, you might not be able to see the
full path. Thats a cosmetic matter that Ill leave you to sort out yourself with CSS. Click the
Upload button. If youre testing locally, the form input field should clear almost instantly.
6. Navigate to the upload_test folder, and confirm that a copy of the image you selected is
there. If there isnt, check your code against file_upload_04.php. Also check that the
correct permissions have been set on the upload folder, if necessary.
The download files set
$destination
to
C:/upload_test/
. Adjust this to your own setup.
7. If you get no error messages and cannot find the file, make sure that the image didnt exceed
upload_max_filesize (see Table 6-1). Also check that you didnt leave the trailing slash off
the end of $destination. Instead of myfile.jpg in upload_test, you may find
upload_testmyfile.jpg one level higher in your disk structure.
8. Change the value of $max to 3000, save file_upload.php, and test it again by selecting a file
bigger than 2.9kB to upload (any file in the images folder will do). Click the Upload button, and
check the upload folder. The file shouldnt be there.
9. If youre in the mood for experimentation, move the MAX_FILE_SIZE hidden field below the file
input field, and try it again. Make sure you choose a different file from the one you used in step
6, because move_uploaded_file() overwrites existing files of the same name. Youll learn
later how to give files unique names.
This time the file should be copied to your upload folder. Move the hidden field back to its
original position before continuing.
The advantage of using MAX_FILE_SIZE is that PHP abandons the upload if the file is bigger than the
stipulated value, avoiding unnecessary delay if the file is too big. Unfortunately, users can get around this
restriction by faking the value submitted by the hidden field, so the script youll develop in the rest of this
chapter will check the actual size of the file on the server side, too.
Creating a PHP file upload class
As you have just seen, it takes just a few lines of code to upload a file, but this is not enough on its own.
You need to make the process more secure by implementing the following steps: