Giải pháp thiết kế web động với PHP - p 36 doc
Bạn đang xem bản rút gọn của tài liệu. Xem và tải ngay bản đầy đủ của tài liệu tại đây (736.27 KB, 10 trang )
CONNECTING TO MYSQL WITH PHP AND SQL
331
In both cases, the result of the query is stored in $stmt.
Error messages can be accessed in the same way as with a PDO connection. However, instead of calling
the errorInfo() method on the connection object, use it on the PDO statement like this:
$error = $stmt->errorInfo();
if (isset($error[2])) {
echo $error[2];
}
To bind the results of a SELECT query to variables, each column needs to bound separately using the
bindColumn() method before calling execute(). The bindColumn() method takes two arguments. The
first argument can be either the name of the column or its number counting from 1. The number comes from
its position in the SELECT query, not the order it appears in the database table. So, to bind the result from
the filename column to $filename, either of the following is acceptable:
$stmt->bindColumn('filename', $filename);
$stmt->bindColumn(2, $filename);
PHP Solution 11-9: Using a PDO prepared statement in a search
This PHP solution shows how to embed the user-submitted value from a search form into a SELECT query
with a PDO prepared statement. It uses the same search form as the MySQLi versions in PHP Solutions
11-7 and 11-8.
1. Copy pdo_prepared_01.php from the ch11 folder, and save it in the mysql folder as
pdo_prepared.php.
2. Add the following code in a PHP block above the DOCTYPE declaration:
if (isset($_GET['go'])) {
require_once(' /includes/connection.inc.php');
$conn = dbConnect('read', 'pdo');
$sql = 'SELECT image_id, filename, caption FROM images
WHERE caption LIKE :search';
$searchterm = '%'. $_GET['search'] .'%';
$stmt = $conn->prepare($sql);
$stmt->bindParam(':search', $searchterm, PDO::PARAM_STR);
$stmt->bindColumn('image_id', $image_id);
$stmt->bindColumn('filename', $filename);
$stmt->bindColumn(3, $caption);
$stmt->execute();
$numRows = $stmt->rowCount();
}
When the form is submitted, this includes the connection file and creates a PDO connection to
MySQL. The prepared statement uses :search as a named parameter in place of the user-
submitted value. Like MySQLi prepared statements, you need to add the % wildcard characters
to the search term before binding it to the prepared statement with bindParam(). The results
are bound to $image_id, $filename, and $caption. The first two use the column names, but
the caption column is referred to by its position in the SELECT query.
CHAPTER 11
332
3. The code that displays the results is identical to step 6 in PHP Solution 11-8. The finished file
is in pdo_prepared_02.php in the ch11 folder.
PHP Solution 11-10: Changing column options through user input
This PHP solution shows how to change the name of SQL keywords in a SELECT query through user input.
SQL keywords cannot be wrapped in quotes, so using prepared statements or the MySQLi
real_escape_string() method wont work. Instead, you need to ensure that the user input matches an
array of expected values. If no match is found, use a default value instead. The technique is identical for
MySQLi and PDO.
1. Copy either mysqli_order_01.php or pdo_order_01.php from the ch11 folder, and save it in
the mysql folder. Both versions select all records from the images table and display the
results in table. The pages also contain a form that allows the user to select the name of a
column to sort the results in either ascending or descending order. In their initial state, the
form is inactive. The pages display the details sorted by image_id in ascending order like this:
2. Amend the code in the PHP block above the DOCTYPE declaration like this (the following listing
shows the MySQLi version, but the changes highlighted in bold type are the same for PDO):
require_once(' /includes/connection.inc.php');
// connect to MySQL
$conn = dbConnect('read');
// set default values
$col = 'image_id';
$dir = 'ASC';
// create arrays of permitted values
$columns = array('image_id', 'filename', 'caption');
$direction = array('ASC', 'DESC');
// if the form has been submitted, use only expected values
if (isset($_GET['column']) && in_array($_GET['column'], $columns)) {
$col = $_GET['column'];
Download from Wow! eBook <www.wowebook.com>
CONNECTING TO MYSQL WITH PHP AND SQL
333
}
if (isset($_GET['direction']) && in_array($_GET['direction'], $direction)) {
$dir = $_GET['direction'];
}
// prepare the SQL query using sanitized variables
$sql = "SELECT * FROM images
ORDER BY $col $dir";
// submit the query and capture the result
$result = $conn->query($sql) or die(mysqli_error());
The new code defines two variables, $col and $dir, that are embedded directly in the SELECT
query. Because they have been assigned default values, the query displays the results
sorted by the image_id column in ascending order when the page first loads.
Two arrays, $columns and $direction, then define permitted values: the column names, and
the ASC and DESC keywords. These arrays are used by the conditional statements that check
the $_GET array for column and direction. The submitted values are reassigned to $col and
$dir only if they match a value in the $columns and $direction arrays respectively. This
prevents any attempt to inject illegal values into the SQL query.
3. Edit the <option> tags in the drop-down menus so they display the selected values for $col
and $dir like this:
<select name="column" id="column">
<option <?php if ($col == 'image_id') echo 'selected'; ?>>image_id</option>
<option <?php if ($col == 'filename') echo 'selected'; ?>>filename</option>
<option <?php if ($col == 'caption') echo 'selected'; ?>>caption</option>
</select>
<select name="direction" id="direction">
<option value="ASC" <?php if ($dir == 'ASC') echo 'selected'; ?>>
Ascending</option>
<option value="DESC" <?php if ($dir == 'DESC') echo 'selected'; ?>>
Descending</option>
</select>
4. Save the page, and test it in a browser. You can change the sort order of the display by
selecting the values in the drop-down menus and clicking Change. However, if you try to inject
an illegal value through the query string, the page uses the default values of $col and $dir to
display the results sorted by image_id in ascending order.
You can check your code against mysqli_order_02.php and pdo_order_02.php in the ch11
folder.
CHAPTER 11
334
Chapter review
PHP provides three methods of communicating with MySQL:
• The original MySQL ex tension, which is no longer actively maintained: It should not be
used for new projects. If you need to maintain an existing site, you can easily recognize
whether it uses the original MySQL extension, because all functions begin with mysql_. For
help using it, consult the first edition of this book or use the online documentation at
• The MySQL Improved (MySQLi) extension: This is recommended for all new MySQL
projects. It requires PHP 5.0 and MySQL 4.1 or higher. Its more efficient, and has the added
safety of prepared statements.
• The PHP Data Objects (PDO) abstraction layer, which is software-neutral: You should
choose this option if your projects are likely to need to be adapted to use other databases.
Although PHP communicates with the database and stores the results, queries need to be written in SQL,
the standard language used to query a relational database. This chapter showed how to retrieve
information stored in a database table using a SELECT statement, refining the search with a WHERE clause,
and changing the sort order with ORDER BY. You also learned several techniques to protect queries from
SQL injection, including prepared statements, which use placeholders instead of embedding variables
directly in a query.
In the next chapter, youll put this knowledge to practical use creating an online photo gallery.
335
Chapter 12
Creating a Dynamic Online Gallery
The previous chapter concentrated mainly on extracting the contents of the images table as text. This
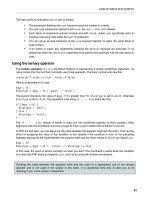
chapter builds on those techniques to develop the mini photo gallery shown in Figure 12-1.
Figure 12-1. The mini photo gallery is driven by pulling information from a database.
The gallery also demonstrates some cool features that youll want to incorporate into text-driven pages,
too. For instance, the grid of thumbnail images on the left displays two images per row. Just by changing
two numbers, you can make the grid as many columns wide and as many rows deep as you like. Clicking
one of the thumbnails replaces the main image and caption. Its the same page that reloads, but exactly
CHAPTER 12
336
the same technique is used to create online catalogs that take you to another page with more details
about a product. The Next link at the foot of the thumbnails grid shows you the next set of photographs,
using exactly the same technique as you use to page through a long set of search results. This gallery
isnt just a pretty face or two . . .
What this chapter covers:
• Why storing images in a database is a bad idea, and what you should do instead
• Planning the layout of a dynamic gallery
• Displaying a fixed number of results in a table row
• Limiting the number of records retrieved at a time
• Paging through a long set of results
Why not store images in a database?
The images table contains only filenames and captions, but not the images themselves. Even though I
said in the previous chapter that you can always add new columns or tables to a database when new
requirements arise, I dont intend to store the images in the database for the simple reason that its usually
more trouble than its worth. The main problems are as follows:
• Images cant be indexed or searched without storing textual information separately.
• Images are usually large, bloating the size of tables. If theres a limit on the amount of storage
in your database, you risk running out of space.
• Table fragmentation affects performance if images are deleted frequently.
• Retrieving images from a database involves passing the image to a separate script, slowing
down display in a web page.
Storing images in a database is messy. Its more efficient to store images in an ordinary folder on your
website and use the database for information about the images. You need just two pieces of information in
the database—the filename and a caption that can also be used as alt text. Some developers store the
full path to the image in the database, but I think storing only the filename gives you greater flexibility. The
path to the images folder will be embedded in the HTML. You could also store the images height and width,
but its not absolutely necessary. As you saw in Chapter 4, you can generate that information
dynamically.
Planning the gallery
Unless youre good at visualizing how a page will look simply by reading its source code, I find that the
best way to design a database-driven site is to start with a static page and fill it with placeholder text and
images. I then create my CSS style rules to get the page looking the way I want, and finally replace each
placeholder element with PHP code. Each time I replace something, I check the page in a browser to make
sure everything is still holding together.
Figure 12-2 shows the static mockup I made of the gallery and points out the elements that need to be
converted to dynamic code. The images are the same as those used for the random image generator in
Chapter 4 and are all different sizes. I experimented by scaling the images to create the thumbnails but
decided that the result looked too untidy, so I made the thumbnails a standard size (80 54 pixels). Also,
CREATING A DYNAMIC ONLINE GALLERY
337
to make life easy, I gave each thumbnail the same name as the larger version and stored them in a
separate subfolder of the images folder called thumbs.
As you saw in the previous chapter, displaying the contents of the entire images table was easy. You
created a single table row, with the contents of each field in a separate table cell. By looping through the
result set, each record displayed on a row of its own, simulating the column structure of the database
table. This time, the two-column structure of the thumbnail grid no longer matches the database structure.
This means that you need to count how many thumbnails have been inserted in each row before triggering
the creation of the next row.
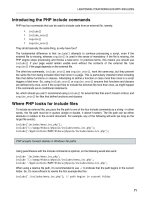
Figure 12-2. Working out what needs to be done to convert a static gallery to a dynamic one
Figure 12-3 shows the framework I created to hold the gallery together. The table of thumbnails and the
main_image <div> are floated left and right respectively in a fixed-width wrapper <div> called gallery. I
dont intend to go into the details of the CSS, but you may study that at your leisure.
CHAPTER 12
338
Figure 12-3. The underlying structure of the image gallery
Once I had worked out what needed to be done, I stripped out the code for thumbnails 2 to 6, and for the
navigation link (which is nested in the final row of the thumbs table). The following listing shows what was
left in the maincontent <div> of gallery.php, with the elements that need to be converted to PHP code
highlighted in bold (you can find the code in gallery_01.php in the ch12 folder):
<div id="maincontent">
<h2>Images of Japan</h2>
<p id="picCount">Displaying 1 to 6 of 8</p>
<div id="gallery">
<table id="thumbs">
<tr>
<! This row needs to be repeated >
<td><a href="gallery.php"><img src="images/thumbs/basin.jpg" alt=""
width="80" height="54"></a></td>
</tr>
<! Navigation link needs to go here >
</table>
<div id="main_image">
<p><img src="images/basin.jpg" alt="" width="350" height="237"></p>
<p>Water basin at Ryoanji temple, Kyoto</p>
</div>
</div>
</div>
CREATING A DYNAMIC ONLINE GALLERY
339
Converting the gallery elements to PHP
Before you can display the contents of the gallery, you need to connect to the phpsols database and
retrieve all the records stored in the images table. The procedure for doing so is the same as in the
previous chapter, using the following simple SQL query:
SELECT filename, caption FROM images
You can then use the first record to display the first image and its associated caption and thumbnail. You
dont need image_id.
PHP Solution 12-1: Displaying the first image
If you set up the Japan Journey website in Chapter 4, you can work directly with the original gallery.php.
Alternatively, copy gallery_01.php from the ch12 folder, and save it in the phpsols site root as
gallery.php. You also need to copy title.inc.php, menu.inc.php, and footer.inc.php to the
includes folder of the phpsols site. If your editing program asks if you want to update the links in the
files, choose the option not to update.
1. Load gallery.php into a browser to make sure that it displays correctly. The maincontent
part of the page should look like Figure 12-4, with one thumbnail image and a larger version of
the same image.
Figure 12-4. The stripped-down version of the static gallery ready for conversion
2. The gallery depends on a connection to the database, so include connection.inc.php,
create a read-only connection to MySQL, and define the SQL query. Add the following code
just before the closing PHP tag above the DOCTYPE declaration in gallery.php (new code is
highlighted in bold):
include('./includes/title.inc.php');
require_once('./includes/connection.inc.php');
CHAPTER 12
340
$conn = dbConnect('read');
$sql = 'SELECT filename, caption FROM images';
If you are using PDO, add 'pdo' as the second argument to dbConnect().
3. The code for submitting the query and extracting the first record from the result depends on
which method of connection you are using.
For MySQLi, use this:
// submit the query
$result = $conn->query($sql) or die(mysqli_error());
// extract the first record as an array
$row = $result->fetch_assoc();
For PDO, use this:
// submit the query
$result = $conn->query($sql);
// get any error messages
$error = $conn->errorInfo();
if (isset($error[2])) die($error[2]);
// extract the first record as an array
$row = $result->fetch();
To display the first image when the page loads, you need to get the first result on its own. The
code for both MySQLi and PDO submits the query, extracts the first record, and stores it in
$row.
4. You now have the details of the first record image stored as $row['filename'] and
$row['caption']. In addition to the filename and caption, you need the dimensions of the
large version so that you can display it in the main body of the page. Add the following code
immediately after the code in the preceding step:
// get the name and caption for the main image
$mainImage = $row['filename'];
$caption = $row['caption'];
// get the dimensions of the main image
$imageSize = getimagesize('images/'.$mainImage);
The getimagesize() function was described in Chapters 4 and 8.
5. You can now use this information to display the thumbnail, main image, and caption
dynamically. The main image and thumbnail have the same name, but you eventually want to
display all thumbnails by looping through the full result set, so the dynamic code that goes in
the table cell needs to refer to the current record—in other words, $row['filename'] and
$row['caption'], rather than to $mainImage and $caption. Youll see later why Ive
assigned the values from the first record to separate variables. Amend the code in the table
like this:
<td><a href="gallery.php"> ➥
<img src="images/thumbs/<?php echo $row['filename']; ?>" ➥