Giải pháp thiết kế web động với PHP - p 48 docx
Bạn đang xem bản rút gọn của tài liệu. Xem và tải ngay bản đầy đủ của tài liệu tại đây (564.1 KB, 10 trang )
MANAGING MULTIPLE DATABASE TABLES
451
} else {
$sql = 'UPDATE blog SET image_id = NULL, title = ?, article = ?
WHERE article_id = ?';
$stmt->prepare($sql);
$stmt->bind_param('ssi', $_POST['title'], $_POST['article'],
$_POST['article_id']);
}
$stmt->execute();
$done = $stmt->affected_rows;
}
The last two lines of this code block execute the prepared statement that updates the record in
the blog table, and then assign the number of affected rows to $done. If you update a record,
the affected_rows property is 1, which is treated as true. However, if you dont make any
changes to the record, affected_rows is 0, which is treated as false. If you update only the
categories associated with a record, without changing the record itself, $done is interpreted as
false, and you wont be returned to blog_list_mysqli.php.
Delete the following line:
$done = $stmt->affected_rows;
6. Assign the return value of $stmt->execute() to $done like this:
$done = $stmt->execute();
The execute() method returns true if the prepared statement is executed successfully, even if
it doesnt result in any changes to the record.
7. Immediately after the line you have just edited, insert the code to delete existing values in the
cross reference table and to insert the newly selected values like this:
$done = $stmt->execute();
// delete existing values in the cross-reference table
$sql = 'DELETE FROM article2cat WHERE article_id = ?';
$stmt->prepare($sql);
$stmt->bind_param('i', $_POST['article_id']);
$stmt->execute();
// insert the new values in articles2cat
if (isset($_POST['category']) && is_numeric($_POST['article_id'])) {
$article_id = (int) $_POST['article_id'];
foreach ($_POST['category'] as $cat_id) {
$values[] = "($article_id, " . (int) $cat_id . ')';
}
if ($values) {
$sql = 'INSERT INTO article2cat (article_id, cat_id)
VALUES ' . implode(',', $values);
if (!$conn->query($sql)) {
$catError = $conn->error;
CHAPTER 16
452
}
}
}
}
This code needs little explanation. The DELETE query removes all entries in the cross-reference
table that match article_id. The remaining code inserts the values selected in the update
form. Its identical to the code in step 4 of PHP Solution 16-4. The key thing to note is that it uses
an INSERT query, not UPDATE. The original values have been deleted, so youre adding them
anew.
8. Save blog_update_mysqli.php, and test it by updating existing records in the blog table. You
can check your code, if necessary, against blog_update_mysqli_06.php in the ch16 folder.
The PDO version is in blog_update_pdo_06.php.
Preserving referential integrity on deletion
In PHP Solution 16-5, there was no need to worry about referential integrity when you deleted records in the
cross-reference table because the values stored in each record are foreign keys. Each record simply refers
to the primary keys stored in the blog and categories tables. Referring to Figure 16-1 at the beginning of
this chapter, deleting from the cross-reference table the record that combines article_id 2 with cat_id 1
simply breaks the link between the article titled “Trainee Geishas Go Shopping” and the Kyoto category.
Neither the article nor the category is affected. They both remain in their respective tables.
The situation is very different if you decide to delete either the article or the category. If you delete the
“Trainee Geishas Go Shopping” article from the blog table, all references to article_id 2 must also be
deleted from the cross-reference table. Similarly, if you delete the Kyoto category, all references to cat_id
1 must be removed from the cross-reference table. Alternatively, you must halt the deletion if an items
primary key is stored elsewhere as a foreign key.
The best way to do this is through the establishment of foreign key restraints. To do so, you need to convert
the storage engine of related tables to InnoDB.
PHP Solution 16-6: Converting tables to the InnoDB storage engine
This PHP solution shows how to use phpMyAdmin to convert the storage engine of database tables from
MyISAM to InnoDB. If you plan to upload the tables to your remote server, it must also support InnoDB (see
PHP Solution 16-1).
1. Select the phpsols database in phpMyAdmin, and then select the article2cat table.
2. Click the Operations tab at the top right of the screen.
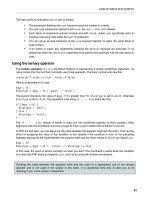
3. In the Table options section, select InnoDB from the Storage Engine drop-down menu, as
shown in Figure 16-10.
Download from Wow! eBook <www.wowebook.com>
MANAGING MULTIPLE DATABASE TABLES
453
Figure 16-10. Changing a tables storage engine is very easy in phpMyAdmin.
4. Click Go. Changing the storage engine is as simple as that!
5. All tables related to each other through foreign key relationships need to use InnoDB. Repeat
steps 1–4 with the blog, categories, and images tables.
PHP Solution 16-7: Setting up foreign key constraints
This PHP solution describes how to set up foreign key constraints between the article2cat, blog, and
category tables in phpMyAdmin. The foreign key constraints must always be defined in the child table. In
this this case, the child table is article2cat, because it stores the article_id and cat_id primary keys
from the other tables as foreign keys.
1. Select the article2cat table in phpMyAdmin, and click the Structure tab.
2. Click Relation view (circled in Figure 16-11) at the bottom of the structure table.
Figure 16-11. Foreign key constraints are defined in phpMyAdmins Relation view.
3. Foreign key constraints can be set up only on columns that are indexed. The article_id and
cat_id columns in article2cat are the tables composite primary key, so theyre both listed in
the screen that opens. If your version of phpMyAdmin has an option labeled Internal relations,
you can ignore it. The section youre interested in is labeled FOREIGN KEY (INNODB).
In the article_id row, click the down arrow to the left of ON DELETE to reveal the list of
indexed columns in the database, and select `phpsols`.`blog`.`article_id` as shown in
CHAPTER 16
454
Figure 16-12. This will be used to establish a formal foreign key relationship between article_id
in the article2cat table and article_id in the blog table.
Figure 16-12. Selecting the primary key in the parent table
The ON DELETE drop-down menus have the following options:
CASCADE: When you delete a record in the parent table, all dependent records are
deleted in the child table. For example, if you delete the record with the primary key
article_id 2 in the blog table, all records with article_id 2 in the article2cat
table are automatically deleted.
SET NULL: When you delete a record in the parent table, all dependent records in
the child table have the foreign key set to NULL. The foreign key column must accept
NULL values.
NO ACTION: On some database systems, this allows foreign constraint checks to
be delayed. MySQL performs checks immediately, so this has the same effect as
RESTRICT.
RESTRICT: This prevents the deletion of a record in the parent table if dependent
records still exist in the child table.
The same options are available for ON UPDATE. With the exception of RESTRICT, they are of limited
interest, because you should change the primary key of a record only in exceptional circumstances. ON
UPDATE RESTRICT not only stops changes being made to the primary key in the parent table; it also
rejects any inserts or updates in the child table that would result in foreign key values that dont have a
match in the parent table.
In the case of a cross-reference table, CASCADE is the logical choice. If you decide to delete a
record in the parent table, you want all cross-references to that record to be removed at the
same time. However, to demonstrate the default behavior of foreign key constraints, select
RESTRICT. Leave ON UPDATE blank.
4. In the cat_id row, select `phpsols`.`categories`.`cat_id` from the drop-down menu
immediate to the left of ON DELETE, and set ON DELETE to RESTRICT. Click Save.
If RESTRICT isnt available in the drop-down menu, leave the option blank
5. If you have not already done so, update at least one blog entry to associate it with a category.
MANAGING MULTIPLE DATABASE TABLES
455
6. In phpMyAdmin, select the categories table, and click the Dele t e icon next to a category that
you know to be associated with a blog entry, as shown in Figure 16-13.
Figure 16-13. Click the large red X to delete a record in phpMyAdmin.
7. Click OK when phpMyAdmin asks you to confirm the deletion. If you have set up the foreign key
constraints correctly, youll see the error message shown in Figure 16-14.
Figure 16-14. The foreign key constraint prevents the deletion if dependent records exist.
8. Select the article2cat table, and click the Structure tab. Then click Relation view. In all
probability, the ON DELETE options will be blank. This is not a cause for concern, RESTRICT is
the default for both ON DELETE and ON UPDATE. Leaving these options blank has the same
effect as selecting RESTRICT.
9. Change both ON DELETE settings to CASCADE, and click Save.
10. Select a record in the blog table that you know is associated with a category, and delete it.
11. Check the article2cat table. The records associated with the record you have just deleted
have also been deleted.
To continue your exploration of foreign key constraints, select the blog table, and establish a foreign key
relationship with image_id in the images table. If you delete a record from the images table, the image_id
foreign key in the blog table needs to be set to NULL. This is done automatically if you set the value of ON
DELETE to SET NULL. Test it by deleting a record from the images table and checking the associated
record(s) in the blog table.
If you need to convert an InnoDB table back to MyISAM, you must first remove any foreign key
constraints. Select Relation view, set all fields to blank, and click Save. After removing the foreign key
relationships, you can change the storage engine as described in PHP Solution 16-6. Select MyISAM
instead of InnoDB.
CHAPTER 16
456
Creating delete scripts with foreign key constraints
Choosing the values for ON DELETE in InnoDB tables depends on the nature of the relationship between
tables. In the case of the phpsols database, its not only safe but desirable to set the option to CASCADE
for both columns in the article2cat cross-reference table. If a record is deleted in either the blog or
categories parent table, the related values need to be deleted in the cross-reference table.
The relationship between the images and blog tables is different. If you delete a record from the images
table, you probably dont want to delete related articles in the blog table. In that case, SET NULL is an
appropriate choice. When a record is deleted from the images table, the foreign key in related articles is set
to NULL, but the articles remain intact.
On the other hand, if images are vital to the understanding of articles, select RESTRICT. Any attempt to
delete an image that still has related articles is automatically halted.
These considerations affect how you handle deletion scripts. When the foreign key constraint is set to
CASCADE or SET NULL, you dont need to do anything special. You can use a simple DELETE query and
leave the rest to MySQL.
However, if the foreign key constraint is set to RESTRICT, the DELETE query will fail. To display an
appropriate error message, use the errno property of a MySQLi statement object. The MySQL error code for
a query that fails as a result of a foreign key constraint is 1451. After calling the execute() method, you can
check for errors like this in MySQLi:
$stmt->execute();
if ($stmt->affected_rows > 0) {
$deleted = true;
} else {
$deleted = false;
if ($stmt->errno == 1451) {
$error = 'That record has dependent files in a child table, and cannot be
deleted.';
} else {
$error = 'There was a problem deleting the record.';
}
}
If you are using PDO, use the errorCode() method. The code for a query that fails as a result of a foreign
key constraint is HY000. After checking the number of affected rows with rowCount(), you can check the
error code like this with PDO:
$deleted = $stmt->rowCount();
if (!$deleted) {
if ($stmt->errorCode() == 'HY000') {
$error = 'That record has dependent files in a child table, and cannot be
deleted.';
} else {
$error = 'There was a problem deleting the record.';
}
}
MANAGING MULTIPLE DATABASE TABLES
457
The error codes in the PDO and MySQLi versions are different because PDO uses the codes defined by
the ANSI SQL standard, whereas MySQLi uses MySQL-specific codes.
Creating delete scripts without foreign key constraints
If you cant use InnoDB tables, you need to build the same logic into your own delete scripts. To achieve the
same effect as ON DELETE CASCADE, run two consecutive DELETE queries like this:
$sql = 'DELETE FROM article2cat WHERE article_id = ?';
$stmt->prepare($sql);
$stmt->bind_param('i', $_POST['article_id']);
$stmt->execute();
$sql = 'DELETE FROM blog WHERE article_id = ?';
$stmt->prepare($sql);
$stmt->bind_param('i', $_POST['article_id']);
$stmt->execute();
To achieve the same effect as ON DELETE SET NULL, run an UPDATE query combined with a DELETE query
like this:
$sql = 'UPDATE blog SET image_id = NULL WHERE image_id = ?';
$stmt->prepare($sql);
$stmt->bind_param('i', $_POST['image_id']);
$stmt->execute();
$sql = 'DELETE FROM images WHERE image_id = ?';
$stmt->prepare($sql);
$stmt->bind_param('i', $_POST['image_id']);
$stmt->execute();
To achieve the same effect as ON DELETE RESTRICT, you need to run a SELECT query to find if there are
dependent records before continuing with the DELETE query like this:
$sql = 'SELECT image_id FROM blog WHERE image_id = ?';
$stmt->prepare($sql);
$stmt->bind_param('i', $_POST['image_id']);
$stmt->execute();
// if num_rows is not 0, there are dependent records
if ($stmt->num_rows) {
$error = 'That record has dependent files in a child table, and cannot be deleted.';
} else {
$sql = 'DELETE FROM images WHERE image_id = ?';
$stmt->prepare($sql);
$stmt->bind_param('i', $_POST['image_id']);
$stmt->execute();
}
CHAPTER 16
458
Chapter review
Once you have learned basic SQL and the PHP commands to communicate with a database, working with
single tables is very easy. Linking tables through foreign keys, however, can be quite challenging. The
power of a relational database comes from its sheer flexibility. The problem is that this infinite flexibility
means there is no single “right” way of doing things.
Dont let this put you off, though. Your instinct may be to stick with single tables, but down that route lies
even greater complexity. The key to making it easy to work with databases is to limit your ambitions in the
early stages. Build simple structures like the one in this chapter, experiment with them, and get to know how
they work. Add tables and foreign key links gradually. People with a lot of experience working with databases
say they frequently spend more than half the development time just thinking about the table structure. After
that, the coding is the easy bit!
In the final chapter, we move back to working with a single table—addressing the important subject of user
authentication with a database and how to handle encrypted passwords.
459
Chapter 17
Authenticating Users with a Database
Chapter 9 showed you the principles of user authentication and sessions to password protect parts of
your website, but the login scripts all relied on usernames and passwords stored in text files. Keeping user
details in a database is both more secure and more efficient. Instead of just storing a list of usernames
and passwords, a database can store other details, such as first name, family name, email address, and
so on. MySQL also gives you the option of using either one- or two-way encryption. In the first section of
this chapter, well examine the difference between the two. Then youll create registration and login scripts
for both types of encryption.
What this chapter contains:
• Deciding how to encrypt passwords
• Using one-way encryption for user registration and login
• Using two-way encryption for user registration and login
• Decrypting passwords
Choosing an encryption method
The PHP solutions in Chapter 9 use the SHA-1 encryption algorithm. It offers a high level of security,
particularly if used in conjunction with a salt (a random value thats added to make decryption harder).
SHA-1 is a one-way encryption method: once a password has been encrypted, theres no way of
converting it back to plain text. This is both an advantage and a disadvantage. It offers the user greater
security because passwords encrypted this way remain secret. However, theres no way of reissuing a
lost password, since not even the site administrator can decrypt it. The only solution is to issue the user a
temporary new password, and ask the user to reset it.
The alternative is to use two-way encryption, which relies on a pair of functions: one to encrypt the
password and another to convert it back to plain text, making it easy to reissue passwords to forgetful
users. Two-way encryption uses a secret key that is passed to both functions to perform the conversion.
The key is simply a string that you make up yourself. Obviously, to keep the data secure, the key needs to
be sufficiently difficult to guess and should never be stored in the database. However, you need to embed
CHAPTER 17
460
the key in your registration and login scripts—either directly or through an include file—so if your scripts
are ever exposed, your security is blown wide apart. MySQL offers a number of two-way encryption
functions, but AES_ENCRYPT() is considered the most secure. It uses the Advanced Encryption Standard
with a 128-bit key length (AES-128) approved by the U.S. government for the protection of classified
material up to the SECRET level (TOP SECRET material requires AES-192 or AES-256).
Both one-way and two-way encryption have advantages and disadvantages. Many security experts
recommend that passwords should be changed frequently. So, forcing a user to change a forgotten
password because it cant be decrypted could be regarded as a good security measure. On the other
hand, users are likely to be frustrated by the need to deal with a new password each time they forget the
existing one. Ill leave it to you to decide which approach is best suited to your circumstances, and Ill
concentrate solely on the technical implementation.
Using one-way encryption
In the interests of keeping things simple, Im going to use the same basic forms as in Chapter 9, so only
the username, salt, and encrypted password are stored in the database.
Creating a table to store users details
In phpMyAdmin, create a new table called users in the phpsols database. The table needs four columns
(fields) with the settings listed in Table 17-1.
Table 17-1. Settings for the users table
Field Type Length/Values Attributes Null Index A_I
user_id INT UNSIGNED
Deselected
PRIMARY
Selected
username VARCHAR 15
Deselected
UNIQUE
salt INT UNSIGNED
Deselected
pwd CHAR 40
Deselected
To ensure no one can register the same username as one thats already in use, the username column is
given an UNIQUE index.
In Chapter 9, the username doubled as the salt, but storing the details in a database means that you can
choose something more unique and difficult to guess. Although a Unix timestamp follows a predictable
pattern, it changes every second. So even if an attacker knows the day on which a user registered, there
are 86,400 possible values for the salt, which would need to be combined with every attempt to guess the
password. So the salt column needs to store an integer (INT).
The pwd column, which is where the encrypted password is stored, needs to be 40 characters long
because the SHA-1 algorithm always produces an alphanumeric string of that length. Its a fixed length, so
CHAR is used in preference to VARCHAR. The CHAR data type is more efficient when dealing with fixed-length
strings.