Bắt đầu với IBM Websphere smash - p 6 doc
Bạn đang xem bản rút gọn của tài liệu. Xem và tải ngay bản đầy đủ của tài liệu tại đây (525.01 KB, 10 trang )
ptg
This page intentionally left blank
Download from www.wowebook.com
ptg
33
Introduction
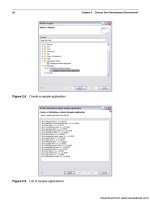
In the previous chapter, you learned how to create a simple WebSphere sMash application using
one of the Tools options. That application demonstrated simple file serving in a WebSphere
sMash environment. To create a more complex application, we need to understand the structure
of a typical WebSphere sMash application. In this chapter, we look at how to use conventions in
the layout of your application to obtain default behaviors that can save you time and code. Web
applications are built on request/response models, and we show you how to easily create handlers
that process these requests. We create a slightly more complex application to illustrate some of
these principles. In this chapter, we touch on a number of topics to help you quickly create appli-
cations. We cover these topics in more detail in later chapters.
Application Directory Layout
One of the principles of radically simplified development environments is “convention over con-
figuration.” This phrase simply means that, where possible, convention should be used to define
application structure and behavior. Convention allows developers to take advantage of common
coding patterns, thus allowing them to specify only where their application differs from the norm.
In most cases, following the convention is sufficient; where it is not, configuration is required.
WebSphere sMash applications are constructed using sets of conventions. We will try to
call out significant conventions as we go and explain how to bypass the conventions using config-
uration when necessary.
The first set of conventions we discuss is the directory layout of a WebSphere sMash appli-
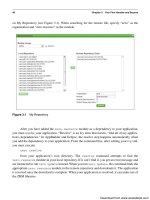
cation. When you created your first application in Chapter 2, “Choose Your Development Envi-
ronment,” you may have noticed that several directories were automatically created for you. This
C
H A P T E R
3
Your First Handler
and Beyond
Download from www.wowebook.com
ptg
34 Chapter 3 Your First Handler and Beyond
directory structure was copied from an application template. That application template defines
what it means to be a WebSphere sMash application. The WebSphere sMash tooling assumes that
all applications follow this template.
In general, you should not change the predefined directories or try to circumvent their
intent. Use them as intended, and you will be on the “happy path” to a working application that is
easy to understand, maintain, and extend. The exception to this rule might be if you have an
existing application that you are trying to port to a WebSphere sMash environment. However,
even in that scenario, you may find that it is easier to use the WebSphere sMash default directory
structure.
Here is a tree view of a typical WebSphere sMash application directory structure:
+ zero
| + private
| \ shared
+ app
| + errors
| + models
| | \ fixtures
| + resources
| + scripts
| \ views
+ classes
+ config
+ export
+ java
+ lib
+ logs
+ META-INF
+ public
\—-reports
Source Directories
The most important directories in a WebSphere sMash application are app, public, and possibly
java. These are the directories where you will put the majority of your application code. The
other directories are supporting directories.
Some directories are automatically made available to client applications through a file-
serving handler—that is, the files in these directories are published and available to web requests
on the application’s port. We identify these directories so that you are aware that these files are
visible to users, applications, and browsers.
Download from www.wowebook.com
ptg
Application Directory Layout 35
• The public directory (file-served) is where you put the files that you want to publish
through HTTP or HTTPS. This directory is the primary directory for your web files.
Place all of your public HTML, CSS, and JavaScript™ files here.
• The app directory contains a set of subdirectories that provide a structural convention
for building your application.
• The app/errors subdirectory (file-served) is a published directory that contains web files
that render error pages. The error pages are typically written in HTML, Groovy, Groovy
templates, or PHP. If you want to create a custom error page to handle the HTTP error code
404 (FILE_NOT_FOUND), for example, you would create the file in this directory. You
can find additional details about this directory in Chapter 6, “Response Rendering.”
• The app/models directory contains Zero Resource Model (ZRM) model files and
fixtures (initial data for priming your database). ZRM is a WebSphere sMash framework
for quickly generating REST-based applications. A ZRM model defines the schema for
your REST resources.
• The app/resources directory (file-served) contains the handlers that respond to
REST requests for your application’s resources. Handlers are written in Groovy or PHP.
You can wri te h an dle rs i n Java a s we ll , but t he J ava fil es a re p ut i nt o th e java d ire ct ory
rather than here.
• The app/scripts directory contains script files (for example, Groovy and PHP) that
are used as library files. These files aren’t served directly. You access them from your
published files in other directories.
• The app/views directory (file-served) contains files for rendering a view in an app that
follows the Model-View-Controller (MVC) pattern. The files can be written in Groovy,
the Groovy template language, or PHP.
• The app/zwidgets directory (file-served) contains Dojo widgets. Dojo widgets are
JavaScript widgets written using the Dojo JavaScript framework.
• The app/iwidgets directory (file-served) contains iWidget widgets. iWidgets are web-
served widgets that are described in an XML file using the iWidget metadata format.
• The java directory is where you put your Java source files. You should, of course, put
your source files in subdirectories corresponding to their Java package, just as in other
Java environments.
Supporting Directories and Files
When you create a WebSphere sMash application, a lot of functionality is enabled for you out-of-
the-box. Some of this functionality appears in the supporting files and directories created for your
application. Depending on the development tool you’re using, some of these files and directories
are hidden. They typically start with a dot and are managed by WebSphere sMash processes. You
won’t usually need to worry about them, but we describe them here for completeness.
Download from www.wowebook.com
ptg
36 Chapter 3 Your First Handler and Beyond
• The .classpath file contains your app’s Java classpath. This file is generated for you
automatically when your application is resolved. Application resolution is a process for
determining and locating the specific code packages your application needs to run. Any
classes compiled from Java or Groovy files or contained in JAR files in your lib direc-
tory are automatically included in the classpath.
• The .project file enables your application to be imported into Eclipse as a project.
• The .zero directory contains a number of intermediate files that are generated by Web-
Sphere sMash. For example, it contains the .zero/private/resolved.properties
file, which contains a list of the specific dependency files located for this application the last
time it was resolved. The .zero directory also contains files with application runtime state.
• The classes directory contains compiled Java classes.
• The config directory contains, obviously, your application’s configuration files. There
are a number of important files in here. However, configuration is covered in much more
detail in Chapter 4, “Configuration Files Explained.”
• config/ivy.xml describes the external modules on which your application depends. It also
declares the name and version of your application if you choose to package it as a module.
• config/php.ini contains configuration options, such as logging and extensions, for
PHP-based applications. More details can be found in the php.ini file itself.
• config/zero.config is the primary configuration file for your application. You can con-
figure your application’s port, database connections, and security rules in zero.config.
• The lib directory is where you put standalone Java JAR files that you want to use in
your application. You don’t need to put JAR files in here that are already bundled into
one of your external dependencies.
• The logs directory contains log files for your application. By default, you get a rotating
set of trace and log files (error-0.0.log and trace-0.0.log are the newest) and an
HTTP access log.
• The reports directory contains a detailed report of which external modules were
found when your application’s dependencies were resolved. To view the report, open up
the .xml file in this directory in a web browser. You should see a nicely formatted report.
REST
You now know wh at a We bS phe re sM as h app lic ati on l oo ks li ke on th e file syst em , but we h aven’t
actually described what an app looks like from an architectural perspective. Although there are a
number of ways to design a WebSphere sMash app, there is a prevailing and preferred architec-
tural style. That style is REpresentational State Transfer, or REST.
REST is a term and concept that was introduced by Roy Fielding, one of the authors of the
HTTP specification. REST is an architectural style that gets back to the basics of HTTP. The
Download from www.wowebook.com
ptg
REST 37
Table 3.1 HTTP Methods
Action HTTP
Method
URI Format with Sample
List resources in a
collection.
GET /resources/<resource-collection>
/resources/bookmarks
Retrieve a particular
resource.
GET /resources/<resource-collection>/<resource-id>
/resources/bookmarks/10240
Create a new resource. POST /resources/<resource-collection>
resources/bookmarks
interface of a RESTful application is defined in terms of standard HTTP methods and structures.
This approach contrasts protocols like SOAP or RPC, where interactions with services are
embedded in message bodies. By using HTTP as it was intended, a developer gains advantages in
interoperability, cacheability, and scalability.
RESTful HTTP applications describe application data and state as URI-addressable
resources. State is not stored in session objects or cookies. Clients interact with these server-based
resources using standard HTTP methods: GET, PUT, POST, and DELETE. REST applications are
often compared to database applications, which offer a CRUD (Create, Retrieve, Update, and
Delete) interface. The HTTP methods are used to provide a CRUD interface on the REST resources.
WebSphere sMash has conventions for describing resources with URIs, and conventions
for interacting with those resources using HTTP methods. These conventions can be overridden
through configuration if necessary.
Relative URIs for WebSphere sMash resources take this form:
/resources/<resource-collection>/<resource-id>
For example, if we have a resource that describes a collection of bookmarks stored on the
server, the relative URI to address that collection could be /resources/bookmarks. To address
a specific bookmark within that collection, we might use a URI like this:
/resources/bookmarks/10240
Yo u m i gh t n ot ic e t h a t t h e r e la tive U RI s t ar ts w it h /resources. It’s not a coincidence that there
is a subdirectory in aWebSphere sMash application’s app directory called resources. It’s a conven-
tion. The /app/resources directory contains pieces of code called handlers that “handle” requests
for resources in the /resources URI namespace. Again, by convention, the filename of the handler cor-
responds to the resource name for which it handles requests. In our bookmarks example, we might
have a “bookmarks” handler written in the Groovy language. The file structure would look like this:
app/resources/bookmarks.groovy
Table 3.1 lists HTTP methods and how they are interpreted in a REST application.
Download from www.wowebook.com
ptg
38 Chapter 3 Your First Handler and Beyond
Table 3.1 HTTP Methods
Action HTTP
Method
URI Format with Sample
Update a resource. PUT /resources/<resource-collection>/<resource-id>
/resources/bookmarks/10240
Delete a resource. DELETE /resources/<resource-collection>
/resources/bookmarks/10240
REST with the Zero Resource Model (ZRM)
How do you create a REST application with WebSphere sMash? There are actually a few differ-
ent ways, but, like most programmers, we start with the easiest. WebSphere sMash provides a
framework for developing REST applications called the Zero Resource Model (ZRM).
Some application frameworks start at the database level and work their way up to the client
application. Other frameworks start at the GUI and work their way down to the database. ZRM
starts in the middle.
Earlier in the chapter, we discussed an application that managed a collection of web book-
marks. We already described what the URI structure of the bookmark resources might look like;
now let’s look at describing the data structure of the bookmark resources. Defining your resource
model or data structure is the first step in writing a RESTful app with ZRM. In ZRM, the data
structure is described using JSON syntax.
JSON (also known as JavaScript Object Notation) is a language-independent data format that
happens to be extremely easy to parse with JavaScript. As such, it is an ideal data format for REST
applications, which often have JavaScript clients. JSON is also pretty easy for humans to read.
JSON data is defined using arrays, objects, and name-value pairs. JSON arrays are delin-
eated with square brackets, and JSON objects are delineated with braces. When passing JSON to
or from a REST service, you should generally pass a single JSON objects rather than a list of dis-
creet parameters for ease of parsing. We discuss how to parse JSON objects in JavaScript later in
this chapter. For more information on JSON, see .
Now, let’s build on our earlier example. First, we need to create an application, using one of
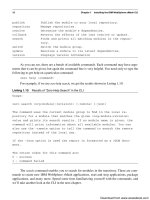
the tools described in the previous chapters. For simplicity, we use the command line interface.
Create an application called Bookmarks, using the following command:
zero create Bookmarks
Note that the application name can be anything; it doesn’t need to correspond to the name
of the resource handler or resource model.
For our bookmarks model, we will start simple. We need a URL, a name, and a category.
The model, by convention, is a .json file placed in the /app/models directory. So, we create a
Download from www.wowebook.com
ptg
REST with the Zero Resource Model (ZRM) 39
file called /app/models/bookmarks.json in our Bookmarks application directory. The con-
tent of the file is a JSON object that looks like Listing 3.1.
Listing 3.1 Bookmarks Model
{
"fields": {
"url": {
"label": "URL",
"required": true,
"type": "string",
"description": "",
"default_value": "",
"max_length": 1024
},
"name": {
"label": "Name",
"required": true,
"type": "string",
"description": "",
"default_value": "",
"max_length": 80
},
"category": {
"label": "Category",
"required": false,
"type": "string",
"description": "",
"default_value": "",
"max_length": 50
}
}
}
The three fields we defined are url, name, and category. Each field has some self-
explanatory metadata that describes the field. The one piece of metadata that might need further
explanation is the label. The label is used by clients to present the field to the user, typically in a
form or a table. The label is meant to be more human-readable than the field name itself.
The model is used to generate database tables for your resources. Before we can do that,
though, we should create some sample data to put into the database. The initial data that we want
Download from www.wowebook.com
ptg
40 Chapter 3 Your First Handler and Beyond
to put into the database is called a fixture, so it gets put into a file named /app/models/fixtures/
initial_data.json. Again, this filename is the convention used by ZRM. The format of the file
is a JSON array of resource instances. Note that the “type” field refers to the name of the model file,
“bookmarks” (see Listing 3.2).
Listing 3.2 Bookmarks Fixture
[
{
"type": "bookmarks",
"fields": {
"url": "",
"name": "IBM",
"category": "Software Companies"
}
},
{
"type": "bookmarks",
"fields": {
"url": "",
"name": "Project Zero",
"category": "Development"
}
},
{
"type": "bookmarks",
"fields": {
"url": "",
"name": "Groovy",
"category": "Development"
}
}
]
Now that we’ve created our model file and our initial data file, we can tell WebSphere
sMash to automatically create a database for us. There are a couple of steps involved here. The
first step is to declare that our application is going to use the ZRM libraries. This is called declar-
ing a dependency.
Download from www.wowebook.com
ptg
REST with the Zero Resource Model (ZRM) 41
Declaring a Dependency
WebSphere sMash uses a dependency management system called Ivy. WebSphere sMash appli-
cations and libraries are packaged into Ivy modules, which are just ZIP files containing code and
an Ivy metadata file that describes the package and the modules it requires. The Ivy metadata file
is called an “Ivy file” and is always named ivy.xml. The modules that are required by the package
are called dependencies.
In our scenario, we want to declare that our bookmark application requires the ZRM
libraries. The ZRM libraries are stored in an Ivy module called zero.resource. Most of the
modules supplied by WebSphere sMash have zero. as a prefix. To add zero.resource as a
dependency, we must edit our application’s Ivy file.
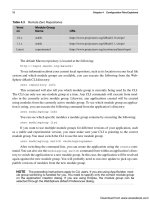
If you are using the WebSphere sMash CLI, edit the /config/ivy.xml file and add the line
in bold, as shown in Listing 3.3. This entry should be entered as a single line in the file. We pro-
vide a more in-depth explanation of Ivy configuration files in the next chapter.
Listing 3.3 Ivy Configuration File
<ivy-module version="1.3">
<info module="Bookmarks" organisation="zero" revision="1.0.0">
<license name="type of license" url="e"/>
<ivyauthor name="author name" url="e"/>
<description homepage="e"/>
</info>
<publications>
<artifact type="zip"/>
</publications>
<dependencies>
<dependency org="zero" name="zero.core" rev="[1.0.0.0, \
3.0.0.0 ["/>
<dependency org="zero" name="zero.resource"
rev="[1.0.0.0, 3.0.0.0["/>
</dependencies>
</ivy-module>
If you are using App Builder or Eclipse, you can either edit your ivy.xml file source as
shown previously, or add the zero.resource dependency using the UI. In App Builder, depend-
encies are added using the Dependencies tab. If you are using Eclipse, opening ivy.xml opens up
an editor that lets you add dependencies. Before the dependency can be added to your application,
it must be downloaded to your computer from an Ivy remote repository. If the zero.resource mod-
ule is not already in your local repository (on your computer), it can be downloaded by clicking
Download from www.wowebook.com