Bắt đầu với IBM Websphere smash - p 20 pps
Bạn đang xem bản rút gọn của tài liệu. Xem và tải ngay bản đầy đủ của tài liệu tại đây (759.41 KB, 10 trang )
ptg
172 Chapter 8 Database Access
Databases Supported in WebSphere sMash
Before we begin, we need to cover the database vendors supported in WebSphere sMash. Vendors
not listed will probably work as long as they support JDBC, and you can acquire the necessary
driver files required to connect to the database server. The database vendors that are supported
and known to work with WebSphere sMash are as follows:
• Apache Derby
• MySQL
• IBM® DB2®
• Informix
• Microsoft® SQL Server®
• Oracle
Configuration Settings
As with most things in WebSphere sMash, we need to start by configuring our application
dependencies. To use database accesses in the application, you need to first add the zero.data
dependency, as shown here:
<dependency name="zero.data" org="zero"
rev="[2.0.0.0,3.0.0.0["/>
The next step is to define the database connections. There are only a couple items to be con-
cerned about here, such as defining the database driver, and the connection details. If you are
impatient, skip ahead to the ZRM discussion, because WebSphere sMash will work automatically
with the embedded Apache Derby database with no configuration requirements.
All database connection information is placed inside /config/db stanzas in the
/config/zero.config file. For each database connection configuration, there needs to be a
named database section that is used to access the manager associated with that connection. The
name should be symbolic of the data accessed more than any particular connection specifics. For
the samples used in this chapter, we use the name bookmark, because we’ll be accessing a data-
base of URL references that may be shared among several users.
Within the configuration stanza, a driver name must be defined that indicates the actual
JDBC class to be used to access the data. It is preferred to use a normal JDBC Type 4 driver.
These are pure Java solutions and do not require any special operating system configuration. Just
place the appropriate JAR file inside the environment CLASSPATH or preferably add it to the
application’s /lib directory. Non-Type 4 drivers can be used, but you must supply any external
configuration settings to make them operational.
Listing 8.1 shows a generic database connection configuration. We cover specific configura-
tions needed for each database type, but this should give you an idea of the information required.
Download from www.wowebook.com
ptg
Configuration Settings 173
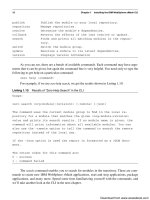
Figure 8.1 Zero encode command to hide passwords
Listing 8.1 Generic Database Connection Configuration
/config/db/employee {
"class" : "{Java driver name}",
"serverName" : "{host.domain.com}",
"portNumber" : {portNumber},
"databaseName" : "{Database name}",
"username" : "{User name}",
"password" : "<xor>Lz4sLCgwLTs="
}
As noted previously, it is preferred to obfuscate any configuration password field using
XOR encoding. It won’t stop a bad guy from figuring out the real password, but it will keep hon-
est people honest. And besides, why are you allowing bad guys to look at your configuration files
anyway? Use the smash command line and run zero encode mypassword to encode a pass-
word, as shown in Figure 8.1. Use the XOR’d results in place of the real password.
In the following sections are configuration settings for common database servers. Every
installation is different, and it is up to you and your favorite database administrator to determine
the exact settings required to connect to your database server.
Apache Derby
Apache Derby is an embedded database solution used for WebSphere sMash. The nice thing
about using Derby is that the drivers are automatically included, and you do not need any special
environment to start using the embedded database. This is the default database used if not explic-
itly defined in the application’s configuration.
To use a local “embedded” Derby database, add the following module dependency into
your application:
<dependency name="derby" org="org.apache.derby"
rev="[10.3.0.0, 10.4.0.0["/>
Download from www.wowebook.com
ptg
174 Chapter 8 Database Access
By default, just adding this dependency to your application will enable automatic use of a
default Derby instance created within the application structure created in the /db directory. If you
want to define an alternative location to create or use an existing Derby database instance, create
a custom derby configuration stanza similar to that shown in Listing 8.2.
Listing 8.2 Embedded Derby Database Configuration
# Derby Embedded
/config/db/bookmark = {
"class" : "org.apache.derby.jdbc.EmbeddedDataSource",
"databaseName" : "db/smashdb",
"createDatabase" : "create"
}
Tables are created or used underneath the defined databaseName attribute. This value is
relative to the smash application. The embedded version of Derby has a unique attribute called
"createDatabase", as shown in Listing 8.2, which automatically creates a database upon first
access if it does not already exist. This enables you to create new databases on-the-fly but can
cause confusion if the databaseName path changes and new tables are created, when you expect
them to be read from an alternative location. Just be aware of the database path and ensure that
it’s what you expect it to be.
If you are using a networked version of Derby, use the client module instead:
<dependency name="derbyclient" org="org.apache.derby"
rev="[10.3.0.0, 10.4.0.0["/>
Note: The version numbers may be different than that shown here, so adjust to match your
installation.
Although the embedded version of Derby requires no configuration stanza, the networked
version does need some extra information for WebSphere sMash to know where to locate the
server. Listing 8.3 shows a sample networked Derby database configuration statement.
Listing 8.3 Networked Derby Database Configuration
# Derby Networked
/config/db/bookmark = {
"class" : "org.apache.derby.jdbc.ClientDataSource",
"serverName" : "dbs.mycompany.com",
"portNumber" : 1527,
"databaseName" : "db/smashdb",
"user" : "root",
"password" : "passw0rd",
}
Download from www.wowebook.com
ptg
Configuration Settings 175
By default, WebSphere sMash uses an embedded Apache Derby database. Derby is fine for
a small application, but for anything serious, you will want to define and use a more robust rela-
tion database, such as IBM’s DB2, Oracle, or MySQL.
IBM DB2
IBM’s DB2 family of databases ranges from the freely available “community” edition, all the
way up to large enterprise UDB editions used to drive some of the largest business in the world.
To use DB2 with WebSphere sMash, use the DB2 JCC drivers, ensuring that the driver version
matches the version of the DB2 instance to which you will be connecting.
A sample DB configuration is shown in Listing 8.4. These settings should be familiar to
anyone who’s worked with DB2 in the past. If you don’t know the proper values for any of these
settings, drop by your DBA’s desk with a hot coffee as an offering, and you’ll walk away with the
right settings.
Listing 8.4 DB2 Database Configuration
# DB2
/config/db/bookmark = {
"class" : "com.ibm.db2.jcc.DB2SimpleDataSource",
"driverType" : 4,
"serverName" : "db.mycompany.com",
"portNumber" : 50000,
"databaseName" : "SMASHDB",
"user" : "db2inst1",
"password" : "passw0rd"
}
For more information on the DB2 DataSource Connection details, refer to the following
URL:
apdv. java.doc/doc/tjvdsdep.htm.
The drivers needed to connect to a DB2 server are normally available as part of the installa-
tion. If needed, you can also acquire DB2 connection drivers from the following URL:
DB2: />DB2 “Community” edition: />ECDDWW01&S_TACT=projectzero.
MySQL
MySQL is a popular open source relational database. To use MySQL in your WebSphere sMash
application, you must have previously installed and configured MySQL, and then define the
MySqlDataSource driver. Listing 8.5 shows a sample MySQL configuration.
Download from www.wowebook.com
ptg
176 Chapter 8 Database Access
Listing 8.5 MySQL Database Configuration
# MySQL
/config/db/bookmark = {
"class" : "com.mysql.jdbc.jdbc2.optional.MysqlDataSource",
"serverName" : "db.mycompany.com",
"portNumber" : 3306,
"databaseName" : "SMASHDB",
"password" : "<xor>Lz4sLCgwLTs="
}
WebSphere sMash comes with a predefined dependency for MySQL, so you do not need
to go out and locate the required driver. Just search for and add the following dependency to
your application, as shown in Listing 8.6. The actual version number will likely be different than
that shown:
<dependency org="mysql" name="mysql-connector-java"
rev="5.0.3"/>
If this doesn’t work for you, or you have specific driver requirements, you can manually
download and add a MySQL driver. To download the MySQL JDBC driver, go to
and select the proper archive file based on your
platform. Follow the prompts. You will be asked to optionally register, but you can go directly to
the download.
Oracle
The following sample shows how to configure an Oracle JDBC connection within WebSphere
sMash. Oracle drivers can be downloaded from
tech/java/sqlj_jdbc/index.html.
Listing 8.6 Oracle Database Configuration
# Oracle
/config/db/bookmark = {
"class" : "oracle.jdbc.pool.OracleDataSource",
"serverName" : "db.mycompany.com",
"portNumber" : 1521,
"driverType" : "thin",
"databaseName" : "SMASHDB",
"user" : "mydbuser",
"password" : "<xor>Lz4sLCgwLTs="
}
Download from www.wowebook.com
ptg
Zero Resource Model 177
Microsoft SQL Server
Microsoft’s SQL Server database can be accessed using normal JDBC type 4 drivers available
directly from the Microsoft MSDN website located at
aa937724.aspx.
A sample configuration stanza for a SQL Server connection is shown in Listing 8.7. Spe-
cific details for server and port number should be available from your DBA.
Listing 8.7 MS SQL Database Configuration
# MS SQL-Server
/config/db/mydb = {
"class" : "com.microsoft.sqlserver.jdbc.SQLServerDataSource",
"serverName" : "db.mycompany.com",
"portNumber" : 1433,
"databaseName" : "MYDBNAME",
"user" : "mydbuser",
"password" : "<xor>Lz4sLCgwLTs="
}
Zero Resource Model
WebSphere sMash provides a nice way to persist and present relational data without the normal
issues of defining the actual tables, fields, constraints, and the common boilerplate code to expose
that data within an application and as referenceable services. In this section, we discuss Web-
Sphere sMash’s Zero Resource Model (ZRM) and how you can utilize this subsystem to rapidly
create interactive data-driven applications. Although it is possible to define the configuration files
necessary to use ZRM within the Eclipse development environment, there is currently no tooling
defined to assist in the creation of the data definition files. The AppBuilder tool is the recom-
mended way to create the files used in ZRM-backed applications. When defined, you may then
transfer the files to an Eclipse project if you want.
Establishing a New ZRM Application
Start by opening the AppBuilder and creating a new WebSphere sMash application called
Book.DB.ZRM. If you want to connect to a specific database, you need to add the appropriate
database driver information discussed earlier. Otherwise, let WebSphere sMash create and use the
Derby database automatically. If using a custom database configuration for the ZRM, you need to
define it to the system by placing the following statement in the zero.config file:
/config/resource/dbKey = "bookmark"
This would point back to the name used to define the database connection. Only one data-
base connection can be used for ZRM-backed resources.
Download from www.wowebook.com
ptg
178 Chapter 8 Database Access
Figure 8.2 Create ZRM from Wizard—step 1
Figure 8.3 Create ZRM Wizard—step 2
Creating a Zero Resource Model
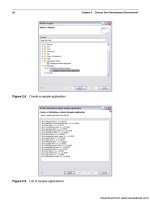
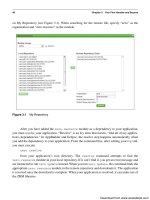
Enter the application, and select New File > Zero Resource Model using the Wizard link. On the
first view of the wizard shown in Figure 8.2, you are asked to enter a resource name. We’ll be
creating a bookmarking application in this example, so enter “bookmark” as the resource to
define. You can leave the other inputs at their defaults and click next to go to the second step of
the wizard.
Next, select the check box to have a resource stub automatically created for access to the
bookmarks data, as shown in Figure 8.3. The created stub simply defers all REST calls directly to
the ZRM manager for processing, so there is a lot of repetitive code that is now taken care of for
us. Select your preferred programming language, as long as that’s either Groovy or PHP (this is
Groovy for our sample), and click Next to proceed to step three of the ZRM wizard.
Download from www.wowebook.com
ptg
Zero Resource Model 179
Figure 8.4 Create ZRM Wizard—step 3
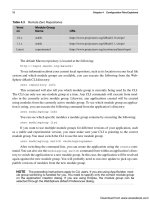
Table 8.1 ZRM Fields
Field Type Name Label Required Other Properties
String url Site Url Checked Maximum Length: 1024
String description Description Maximum Length: 1024
Date created Created Default Value: 1/1/1900
Automatically set initial value:
checked
The final wizard view is shown in Figure 8.4. Here, we are offered some more convenient
file creation options. Select both options and click Finished to complete the ZRM Wizard. You
may be asked if you want to include a resource dependency; click yes to add the new module.
At this point, WebSphere sMash has created the base files required to define a ZRM for our
bookmark’s database table. An empty table definition is opened. We need to define the fields that
will go into this table. For our application, we need the following fields shown in Table 8.1. For
each field shown, click the button that corresponds to the Field Type column. A new field type is
added to the table. You can either edit the field in the table, or (what I find to be easier) click the
properties icon—the second-to-last icon in each row—and enter the definitions that way. Note
that some of the settings may reside under the Advanced tab. When completed, your table fields
should look like Figure 8.5. Although the table definition builder makes creating ZRM tables
easy, you can also use an editor to create the definition in JSON. Click on the Source tab to see the
table definition represented in JSON.
Download from www.wowebook.com
ptg
180 Chapter 8 Database Access
Table 8.1 ZRM Fields
Field Type Name Label Required Other Properties
Date last_visited Last Visited Default Value: 1/1/1900
Automatically set initial value:
checked
Automatically update: checked
Integer visits Visited Count Default Value: 0
String tags Tags Maximum Length: 1024
Figure 8.5 ZRM table fields GUI
You a re n ow r ea dy t o crea te the n ew b ookma rk tabl e in o ur d at abase.
To push our table definition into the defined database, you need to access the command line
and run zero model sync. Just click the console tab and run this command, as shown in Figure 8.6.
You sho ul d n ot see any e rrors i n t he o utput. S ho uld you see a mes sa ge t hat stat es t hat the “mod el ”
task cannot be found, or if you do not get an output similar to that shown in the figure, try running
a zero resolve first. If the table is being created for the first time, you will notice that ZRM
automatically adds two other fields, called id and updated. These are for referential integrity,
and you do not need to be concerned by them. It is important that you are fairly satisfied with
your table definition prior to running the sync command. Although you can add new fields at any
time, you may not change field names or types without exporting your data, dropping the table,
re-syncing (creating) the table, and then importing the data back into the table.
Download from www.wowebook.com
ptg
Zero Resource Model 181
Figure 8.6 Zero model sync command
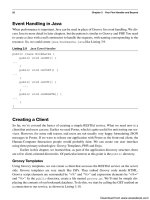
Making ZRM Data Available as a Service
Now that you have defined your data model, you need to make it available for consumption as
REST services. We discussed how to do this previously in the REST chapter by creating a service
class under /app/resources and then adding in the accessor and modifier functions to be exposed
as the REST verbs: GET, POST, PUT, and DELETE. Within each of these functions, there is the
code to parse the input parameters, obtain a database connection, make a parametrized SQL call,
process the results, and return them to the client. Wouldn’t it be nice if the ZRM subsystem would
help us out here. Well, you know where this is going, don’t you. ZRM provides a simple abstrac-
tion for all this—essentially boilerplate—code that exposes our data as REST services.
In the spirit of the ZRM philosophy of keeping things simple, we need to define a delegate
service handler for our ZRM model. If you selected to have the ZRM create a resource handler in
step 2 of the ZRM Wizard, this has already been done for you. Otherwise, create a new REST
handler file named /app/resources/bookmark.groovy, or /app/resources/bookmark.php,
depending on your preferred scripting language. Within the resource file, add the appropriate
code, as shown in Listings 8.8 and 8.9. As you can see, we just hand over the responsibility of
REST services handling over to the ZRM subsystem. If your needs require you to have custom
handling of REST calls, you can always supply your own REST handler functions.
Listing 8.8 /app/resources/bookmark.groovy
ZRM.delegate()
Listing 8.9 /app/resources/bookmark.php
<?php
zrm_delegate();
?>
The ZRM delegate handles all the normal RESTful verbs. The resources listed in Table 8.2
are available immediately.
Download from www.wowebook.com