Bắt đầu với IBM Websphere smash - p 33 potx
Bạn đang xem bản rút gọn của tài liệu. Xem và tải ngay bản đầy đủ của tài liệu tại đây (713.1 KB, 10 trang )
ptg
302 Chapter 13 PHP in WebSphere sMash
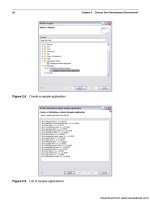
Figure 13.1 Adding PHP dependency to your application
PHP Applications
There are many PHP applications that currently run on the latest development drivers of Web-
Sphere sMash. Many other applications will likely work, but there are known gaps in feature sup-
port. The WebSphere sMash development team is working hard to address these issues to provide
near full support for all PHP APIs and applications. Check the Project Zero website for the latest
list of applications that are known to work with WebSphere sMash. There is also information for
many PHP-based applications, along with any custom setup requirements needed to make it run
properly. Just search the site and community forums for the applications you are trying to install,
and if it’s been done, you should find the information you need. If the application package you
want to use is not listed, give it a try. Post your results on the site, and if you are having problems,
chances are someone will be willing to offer assistance.
The following popular PHP applications are known to work with WebSphere sMash:
• PhpBB
• WordPress
• Mediawiki
• SugarCRM
• FirePHP
• Drupal, plus many extensions
• Gallery2
Download from www.wowebook.com
ptg
PHP to Java Bridge 303
Table 13.1 Syntax for Access Java Constructs from PHP
Syntax Description
java_import("pkg.ClassName"); Imports a static Java class.
$var = new JavaClass("pkg.Class-
Name");
Creates a variable for a static class. Using
java_import() is preferred over this format.
ClassName::staticMethod() Calls a static method of a Java class.
• elgg
• EyeOS
• Moodle
Running PHP Applications in WebSphere sMash
To run a PHP application within WebSphere sMash, download the PHP archive and extract it into
the /public directory of a new project. Ensure that you enable the zero.php dependency. If the
application requires database support, you need to add the required dependencies or jar files for
that as well. MySQL is very popular and is widely supported by many PHP applications. To
enable MySQL support, add the mysql:mysql-connector-java module. For more informa-
tion on MySQL support within WebSphere sMash, refer to Chapter 8, “Database Access.” After
the required modules are added to the application, run a resolve and start the application. If every-
thing goes well, the PHP application will be available and functional. Make sure to follow any
application-specific installation setup, including creating and populating databases.
There have been several sample PHP applications in this book. The rest of this chapter
assumes you have a basic understanding of how to write conventional PHP applications. If
needed, stop and review some of the previous samples, or check out a couple PHP tutorial sites
to refresh your PHP knowledge. The Project Zero site contains many PHP example applications
as well.
PHP to Java Bridge
The PHP implementation used in WebSphere sMash is written in Java (see Table 13.1). As such,
there is a clean bonding capability that enables you to access native Java code from within your
PHP programs. This has huge potential, especially when you are dealing with an enterprise envi-
ronment, where you want the ease of rapid development of PHP for the presentation layer but still
need to access remote resources using standard Java APIs or any in-house developed libraries.
The WebSphere sMash PHP implementation makes it easy to call Java APIs. It’s a matter of call-
ing a custom import statement to load the Java class and then following simple conventions to
access variables and make calls to Java methods.
Download from www.wowebook.com
ptg
304 Chapter 13 PHP in WebSphere sMash
Table 13.1 Syntax for Access Java Constructs from PHP
Syntax Description
ClassName::$staticVariable Provides read/write access to a static variable within
the Java class.
$var = new Java("pkg.
ClassName", arg1, )
Creates an instance of a Java class.
$var->instanceMethod( arg1, ) Calls a method of the class instance.
The PHP-Java bridge will always try to access a bean-getter function for a request, and then
failing that, will attempt to access a field member directly. So, making a call to $obj->member
will first result in an attempt to access the obj.getMember() method. If that function does not
exist, it will attempt to access the obj.member value directly. This provides for a clean accessor
pattern for both instance and static member variables.
Accessing Java Classes
To directly access Java instance classes from PHP, use the following syntax:
$myVar = new Java("package.MyClassname", args, );
This provides the ability to instantiate Java classes and then work with the functions and
members of the class instance directly through PHP. The following code sample illustrates how to
instantiate a new Java classes and then work with the functions. Notice that even though you are
dealing directly with PHP variables, the bridge will coerce the values into a proper Java type
when applying them to the functions.
Listing 13.1 Instantiating and Using a Java Class in PHP
$sb = new Java("java.util.StringBuilder", 1024);
$sb.append("This is the first of many, many line of text.<br/>");
for ( $i = 0; $i <= 1000; $i++) {
$sb.append("Line ".i.": More text added to buffer<br/>");
}
echo $sb.toString();
Access Static Java Class Members
To enable access to a Java class, add an import statement to the PHP file. This will provide access
to all the members and functions of the imported class:
java_import("com.company.package.MyJavaAPI.java");
Download from www.wowebook.com
ptg
PHP to Java Bridge 305
Care should be observed when accessing Java methods, because PHP is not case-sensitive
in this regard. The PHP-Java Bridge will attempt to locate the appropriate function/member
based on the normalization of the function name, as well as the number of arguments passed into
the call. The bridge attempts to best match the function with the same or fewer number of argu-
ments made in the PHP call. You must pass in the expected number of arguments to a Java func-
tion form PHP, because Java does not support default argument values.
Example: Using Apache Commons Logging in PHP
Many companies have a standard and often-complex logging mechanism to be used in all appli-
cations. Sometimes these are written using Log4J, Java Logging, or one of the many other stan-
dard logging facilities out there. The Apache Commons Logging API provides a simple API
façade for these logging frameworks so that Java application developers can write to a single API
without regard to the actual logging implementation. Using the WebSphere sMash PHP to Java
Bridge, we can write to the Java-based Commons Logging API from a PHP page, and then our
new PHP-based application will be conforming to the corporate standards for logging. That
should make the Enterprise Architecture Review Board happy.
The first thing we need to do is download the Apache Commons Logging JAR and place it
into the lib directory of our application. If you’ve gotten this far in the book, I’m sure you are well
accustomed to doing this, but in case you’re the type to jump around, here are the steps involved:
1. Access the Apache Commons Logging page at:
download_logging.cgi.
2. Download the latest binary release, which is 1.1.1 as of this writing. Select the archive
format you are most comfortable with.
3. When downloaded, open the archive and extract the common-logging-1.1.1.jar file into
a temporary directory. We don’t need anything else from the download archive.
4. Start AppBuilder and open your browser to the appropriate URL (typically
http://localhost:8070).
5. Click the Create New Application link and enter a name of Book.PHP.Java, or what-
ever suits your taste.
6. Click on the new application’s name to access it.
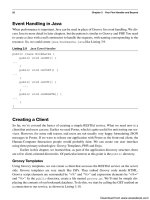
7. Add the JAR file to the lib directory, by clicking the Explorer tab, clicking the lib direc-
tory on the left side, and then clicking the Upload button. In the dialog shown in Figure
13.2, browse for the location of the JAR file and make sure that the lib directory is
selected as the target location.
8. Return to the File Editor tab and create a new PHP file in /public called logging.php.
The only reason to put this into a public response file is so that it’s easy to run and view
the output this way.
Download from www.wowebook.com
ptg
306 Chapter 13 PHP in WebSphere sMash
Figure 13.2 Adding JAR file to the application lib directory
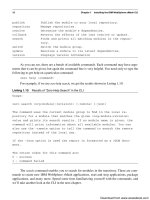
9. Enter the following block of code into this file. This code will define our logger, log sev-
eral different log messages, and then output the logging levels supported. Note how a
$src variable is used to define where these logs came from. This is required due to the
reflective nature of how the PHP to Java Bridge works.
Listing 13.2 Logging PHP to Java Sample Program
<?php
// Produce standard Log4J logging calls.
java_import("org.apache.commons.logging.Log");
java_import("org.apache.commons.logging.LogFactory");
$log = LogFactory::getLog("MyPhpLogger");
$src = "logging.php: ";
$log->fatal($src."Fatal message from PHP");
$log->error($src."Error message from PHP");
$log->warn($src."Warn message from PHP");
$log->info($src."Info message from PHP");
$log->debug($src."Debug message from PHP");
$log->trace($src."Trace message from PHP");
echo "ACL logging levels check<br/>";
echo "Fatal enabled = ".$log->isFatalEnabled()."<br/>";
echo "Error enabled = ".$log->isErrorEnabled()."<br/>";
echo "Warn enabled = ".$log->isWarnEnabled()."<br/>";
echo "Info enabled = ".$log->isInfoEnabled()."<br/>";
echo "debug enabled = ".$log->isDebugEnabled()."<br/>";
echo "Trace enabled = ".$log->isTraceEnabled()."<br/>";
?>
Download from www.wowebook.com
ptg
PHP to Java Bridge 307
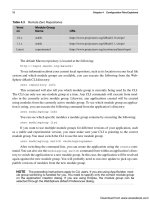
Figure 13.3 Response output of Logger sample
Figure 13.4 Logger sample console output
10. Start the application by clicking the green run arrow in the upper left of the AppBuilder
window.
11. Open the file in a new browser window with a URL of http://localhost:8080/logger.php.
There won’t be much to see in the response shown in Figure 13.3, but that’s not what we
are concerned with.
12. Return to the AppBuilder Window and click the Console tab. Here we should see the
logging output from our PHP program, as shown in Figure 13.4.
13. The logger output by default goes to standard out, which in this case is the runtime
logs. By manipulating the logging.properties file located in the classpath, or in
the applications lib directory, the logging output can be directed to any proper handler,
such as common log files, databases, email, or whatever your logging implementation
is configured for. Testing different logging implementations is beyond the scope of
this sample, but you should get the basic concept of using external Java from this
example.
Download from www.wowebook.com
ptg
308 Chapter 13 PHP in WebSphere sMash
Table 13.2 Access Patterns for PHP to Groovy Bridge
Syntax Description
ClassName::staticMethod() Calls a static method of a Groovy class
ClassName::$staticVariable Provides read/write access to a static variable within the
Groovy class
$var = new ClassName() Creates an instance of a Groovy class
$var->instanceMethod() Calls a method of the class instance
$var->instanceField Provides Read/Write access to a variable within the class
instance
PHP to Groovy Bridge
The Groovy bridge enables you to connect and use Groovy classes and closures from within your
PHP applications. You can also run Groovy script code directly in your PHP blocks. This mecha-
nism provides a clean way to merge different projects as dependencies and allow developers to
use their language of choice and still have the integration desired between modules.
It’s quite common within WebSphere sMash applications to write simple static Groovy
classes; as such, it’s mostly a matter of importing the Groovy class and directly accessing its
methods and variables. To enable access to a Groovy class, add an import statement to the php file
pointing to the Groovy class you want to interact with, as shown here:
groovy_import("MyGroovyStuff.groovy");
At this point, you have access to all the public variables and methods contained within this
class. The general syntax is the class name, two colons, and the member you want to access. This
is better shown in Table 13.2.
PHP to Groovy Bridge Example
Let’s go for a simple example to illustrate how a PHP application can utilize existing Groovy
classes and functionality. In this scenario, let’s assume that we have two developers working on a
project. Developer A is a PHP developer by trade and will be working on the front-end user inter-
face. Developer B handles the access to all the databases and other remote resources. She prefers
to use Groovy for all her processing. Assuming that both developers are using WebSphere sMash,
it’s easy for developer A to use the PHP-Groovy bridge to access the back-end classes into the
PHP-based UI portion of the project. For this example, we keep everything in a single project for
simplicity, but layering different projects as dependencies for complex applications is an often-
untapped strength of WebSphere sMash.
Download from www.wowebook.com
ptg
PHP to Groovy Bridge 309
Take a look at the following PHP code shown in Listing 13.3. This example creates two
instances of a Groovy Person class and processes the results. The first statement defines the
Groovy class to be used in this script. From this point, we have access to all the members and
methods of this class. If you don’t want the fuss of actually creating a standalone Groovy file, you
can also run groovy code directly within the groovy_eval() function.
Listing 13.3 PHP Accessing Groovy Class
<h1>People</h1>
<?php
groovy_import("Person.groovy");
// Create and then Populate a person
$joe = new Person();
$joe->setFirstName("Joe");
$joe->setLastName("Strummer");
$joe->setBirth("1952-07-21");
$joe->setDeath("2002-12-22");
echo "$joe<br/><hr/>";
// Create person passing in values into constructor
$data = array(
firstName => "Jerry",
lastName => "Garcia",
birth => "1942-08-01",
death => "1995-09-05"
);
$jerry = new Person( $data );
echo $jerry."<br/>";
echo "He lived for ".$jerry->daysAlive()." days!<br/><hr/>";
// Create and execute Groovy scripts dynamically
$groovyScript = "'Johnny Cash'.reverse()";
echo "Evaluating: $groovyScript = ".groovy_eval($groovyScript);
echo "<br/><hr/>";
// Access static members too
echo "Class description: ".Person::$description."<br/><hr/>";
?>
Download from www.wowebook.com
ptg
310 Chapter 13 PHP in WebSphere sMash
The Groovy code for the Person class is shown in Listing 13.4. Note that there are two con-
structors defined in this class. GroovyBeans have two assumed constructor formats: the first tak-
ing no arguments and the second taking a map of key/value pairs that match the member
variables. By default, the WebSphere sMash introspection routine assumes the zero argument
constructor, which is normally fine. The definition of a constructor with explicit arguments over-
rides this default behavior, and therefore you must also provide a no-argument constructor signa-
ture. Otherwise, the introspection will complain that there is not a valid constructor for a
no-argument constructor.
Mapping of dates between PHP and Groovy can be somewhat problematic, so a clean
approach is to use an ISO string representation of a date and parse it back into a real Date object,
as shown in the setBirth and setDeath methods. One of the nice convenience features of
Groovy is the ability to easily perform math on dates, as represented in the daysAlive()
method. Because this is arguably more difficult to do in PHP, it makes for a good candidate to
pass off to Groovy to handle for us.
Listing 13.4 Person Groovy Class
class Person {
def public static description = "Person class for working with
people data"
String firstName
String lastName
Date birth
Date death
Person() {}
Person(args) {
this.firstName = args.firstName
this.lastName = args.lastName
setBirth( args.birth )
setDeath( args.death )
}
void setBirth( dob ) {
this.birth = new Date().parse('yyyy-MM-dd', dob)
}
void setDeath( dob ) {
this.death = new Date().parse('yyyy-MM-dd', dob)
}
String toString() {
return "${firstName} ${lastName} was born on: ${birth}"
}
Download from www.wowebook.com
ptg
Extending PHP 311
Figure 13.5 Output of PHP to Groovy example
int daysAlive() {
if (this.birth && this.death ) {
return this.death - this.birth
} else if ( this.birth ) {
return new Date() - this.birth
} else {
return 0
}
}
}
When we access the PHP script from a browser, we get the results shown in Figure 13.5.
Extending PHP
There are times when you may want to develop a façade over a Java or Groovy class in PHP. This
allows PHP developers to access custom Java/Groovy functionality but maintain a pure PHP
environment. WebSphere sMash enables you to easily create your own PHP extensions. PHP
extension classes must extend the com.ibm.phpj.xapi.ExtensionBaseImpl class and have
custom XAPI annotations defined for the class and all functions. The final restriction is
RuntimeContext that is used to pass in function arguments and set the return value. Because all
arguments and return values are actually managed by the RuntimeContext, all extension
classes and function signatures follow a common template, as shown in Listing 13.5.
Download from www.wowebook.com