Beginning Game Programming (phần 6) ppsx
Bạn đang xem bản rút gọn của tài liệu. Xem và tải ngay bản đầy đủ của tài liệu tại đây (1.19 MB, 50 trang )
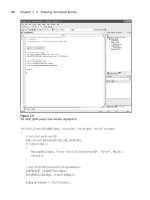
On Your Own
The following exercises will challenge your retention of the information pre-
sented in this chapter.
Exercise 1. Paddle Game featured a single ball bo uncing on the screen with
support for collision with the paddle. This is obviously just the start of what
could become a great game. Add support for blocks that the ball can strike. When
the ball hits a block, the block should disappear and the ball should reverse
direction.
Exercise 2. In addition to adding blocks to make this a functional game, add the
logic to cause the player to lose when the ball hits the bottom edge of the screen.
230 Chapter 10
n
Handling Input Devices
Tile-Based Scrolling
Backgrounds
Most action and arcade games use the technique of tile-based scrolling to achieve
the moving background you see in such games. Although this technique is now
decades old, it is still employed for rendering backgrounds, and this style of 2D
game is still used frequently today. Back in the old days, when computer memory
was very limited, tile-based scrolling was used because it is very efficient. We take
for granted multiple gigabytes of memory today, but that much memory was
unbelievable, even in a hard drive, let alone main memory (RAM). The concept
of a virtual screen buffer, which you will learn about in this chapter, was used
with very limited video cards at the time (with 256 to 1024 KB of video memory).
Back then, you would be very lucky to have two 320Â240 screens (or buffers), let
alone enough memory for a large scrolling world. This chapter focuses on creating
tile-based backgrounds with scrolling using secondary buffers. As you will discover,
231
chapter 11
this is far easier than trying to wrangle memory out of a video card as programmers
were forced to do years ago. A memory buffer will work well with either full-screen
or windowed mode.
Here is a breakdown of the major topics in this chapter:
n Introduction to scrolling.
n Creating tile-based backgrounds.
n Using a single large scroll buffer.
n Using dynamically drawn tiles.
Introduction to Scrolling
What is scrolling? In today’s gaming world, where 3D is the focus of everyone’s
attention, it’s not surprising to find gamers and programmers who have never
heard of scrolling. What a shame! The heritage of modern games is a long and
fascinating one that is still relevant today, even if it is not understood or
appreciated. The console industry puts great effort and value into scrolling,
particularly on handheld systems, such as the Game Boy Advance. Given the
extraordinary sales market for the GBA, would you be surprised to learn that
more 2D games may be sold in a given day than 3D games? Figure 11.1 illustrates
the concept of scrolling.
232 Chapter 11
n
Tile-Based Scrolling Backgrounds
Figure 11.1
The scroll window shows a small part of a larger game world.
Note
Scrolling is the process of displaying a small portion of a large virtual game world in a window on the
screen, and moving the view of that window to reflect the changing position within the game world.
You could display one huge bitmap image in the virtual game world, representing
the current level of the game, and then copy (blit) a portion of that virtual world
onto the screen. This is the simplest form of scrolling. Another method uses tiles
to create the game world, which I’ll cover shortly. First, you’ll write a short
program to demonstrate how to use bitmap scrolling.
Introduction to Tile-Based Backgrounds
You have seen what a simple scroller looks like, even though it relied on keyboard
input to scroll. A high-speed scrolling arcade game would automatically scroll
horizontally or vertically, displaying a ground-, air-, or space-based terrain below
the player (usually represented by an airplane or a spaceship). The point of these
games is to keep the action moving so fast that the player doesn’t have a chance to
rest from one wave of enemies to the next. Two upcoming chapters have been
dedicated to these very subjects! For the time being, I want to keep things simple
to cover the basics of scrolling before you delve into these advanced chapters.
Backgrounds and Scenery
A background is comprised of imagery or terrain in one form or another, upon
which the sprites are drawn. The background might be nothing more than a
pretty picture behind the action in a game, or it might take an active part, as in a
scroller. When you are talking about scrollers, they need not be relegated only to
the high-speed arcade games. Role-playing games are usually scrollers too, as are
most sports games.
You should design the background around the goals of your game, not the other
way around. You should not come up with some cool background and then try to
build the game around it. (However, I admit that this is often how games are
started.) You never want to rely on a single cool technology as the basis for an
entire game, or the game will be forever remembered as a trendy game that tried
to cash in on the latest fad. Instead of following and imitating, set your own
precedents and make your own standards!
What am I talking about, you might ask? You might have the impre ssion that
anything and everything that could possibly have been done with a scrolling
Introduction to Tile-Based Backgrounds 233
game has already been done ten times over . Not true. Not true! Remember when
Doom first came out? Everyone had been imitating Wolfenstein 3D when Car-
mack and Romero bumped up the notch a few hundred points and raised
everyone’s expectations so high that shockwaves reverberated throughout the
entire game industry—console and PC alike.
Do you really think it has all been done before and there is no more room for
innovation, that the game industry is saturated and it’s impossible to make a
successful ‘‘indie’’ game? That didn’t stop Bungie from going for broke on their
first game project. Halo has made its mark in gaming history by upping everyone’s
expectations for superior physics and intelligent opponents. Now, a few years
hence, what kinds of games are coming out? What is the biggest industry buzz-
word? Physics. Design a game today without it, and suddenly your game is so
1990s in the gaming press. It’s all about physics and AI now, and that started with
Halo. Rather, it was perfected with Halo—I can’t personally recall a game with
that level of interaction before Halo came along. There is absolutely no reason why
you can’t invent the next innovation or revolution in gaming, even in a 2D game.
Creating Backgrounds from Tiles
The real power of a scrolling background comes from a technique called tiling.
Tiling is a process in which there really is no background, just an array of tiles
that make up the background as it is displayed. In other words, it is a virtual
background and it takes up very little memory compared to a full bitmapped
background. Take a look at Figure 11.2 for an example.
Can you count the number of tiles used to construct the background in
Figure 11.2? Eighteen tiles make up this image, actually. Imagine that—an entire
game screen built using a handful of tiles, and the result is pretty good!
Obviously, a real game would have more than just grass, roads, rivers, and
bridges; a real game would have sprites moving on top of the background. How
about an example? I thought you’d like that idea.
Tile-Based Scrolling
The ScrollTest program, which you will write soon, uses tiles to fill the large
background bitmap when the program starts. It loads up the tiles from a bitmap
(containing the tiles arranged in rows and columns), and then uses the map data
to fill in the virtual scroll surface represented by a large bitmap in memory. Take
a look at Figure 11.3.
234 Chapter 11
n
Tile-Based Scrolling Backgrounds
Introduction to Tile-Based Backgrounds 235
Figure 11.3
The ScrollTest program demonstrates how to perform tile-based background scrolling.
Figure 11.2
A bitmap image constructed of tiles
This program creates the tiles that you see in this figure by drawing the tiles onto a
large bitmap image created in memory (which is actually a Direct3D surface—and
we’re using a surface rather than a texture because no transparency is needed). The
actual bitmap containing the tiles is shown in Figure 11.4. These tiles were created
by Ari Feldman (http://www.flyingyogi.com) as part of his free SpriteLib.
I have prepared a legend of the tiles and the value for each in Figure 11.5. You can
use the legend while building your own maps.
ScrollTest Header File
Now, let’s write a test program to demonstrate, because theory only gets one so far
when trying to build an actual game. I don’t know about you, but I learn better by
doing rather than by reading. I’m assuming that you’re going to follow the same
steps from the previous chapter for creating a new project, and adding the necessary
236 Chapter 11
n
Tile-Based Scrolling Backgrounds
Figure 11.4
The source file containing the tiles used in the ScrollTest prog ram
Figure 11.5
A legend of the tiles and their reference numbers used to create a map in the DynamicScroll program
library files. For reference, here are the library files again that must be added to the
Additional Dependencies field under Project Properties, Linker, Input:
n d3d9.lib
n d3dx9.lib
n dsound.lib
n dinput8.lib
n dxguid.lib
n dxerr9.lib
n winmm.lib
Here’s the header file for the ScrollTest program. This is the code that goes in the
game.h file.
// Beginning Game Programming, Second Edition
// ScrollTest program header file
#ifndef _GAME_H
#define _GAME_H
#include <d3d9.h>
#include <d3dx9.h>
#include <d3dx9math.h>
#include <time.h>
#include <stdio.h>
#include <stdlib.h>
#include "dxgraphics.h"
#include "dxinput.h"
//application title
#define APPTITLE "ScrollTest"
//screen setup
#define FULLSCREEN 0 //0 = windowed, 1 = fullscreen
#define SCREEN_WIDTH 800
#define SCREEN_HEIGHT 600
//data for the scrolling map
#define TILEWIDTH 64
Introduction to Tile-Based Backgrounds 237
#define TILEHEIGHT 64
#define MAPWIDTH 25
#define MAPHEIGHT 18
#define GAMEWORLDWIDTH (TILEWIDTH * MAPWIDTH)
#define GAMEWORLDHEIGHT (TILEHEIGHT * MAPHEIGHT)
//macros to read the keyboard asynchronously
#define KEY_DOWN(vk_code) ((GetAsyncKeyState(vk_code) & 0x8000) ? 1 : 0)
#define KEY_UP(vk_code)((GetAsyncKeyState(vk_code) & 0x8000) ? 1 : 0)
//function prototypes
int Game_Init(HWND);
void Game_Run(HWND);
void Game_End(HWND);
//scrolling map support functions
void ScrollScreen();
void BuildGameWorld();
void DrawTile(LPDIRECT3D SURFAC E9,in t,int ,int, int,LP DIREC T3DSU RFACE 9,int, int);
#endif
ScrollTest Source Code
Now let’s write the main source code for the ScrollTest program, which is typed
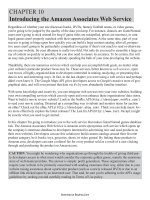
into the game.cpp source code file. The map data shown in this code has been
compacted in order to save space and to fit on alinewithout wrapping, but it is hard
to read this way. If you prefer, you may type in the map data as shown in Figure 11.6.
// Beginning Game Programming, Second Edition
// ScrollTest program
#include "game.h"
int ScrollX, ScrollY; //current scroll position
int SpeedX, SpeedY; //scroll speed
LPDIRECT3DSURFACE9 gameworld; //scroll buffer
long start; //timing variable
int MAPDATA[MAPWIDTH*MAPHEIGHT] = {
80,81,81,81,81,81,81,81,81,81,81,81,81,81,81,81,81,81,81,81,81,
81,81,81,82,90,3,3,3,3,3,3,3,3,3,3,3,3,3,3,3,92,3,3,3,3,3,92,3,
92,90,3,13,83,96,3,3,23,3,92,3,13,92,3,3,3,3,3,3,11,3,13,3,3,92,
238 Chapter 11
n
Tile-Based Scrolling Backgrounds
90,3,3,3,3,3,3,3,10,3,3,3,3,3,23,3,3,3,3,3,3,3,13,3,92,90,3,96,
3,13,3,3,3,3,3,3,3,3,3,3,3,3,96,3,23,3,96,3,3,92,90,3,3,3,3,3,3,
13,3,3,3,13,3,3,11,3,3,3,3,3,3,3,13,3,92,90,3,83,11,3,92,3,3,3,
3,3,11,3,3,3,3,3,3,3,83,3,3,3,92,92,90,3,3,3,96,3,13,3,3,3,11,
10,3,3,3,3,3,13,3,3,13,3,3,3,92,90,3,23,3,3,3,3,3,3,96,3,3,83,
3,3,3,92,3,3,3,3,3,13,3,92,90,3,3,3,3,3,3,3,3,3,3,3,3,23,3,3,3,
3,3,3,3,3,3,3,92,90,3,3,3,11,3,92,3,3,13,3,3,131,3,10,3,3,3,96,
3,92,3,96,3,92,90,3,13,83,3,3,3,3,3,3,3,3,3,3,3,13,3,3,3,3,3,3,
3,3,92,90,3,3,3,3,13,3,3,3,3,3,11,96,3,3,3,3,3,3,13,3,13,3,11,
92,90,92,3,13,3,3,3,3,3,3,92,3,10,3,23,3,3,3,3,3,3,3,3,3,92,90,
3,3,3,3,3,96,3,23,3,3,3,3,3,3,3,3,83,3,3,13,3,96,3,92,90,3,3,3,
3,92,3,3,3,3,3,13,3,3,3,13,3,3,3,11,3,3,3,3,92,90,3,13,3,3,3,3,
3,3,3,96,3,3,3,3,3,3,3,3,3,3,92,3,3,92,100,101,101,101,101,101,
101,101,101,101,101,101,101,101,101,101,101,101,101,101,101,101,
101,101,102
};
Introduction to Tile-Based Backgrounds 239
Figure 11.6
The map data in the ScrollTest program
//initializes the game
int Game_Init(HWND hwnd)
{
Init_DirectInput(hwnd);
Init_Keyboard(hwnd);
Init_Mouse(hwnd);
start = GetTickCount();
BuildGameWorld();
return 1;
}
//the main game loop
void Game_Run(HWND hwnd)
{
//make sure the Direct3D device is valid
if (d3ddev == NULL)
return;
//poll DirectInput devices
Poll_Keyboard();
Poll_Mouse();
//check for escape key (to exit program)
if (Key_Down(DIK_ESCAPE))
PostMessage(hwnd, WM_DESTROY, 0, 0);
//scroll based on mouse input
if (Mouse_X() != 0) ScrollX += Mouse_X();
if (Mouse_Y() != 0) ScrollY += Mouse_Y();
//keep the game running at a steady frame rate
if (GetTickCount() - start >= 30)
{
//reset timing
start = GetTickCount();
//start rendering
if (d3ddev->BeginScene())
{
//update the scrolling view
ScrollScreen();
240 Chapter 11
n
Tile-Based Scrolling Backgrounds
//stop rendering
d3ddev->EndScene();
}
}
//display the back buffer on the screen
d3ddev->Present(NULL, NULL, NULL, NULL);
}
//frees memory and cleans up before the game ends
void Game_End(HWND hwnd)
{
Kill_Keyboard();
Kill_Mouse();
dinput->Release();
}
void BuildGameWorld()
{
HRESULT result;
int x, y;
LPDIRECT3DSURFACE9 tiles;
//load the bitmap image containing all the tiles
tiles = LoadSurface("groundtiles.bmp", D3DCOLOR_XRGB(0,0,0));
//create the scrolling game world bitmap
result = d3ddev->CreateOffscreenPlainSurface(
GAMEWORLDWIDTH, //width of the surface
GAMEWORLDHEIGHT, //height of the surface
D3DFMT_X8R8G8B8,
D3DPOOL_DEFAULT,
&gameworld, //pointer to the surface
NULL);
if (result != D3D_OK)
{
MessageBox(NULL,"Error creating working surface!","Error",0);
return;
}
//fill the gameworld bitmap with tiles
for (y=0; y < MAPHEIGHT; y++)
Introduction to Tile-Based Backgrounds 241
for (x=0; x < MAPWIDTH; x++)
DrawTile(tiles, MAPDATA[y * MAPWIDTH + x], 64, 64, 16,
gameworld, x * 64, y * 64);
//now the tiles bitmap is no longer needed
tiles->Release();
}
void DrawTile(LPDIRECT3DSURFACE9 source, // source surface image
int tilenum, // tile #
int width, // tile width
int height, // tile height
int columns, // columns of tiles
LPDIRECT3DSURFACE9 dest, // destination surface
int destx, // destination x
int desty) // destination y
{
//create a RECT to describe the source image
RECT r1;
r1.left = (tilenum % columns) * width;
r1.top = (tilenum / columns) * height;
r1.right = r1.left + width;
r1.bottom = r1.top + height;
//set destination rect
RECT r2 = {destx,desty,destx+width,desty+height};
//draw the tile
d3ddev->StretchRect(source, &r1, dest, &r2, D3DTEXF_NONE);
}
void ScrollScreen()
{
//update horizontal scrolling position and speed
ScrollX += SpeedX;
if (ScrollX < 0)
{
ScrollX = 0;
SpeedX = 0;
}
else if (ScrollX > GAMEWORLDWIDTH - SCREEN_WIDTH)
242 Chapter 11
n
Tile-Based Scrolling Backgrounds
{
ScrollX = GAMEWORLDWIDTH - SCREEN_WIDTH;
SpeedX = 0;
}
//update vertical scrolling position and speed
ScrollY += SpeedY;
if (ScrollY < 0)
{
ScrollY = 0;
SpeedY = 0;
}
else if (ScrollY > GAMEWORLDHEIGHT - SCREEN_HEIGHT)
{
ScrollY = GAMEWORLDHEIGHT - SCREEN_HEIGHT;
SpeedY = 0;
}
//set dimensions of the source image
RECT r1 = {ScrollX, ScrollY, ScrollX+SCREEN_WIDTH-1,
ScrollY+SCREEN_HEIGHT-1};
//set the destination rect
RECT r2 = {0, 0, SCREEN_WIDTH-1, SCREEN_HEIGHT-1};
//draw the current game world view
d3ddev->StretchRect(gameworld, &r1, backbuffer, &r2,
D3DTEXF_NONE);
}
Dynamically Rendered Tiles
Displaying tiles just to make a proof-of-concept is one thing, but it is not very
useful. True, you have some code to create a virtual background, load tiles onto
it, and then scroll the game world. In the past, I have generated a realistic-looking
game map with source code, using an algorithm that matched terrain curves and
straights (such as the road, bridge, and river) so that I created an awesome map
from scratch, all by myself. Building an algorithmic landscape is one thing, but
constructing it at run time is not a great solution—even if your map-generating
routine is very good.
Dynamically Rendered Tiles 243
For instance, many games, such as Warcraft III, Age of Mythology, and Civili-
zation IV can generate the game world on the fly. Obviously, the programmers
spent a lot of time perfecting the world-generating routines. If your game would
benefit by featuring a randomly generated game world, then your work is cut out
for you, but the results will be worth it. This is simply one of those design
considerations that you must make, given that you have time to develop it.
The Tile Map
Assuming you don’t have the means to generate a random map (or simply do not
want to go that route), you can simply create one within an array, as we did in the
ScrollTest program. But where did this map data actually come from? And, fur-
thermore, where do you start? First of all, you should realize that the tiles are
numbered and should be referenced this way in the map array. Each number in the
tile map represents a tile image in a bitmap file. Here is what the array looks like, as
defined in the DynamicScroll program (which we’ll cover here in a minute).
244 Chapter 11
n
Tile-Based Scrolling Backgrounds
int MAPDATA[MAPWIDTH*MAPHEIGHT] = {
1, 2, 3, 4, 5, 6, 7, 8, 9, 10, 11, 12, 13, 14, 15, 16,
17, 18, 19, 20, 21, 22, 23, 24, 25, 26, 27, 28, 29, 30, 31, 32,
33, 34, 35, 36, 37, 38, 39, 40, 41, 42, 43, 44, 45, 46, 47, 48,
49, 50, 51, 52, 53, 54, 55, 56, 57, 58, 59, 60, 61, 62, 63, 64,
65, 66, 67, 68, 69, 70, 71, 72, 73, 74, 75, 76, 77, 78, 79, 80,
81, 82, 83, 84, 85, 86, 87, 88, 89, 90, 91, 92, 93, 94, 95, 96,
97, 98, 99, 100, 101, 102, 103, 104, 105, 106, 107, 108, 109, 110, 111, 112,
113, 114, 115, 116, 117, 118, 119, 120, 121, 122, 123, 124, 125, 126, 127, 128,
129, 130, 131, 132, 133, 134, 135, 136, 137, 138, 139, 140, 141, 142, 143, 144,
145, 146, 147, 148, 149, 150, 151, 152, 153, 154, 155, 156, 157, 158, 159, 160,
161, 162, 163, 164, 165, 166, 167, 168, 169, 170, 171, 172, 173, 174, 175, 176,
177, 178, 179, 180, 181, 182, 183, 184, 185, 186, 187, 188, 189, 190, 191, 192,
1, 2, 3, 4, 5, 6, 7, 8, 9, 10, 11, 12, 13, 14, 15, 16,
17, 18, 19, 20, 21, 22, 23, 24, 25, 26, 27, 28, 29, 30, 31, 32,
33, 34, 35, 36, 37, 38, 39, 40, 41, 42, 43, 44, 45, 46, 47, 48,
49, 50, 51, 52, 53, 54, 55, 56, 57, 58, 59, 60, 61, 62, 63, 64,
65, 66, 67, 68, 69, 70, 71, 72, 73, 74, 75, 76, 77, 78, 79, 80,
81, 82, 83, 84, 85, 86, 87, 88, 89, 90, 91, 92, 93, 94, 95, 96,
97, 98, 99, 100, 101, 102, 103, 104, 105, 106, 107, 108, 109, 110, 111, 112,
113, 114, 115, 116, 117, 118, 119, 120, 121, 122, 123, 124, 125, 126, 127, 128,
129, 130, 131, 132, 133, 134, 135, 136, 137, 138, 139, 140, 141, 142, 143, 144,
145, 146, 147, 148, 149, 150, 151, 152, 153, 154, 155, 156, 157, 158, 159, 160,
161, 162, 163, 164, 165, 166, 167, 168, 169, 170, 171, 172, 173, 174, 175, 176,
177, 178, 179, 180, 181, 182, 183, 184, 185, 186, 187, 188, 189, 190, 191, 192
};
The trick here is that this is really only a single-dimensional array, but the listing
makes it obvious how the map will look because there are 16 numbers in each
row—the same number of tiles in each row of the bitmap file, which is shown in
Figure 11.7. I did this intentionally so you can use this as a template for creating
your own maps. And you can create more than one map if you want. Simply
change the name of each map and reference the map you want to draw so that
your new map will show up. You are not limited in adding more tiles to each row.
One interesting thing you can try is making
MAPDATA a two-dimensional array
containing many maps, and then changing the map at run time! You could use
this simple scrolling code as the basis for any of a hundred different games if you
have the creative gumption to do so.
Creating a Tile Map Using Mappy
I’m going to go through the steps with you for creating a very simple tile map using
the awesome (and free) tile-editing program, Mappy. This program is available at
, and is provided on the CD-ROM in \software\Mappy.
It is my favorite level/map-editing program for tile-based games, and is used by
many professional game developers as well (especially those working on handheld
Dynamically Rendered Tiles 245
Figure 11.7
This starfield image used by the DynamicScroll program was shot by the Hubble Space Telescope
(courtesy of NASA).
and strategy games). I wish we had time for a full tutorial on using Mappy, because
it really is jam-packed with an amazing assortment of features (tucked away in its
various sub-menus). We’ll have to rely on simplistic coverage of Mappy here, just
enough to read in a large photograph and convert it to a tile map.
Note
If you enjoy this subject and want to learn more, I recommend you pick up
Game Programming All
in One, Third Edition
, which contains five whole chapters on just the subject of scrolling back-
grounds, including a complete tutorial chapter on using Mappy! Although that book focuses on
the open-source Allegro Game Library, it uses DirectX behind the scenes.
Let’s start by firing up Mappy. When it starts running, open the File menu and
select New Map. This will bring up the New Map dialog box shown in Figure 11.8.
As shown in this figure, type in 64 Â 64 for the tile size and 16 Â 24 for the map
size (which is a count of the number of tiles in the tile map). The new map will be
created, but will be void of any tiles as of yet, as you can see in Figure 11.9.
Importing an Existing Bitmap File
Next, we’re going to import the space photograph taken by Hubble into Mappy
and convert it to a tile map. As shown in Figure 11.10, open the MapTools menu,
and select Useful Functions, followed by the option ‘‘Create map from big
picture’’. Browse for the space1.bmp file, located in \sources\chapter11\Dyna-
micScroll\map on the CD-ROM. When you select this file, Mappy will import it
into the palette of tiles, as shown in Figure 11.11.
As you can see from this figure, there are a lot of tiles that made up the image! If
you are curious about the number of tiles in this palette, let’s take a look! Open
246 Chapter 11
n
Tile-Based Scrolling Backgrounds
Figure 11.8
Creating a new map using Mappy
up the MapTools menu and select Map Properties. This brings up the Map
Properties dialog box, shown in Figure 11.12. Take a look at the text values on the
left side of the dialog: Map Array, Block Str, Graphics, and so on. The Map Array
text tells you the size of the map in tiles (16Â24, just as we specified). Now take a
look at the Graphics information. Here we see that there are 193 tiles in this tile
map, and they are all 64Â64 pixels in size, and have a color depth of 24 bits.
When you import a large bitmap into Mappy, it grabs tiles starting at the upper-
left corner of the bitmap, and goes through the image in a grid, from left to right
and from top to bottom, until the entire image has been encoded into tiles. It
then constructs the tile map using those tile numbers and inserts the tile map into
the editor, so that it resembles the original bitmap image. Note that you must
create the tile map in the first place so that it is at least as large as the bitmap
image (in this case, 1024Â768) or larger.
Dynamically Rendered Tiles 247
Figure 11.9
The new map that has been created by Mappy, awaiting your custom tiles
Exporting the Tile Map
First, let’s just save the tile map in the native Mappy file format, so it can be edited
later. Open the File menu and select Save. I have named this tile map
‘‘spacemap’’. The default extension for a Mappy file is .fmp.
Now, you can go ahead and edit the tile map if you want, but I’m going to just go
ahead and export the tile map now and show you how to do that. First, open up
the File menu and select the Export option. This brings up the Export dialog,
shown in Figure 11.13. Select the options on this dialog as follows:
n Map array as comma values only (?.CSV)
n Graphics Blocks as picture (?.BMP)
n 16 blocks per row
These options will cause Mappy to export a new bitmap file comprised of the tiles
in the order that they appear in the palette—which means this bitmap image will
248 Chapter 11
n
Tile-Based Scrolling Backgrounds
Figure 11.10
Preparing to import a large bitmap file as the source for our tiles
Dynamically Rendered Tiles 249
Figure 11.12
The Map Properties dialog box shows the properties of the tile map.
Figure 11.11
The palette of tiles has been imported from the large space photograph.
then be used to draw the tiles in your game. Note that Mappy automatically
inserts a blank tile first in the palette. You want to keep that blank tile in place,
because the tile map values begin with that first blank tile (index number zero). I
have named the export file spacemap.
Click the Okay button and Mappy will save two new files for your use:
n spacemap.csv
n spacemap.bmp
The .csv file is a comma-separated values file, which is actually just stored in a text
format (which can be opened in Notepad or any text editor). If you have
Microsoft Excel installed, it will try to open the .csv file if you double-click it,
because Excel uses that format for text-based spreadsheets as well. You can
rename it to spacemap.txt to make it easier to open the file if you wish. Once
open, copy the contents out of this file and paste it into your source code over
any pre-existing tile map (defined by the array called
MAPDATA in the examples in
this chapter).
250 Chapter 11
n
Tile-Based Scrolling Backgrounds
Figure 11.13
The Export dialog box is used to export a tile map to a text file.
The DynamicScroll Project
Now let’s create a new project. You may just re-use one of the projects from the
previous chapter if you want, since it will already be configured with the proper
library files and so forth. Or, if you created the ScrollTest program, feel free to
reuse that project.
If you are creating a new project file, call it DynamicScroll, since that is the name
of this program. This program is similar to ScrollTest, but it draws the tiles
directly to the screen without the need for a large bitmap in memory. This
program will also use a smaller virtual background to cut down on the size of the
map array. Why? Not to save memory, but to make the program more man-
ageable. Because the virtual background was 1600Â1200 in the previous pro-
gram, it would require 50 columns of tiles across and 37 rows of tiles down to fill
it! That is no problem at all for a map editor program, but it’s too much data to
type in manually.
To make it more manageable, the new virtual background will be 1024 pixels
across, which also happens to be the width of the screen in this program. That
was intentional, because the DynamicScroll program will simulate a vertically
scrolling arcade shooter game! The point is to demonstrate how it will work, not
to build a game engine, so don’t worry about precision at this point. If you want
to type in the values to create a bigger map, by all means, go for it! That would be
a great learning experience, as a matter of fact. For your purposes here (and with
my primary goal of being able to print an entire row of numbers in a single source
code line in the book), I’ll stick to 16 tiles across and 24 tiles down.
In the example tile map, I have doubled its size by copying the entire tile map of
values and pasting them at the end, which effectively doubles the map size;
otherwise, you would not be able to scroll it. We’re just going to scroll the screen
of tiles over and over again in such a game, but in this example, the scrolling will
be controlled by the mouse. You can work with a map that is deeper than it is
wide, so that will allow you to test scrolling up and down fairly well. Figure 11.14
shows the output from the DynamicScroll program.
DynamicScroll Header File
Here’s the DynamicScroll header file, which goes in the game.h header file.
// Beginning Game Programming, Second Edition
// DynamicScroll program header
Dynamically Rendered Tiles 251
#ifndef _GAME_H
#define _GAME_H
#include <d3d9.h>
#include <d3dx9.h>
#include <d3dx9math.h>
#include <time.h>
#include <stdio.h>
#include <stdlib.h>
#include "dxgraphics.h"
#include "dxinput.h"
#include "dxaudio.h"
//application title
#define APPTITLE "DynamicScroll"
//screen setup
#define FULLSCREEN 0 //0 = windowed, 1 = fullscreen
#define SCREEN_WIDTH 1024
#define SCREEN_HEIGHT 768
252 Chapter 11
n
Tile-Based Scrolling Backgrounds
Figure 11.14
The DynamicScroll program scrolls a map that was defined in the map array.
//data for the scrolling map
#define TILEWIDTH 64
#define TILEHEIGHT 64
#define MAPWIDTH 16
#define MAPHEIGHT 24
#define GAMEWORLDWIDTH (TILEWIDTH * MAPWIDTH)
#define GAMEWORLDHEIGHT (TILEHEIGHT * MAPHEIGHT)
//scrolling window size
#define WINDOWWIDTH (SCREEN_WIDTH / TILEWIDTH) * TILEWIDTH
#define WINDOWHEIGHT (SCREEN_HEIGHT / TILEHEIGHT) * TILEHEIGHT
//scroll buffer size
#define SCROLLBUFFERWIDTH (SCREEN_WIDTH + TILEWIDTH * 2)
#define SCROLLBUFFERHEIGHT (SCREEN_HEIGHT + TILEHEIGHT * 2)
//macros to read the keyboard asynchronously
#define KEY_DOWN(vk_code) ((GetAsyncKeyState(vk_code) & 0x8000) ? 1 : 0)
#define KEY_UP(vk_code)((GetAsyncKeyState(vk_code) & 0x8000) ? 1 : 0)
//function prototypes
int Game_Init(HWND);
void Game_Run(HWND);
void Game_End(HWND);
//scrolling map support functions
void DrawTile(LPDIRECT3DSURFACE9,int,int,int,int,LPDIRECT3DSURFACE9,int,
int);
void DrawScrollWindow();
void DrawTiles();
void UpdateScrollPosition();
#endif
DynamicScroll Source Code
Now let’s type in the source code for the DynamicScroll program. This code goes
in the game.cpp file.
// Beginning Game Programming, Second Edition
// DynamicScroll program
#include "game.h"
int ScrollX, ScrollY; //current scroll position
int SpeedX, SpeedY; //scroll speed
Dynamically Rendered Tiles 253
LPDIRECT3DSURFACE9 scrollbuffer; //scroll buffer
LPDIRECT3DSURFACE9 tiles; //source image containing tiles
long start; //timing variable
int MAPDATA[MAPWIDTH*MAPHEIGHT] = {
1,2,3,4,5,6,7,8,9,10,11,12,13,14,15,16,17,18,19,20,21,22,23,24,25,
26,27,28,29,30,31,32,33,34,35,36,37,38,39,40,41,42,43,44,45,46,47,
48,49,50,51,52,53,54,55,56,57,58,59,60,61,62,63,64,65,66,67,68,69,
70,71,72,73,74,75,76,77,78,79,80,81,82,83,84,85,86,87,88,89,90,91,
92,93,94,95,96,97,98,99,100,101,102,103,104,105,106,107,108,109,
110,111,112,113,114,115,116,117,118,119,120,121,122,123,124,125,
126,127,128,129,130,131,132,133,134,135,136,137,138,139,140,141,
142,143,144,145,146,147,148,149,150,151,152,153,154,155,156,157,
158,159,160,161,162,163,164,165,166,167,168,169,170,171,172,173,
174,175,176,177,178,179,180,181,182,183,184,185,186,187,188,189,
190,191,192,1,2,3,4,5,6,7,8,9,10,11,12,13,14,15,16,17,18,19,20,
21,22,23,24,25,26,27,28,29,30,31,32,33,34,35,36,37,38,39,40,41,
42,43,44,45,46,47,48,49,50,51,52,53,54,55,56,57,58,59,60,61,62,
63,64,65,66,67,68,69,70,71,72,73,74,75,76,77,78,79,80,81,82,83,
84,85,86,87,88,89,90,91,92,93,94,95,96,97,98,99,100,101,102,103,
104,105,106,107,108,109,110,111,112,113,114,115,116,117,118,119,
120,121,122,123,124,125,126,127,128,129,130,131,132,133,134,135,
136,137,138,139,140,141,142,143,144,145,146,147,148,149,150,151,
152,153,154,155,156,157,158,159,160,161,162,163,164,165,166,167,
168,169,170,171,172,173,174,175,176,177,178,179,180,181,182,183,
184,185,186,187,188,189,190,191,192
};
//initializes the game
int Game_Init(HWND hwnd)
{
HRESULT result;
Init_DirectInput(hwnd);
Init_Keyboard(hwnd);
Init_Mouse(hwnd);
//load the tile images
tiles = LoadSurface("spacemap.bmp", D3DCOLOR_XRGB(0,0,0));
//create the scroll buffer surface in memory, slightly bigger
//than the screen
result = d3ddev->CreateOffscreenPlainSurface(
254 Chapter 11
n
Tile-Based Scrolling Backgrounds