Professional Information Technology-Programming Book part 5 potx
Bạn đang xem bản rút gọn của tài liệu. Xem và tải ngay bản đầy đủ của tài liệu tại đây (21.85 KB, 6 trang )
1.8. Final Output
The very last stage of processing is to create your invaluable and nearly
irreplaceable digital positive. First of all, calling it a negative is technically
incorrect and, well, negative. Besides, we've gone well past the point where the
image was RAW. You're now making a copy that can be flattened, sized,
converted to a more universal format (such as JPEG or TIFF), and assigned the
proper color profile for the destination reproduction vehicle. How you create that
digital positive (Figure 1-5) will depend on what your purpose is for any given
version of a final output file: web, online media, offset printing, or output to a
desktop printer. The process may also require switching Color Spaces and Color
Management Profiles. We'll cover the ins and outs of all of that in Chapter 12.
Figure 1-5. In the end, the goal is a beautiful photograph that can be sent out into
the world.
Chapter 2. Be Prepared
This chapter is about what you need to do to make sure that the pictures you shoot
will be of the highest possible quality (given the circumstances you are shooting in
at the time). When I start to shoot a job, I want to make certain I think about all the
things I can do to ensure that I'm capturing as much of the scene's full dynamic
range as circumstances permit, that the pictures will be sharp, and that I am
exposing for the most important part of the subject. You may be surprised at how
comprehensive that checklist should be. On the other hand, I'm not going to crowd
these pages with every esoteric possibility. Photoshop is important, yes, but it
works best when it starts with good data.
Your Preparation Does Not Start with Photoshop
People tend to think of the Photoshop workflow as something that starts
in Photoshop. In fact, if you hope to get the best results from Photoshop,
the first step in your digital photo-making workflow should be making
sure you're prepared. Of course, being completely prepared could entail
all manner of complexities. So nope, we're not even going to try that.
Instead, this chapter is about making sure you've covered the pre-
planning basics. If what you need to do entails more than this chapter
covers, chances are you've been in business long enough to know what to
do and have an assistant or two who might even know more than you do.
If you've been shooting film and are just jumping into digital, you may
already know most of what's here. If that's the case, at least read the parts
of this chapter that have to do with calibrating your camera and using
your camera's Histogram feature.
2.1. Pre-Set Your Camera
This section is all about helping you get the most out of the data you create with
your camera.
If you're shooting JPEGs, you should be doing so because you have no time at all
to work on the images before you hand them off to your client. You want to set
your camera up so that when it does all the processing, it knows what it's supposed
to accomplish in terms of color balance, noise reduction, saturation, sharpening,
and even shooting modes such as black and white, sepia, snow, shade, and night
shot.
NOTE
JPEGs are not losslessly compressed, so be sure you always shoot at the highest
level of JPEG quality. Remember that each time a JPEG is opened and saved, it is
recompressed, so more of your original data is destroyed each time.
Consequenbtly, there's actually no such thing as a nondestructive JPEG workflow.
If you must shoot JPEGs, at least this book can help you with minimally
destructive workflow.
If you're shooting RAW, there's no need to use situational adjustment settings, such
as cloudy or portrait. The RAW file records everything the camera sees, regardless,
and leaves it up to you to adjust things in whatever RAW image processor you
choose. So there's no need to waste the camera's energy. Of course, you may want
to use those settings if you're shooting simultaneous JPEGs, since the JPEGs will
be affected.
If you have no control at all over what the next lighting situatio
n will be, make sure
your ISO is set to 200. If you're shooting after sunset or indoors (or both) make that
ISO 800. Then you have a reasonable expectation of getting enough depth-of-field
(DOF) or a fast enough shutter speed in a wide range of shooting conditions. What
you're doing is making the best compromise between getting a noisier image than
you're willing to put up with and having enough "film speed" to get a steady shot
in the broadest variety of outdoor daylight shooting situations. If, once you're
shooting, you find you have the leeway to drop your ISO setting, you'll have less
noise.
If you're going to be shooting at night or indoors, take along a flash even if you
prefer not to use it most of the time. Instead, take test shots and set your ISO high
enough to create a steady hand-held shot. You probably shouldn't worry much
about extending DOF unless you can afford a battery-powered external flash
system. You'll also want to be able to remove the flash from the camera and,
ideally, fire it by infrared remote control. Figure 2-1 shows several portable
external flash units.
Figure 2-1. External strobes come in a variety of sizes.
Plan on using tungsten bulbs if you need to keep your budget down when shooting
interiors or in the studio. If you want to have maximum depth of field and the
ability to freeze all movement (such as hair blown by a fan), use studio strobes (see
Figure 2-2). Battery powered studio strobes cost a bit more but make it possible to
use them at locations where there's no easy access to power or where a person is
likely to trip over the cords and damage your equipment.
Figure 2-2. A typical, reasonably priced studio strobe system.
2.1.1. Set Up Your Camera for What's Most Likely to Happen Next
If you miss an important moment because you had to stop and fiddle with your
camera, remember that I said this: any time you're about to move from one
situation to another and don't know exactly what the upcoming shooting conditions
will be, set your camera's mode dial to P, which is short for "Point and Shoot."
That is, the camera does the best to automatically figure out the best compromise
between shutter speed and aperture. It also assures you that you're going to get a
picture. At the very least, you'll be able to look at that picture after you've shot it
and be able to figure out whether you need to be able to go to Aperture or Shutter
priority or whether you need to switch to entirely manual control.
Speaking of manual control, there's one situation where it's always called forwhen
shooting with an external flash that's not made specifically to be controlled by the
camera. The best clue as to whether your camera can control the flash is whether
the brand name on flash and camera are the same. You should also read the
instructions for the flash.
2.1.2. Shooting a Calibration Target or Gray Card
It's always a good idea to put a gray card in the same position as the subject in at
least one frame of any sequence that is shot of the same subject in the same
location and lighting conditions. Later, it will be very easy to set your white
balance. The best candidate for utility and price is the Digital Gray Card from
Robin Myers Imaging. It is made of washable plastic, has full instructions on the
back of the card, and comes in two sizes (4x6 and 6x9 at $9.95 and $14.95,
respectively). This gray card is 10 percent, rather than the 18 percent gray that is
more traditional for film photography, and is said to work much better for
calibrating digital sensors.
2.1.3. Get in the Histogram Habit
Digital sensors have a greater tendency than film to block highlights. They also
have a tendency to exhibit more noise in the shadows. However, don't loose heart.
The flexibility you have in interpreting digital imagesespecially RAW filesfar
outweighs what you can practically expect from film. Just try to make sure you
don't over- or underexpose.
NOTE
The shape of the histograms will vary greatly from one picture to the next because
the shape reflects the distribution of pixels assigned to a given area of brightness. I
t
only matters that the histogram stops and starts with some space between the
endpoint of the histogram and the beginning of "the mountain."
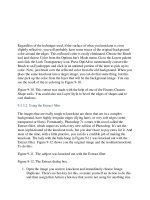
You do that by not relying on the camera's preview monitor for checking your
exposures. Almost all digital cameras, especially those likely to be used by readers
of this book, will let you check the histogram for any image you've shot. If you're
shooting with a DSLR, you won't be able to do that until after you've taken the
picture. So, as soon as you've put yourself in a position where you're likely to
shoot, take a picture. Then look at the Histogram for that picture. You want it to
look as much as possible like the Histogram (drawn in Photoshop Elements 4) in
Figure 2-3. You do not want the histogram to look like those in Figures 2-4
through 2-7.
Figure 2-3. The histogram for a properly exposed image.
Figure 2-4. A histogram showing blocked highlights. This is the biggest no-no.
Figure 2-5. A histogram showing blocked shadows. Some blocking is OK, as long
as the tones that are blocked don't convey important information. For instance, you
wouldn't expect to see much detail if looking directly into the sun or at a black
velvet curtain.
Figure 2-6. Most of the pixels are in the shadows. There are likely to be increased
noise levels when the image is properly adjusted because noise tends to reside
mostly in the shades below the midtones.
Figure 2-
7. Midtones are posterized because they are all the same brightness value.
Try lowering the camera's saturation value and/or dropping exposure by one-half
stop or so.