Professional Information Technology-Programming Book part 20 potx
Bạn đang xem bản rút gọn của tài liệu. Xem và tải ngay bản đầy đủ của tài liệu tại đây (39.07 KB, 7 trang )
shadows. High-key interpretations of an image tend to look dreamy, glamorous,
and idealized. That's one of the reasons they keep cropping up as a fad in fashion,
female portraiture, and cosmetic ads. However, high-key images can be equally
effective in creating a dreamy or foggy landscape or romantic wedding photo.
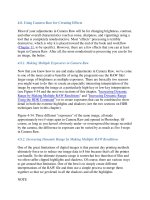
One precaution: any image that is destined to be interpreted as high-key should be
adjusted in RAW so that all the detail falls inside the borders of the Histogram. In
other words, you don't want to see any more "blocked" detailespecially in the
highlightsthan absolutely necessary, even though you may decide it's appropriate
when you finalize the adjustments in Photoshop. The Camera Raw Histogram
should look something like the one in Figure 4-42. Of course, this is an ideal
Histogram for virtually any type of RAW file exposure interpretation. But it's more
important here because if highlight detail is blocked to begin with, there will be
even more detail blocked when you use Photoshop to further interpret the image as
high-key.
Figure 4-42. The ACR adjustments and Histogram of a high-key interpretation.
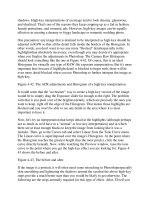
It would seem that the "no brainer" way to create a high-key version of the image
would be to simply drag the Exposure slider far enough to the right. The problem
with that is you push a lot of the brightest details, which are precisely the ones you
want to keep, right off the edge of the Histogram. That means those highlights are
blocked and you won't be able to see any detail in the area where it is most
important to have it.
Now, let's try an interpretation that keeps detail in the highlights (although perhaps
not as much as we'd have in a "normal" or low-key interpretation) and in which
there are at least enough blacks to keep the image from looking like it was a
mistake. Then, go to the Curves tab and select Linear from the Tone Curve menu.
The Linear curve is superimposed over the image's Histogram. At the point where
the Histogram reaches the greatest height (has the most pixels), click the tone
curve directly beneath. Now, while watching the Preview window, raise the tone
curve to the point where you get the high-key effect you are looking for. Figure 4-
43 shows the before and after.
Figure 4-43. The before and after.
If the image is a portra
it, it will often need some retouching in Photoshopespecially
skin smoothing and lightening the shadows around the eyesbut the above high-key
steps provide a much better start than you would be likely to get otherwise. The
following are the steps normally required for this type of effect. After, I'll tell you
what I did in Photoshop to improve these effects when applied to a portrait.
1. Open your image in Camera Raw.
2. Move the Highlight slider until the highlights are just touching the right foot
of the Histogram.
3. Move the Shadows slider as far to the left as you can without pushing the
shadows off the left end of the Histogram.
4.
Move the Brightness slider all the way to the right. If a significant amount of
the Highlight detail has moved off the end of the Histogram, look at the
brightest tones in your image. If they lack detail that you'd like to see, drag
the Highlight slider back to the left until you reach the best compromise.
5. Drag the Contrast slider both ways until you feel you've gotten the best
effect that you can get from this particular image.
6. Click the Open button.
You will almost always want to do some further work on your high-key image in
Photoshop. The main reasons are retouching, layer blend modes, and masked
Adjustment layers, since none are available (yet) in Camera Raw.
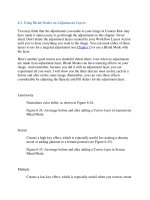
In this portrait in Figure 4-44, there are still areas of the face that are in shadow
and, as a result, aren't very flattering. In fact, they're even less flattering than in a
normal tone portrait because the lighter skin tones contrast more noticeably with
the shadows. After opening the RAW file you just made in Photoshop CS2, open
the Layers palette and click the New Layer icon at the bottom of the palette. A new
layer will appear just above the background layer.
Figure 4-44. The high-key portrait as it came out of Camera Raw (left) and after
further adjustments in Photoshop (right).
There are big advantages to burning and dodging with the Brush and an Overlay
layer, rather than the burn and dodge tools. First, it has no effect on the original
image's layer. So, if you goof, you can just paint that part of the layer 50 percent
gray and then start over. Second, there's no loss of contrast or change of color
balance in the burned or dodged areas because you are changing brightness with
absolutely color-neutral tools. Third, you can "blend" the effect by changing the
layer Opacity after the fact. To burn and dodge with the Brush and a 50% Gray
Overlay layer:
1. Fill the new layer with 50 percent gray. Of course, this will hide your
portrait momentarily, but choose Overlay from the Blend mode menu in the
Layers palette and the gray suddenly becomes transparent.
2. Press D (for default) to set your foreground colors to black and white, then
press X to switch your foreground and background colors so that White is
the foreground color. Now you can dodge by using the Brush tool to paint in
white. In the Brush Options, set Opacity to about 12 percent. Size the brush
so it covers a bit less than the area you want to dodge and start painting into
the shadows you want to lighten. Keep stroking (just as you would with the
Dodge tool) until the area is as light as you like. In Figure 4-44, I did the
following:
o Created a large feathered brush to darken her hair slightly. To do this,
I switched the foreground color to Black, lowered the opacity, and
painted over the highlighted areas of the hair.
o Created a new layer above the background layer to remove the
wrinkles and skin blemishes nondestructively. But this time I selected
the background layer. I also tu
rned off the Burn and Dodge layer I just
created (and any other layers that might have been added for whatever
reason), leaving only the new, transparent layer and the Background
layer visible. Next I chose the Spot Healing brush. In its Options bar, I
make sure the Sample All Layers box is checked (clicking the box
toggles the checkmark on and off). Now I "heal" all the spots. The
Healing and Clone Stamp brushes will work the same way, but not the
Patch tool. All the healing strokes appear on the new transparent
layer.
3. Use a masked adjustment layer to lighten, darken, or change contrast or
color balance to specific areas of the image. Select the area of the
background layer you want to change. You'll want to soften the edge of the
selection enough so that it blends smoothly with the other areas of the
image, so choose Select
Feather and then enter a number of pixels for the
width of the transition from 100 to 0 percent opacity. Go to the Layers
palette and choose the type of Adjustment layer you want to use.
For this example, I wanted to drastically lighten the blouse and background, so I
selected both, feathered at 100 pixels, and then used a Levels Adjustment layer and
dragged the Midtone (middle) slider to the left until those areas were bright enough
to suit me.
You can see the result of both the Camera Raw and Photoshop CS2 steps in Figure
4-44.
4.8.5. Creating a Low-Key Effect
In case you haven't already guessed, a low-key image is the opposite of a high-key
image. That is, most of the tones in the image are in less than 50 percent of the
overall brightness range. Low-key images tend to lend a more classic or somber
effect. They're also used more often for masculine subjects than for feminine.
Think Rembrandt. Creating a low-key effect isn't just a variation on creating a
high-key effect. After you've opened the image in Camera Raw:
1. Move the Highlights slider to the left until the highlights leave a bit of space
at the right foot of the Histogram.
2. Move the Shadows slider a little to the right, cutting off a bit of the end of
the Histogram.
3. Move the Brightness slider to the left. Take a look at the Histogram. If a
significant amount of the Highlight detail has been cropped at the top, take a
look at the brightest tones in your image. If they lack detail that you'd like to
see, drag the Highlight slider back to the right until you reach the best
compromise that you can.
4. Click the Curve tab and choose Linear from the Tone Curve menu. Now
make a curve somewhat like that in Figure 4-45.
Figure 4-45. A tone curve for a low-
key image. Yours will vary according to
the exact levels of brightness in your image. Be careful not to let the peak of
the Histogram move above the top side of the frame, as this will cause a loss
of data.
5. Click the Open button. Your low-key image will open in Photoshop.
You may need to repeat these steps for post-processing in Photoshop. You
especially may need to burn in areas that were formerly very bright highlights.
4.8.6. Making a Black and White Image in Camera Raw
There are many ways to make black and white and other types of monochrome
images in Photoshopso many in fact that it could almost become its own separate
science. Bet you didn't know you could do quite a decent job and do it a lot faster
(although with slightly less flexibility) using Camera Raw.
Simply making an ordinary black and white comes about as close as possible to
being a no brainer. After adjusting Shadows, Brightness, and Contrast to your
liking, simply drag the Saturation slider all the way to the left. Figure 4-46 shows
the color and black and white renditions of the same photo after this treatment.
Figure 4-46. Left: a color portrait after adjusting Exposure, Shadows, Brightness,
and Curves. Right: a black and white rendition of the same portrait made by simply
removing saturation in Camera Raw.
You can do better than that, though. That is, you probably can but won't know until
you try. There are two ways that Camera Raw lets you change the tonalities in the
image. This is done in analog photography by choosing film or using filters that
make the film more sensitive to different colors of light. You can do a similar thing
in Camera Raw by changing the Temperature and Tint settings. You can then go
one step further by changing the color sensitivities using the Calibrate tab. All of
these actions will change the tonalities in the monochrome image without actually
bringing any color back into the image. To create a black and white image:
1. Make the color version of the image look as good as possible in Camera
Raw by using the steps described earlier in the Adjust Tab section.
2. Drag the Saturation slider all the way to the left (by the way, you can
approximate a hand-colored process by removing nearly all the saturation;
try entering -60 in the box).
3. With the Saturation at -100, move the Temperature slider back and forth
until you're pleased with the new Tonal values. Figure 4-47 shows several
different interpretations of the same image.
Figure 4-47. From left to right, the color temperature has been changed to
2,000, 4,000, 6000, and 8,000.
4.8.7. Toned Monochrome from Camera Raw
You can actually use the previous techniques to create a "look" approximating
sepia- or blue-
toned images, although they'll still have a bit of color in them. It's an
especially good trick for a web s
ite photo or to approximate it for client approval in
a proof.
To create a sepia-toned image, drag the Temperature slider so far to the right that
the whole image turns a reddish-brown. Now drag the Saturation slider to about -
55.
To create a blue-toned image, drag the Temperature slider so far to the left that the
whole image turns blue. Now drag the Saturation slider to about -55. The result is
Figure 4-48.
Figure 4-48. Faux sepia and blue renditions of a portrait.
Chapter 5. Nondestructive Layering
The secret to a good nondestructive workflow lies in a regular system of
organizing layers and layering techniques. The objective of keeping the workflow
layered is that individual layers can be modified without affecting other layers.
One type of layers, Adjustment layers, are completely nondestructive. You can
always readjust an adjustment layer's effect as long as it hasn't been blended with
another layer by double-clicking on the icon that designates its adjustment type.
When you do that, the standard dialog for that type of adjustment appears.
Adjustment layers affect all v
isible portions of any underlying layers. You can also
make them affect only a specific layer or group of layers by attaching them as a
Clipping Mask to the target layer or group.
Adjustment Layers: The Key to the Nondestructive Workflow
This chapter is about how certain types of layers should be ordered and
how you can use them to track exactly what you've done to your image.
I'm not going to break down all the individual tricks that could be used
on each of these layer types right here. This chapter covers the rationale
for why the layers are placed in this order.
This seems to be the best place to objectively address a problem that many users
have with using "too many" layers: use of disk space and RAM. Let's face it, some
of your images will be approaching 300 or 400 MBs by the time they near the end
of the nondestructive workflow recommended in this book. But there are several
solutions to this problem, including:
Add a cheap external hard drive to your setup. Buy the capacity of driv
e that
will give you the lowest cost per megabyte. These days, it is about 30 cents
per megabytethe cost of a single CD.
Create a LZW compressed and flattened version of the final image and let
that be the only one that is permanently kept on your hard drive. To do this,
copy the layered file and move it to both CD/DVD and to an external hard
drive. If you can't yet afford the hard drive, at least make the backup to a
name brand CD/DVD and mark it with an acid-free marker. Don't use a
standard marker or store your CDs in albums that haven't been certified as
acid-free or archival.
NOTE
Although it's good discipline to arrange your Photoshop editing workflow in the
suggested order on the layers as they appear in the book, you do have the option of
performing the work for a layer out of necessity and then moving it to its "proper"
position later. After all, there will be times when you need to do the work that
creates the most obvious results first to turn an image around as quickly as
possible.