Professional Information Technology-Programming Book part 12 pptx
Bạn đang xem bản rút gọn của tài liệu. Xem và tải ngay bản đầy đủ của tài liệu tại đây (30 KB, 7 trang )
www.kenmilburn.com.
Camera Data 1
All this data is automatically entered by your camera and cannot be
modified.
Camera Data 2
All this data is automatically entered by your camera and cannot be
modified.
Categories
Category: Don't enter. These fields are no longer used in current IPTC core.
Supplemental categories: Don't enter. These fields are no longer used in
current IPTC core.
History
Big blank page that you can fill with a descriptive paragraph or two.
IPTC contact
Creator: Your name, not that other guy's.
Creator's job title: Photographer, assistant photographer, whatever.
Address: Your business address.
City: Your town or village.
State/province: Just what it says.
Postal code: The zip code.
Country: Not the planet, silly.
Phone(s): As many phone numbers as you care to list.
Email(s): As many email addresses as you care to list.
Web site(s): As many of your web sites as you care to list.
IPTC content
Headline: Could be the same as title, but should be descriptive rather than
emotional.
Description: Should be the same as the caption, or an alternative caption.
Keywords (be sure to separate each with a comma or semicolon): For
consistency, these should be the same as the keywords in the Description
above and come from your list.
IPTC subject code: These must be the official IPTC-sanctioned codes. (See
list at www.newscodes.org.)
Description writer: Whoever wrote the descriptionyou, an assistant, or the
agency exec.
IPTC image
Date created: The date the information on this page was created.
Intellectual genre: These are meant for the IPTC listings at
www.newscodes.org.
IPTC scene: These should be taken from the official IPTC listing of scene
codes, found at www.newscodes.org.
Location: The one where you took the picture.
City: The one where you took the picture.
State/province: The one where you took the picture.
Country: The one where you took the picture.
ISO country code (menu): Codes are listed from all countries. Just choose
the one where you took the picture.
IPTC status
Title: Same as the other title.
Job identifier: Codes that you invent for a particular job. Be sure to keep a
listing of them, both printed out and on your computer(s).
Instructions: Notes on how the image should be processed, delivered, etc.
Provider: Person or organization who provided the image. If it's your photo,
you're the provider. If it was a stock agency or someone else, make note
here.
Source: Owner of the original copyright on this image.
Copyright notice: Create copyright symbol using these commands: Opt/Alt-
Cmd/Ctrl-C (e.g., © 2005, Ken Milburn).
Rights usage terms: Where, how, and how many times the image can be
published by this specific client (named here).
Adobe Stock Photos
This information should come with the photo when you purchase it.
Origin
Date created: When the photo was taken.
City: Where the photo was taken.
State/Province: Where the photo was taken.
Credit: Who's providing this image (probably you).
Source: Original copyright holder.
Headline: Short description of what's going on here.
Instructions:
How to transmit or transport the photo to its destination, as well
as any additional rights or usage info.
Transmission reference: Codes for identifying the job.
Urgency (menu):
Ratings from 19: 1 is High, 5 is Normal, 8 is Low, and 9 is
None.
Advanced
You have to take a graduate course for these.
3.5.5. Using Bridge to Find Images by Metadata Fields
The power of Bridge's Find command is a well-kept secret that is seldom even
mentioned in other books. There's a reason for this: the location and name of the
command make it look as though there's no difference between it and the
Photoshop Find command. Ha! Wait 'til you see Figure 3-
22the dialog that appears
when you choose Edit Find from the Bridge main menu.
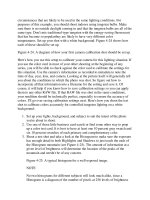
Figure 3-
22. The Bridge Find dialog is reminiscent of the Batch Rename menu and
features an amazingly powerful selection of options.
Although it's unlikely you'll ever search all the criteria shown, you can search on
any combination of them. Note that you can search an entire drive if you check the
Include All Subfolders box. Maybe someday you'll even be able to search multiple
drives.
After you've entered your search criteria in the Find dialog above and clicked OK,
you'll eventually see a new window that contains just those images (see Figure 3-
23). It may be that you want to save that particular set of images as a collection so
that you can quickly find the whole group. Then you can send them to the client,
turn them into a slide show, or use the Image Processor to convert them to TIF,
JPEG, or resized PSD for a different purpose or to turn them over to someone else,
such as a publisher, client, or fine-art printer.
Figure 3-23. The Save As Collection opens as a new Bridge Window. Once you've
saved what your search has gathered, the button changes to Edit Collection, and
you can add criteria to your search or change the folders you're searching.
NOTE
Any time you add a keyword(s) that was also used to create the search, that image
will automatically be added to the collection. No need to repeat the Find command
or to use the Edit Collection button unless you want to add more keywords to the
search criteria for that collection.
3.5.6. Entering Keywords
You can sort and search o
n metadata fields much more quickly than you can search
through the thumbnails. One of the most useful things to search and group are
descriptive keywords that you can add to the metadata by hand:
To add keywords, make sure the Keywords panel is open by clicking its tab.
If the tab isn't available in your current choice of workspaces, just check the
Keywords panel in the View menu. You can see the Keywords panel in
Figure 3-24.
Figure 3-
24. The Keywords panel, with the keywords that have already been
assigned.
NOTE
You can add keywords when you group and rank your files in Bridge or any
time you think it might be helpful to add keywords to an image or a group.
To add keywords to a pre-existing category:
1. Click the Category you want the keyword to appear under.
2.
Choose New Keyword from the Keywords panel menu (click the little
arrow at the top-right of the panel). Or Ctrl/right-click the Category
heading. Or click the New Keywords icon at the bottom of the
Keywords panel.
3. Enter keyword in the new Keyword field that appears right under the
category heading. Its name is Untitled Key, but it's highlighted so you
can just enter any name you want. For consistencies sake, it's a good
idea to use the IPTC list and your own lists that you made in Chapter
1 as the source for keywords. If you have to use a new word, be sure
to add it to the list you typed on your computer.
To add a new Keyword Set, follow the same options as above, but choose
Keyword Set from whichever menu you pop up. Once again, use your
existing list of categories a
nd be sure to add to that list when you must create
an entirely new name.
NOTE
You may wonder why I haven't suggested that you premake a list and then
add the whole list to your Keywords panel. It's very important not to
overcrowd your list, because you may end up adding a lot of keywords that
aren't applicable to any images in your collection. When you try to sort for
that keyword, you'll just be wasting time. Worse, you'll have to search
through all the keywords you never use before you find the ones you do use.
To add Keywords to a group of files:
1. Preselect the files you want to add the same keyword to. Presumably,
since you are supposed to do what I tell you to do, you have already
dragged files within a given category so that they're adjacent to one
another. So all those files should have a number of their keywords in
common. Because it's a lot faster to add keywords to all the files that
will have them in common (as long as they're in the same folder),
press Shift while clicking the first image's thumbnail, then go to the
last image, press Shift again, and click on the last image.
2. Scroll to other images that need the same keywords you're about to
enter and press Cmd/Ctrl Click on each of the individual images. They
will be selected discontiguously.
3. Click the Keywords panel tab.
4. Check any of the existing keywords that apply.
5.
Follow the instruction for adding keywords in the section above if you
have new keywords that need to be added to these images. Be sure to
check your keywords list and make sure to cho
ose keywords from that
list unless you've discovered a new category that simply can't be
described by anything in your existing list. Then add it to both your
existing list and to the new keywords.