Professional Information Technology-Programming Book part 15 ppsx
Bạn đang xem bản rút gọn của tài liệu. Xem và tải ngay bản đầy đủ của tài liệu tại đây (32.14 KB, 6 trang )
Now you've got your basic exposure nailed. If you feel the image needs a bit more
or less contrast, you can play with the Contrast slider. You can (and probably
should) finalize contrast with the Curve tab (see the "Using the Curve Tab" section
next), which will give you more control over the amount of contrast assigned to a
given brightness range in the image. Using the Contrast slider is simply a matter of
adjusting it to suit your visual preferences. Remember to leave all three Preview
boxes checked so you can tell if your contrast adjustments start blocking highlights
and shadows.
Whether to Check Auto on the Adjust Tab
If you're looking at your photos as Camera Raw automatically interpreted
them, you may be wondering why you should make any adjustment at all.
In the default Auto mode, Camera Raw is pretty good at giving you the
same result you'd expect from a one-hour photo lab. This is a blessing
because you can now turn around a whole RAW photo shoot to your client
for approval with very little fiddling. So as I tell you about the correct
workflow for adjusting the rest of the sliders in the Adjust tab, I'm going
to be telling you how (almost 100 percent of the time) you can make the
image look even betterand sometimes a whole lot better.
I recommend leaving Auto Adjust on as a default valueit gives you a
starting place.
There is one danger to this: you can't always tell how close to perfect your
original exposure was and, therefore, what needs the most adjustment. But
all you have to do to compare the original exposure with the Auto
exposure is press Cmd/Ctrl-U to toggle Auto settings on and off. When
you turn Auto off, the images appear as they were shot. When you turn
them on, the settings will go back to being the last ones you chose. So
there's no chance that you'll inadvertently obliterate your painstaking
adjustments.
When you're ready to "perfect" your image (for maximum efficiency, it's
best to wait for client feedback so you don't have to do more work on all
of them) use the following workflow:
After client approval, make as many improvements as you can in
Camera Raw because it's completely nondestructive.
Go to the images that have been approved, press Cmd/Ctrl-U to turn
off all the Auto checkmarks.
"Custom" adjust the settings in the tabs to produce the best-looking
image possible.
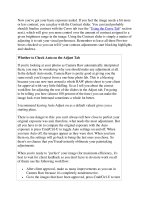
4.3.2. Using the Curve Tab
The next tab in the workflow is the one that goes out of order. The Curve tab's
workspace is too large to fit within the Adjust tab, so it has to have its own tabeven
though you're still adjusting. It really should have been positioned right after the
Adjustment tab, but it's brand new, so it was simply tacked on near the end. You
can see the Curve tab in Figure 4-15.
Figure 4-15. The Curve tab.
The Curve tab is just a simplified version of the Curves command in Photoshop's
Image menu or in the Curves adjustment layer. There are some important
differences:
The contrast of individual color channels can't be adjusted in Camera Raw
Curve.
There is no Pencil tool that lets you draw a freehand curve.
The curve adjustment can't be masked so that it is focused only on specific
portions of the image.
It can only be used once on the entire image.
So if the Curve tab isn't quite as powerful as the (nearly) equivalent command in
Photoshop, why not wait until the image is in Photoshop? Well, there are actually
several reasons:
Creating the basic contrast curve for the image is completely nondestructive.
However, to readjust it you have to return to the RAW image and reset the
curve contrast. So you only want to use it here to control the contrast within
overall brightness ranges in the image.
The more basic you make this adjustment now, the easier it will be to add
Curves Adjustment layers in Photoshop to control very specific brightness
ranges (skin tones or skies, for example).
You can immediately see how your curve adjustments affect the image's
Histogram, so you know when you push the brightness of a certain range
beyond its limits. Remember, too much brightness information in a specific
range will push past the top border of the chart. Too little will leave a blank
space in the Histogram. If the Histogram goes off the chart at either end,
there is no brightness detail in either the whites (highlights) or blacks
(shadows).
There are many ways you can construct a curve. The most basic curve is a linear
curve (so called because it is simply a straight diagonal line from one corner of the
Histogram to the other). By default, the Tone Curve menu is set at Medium
Contrast. I find that I have more control over the tonalities that I want to see by
choosing Linear and then performing the following steps to adjust the curve (if you
have a lot of experience with curves, you might want to skip the first two steps):
1. Choose Linear from the Tone Curve pop-up menu. Move the cursor to the
very center of the diagonal line (where it intersects a grid point) and click.
This point represents the exact midrange of the image.
2. Place a point and the other two intersections of the diagonal line. The one at
the bottom represents shadow midtones; the one at the top represents
highlight midtones.
3. To brighten a range of tones, click to highlight the point that represents that
range of tones. You can drag it around, but your adjustments will be much
more precise if you use the arrow keys.
4. Experiment with the placement of the dots until you like the way the image
looks in the Preview window. If you've left the Preview boxes checked, you
can also make sure that none of your Curve changes have caused blocked
highlights or shadows.
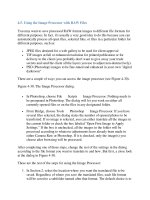
4.3.3. Using the Detail Tab Settings
Many experts recommend using Photoshop to correct issues instead of using the
Detail tab. If your goal is maximum image quality no matter how long it takes,
follow that advice by all means. On the other hand, if you often find yourself in
high-pressured situations, it's a great advantage to do your initial sharpening and
sensor noise cleanup before you send it out of Camera Raw and straight to your
client.
The Detail tab is immediately to the right of the Adjust tab. It is used to control
sharpening and sensor noise (see Figure 4-16).
Figure 4-16. The Detail tab.
4.3.3.1. Sharpening
The Sharpeness slider is meant to be intuitive and interactive. However, you
should be very careful to avoid over-sharpening, especially if you plan to do the
Effects and Output sharpening that a good "workflow for perfection" calls for.
That's because sharpening sharpens sharpening. The result is overly contrasting
edges and (worst case) added black shadow outlines and white halo outlines.
To avoid over-sharpening, sharpen at normal size in the Preview window. Then,
before you save the image, double-click the Zoom tool so you can see a 100
percent preview. If you see even the hint of sharpening artifacts, back down on the
sharpness slider.
4.3.3.2. Eliminating sensor noise
Sensor noise is something you're most likely to encounter if:
You're shooting with a small sensor (point-and-shoot) camera.
You had to elevate the ISO setting because you were shooting in low light or
needed to capture speedy movement.
You have a series of images with a lot of deep shadow detail that you needed
to brighten.
Like Sharpening, eliminating sensor noise is something that can be done as well as
or better once the image is saved to Photoshop CS2. However, if you only have
enough time to process your image in Camera Raw before using the Image
Processor to convert your files into TIF or JPEG to ship to your client, then
Camera Raw's ability to clean up any sensor noise is better than none. And, once
again, if you have the time later, you can always return to the RAW file and output
an image in which you've turned off Luminance Smoothing and Color Noise
Reduction.
Luminance Smoothing
Works on the odd monochromatic clumps of artifacts that look a bit like film
grain. It selects and blurs these lumps so they blend in with the rest of the
image. Actually, as you might guess, you have to be careful not to overdo it,
as this will soften the image, thereby "undoing" your sharpening.
Color Noise Reduction
Gets rid of the wee color speckles that are the really distracting and upsetting
part of image noise.
The amount and characteristics of noise that you get in your images will vary
greatly. First, every camera model is different. Second, the smaller the sensor, the
more likely you are to encounter noise. If you have an APS or larger size sensor,
there will likely be no camera noise except at settings above ISO 400. In fact, some
full-frame CMOS cameras and Foveon sensors may have no noise except when
shooting very long exposures in the dark.
If the noise problem for a given image is extreme, you may just have to live with
what you can reduce it to or buy a third-party noise filter such as Noise Ninja or
Neat Image. The best you can do in Camera Raw is to do the best you can. More
often than not, that will be enough. To find and reduce the noise that may be in an
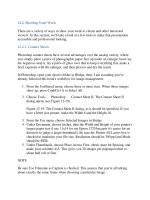
image, follow these steps:
1. Double-click the Zoom tool. You'll be at 100 percent magnification.
2. Use the Hand tool to pan around the image until you find a dark to medium
gray area of fairly uniform color (the smoother the better). You may want to
zoom in a bit more. Do you see anything that looks like grain or little
blotches of color? If so, you've got noise (Figure 4-17).
Figure 4-17. A 100 percent enlargement of a section of an image that shows
pronounced noise.
3. In the Details tab, drag the Luminance Smoothing slider slowly to the right.
Be sure to release it every 1/8" so you can see the result. At the point where
the grainy monochrome spots seem to loose their texture, stop. If you haven't
lost any sharp edges, you're fine. If you have, back off a bit.
4. Are there any blotches of color that don't look like the natural texture of
what you've photographed? If so, drag the Color Noise Reduction slider
slightly to the right. When the color blotchiness is gone, you're coolas long
as you haven't fuzzed your image.