Professional Information Technology-Programming Book part 18 ppsx
Bạn đang xem bản rút gọn của tài liệu. Xem và tải ngay bản đầy đủ của tài liệu tại đây (34.36 KB, 6 trang )
4.5. Using the Image Processor with RAW Files
You may want to save processed RAW format images to different file formats for
different purposes. In fact, it's usually a very good idea to do this because you can
automatically process all open files, selected files, or files in a particular folder for
different purposes, such as:
JPEG files destined for a web gallery to be used for client approval
TIF images at full or enhanced resolution for printed publication or for
delivery to the client (you probably don't want to give away your trade
secrets and send the client all the layers you use to adjust non-destructively).
PSD (Photoshop) images to be fine-
tuned and enhanced in your own "digital
darkroom"
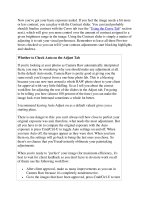
There are a couple of ways you can access the image processor (see Figure 4-30).
Figure 4-30. The Image Processor dialog.
In Photoshop, choose File Scripts Image Processor. Nothing needs to
be preopened in Photoshop. The dialog will let you work on either all
currently opened files or on the files in any designated folder.
From Bridge, choose Tools Photoshop Image Processor. If you have
several files selected, the dialog states the number of opened photos to be
transferred. If no image is selected, you can either translate all the images in
the current folder or check the box labeled "Open First Image to Apply
Settings." If the box is unchecked, all the images in the folder will be
processed according to whatever adjustments have already been made in
either Camera Raw or Photoshop. If it is checked, only the image(s) you
choose after browsing will be processed.
After completing one of those steps, change the rest of the settings in the dialog
according to the file format you want to translate to and how. But first, a close look
at the dialog in Figure 4-30.
These are the rest of the steps for using the Image Processor:
1. In Section 2, select the location where you want the translated file to be
saved. Regardless of where you save the translated files, each file format
will be saved to a subfolder named after that format. The default choice is to
have the "Save in Same Location" radio button active. If you want to browse
to a different folder, click the Select Folder radio button, and click the Select
Folder button to bring up a Browser dialog. Use that dialog to navigate, and
pick the folder in which you want to place the translated files.
2. Image Processor will translate to any or all of the three file types at once. In
Section 3, check the boxes for the formats you want to use. If you choose
"Resize to Fit" for any file type, the files will be resized to fit within your
designated dimensions while maintaining their original proportions. For
JPEGs, you can choose the quality level by entering a number between 1 and
10. The lower the number, the faster files will load
on the Internet. If you are
saving JPEGs to be printed as proofs, select a quality level between 8 and
10. Finally, JPEGs destined for the Internet should be saved to sRGB color
profile so they look more consistent on a wide variety of monitors. If you ar
e
saving to PSD, you will want to check the Maximize Compatibility box if
those files will be shared with others who have different operating systems
or versions of Photoshop and other compatible image processors. If you are
saving as TIF, I recommend usin
g LZW compression, since it is lossless and
saves file space. The only danger LZW poses is very rare incompatibility
with some programs.
3. You will rarely use Section 4, but it can be pretty jazzy. It can run any
Action you've recorded on all the files you're translating. Keep in mind that
it will run that Action on all the different types of files, which may be reason
to designate only one file type for translation in Section 3. You can also
enter copyright text that will be saved in the image's metadata; type
"Copyright Your Name Year" in the Copyright Info field.
4.6. Differences in Camera Raw in Photoshop CS2 and Photoshop Elements 4
Perhaps the most important thing you need to know about processing your RAW
files in Photoshop Elements 4 versus Photoshop CS2 is that nothing you do to a
RAW file is permanent. So if you move up to the more plentiful and sophisticated
features in Photoshop CS2, there's a chance that you'll be able to improve on what
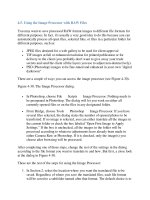
you could do with the same image in Elements 4. Figure 4-31 shows you the
Photoshop Elements 4 Camera Raw interface.
Figure 4-31. The Camera Raw workspace in Photoshop Elements 4.
If you're fam
iliar with Camera Raw in Photoshop CS2, it's easy to see what most of
the differences are. From left to right, top to bottom:
There are no Color Sample, Crop, or Levels tools.
You can't open multiple files in the same workspace, so you can't winnow
and app
ly identical application settings to multiple files. Instead, if you open
multiple RAW files at once, you have to do the settings for the first file,
push any button other than Cancel, and wait until the Camera Raw
workspace opens for the next file you selected. You can then apply the same
settings as for the previous file.
No option for saving settings, except as a default.
There are only two settings tabsAdjust and Detailbut they are identical to the
same tabs in Camera Raw for Photoshop CS2.
There are no Auto adjust boxes.
There is no Show Workflow Options space, so you can't choose to assign a
color space, change the output image size, or change the resolution.
There is no 32-bit output option, only 8- and 16-bit.
The bottom line: I wouldn't use Photoshop Elements 4 for "bulk" processing of
high-volume shoots with numerous variations of the same image. There is an
alternative, however, if you're not quite ready to invest in Photoshop CS2: Raw
Shooter Essentials (free) or Premium (only $100 and even more capable than
Camera Raw CS2). You'd also have the option of using Adobe Lightroom or Apple
Aperture. You'll find more on these alternatives near the end of this chapter. And
Chapter 6 is all about Lightroom, which you will want to download as soon as a
beta is available for your computer.
4.7. Opening and Adjusting Multiple RAW Files in Photoshop CS2
When you have multiple images that have the same exposure, brightness range,
contrast, and color balance, you should open them all at once in Camera Raw.
Then click the Select All and Synchronize buttons so the settings applied to any
one of the images will apply to all of them. This situation especially applies to
product, fashion, journalism, and event photography where many photographs are
taken of the same subject to ensure capturing just the right "moment." You do not
want to spend time adjusting each photo individually, since it could unnecessarily
add hours to your processing time.
You have to start in Bridge to get into Camera Raw. If you jumped ahead to this
chapter out of a rabid curiosity about Camera Raw, jump back to the "Applying
Camera Raw Settings in Adobe Bridge" section earlier in this chapter and
familiarize yourself with the steps you ordinarily take in Bridge. Then, if you're
following my workflow rules as religiously as I dogmatically demand, you have
already eliminated all the really obvious losers. You've also used Bridge's lightbox
feature (choose Window Workspace Lightbox) to physically place photos
that should be adjusted in the same (or nearly the same) way next to one another.
Once you've done that, processing efficiency demands that you open all the related
files in Camera Raw at the same time.
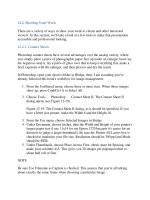
You select a series of contiguous files by selecting the first file, pressing Shift, and
then selecting the last file in the series. Figure 4-32 shows you the Bridge Light
Table workspace after putting contiguous files together.
Figure 4-32. Using the lightbox workspace in Bridge, with similar images placed
so that they are next to one another on the "light table."
Select a series of files that you haven't "lightboxed" into contiguous groups by
selecting the first image, Cmd/Ctrl-
clicking on another and then on all the files you
want in that series. To simultaneously transfer those files into Camera Raw, press
Enter/Return.
4.7.1. Adjust Similar Files at One Time
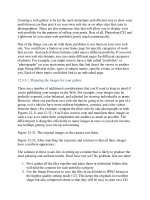
You c
an synchronize the open files so that when an adjustment is made to one, it is
applied all. If you've opened 15 files, that means that you've saved 15 times as
much as if you'd done each file individually. Doing this is a matter of:
1. Clicking the Select All button.
2.
Clicking the Synchronize button. The Synchronize dialog appears, as seen in
Figure 4-33.
Figure 4-33. The Synchronize dialog in the Camera Raw workspace.
3. Unchecking the boxes for the properties you don't want to synchronize.
4. Making the adjustments for the image currently in the Preview window. The
images for all the thumbnails will be adjusted simultaneously for the
selected properties.
If you are doing this for the first time, you probably want to keep all the boxes in
the Synchronize dialog checked. If you just want to change a setting or two for a
group of files that you've already adjusted, uncheck all the settings except those
you want to change. If you only want to change one property for all the
synchronized files, choose that property from the Synchronize menu at the top of
the dialog. Now when you adjust any of the settings in any of the tabs, the same
adjustment will take effect for all the images that are currently open, selected, and
synchronized.
4.7.2. Ranking and Deleting
You should have already done all your initial ranking and winnowing (deleting) in
Bridge. However, there's a big advantage to making your final choices after you
open multiple files in Camera Raw: you can magnify all the images to whatever
extent it is necessary to spo
t fatal flaws. The most persistent of these include minor
blurring due to focus, camera shake, or forgetting to stop down enough to increase
depth of field to the degree necessary. No matter how good the shots are in other
respects, these shots are never going to be good enough (and don't fool yourself
into thinking that you can recover them by sharpening).
Click the Select All button and then double-click the Zoom Tool icon. You'll still
see the whole image in the thumbnail, but when you choose an image for
previewing it will be enlarged to 100 percent in the Preview window. Grab the
Hand tool and pan the image to the place where focus is most critical. As long as
all the other images are still selected, they will be prepanned to the same location
when you select them for previewing. Now you see approximately the same
portion of the image when you preview each image using the arrow keys.
When you see an image that's technically unacceptable, just press
Delete/Backspace. A red X will appear in the upper-right corner of the thumbnail.
If you change your mind before leaving Camera Raw, select that image and press
Delete/Backspace again. The red X will be gone. Don't leave Camera Raw until
you're sure you want to delete the images in the Trash, because that's exactly what
will happen. Of course, you could still open the Trash and drag any images back to
the folder they came from. You just have to be able to identify them by their
filename since your system's file browser may not read RAW files.
4.7.3. Using the Save Button
You do not want to click Save until you've done everything in Camera Raw to
make the image look as much like the final image as possible. The result of your
Camera Raw adjustments will become the Background Layer of your Photoshop
file. This is because you want to avoid keeping track of multiple versions of a
Photoshop file, which is because you can keep all the versions on layers inside the
same file in .psd format. So when you have finished adjusting but need various
versions for various purposes, automatically create a version for each of those
purposes. You do that by turning off the layers you don't need for that version,
exporting the result to all the sizes, color spaces, quality settings (if they are
JPEGs), and sizes you need for the image's various intended purposes, and then
number those versions.
At the bottom right of the Camera Raw dialog is the only button that doesn't record
any settings or changes made in the current Camera Raw session. That button is the
Cancel button. Use it when and if you come to a point where you just know you
have to take a deep breath and start over from a fresh point of view.