Professional Information Technology-Programming Book part 37 potx
Bạn đang xem bản rút gọn của tài liệu. Xem và tải ngay bản đầy đủ của tài liệu tại đây (31.24 KB, 6 trang )
.1. Where to Find the Pieces for Your Collage or Montage
The problem with composites is that you don't always have immediate access to
the photos that you need at the time the image is put together. And the trouble is
other people's photos (as all pros know) can't be used for commercial purposes
without express permission and probably some payment on your part. The first
thing that comes to mind is stock photos. In the past, traditional stock agencies
concentrated on the big money markets. That's fine if you're doing an ad that has a
budget for stock photos. But what if you're just creating an illustration for an
internal brochure or for an illustration on a small client's web site?
9.1.1. Collecting Your Own Stock Photos
In the course of your daily business, keep your eye out for objects and props that
you could possibly use in your own stock photos. For one thing, you should take a
photo of the sky every time it looks interesting. Collect all types of clouds, sunrise,
and sunset shots. Shoot the sky every different seasons of the year. The most
common use for montage is placing an interesting sky into a scene that was taken
when you didn't have time to wait for just the right time, season, and weather. You
might also consider puppies, flying planes, flying birds, cyclists, skateboarders,
and people viewing something.
Here are some guidelines for collecting your own stock:
Try to shoot subjects against a contrasting and uncluttered background.
Shoot in conditions that produce few, if any, shadows or reflections. It's
much easier to add highlights and shadows to simulate the lighting that
predominates in a background photo than eliminate them. This topic is
covered in the "Lighting and Casting Shadows" section later in this chapter.
Shoot the subject from several angles and distances. You will want to match
angle and distance when you place the images in the target montage.
Put the objects into their own category folders or "collections" and give
them uniform category keywords so you can find them quickly when you
need them.
9.1.2. Using Adobe Stock Photos
Adobe now includes its own stock photo library in Photoshop CS2 (and all other
CS2 applications). Make sure your computer is online, open Bridge, and choose
Edit Search Adobe Stock Photos. Adobe represents most of the major
commercial stock photo agencies and you can use a keyword to search through all
of their libraries. Thumbnails appear in the window just as if they were on your
own hard drive. Right-click on an image and you get an in-context menu to
download a low-resolution comp of any image at no charge. The comp images
aren't at a high enough resolution for commercial print purposes, but they're large
enough to fill a full screen. So you could make a low-resolution image of your
background photo and then incorporate the comp into it as a test before you
commit to buying the photo.
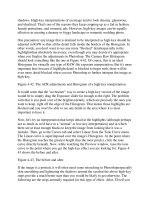
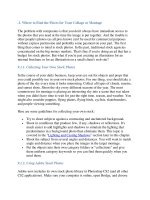
Figure 9-2 shows how easy it is to search for stock photos in the Bridge interface.
Now, the only problem is that if you're just looking for a bird to fly through your
sky or a mouse to peer out of your kitchen cupboard you may find these prices to
be more than you'd care to pay. On the other hand, if the alternative is to take the
time to go make the photo yourself, you'll find most of these prices quite
affordable. You can always check the price without having to go through a major
process by highlighting the thumbnail of the image you're interested in and
clicking the Get Price button. A dialog will appear that displays the full range of
price information. If you want, you can even then download the photo right there
on the spot.
Figure 9-2. Browsing Adobe stock photos in Camera Raw.
There are also many very affordableand sometimes, even freestock agencies
popping up on the scene. The following are some that I find very useful. These
agencies are also good outlets for your own photosespecially those that would
otherwise be surplus.
iStockphoto (www.istockphoto.com)
This large and heavily advertised stock agency charges between $1 and $20
for images, depending on their physical size. For most collage purposes,
you'll be paying less than $5. O'Reilly authors often use iStockphoto when
they simply don't have time to take the photo needed to illustrate a given
point. (I may even resort to that myself before this book is done.)
Shutterstock (www.shutterstock.com)
This site has about half a million photos in all categories. You buy a
subscription for a limited time and are then able to download as many
images as you need. There is a limit, however, of 25 images on any given
day.
Inmagine PhotoSubscribe (www.photosubscribe.com)
This is the subscription service for Inmagine, on of the largest stock
agencies. There are numerous subscription plans, for example you can buy
by collections, by the month, or by the year. There's also a collection of pre-
knocked out images for lower prices so if you find the image you want, at
least you won't have to spend the time doing the knockout work yourself.
9.2. Making a Collage
Putting individual pictures together in such a way t
hat they create a feeling or tell a
story is relatively easy. The main hurdle is collecting the photos you feel will tell
that story. If you have to collect them from existing pictures, start by collecting as
many as possible, then use Bridge to Light Table and winnow them. Pick the shots
that do the most to tell the story you want to tell.
If you are photographing a scene to turn it into a collage, think in terms of long,
medium, and close-up shots. You want have as many perspectives as possible. For
example, if your collage was intended to be a poster of a farmer's market, it might
help to include a long shot of the venue. That long shot might even become a
background over which all the other photos are imposed. Then you want to
photograph both the prepared and the freshly picked foods. And, of course, you
want some of the colorful or well-known participants in this event.
NOTE
Before you make a collage, it's a good idea to make sure you've done all the
workflow steps that image is going to require. Duplicate and flatten the original
before bringing into the collage. Otherwise, you could end up with hundreds of
layers in the composite photo.
Now you can start putting your collage together:
1. Decide roughly how many images wide and how many images high you
want your collage to be. Then decide what the full resolution width and
height of the collage will be. Divide that width and height by about two-
thirds of the full-resolution. Then you will know how many images you'll
need for the entire composition.
2. Assign a five-star rating on that number of images in Bridge. From Bridge's
Unfiltered menu, choose Show 5 stars.
3. Add a keyword that designates the name of the poster. (This will make it
easier to find the same collection of images should you move onto to
Lightroom, Aperture, Capture One, or some other image management
program.)
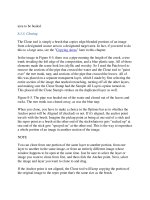
4. Open Photoshop and choose File New. The New dialog opens. Enter the
width and height you want your final project to be and then complete all the
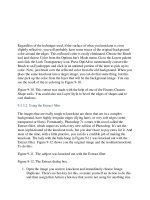
other entries as shown in Figure 9-3.
Figure 9-3. The New dialog for creating a new, black background for a
collage.
5. Start putting together your collage. Go to Bridge; only your five-star images
should be showing. Press Cmd/Ctrl-
A to select all. Now scroll down to make
sure you haven't also collected folders and unrelated files from other Adobe
CS applications. If you have, press Cmd/Ctrl-click on each of the strays to
take them out of the collection. Now press Return/Enter to open all the five-
star files in Photoshop.
6. Drag each image onto the New background one at a time. The background
will probably be larger than you want it to be, but that's a good thingit's
much better to maintain fidelity by scaling down. Choose the Move tool and
drag the new layer to the approximate location where you want it to be.
7. Press Cmd/Ctrl-T. A Transform marquee will appear around your image. If
you want to resize it proportionately, press Shift and drag a corner handle. If
you want to rotate the image, place the cursor just outside a corner handle.
When the cursor changes to a curved double-
headed arrow, drag from side to
side and watch it rotate. The further you drag from a corner, the more
precisely you'll be able to rotate.
8. To crop the image, make a selection in the shape you want to fit it inside of.
Then invert the selection (Cmd/Ctrl-Shift-I) and click the Mask icon at the
bottom of the Layers palette. The layer mask is always a good idea in this
application because you can modify it to show more or less of the image
once the whole composite is arranged. Also, it's very easy to make a new
mask without having to reload a new image.
9.
Repeat Steps 69 until all of your images are in place. If you want to hide one
image behind another, go to the Layers palette and just drag its layer further
down in the stack. You may have to do this several times to get all of the
images in the right stacking order.
10. Since you usually want all the outside images to be direct attention to the
center of the collage. Often, you can do that by flipping the image
horizontally. To do that, choose Edit Transform Flip Horizontal.
NOTE
If you do a lot of collages, you may want to use the Shape tools to cut out images
in certain shapes. You can even invent your own shapes and draw them with the
Pen tool or in Adobe Illustrator. If you do it in Illustrator, you'll have to import the
shapes into Photoshop (see Photoshop Help if you don't know how to do that).