Bài giảng: Giao diện quản lý ppt
Bạn đang xem bản rút gọn của tài liệu. Xem và tải ngay bản đầy đủ của tài liệu tại đây (436.51 KB, 24 trang )
Layout Managers
Bài 5
Bài 05 2/ 24
Nội dung chính
Định nghĩa và chức năng của layout managers
Các kiểu Layouts
Ứng dụng của layout managers
Nội dung chi tiết các loại layouts:
FlowLayout
BorderLayout
GridLayout
CardLayout
GridBagLayout
Bài 05 3/ 24
Layout Manager
Các component trên giao diện người dùng nên
được sắp xếp theo một trình tự hợp lý.
Mỗi nhóm component nên sắp theo một bố cục
riêng cho phù hợp nhất.
Để quản lý bố cục ta có layout managers.
Bài 05 4/ 24
Các kiểu Layouts
AWT cung cấp một số lớp để quản lý layout
được gọi là layout managers.
Các kiểu layout :
FlowLayout
BoxLayout
BorderLayout
CardLayout
GridLayout
GridBagLayout
Bài 05 5/ 24
Thiết lập layouts như thế nào?
Component đầu tiên được thiết lập, nó sẽ sử
dụng layout mặc định.
Layout mặc định của applet là FlowLayout
Layout mặc định của Frame là BorderLayout
Tất cả components được đặt trong một
container và được sắp xếp theo layout thiết
lập cho nó.
Một layout manager có thể được thiết lập nhờ
method setLayout()
Bài 05 6/ 24
FlowLayout Manager
Layout mặc định của applet và panel
Các Components được sắp xếp theo thứ từ góc
trái trên xuống góc phải dưới.
Constructors của FlowLayout là :
FlowLayout mylayout = new FlowLayout();
FlowLayout exLayout = new
FlowLayout(FlowLayout.LEFT);
// alignment specified
Bài 05 7/ 24
FlowLayout Manager Contd…
Flow Layout – Left and Right Aligned
Bài 05 8/ 24
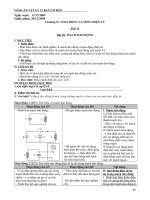
Example
Output
import java.awt.*;
import java.awt.event.*;
class FlowlayoutDemo extends Frame
{
Label lblName;
TextField txtName;
Button btnOk;
public FlowlayoutDemo(String title)
{
super(title);
setLayout(new FlowLayout());
lblName = new Label("Name: ");
txtName = new TextField(20);
btnOk = new Button("Ok");
add(lblName);
add(txtName);
add(btnOk);
}
public static void main(String[]arg)
{
FlowlayoutDemo frmLayout = new
FlowlayoutDemo("Flowlayout Demo ");
frmLayout.setSize(300,200);
frmLayout.setVisible(true);
}
}
Bài 05 9/ 24
BorderLayout Manager
Là layout mặc định cho Window, Frame và
Dialog
Các component có thể được đặt vào các vùng
North, South, East, West, or Center của container
sử dụng BorderLayout
Bài 05 10/ 24
BorderLayout Manager
Các hằng số xác định vùng để đặt
component vào container:
PAGE_START: đỉnh trên container theo chiều dọc
LINE_END: bên phải container theo chiều ngang
PAGE_END: đỉnh dưới container theo chiều dọc
LINE_START: bên trái container theo chiều ngang
LINE_CENTER: center của container
Bài 05 11/ 24
Example
Output
import java.awt.*;
public class BorderLayoutDemo extends Frame
{
public BorderLayoutDemo()
{
setLayout(new BorderLayout());
Button best = new Button("EAST");
Button bwest = new Button("WEST");
Button bnorth = new Button("NORTH");
Button bsouth = new Button("SOUTH");
Button bcentre = new Button("CENTER");
add(best, BorderLayout.LINE_END);
add(bwest, BorderLayout.LINE_START);
add(bnorth, BorderLayout.PAGE_START);
add(bsouth, BorderLayout.PAGE_END);
add(bcentre, BorderLayout.CENTER);
}
public static void main(String [] args)
{
BorderLayoutDemo frmBorder = new BorderLayoutDemo();
frmBorder.setSize(300,300);
frmBorder.setVisible(true);
}
}
Bài 05 12/ 24
GridLayout Manager
GridLayout chia container thành lưới hình chữ
nhật
Các component sẽ được sắp xếp trong các
cell
Thường dùng khi các component có cùng kích
thước
Constructor của GridLayout:
GridLayout g1= new GridLayout(4,3);
(khởi tạo một grid 4 hàng, 3 cột)
Bài 05 13/ 24
Hình ảnh của GridLayout
Bài 05 14/ 24
GridBagLayout Manager
Các component thường có kích thước khác
nhau
Components được sắp xếp theo rows, cols
Thứ tự các comp có thể ko theo chiều top-to-
bottom or left-to-right
Thiết lập GridBaglayout cho 1 container theo
cú pháp như sau:
GridBagLayout gb = new GridBagLayout();
ContainerName.setLayout(gb);
Bài 05 15/ 24
GridBagLayout Manager
Để sử dụng Gridbaglayout ta phải thiết lập
thông tin về size và layout của mỗi
component
Lớp GridBagConstraints chứa đựng tất
cả các thông tin được GridBagLayout yêu
cầu để cung cấp vị trí, kích thước của
component
Bài 05 16/ 24
GridBagLayout Manager
Các thuộc tính của GridBagConstraints :
weightx, weighty: xác định khoảng trống trong
GridbagLayout
gridwidth, gridheight: Xác định số ô theo chiều
ngang, dọc để hiển thị component
ipadx, ipady: lượng làm thay đổi chiều cao, chiều rộng
tối thiểu, nó sẽ thêm 2*ipadx vào chiều rộng tối thiểu và
2*ipady vào chiều cao
Bài 05 17/ 24
GridBagLayout Manager
Các thuộc tính của GridBagConstraints:
Anchor: vị trí của comp trong cell (NORTH, WEST,EAST,
SOUTH…)
gridx, gridy: vị trí cell sẽ đặt comp
Fill: cách mà một thành phần đc bố trí vào cell ntn nếu
cell lớn hơn comp
Insets: xác định khoảng cách top, bottom, left và right giữa
các comp
Bài 05 18/ 24
Example
import java.awt.*;
public class GridbagLayoutDemo extends Frame
{
TextArea ObjTa;
TextField ObjTf;
Button butta, buttf;
CheckboxGroup cbg;
Checkbox cbbold,cbitalic,cbplain,cbboth;
GridBagLayout gb;
GridBagConstraints gbc;
public GridbagLayoutDemo()
{
gb = new GridBagLayout(); //tao mot doi tuong gridbaglayout
setLayout(gb);
gbc = new GridBagConstraints();
//doi tuong gridbagconstraints de quan ly cac rang buoc ->gan vao gb
ObjTa = new TextArea("Textarea ",5,10);
ObjTf = new TextField("enter your name");
butta = new Button("TextArea");
buttf = new Button("TextField");
cbg = new CheckboxGroup();
cbbold = new Checkbox("Bold",cbg,false);
cbitalic = new Checkbox("Italic",cbg,false);
cbplain = new Checkbox("Plain",cbg,false);
cbboth = new Checkbox("Bold/Italic",cbg,true);
gbc.fill = GridBagConstraints.BOTH;
addComponent(ObjTa,0,0,4,1);
gbc.fill = GridBagConstraints.HORIZONTAL;
addComponent(butta,0,1,1,1);
gbc.fill = GridBagConstraints.HORIZONTAL;
addComponent(buttf,0,2,1,1);
gbc.fill = GridBagConstraints.HORIZONTAL;
addComponent(cbbold,2,1,1,1);
gbc.fill = GridBagConstraints.HORIZONTAL;
addComponent(cbitalic,2,2,1,1);
gbc.fill = GridBagConstraints.HORIZONTAL;
addComponent(cbplain,3,1,1,1);
gbc.fill = GridBagConstraints.HORIZONTAL;
addComponent(cbboth,3,2,1,1);
gbc.fill = GridBagConstraints.HORIZONTAL;
addComponent(ObjTf,4,0,1,3);
}
Bài 05 19/ 24
Example
public void addComponent(Component comp, int row, int col, int nrow, int ncol)
{
gbc.gridx = col;
gbc.gridy = row;
gbc.gridwidth = ncol;
gbc.gridheight = nrow;
gb.setConstraints(comp,gbc);
add(comp);
}
public static void main(String []args)
{
GridbagLayoutDemo frmGrid= new GridbagLayoutDemo();
frmGrid.setSize(250,200);
frmGrid.setVisible(true);
}
}
Bài 05 20/ 24
Example
Output
Bài 05 21/ 24
CardLayout Manager
Có thể lưu trữ như một ngăn xếp các layouts
Mỗi layout giống như một card trong thân
Card thường là đối tượng Panel
Sử dụng khi chúng ta muốn dùng nhiều panel
mà mỗi panel chỉ hiển thị một thời điểm
Main panel sẽ chứa đựng các panel này
Bài 05 22/ 24
Example
/*
<applet code = "MyCardDemo" height = 300 width = 300>
</applet>
*/
import java.awt.*;
import java.awt.event.*;
import java.applet.*;
public class MyCardDemo extends Applet implements
ActionListener, MouseListener
{
Checkbox nov, fic, autobio, story, swim, runn;
Panel hobcards;
CardLayout cardlo;
Button reading, playing;
CheckboxGroup cbg;
public void init()
{
reading = new Button("Reading");
playing = new Button ("Games");
add(reading);
add(playing);
cardlo = new CardLayout();
hobcards = new Panel(); // main panel
// sets the layout of the main panel to card layout
hobcards.setLayout(cardlo);
cbg = new CheckboxGroup();
nov = new Checkbox("NOVELS", cbg, true);
fic = new Checkbox("FICTIONS", cbg, false);
autobio = new Checkbox("AUTOBIOGRAPHY", cbg, false);
story = new Checkbox("STORIES", cbg, false);
swim = new Checkbox("SWIMMING", false);
runn = new Checkbox("RUNNING", false);
Bài 05 23/ 24
Example
// adding radio buttons to the reading card panel – first deck
Panel readpan = new Panel();
readpan.setLayout(new GridLayout(2,2));
readpan.add(nov);
readpan.add(fic);
readpan.add(autobio);
readpan.add(story);
// adding checkbox to the playing card panel – Second deck
Panel playpan = new Panel();
playpan.add(swim);
playpan.add(runn);
// adding the two panels to the card deck panel
hobcards.add(readpan,"READING");
hobcards.add(playpan,"PLAYING");
// adding cards to the main applet pannel
add(hobcards);
// register to receive action events
reading.addActionListener(this);
playing.addActionListener(this);
// registering mouse movements
addMouseListener(this);
}
public void mousePressed(MouseEvent m)
{
cardlo.next(hobcards);
}
public void mouseClicked(MouseEvent m)
{}
public void mouseEntered(MouseEvent m)
{}
public void mouseExited(MouseEvent m)
{}
public void mouseReleased(MouseEvent m)
{}
public void actionPerformed(ActionEvent ae)
{
if(ae.getSource() == reading)
{
cardlo.show(hobcards,"READING" );
}
else
{
cardlo.show(hobcards,"PLAYING");
}
}
}
Bài 05 24/ 24
Example (Output)
Output