SUSE Linux 10 for dummies phần 10 pptx
Bạn đang xem bản rút gọn của tài liệu. Xem và tải ngay bản đầy đủ của tài liệu tại đây (2.43 MB, 71 trang )
If you want to ensure that the user is forced to change a password every 90
days, you can use the -M option to set the maximum number of days that a
password stays valid. For example, to make sure that user naba is prompted
to change the password in 90 days, I log in as root and type the following
command:
chage -M 90 naba
You can use the command for each user account to ensure that all passwords
expire when appropriate, and that all users must pick new passwords.
Protecting files and directories
One important aspect of securing the host is to protect important system
files — and the directories that contain these files. You can protect the files
through the file ownership and through the permission settings that control
who can read, write, or (in case of executable programs) execute the files.
The default Linux file security is controlled through the following settings for
each file or directory:
ߜ User ownership
ߜ Group ownership
ߜ Read, write, execute permissions for the owner
ߜ Read, write, execute permissions for the group
ߜ Read, write, execute permissions for others (everyone else)
Viewing ownerships and permissions
You can see these settings for a file when you look at the detailed listing with
the ls -l command. For example, type the following command to see the
detailed listing of the /etc/inittab file:
ls -l /etc/inittab
The resulting listing looks something like this:
-rw-r r 1 root root 2926 Nov 12 20:11 /etc/inittab
In Chapter 6, I explain how to interpret the first ten characters on that line.
For now, you should know that the set of nine characters, starting with the
second one, describes the file permissions for user, group, and others. The
third and fourth fields show the user and group that own this file. In this
case, both user and group names are the same: root.
298
Part IV: Becoming a SUSE Wizard
26_754935 ch19.qxp 11/7/05 10:03 PM Page 298
Changing file ownerships
You can set the user and group ownerships with the chown command. For
example, if the file /dev/hda should be owned by the user root and the
group disk, type the following command as root to set up this ownership:
chown root.disk /dev/hda
To change the group ownership alone, use the chgrp command. For exam-
ple, here’s how you can change the group ownership of the file ledger.out
from whatever it was earlier to the group named accounting:
chgrp accounting ledger.out
Changing file permissions
You may need to change a file’s permission settings to protect it from others.
Use the chmod command to change the permission settings of a file or a
directory.
To use chmod effectively, you have to specify the permission settings. A good
way is to concatenate one or more letters from each column of Table 19-2, in
the order shown (Who/Action/Permission).
Table 19-2 File Permission Codes
Who Action Permission
u user + add r read
g group - remove w write
o others = assign x execute
a all s set user ID
For example, to give everyone read access to all files in a directory, pick a
(for all) from the first column, + (for add) from the second column, and r (for
read) from the third column to come up with the permission setting a+r.
Then use the whole set of options with chmod, like this:
chmod a+r *
On the other hand, to permit everyone to read and execute one specific file,
type
chmod a+rx filename
299
Chapter 19: Securing SUSE Linux
26_754935 ch19.qxp 11/7/05 10:03 PM Page 299
Suppose you have a file named mystuff that you want to protect. You can
make it accessible to no one but you if you type the following commands, in
this order:
chmod a-rwx mystuff
chmod u+rw mystuff
The first command turns off all permissions for everyone, and the second
command turns on the read and write permissions for the owner (you). Type
ls -l to verify that the change took place. (You see a permission setting of
-rw )
Another way to specify a permission setting is to use a three-digit sequence
of numbers. In a detailed listing, the read, write, and execute permission set-
tings for the user, group, and others appear as the sequence
rwxrwxrwx
with dashes in place of letters for disallowed operations. Think of rwx
rwxrwx as three occurrences of the string rwx. Now assign the values r=4,
w=2, and x=1 (use zero for a missing letter — one that appears as a dash). To
get the value of the sequence rwx, simply add the values of r, w, and x. Thus,
rwx = 7 (4+2+1). Using this formula, you can assign a three-digit value to
any permission setting. For example, if the user can read and write the file
but everyone else can only read the file, the permission setting is rw-r r
(that’s how it appears in the listing), and the value is 644 because rw- is 4+2,
which is 6 and r is just 4 (for r alone). Thus, if you want all files in a direc-
tory to be readable by everyone but writable only by the user, use the follow-
ing command:
chmod 644 *
Setting default permission
What permission setting does a file get when you (or a program) create a new
file? The answer is in what is known as the user file-creation mask that you
can see and set using the umask command.
Type umask, and it prints out a number showing the current file-creation
mask. The default setting is different for the root user and other normal
users. For the root user, the mask is set to 022, whereas the mask for normal
users is 002. To see the effect of this file-creation mask and to interpret the
meaning of the mask, follow these steps:
1. Log in as root and type the following command:
touch junkfile
This command creates a file named junkfile with nothing in it.
300
Part IV: Becoming a SUSE Wizard
26_754935 ch19.qxp 11/7/05 10:03 PM Page 300
2. Type ls -l junkfile to see that file’s permissions.
You see a line similar to the following:
-rw-r r 1 naba users 0 2005-09-03 08:45 junkfile
Interpret the numerical value of the permission setting by converting
each three-letter permission in the first field (excluding the very first
letter) into a number between 0 and 7. For each letter that’s present, the
first letter gets a value of 4, second letter is 2, and the third is 1. For
example, rw- translates to 4+2+0 (because the third letter is missing) or
6. Similarly, r is 4+0+0 = 4. Thus the permission string -rw-r r
becomes 644.
3. Subtract the numerical permission setting from 666 and what you get
is the umask setting.
In this case, 666 – 644 results in an umask of 022.
Thus, an umask of 022 results in a default permission setting of 666 – 022 =
644. When you rewrite 644 in terms of a permission string, it becomes
rw-r r
To set a new umask, type umask followed by the numerical value of the mask.
Here is how you go about it:
1. Figure out what permission settings you want for new files.
For example, if you want new files that can be read and written only by
the owner and by nobody else, the permission setting looks like this:
rw
2. Convert the permissions into a numerical value by using the conver-
sion method that assigns 4 to the first field, 2 to the second, and 1 to
the third.
Thus, for files that are readable and writable only by their owner, the
permission setting is 600.
3. Subtract the desired permission setting from 666 to get the value of
the mask.
For a permission setting of 600, the mask becomes 666 – 600 = 066.
4. Use the umask command to set the file-creation mask:
umask 066
A default umask of 022 is good for system security because it translates to
files that have read and write permission for the owner and read permissions
for everyone else. The bottom line is that you don’t want a default umask
that results in files that are writable by the whole wide world.
301
Chapter 19: Securing SUSE Linux
26_754935 ch19.qxp 11/7/05 10:03 PM Page 301
Checking for set user ID permission
Another permission setting called set user ID (or setuid for short) can be a
security hazard. When the setuid permission is enabled, the file executes
under the user ID of the file’s owner. In other words, if an executable program
is owned by root and the setuid permission is set, no matter who executes
that program, it runs as if root is executing it. This permission means that
the program can do a lot more (for example, read all files, create new files,
and delete files) than what a normal user program can do. Another risk is
that if a setuid program file has some security hole, crackers can do a lot
more damage through such programs than through other vulnerabilities.
You can find all setuid programs with a simple find command (remember
to type su - to become root):
find / -type f -perm +4000 -print
You see a list of files such as the following:
/bin/su
/bin/ping
/bin/eject
/bin/mount
lines deleted
Many of the programs have the setuid permission because they need it, but
check the complete list and make sure that there are no strange setuid pro-
grams (for example, setuid programs in a user’s home directory).
If you want to see how these permissions are listed by the ls command, type
ls -l /usr/bin/passwd and you see the permission settings:
-rwsr-xr-x 1 root shadow 74952 Aug 29 14:52 /usr/bin/passwd
The s in the owner’s permission setting (rws) tells you that the setuid per-
mission is set.
Securing the Network
To secure your SUSE Linux system, you have to pay attention to both host
security and network security. The distinction between the two types of secu-
rity is somewhat arbitrary because securing the network involves fixing up
things on the host that relate to what Internet services your system offers. In
this section, I explain how you can secure the Internet services (mostly by
302
Part IV: Becoming a SUSE Wizard
26_754935 ch19.qxp 11/7/05 10:03 PM Page 302
not offering unnecessary services), how you can use a firewall to stop
unwanted network packets from reaching your network, and how to use
Secure Shell for secure remote logins.
Securing Internet services
For an Internet-connected Linux system (or even one on a LAN that’s not con-
nected to the Internet), a significant threat is the possibility that someone
could use one of many Internet services to gain access to your system. Each
service — such as mail, Web, or FTP — requires running a server program
that responds to client requests arriving over the TCP/IP network. Some of
these server programs have weaknesses that can allow an outsider to log in
to your system — maybe with root privileges. Luckily, Linux comes with
some facilities that you can use to make the Internet services more secure.
Potential intruders can employ a port-scanning tool — a program that attempts
to establish a TCP/IP connection at a port and to look for a response — to
check which Internet servers are running on your system. Then, to gain access
to your system, the intruders can potentially exploit any known weaknesses of
one or more services.
Turning off stand-alone services
To provide Internet services such as Web, mail, and FTP, your Linux system
has to run server programs that listen to incoming TCP/IP network requests.
Some of these servers are started when your system boots, and they run all
the time. Such servers are called stand-alone servers. The Web server and
mail server are examples of stand-alone servers.
Another server, called xinetd, starts other servers that are configured to
work under xinetd. Some servers can be configured to run stand-alone or
under a superserver such as xinetd. For example, the vsftpd FTP server
can be configured to run stand-alone or to run under the control of xinetd.
You can turn the servers on or off by using the chkconfig command. For
example, to turn off the FTP service, type chkconfig vsftpd off.
Configuring the Internet superserver
In addition to stand-alone servers such as a Web server or mail server, there
is another server — xinetd — that you have to configure separately. The
xinetd server is called Internet superserver because it can start other
servers on demand.
303
Chapter 19: Securing SUSE Linux
26_754935 ch19.qxp 11/7/05 10:03 PM Page 303
The xinetd server reads a configuration file named /etc/xinetd.conf
at startup. This file, in turn, refers to configuration files stored in the /etc/
xinetd.d directory. The configuration files in /etc/xinetd.d tell xinetd
which ports to listen to and which server to start for each port. Type ls /etc/
xinetd.d to see a list of the files in the /etc/xinetd.d directory on your
system. Each file represents a service that xinetd can start. To turn off any
of these services, type chkconfig filename off where filename is the name of
the configuration file in the /etc/xinetd.d directory. After you turn any of
these services on or off, you must restart the xinetd server; otherwise, the
changes don’t take effect. To restart the xinetd server, type /etc/init.d/
xinetd restart. This command stops the xinetd server and then starts it
again. When it restarts, it reads the configuration files, and the changes take
effect.
Configuring TCP wrapper security
A security feature of xinetd is its use of a feature called TCP wrapper to start
various services. The TCP wrapper is a block of code that provides an access-
control facility for Internet services, acting like a protective package for your
message. The TCP wrapper can start other services, such as FTP and vnc (a
server that enables other computers to view and interact with your computer’s
graphical desktop); but before starting a service, it consults the /etc/hosts.
allow file to see whether the host requesting service is allowed that service. If
nothing appears in /etc/hosts.allow about that host, the TCP wrapper
checks the /etc/hosts.deny file to see if it denies the service. If both files
are empty, the TCP wrapper provides access to the requested service.
Here are the steps to follow to tighten the access to the services that inted
or xinetd are configured to start:
1. Use a text editor to edit the /etc/hosts.deny file, adding the follow-
ing line into that file:
ALL:ALL
This setting denies all hosts access to any Internet services on your
system.
2. Edit the /etc/hosts.allow file and add to it the names of hosts that
can access services on your system.
For example, to enable only hosts from the 192.168.1.0 network and the
localhost (IP address 127.0.0.1) to access the services on your
system, place the following line in the /etc/hosts.allow file:
ALL: 192.168.1.0/255.255.255.0 127.0.0.1
304
Part IV: Becoming a SUSE Wizard
26_754935 ch19.qxp 11/7/05 10:03 PM Page 304
3. If you want to permit access to a specific Internet service to a specific
remote host, you can do so by using the following syntax for a line in
/etc/hosts.allow:
server_program_name: hosts
Here server_program_name is the name of the server program, and
hosts is a comma-separated list of hosts that can access the service.
You may also write hosts as a network address or an entire domain
name, such as .mycompany.com.
Using Secure Shell (SSH)
for remote logins
SUSE Linux comes with the Open Secure Shell (OpenSSH) software that uses
public-key cryptography to authenticate users and to encrypt the communi-
cation between two hosts, so users can securely log in from remote systems
and copy files securely.
In this section, I briefly describe how to use the OpenSSH software in SUSE
Linux. The OpenSSH software is installed during SUSE Linux installation.
OpenSSH uses public-key encryption where the sender and receiver both
have a pair of keys — a public key and a private key. The public keys are
freely distributed, and each party knows the other’s public key. The sender
encrypts data by using the recipient’s public key. Only the recipient’s private
key can then decrypt the data.
To use OpenSSH, you first need to start the sshd server and then generate
the host keys. Here’s how:
ߜ If you want to support SSH-based remote logins on a host, start the sshd
server on your system. Type ps ax | grep sshd to see if the server is
already running. If not, in a terminal window type su - to become root,
and turn on the SSH service.
Type /etc/init.d/sshd start to start the sshd server immediately. To
ensure that the server starts the next time you reboot the system, type
chkconfig sshd on.
ߜ Generate the host keys with the following command:
ssh-keygen -d -f /etc/ssh/ssh_host_key -N ‘’
The -d flag causes the ssh-keygen program to generate DSA keys,
which the SSH2 protocol uses. If you see a message saying that the file
/etc/ssh/ssh_host_key already exists, that means that the key pairs
were generated during SUSE Linux installation. In that case, press n to
avoid overwriting the keys and continue to use the existing file.
305
Chapter 19: Securing SUSE Linux
26_754935 ch19.qxp 11/7/05 10:03 PM Page 305
A user can now log in from a remote system using the ssh command (assum-
ing that the remote system also runs Linux). From a Windows system, a user
can run a program such as putty that supports SSH.
For example, to log in to my account on a SUSE Linux system from another
Linux system on the network, I type
ssh 192.168.0.6 -l naba
Here I identify the remote host by its IP address (192.168.0.6). When
prompted for the password, I enter the password. After that, I can have a
secure login session with the remote host. (The information sent between the
two systems is encrypted.)
Setting up a simple firewall
A firewall is a network device or host with two or more network interfaces —
one connected to the protected internal network and the other connected to
unprotected networks, such as the Internet. The firewall controls access to
and from the protected internal network.
If you connect an internal network directly to the Internet, you have to make
sure that every system on the internal network is properly secured — which
can be nearly impossible because just one careless user can render the entire
internal network vulnerable. A firewall is a single point of connection to the
Internet: You can direct all your efforts toward making that firewall system a
daunting barrier to unauthorized external users. Essentially, a firewall is like a
protective fence that keeps unwanted external data and software out and sen-
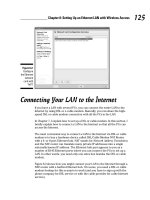
sitive internal data and software in. (See Figure 19-1.)
Firewall
Public network Private network
Desktop PC
Server
Local Area Network (LAN)
Internet
Figure 19-1:
A firewall
protects
hosts on a
private
network
from the
Internet.
306
Part IV: Becoming a SUSE Wizard
26_754935 ch19.qxp 11/7/05 10:03 PM Page 306
The firewall runs software that examines the network packets arriving at its
network interfaces and takes appropriate actions based on a set of rules. The
idea is to define these rules so that they allow only authorized network traffic
to flow between the two interfaces. Configuring the firewall involves setting
up the rules properly. A configuration strategy is to reject all network traffic
and then enable only a limited set of network packets to go through the fire-
wall. The authorized network traffic would include the connections neces-
sary to enable internal users to do things such as visiting Web sites and
receiving electronic mail.
Your SUSE Linux system comes with built-in packet-filtering capability that
provides a simple firewall. The Linux kernel’s built-in packet-filtering capabil-
ity is handy when you don’t have a dedicated firewall between your Linux
system and the Internet. This is the case, for example, when you connect
your Linux system to the Internet through a DSL or cable modem. You can
essentially have a packet-filtering firewall inside your Linux system, sitting
between the kernel and the applications.
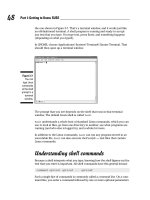
SUSE Linux includes a GUI tool to turn on a packet filtering firewall. To set up
a firewall, select Main Menu➪System➪Control Center (YaST). In the YaST
Control Center window that appears, click Security and Users on the left side
of the window and then click Firewall on the right side. YaST opens a window
(see Figure 19-2) that you can use to configure the firewall.
Figure 19-2:
Configure
the firewall
from this
YaST
window.
307
Chapter 19: Securing SUSE Linux
26_754935 ch19.qxp 11/7/05 10:03 PM Page 307
From the first screen (refer to Figure 19-2), you can specify whether the fire-
wall should start when the system boots; you can also start, stop, or restart
the firewall. To configure other aspects of the firewall, such as what services
to allow through the firewall, click the categories on the left side and then
specify whatever that category requires. You can designate network interfaces
(by device name, such as eth0, ppp0, and so on) to one of three zones: inter-
nal, external, or demilitarized zone. Then for that zone you can specify what
services (such as HTTP, FTP, and SSH) are allowed. If you have two or more
network interfaces and you use the Linux system as a gateway (a router), you
can enable forwarding packets between network interfaces (a feature called
masquerading). You can also turn on different levels of logging. (For example,
logging all dropped packets that attempted connection at specific ports.) If
you make changes to firewall settings, click the Startup category and then
click Save Settings and Restart Firewall Now (refer to Figure 19-2).
Using NATs
Network Address Translation (NAT) is an effective tool that enables you to
“hide” the network addresses of an internal network behind a firewall. In
essence, NAT allows an organization to use private network addresses behind
a firewall while still maintaining the ability to connect to external systems
through the firewall.
You can implement NAT by purchasing a NAT router that can connect
your internal network to a DSL or cable modem. I describe NAT routers
in Chapter 7.
Keeping Up with Security
News and Updates
To keep up with the latest security alerts, you may want to visit one or more
of the following sites on a daily basis:
ߜ Novell’s online Linux security support Web site at www.novell.com/
linux/security/securitysupport.html
ߜ CERT Coordination Center (CERT/CC) at www.cert.org
ߜ Computer Incident Advisory Capability (CIAC) at www.ciac.org/ciac
ߜ United States Computer Emergency Readiness Team (US-CERT) at
www.us-cert.gov
308
Part IV: Becoming a SUSE Wizard
26_754935 ch19.qxp 11/7/05 10:03 PM Page 308
If you have access to Internet newsgroups, you can periodically browse the
following:
ߜ comp.security.announce: A moderated newsgroup that includes
announcements from CERT about security.
ߜ comp.security.linux: A newsgroup that includes discussions of
Linux security issues.
ߜ comp.security.unix: A newsgroup that includes discussions of UNIX
security issues, including items related to Linux.
If you prefer to receive regular security updates through e-mail, you can also
sign up for (subscribe to) various mailing lists:
ߜ FOCUS-LINUX: Fill out the form at www.securityfocus.com/
subscribe to subscribe to this mailing list focused on Linux security
issues.
ߜ US-CERT National Cyber Alert System: Follow the directions at www.
us-cert.gov to subscribe to this mailing list. The Cyber Alert System
features four categories of security information through its mailing lists:
• Technical Cyber Security Alerts provide technical information
about vulnerabilities in various common software products.
• Cyber Security Alerts are sent when vulnerabilities affect the gen-
eral public. They outline the steps and actions that nontechnical
home and corporate computer users can take to protect them-
selves from attacks.
• Cyber Security Bulletins are biweekly summaries of security issues
and new vulnerabilities along with patches, workarounds, and
other actions that users can take to help reduce the risk.
• Cyber Security Tips offer advice on common security issues for
nontechnical computer users.
309
Chapter 19: Securing SUSE Linux
26_754935 ch19.qxp 11/7/05 10:03 PM Page 309
310
Part IV: Becoming a SUSE Wizard
26_754935 ch19.qxp 11/7/05 10:03 PM Page 310
Part V
The Part of Tens
27_754935 pt5.qxp 11/7/05 10:02 PM Page 311
In this part . . .
H
ere we go again — yet another Top Ten list . . . No,
wait . . . a whole slew of Top Ten lists! It’s the signa-
ture part of the For Dummies series. Hey, I can’t argue with
success!
I begin with a selected set of frequently asked questions
(or FAQs, as everyone calls them) about SUSE Linux. Next
come the ten best things about SUSE. Then I present ten
good resources for finding out more about SUSE. Finally,
I end with the ten most frequently used SUSE Linux
commands.
27_754935 pt5.qxp 11/7/05 10:02 PM Page 312
Chapter 20
Ten Frequently Asked
Questions about SUSE
In This Chapter
ᮣ What does SUSE stand for?
ᮣ Where can I find answers to SUSE Linux questions?
ᮣ When is the next SUSE release?
ᮣ Can I get ISO files for SUSE Linux from the Internet?
ᮣ How do I do an FTP install of SUSE Linux?
ᮣ How can I auto-login into KDE as another user?
ᮣ How can I reboot after an apparent crash?
ᮣ How do I schedule a command to run every 30 minutes?
ᮣ How can I find all the huge files on my system?
ᮣ Where can I find SUSE RPMs?
I
f you are new to SUSE Linux, you probably have lots of questions about
SUSE (even if you already know Linux). I had questions when I first started
using SUSE Linux, and I have been using Linux since 1991. Frequently Asked
Questions — FAQs — are the time-honored solutions to providing answers to
common questions about a specific subject. In this chapter, I present ten
such frequently asked questions about SUSE Linux. These are the questions
that, in my opinion, are likely to be asked by beginners and experienced
Linux users alike. I hope you find an answer or two that help you do your job
with SUSE Linux.
What Does SUSE Stand for and
How Do You Pronounce It?
The acronym SUSE came from the German name Software und System
Entwicklung (Software and System Development). SUSE is pronounced soo-suh.
28_754935 ch20.qxp 11/7/05 10:17 PM Page 313
The distribution was originally referred to by a mixed-case name: SuSE. Now,
however, the distribution’s name is written in all uppercase: SUSE. Eventually,
SUSE’s origins as an acronym will probably be forgotten, and it will be
thought of as a name that doesn’t stand for anything at all.
How Can I Find Answers to
My SUSE Linux Questions?
You can find helpful information about SUSE Linux at many online resources.
Start with www.suse.com. Choose Support➪knowledgebase from that Web
page’s menu. Then select SUSE as the product, type in one or more keywords,
and click Search Now.
If you don’t find the answer at www.suse.com, try searching newsgroups
through the Advanced Groups Search on Google Groups:
/>Type the search terms you prefer. You can even set the date ranges for the
articles to search.
If the newsgroup search does not give you the answer, do a Linux search on
Google by visiting the search page at
/>Type the search words and press Enter or click Google Search. For SUSE-
specific answers, type SUSE in addition to the search words.
If you also want to search the SUSE mailing lists, visit www.google.com and
type lists site:lists.suse.com followed by the search words. For example, to
search for DVD movie player you would type lists site:lists.suse.com DVD
movie player into the search field.
One of these online searches should get you the answer to your question. If
not, you can post a question at one of the forums such as www.suseforums.
com that are listed in Chapter 22.
When Is the Next SUSE Linux Release?
Everyone wants to know the answer to this question, including myself! Of
course, the correct answer is, “Whenever Novell decides to release it.” Based
on past history, however, a new SUSE release seems to appear about every
314
Part V: The Part of Tens
28_754935 ch20.qxp 11/7/05 10:17 PM Page 314
six months. And now that SUSE is being developed through the Novell-
sponsored openSUSE project, you can find the latest SUSE milestones at
www.opensuse.org/index.php/Roadmap.
Can I Get ISO Files for SUSE Linux
from the Internet?
Prior to version 10.0, you used to have to wait for several weeks after the
release of a new version of SUSE Linux before Novell made available for free
the ISO image files for that version. With Novell having sponsored and estab-
lished the openSUSE project in August 2005, the ISO files for the latest ver-
sion of SUSE Linux are always available from www.opensuse.org/index.
php/Download and from many mirror sites on the Internet.
How Do I Do an FTP Install
of SUSE Linux?
Say that you have this book in hand, but a later version of SUSE Linux is now
available for FTP install. Instead of installing the version on the companion
CD or DVD, you can easily do an FTP install.
To install SUSE Linux from one of many FTP servers that mirror the latest
SUSE distribution, you have to perform the following major steps:
1. Download the SUSE boot image from the FTP server and burn a CD with
that image.
2. Make a note of the FTP server’s IP address and the directory where the
SUSE distribution’s files are located.
3. Boot the PC with the boot CD and then type a command at the boot
prompt to begin an FTP install from the FTP server that you identify by
its IP address.
If you have a PC that runs Windows and has a high-speed Internet connec-
tion, you can use that PC to download the boot image and burn the boot CD.
You can also use the PC to look up the IP address of the FTP server.
You also need to know the name of the network card installed in your PC
because you have to manually load the driver before you can start the SUSE
FTP install. You can find the FTP server’s IP address when you download the
SUSE installer’s boot image. I explain the steps in this section.
315
Chapter 20: Ten Frequently Asked Questions about SUSE
28_754935 ch20.qxp 11/7/05 10:17 PM Page 315
Installing SUSE from an FTP server can take two hours or more over a typical
broadband DSL or cable modem connection to the Internet. Follow these
steps to do an FTP install from an FTP server over the Internet:
1. Use a Web browser to open the list of FTP servers at www.suse.com/
us/private/download/ftp/int_mirrors.html and find an FTP
server near you that’s marked complete (that means the server has
the complete SUSE distribution and all updates).
The list of servers is organized by country, and it includes both FTP and
HTTP (Web) servers. Go to the country nearest yours and pick the near-
est server that’s marked complete.
In a terminal window, type ping followed by the name of the FTP server
(for example, mirror.mcs.anl.gov). You’ll then see the IP address of the
FTP server on the next line (for example, 140.221.37.130). Write down
that IP address for use later on. If you are performing this step in
Microsoft Windows, you also use the ping command, but type the com-
mand in a Command Prompt window (choose Start➪Run and type cmd
and press Enter).
2. Click your FTP server link and find the directory that contains the
boot.iso file — that’s the SUSE installer’s boot image.
The directory depends on the version of SUSE. For example, for version
10.0, the boot.iso file is in the FTP server’s pub/suse/i386/10.0/
boot/ directory. The file is several tens of megabytes in size.
3. Download the boot.iso file and save it.
4. Burn the boot.iso image onto a CD.
Use your PC’s CD burner application to burn the ISO image named
boot.iso.
5. Go to the PC on which you want to do the SUSE FTP install, insert the
boot CD, and restart the PC.
If your PC isn’t set up to boot from the CD/DVD drive, you have to enter
SETUP (by pressing a key such as F2 as the PC powers up) and change
the order of the boot devices.
The PC reboots and, after a few moments, a text screen displays a
screen with a number of options. Use the arrow keys to move between
list items and the buttons on the screen.
6. Use the arrow keys to select the Installation option and press Enter.
This step loads a Linux kernel and runs the installer. After detecting and
initializing the hardware, the installer displays a message saying that it
cannot find the SUSE Linux installation source and is activating a manual
setup program. This result is normal, and you should press Enter to con-
tinue. The installer shows a list of languages.
316
Part V: The Part of Tens
28_754935 ch20.qxp 11/7/05 10:17 PM Page 316
7. Select the language and press Enter.
The installer displays a list of keyboard maps — the language-dependent
layouts for the keyboard.
8. Select the keyboard language and press Enter.
The installer displays the Main menu.
9. Use arrow keys to select Start Installation/System and press Enter. On
the next screen, select Start Installation/Update and press Enter.
The installer displays a list of source mediums — this is where you indicate
where the installer can find the files it needs to perform the installation.
10. Select Network as the source medium and press Enter.
The installer prompts you for the network protocol.
11. Select FTP as the network protocol and press Enter.
A dialog box prompts you to determine whether to configure the net-
work automatically by using the Dynamic Host Configuration Protocol
(DHCP). If your network uses DHCP as most do, select Yes and press
Enter. Otherwise, you have to enter the IP address and the name
server’s IP address at this step. The installer then prompts for the IP
address of the FTP server.
12. Enter the IP address of the FTP server that you found in Step 1 (for
example, enter 140.221.37.130 for the FTP server mirror.mcs.anl.gov).
The installer prompts you if you want to use a username and password to
connect to the FTP server. Because the FTP servers support anonymous
FTP — which means anyone can log in with the username anonymous —
select No and press Enter. The installer also prompts if you want to use
an HTTP proxy. Unless your PC is behind a proxy (which may be the case
at some organizations), select No and press Enter. The installer then
prompts for the name of the directory where the SUSE files are located.
13. Enter the name of the directory on the FTP server where the SUSE
Linux files are located and press Enter.
The directory name would be the parent directory of the location where
you found the boot.iso file in Step 1. For example, if the boot.iso file
is in pub/suse/i386/10.0/boot/, you should type pub/suse/i386/10.0/
and press Enter.
The installer displays a message informing you that it is loading data
into ramdisk (which refers to an area of memory that acts as a hard
drive). When the installer finishes downloading data, the YaST (that’s
what the SUSE installer is called) installer starts and displays its initial
GUI screen.
317
Chapter 20: Ten Frequently Asked Questions about SUSE
28_754935 ch20.qxp 11/7/05 10:17 PM Page 317
From this point on, the installation steps are the same as the ones for a
CD/DVD install, which I explain in Chapter 2. You should jump to the point
where the YaST installer displays its initial GUI screen.
How Can I Auto-Login into the
KDE Desktop as Another User?
If yours is the only user account on your SUSE Linux system and you use the
KDE desktop, you are probably accustomed to the convenience of auto-login.
Basically, you just power up SUSE Linux and you are automatically logged
into the KDE desktop.
You might face the question of changing the auto-login to another user if you
have defined additional user accounts on your SUSE Linux system (for exam-
ple, for your spouse or kids). If you want the auto-login to use another user
account, it’s easy to make that change from the KDE desktop by following
these steps:
1. Choose Main Menu➪Control Center.
The KDE Control Center starts.
2. Click System Administration in the left pane.
Icons for several system administration categories appear in the left
pane.
3. Click Login Manager in the left pane.
Login Manager options appear in tabs in the right pane.
4. Click the Administrator Mode button at the bottom of the right pane.
A dialog box prompts you for the root password.
5. Type the root password and click OK.
Login Manager options reappear with everything enabled (because you
have entered administrator mode).
6. Click the Convenience tab.
The Convenience tab’s options appear, as shown in Figure 20-1. The
Enable Auto-Login box is checked, and you can see the username for
which the auto-login is enabled.
318
Part V: The Part of Tens
28_754935 ch20.qxp 11/7/05 10:17 PM Page 318
7. Click the User drop-down menu and select the user account that you
want to use for auto-login. Then click Apply.
If the Enable Auto-Login box is not checked, click on it until it shows a
checkmark.
Although auto-login is convenient, it’s definitely not good for security. You
should enable auto-login only if you are using the SUSE Linux system in a safe
environment such as your home. Otherwise, turn auto-login off from the
Convenience tab mentioned in Step 6.
If My System Crashes, Can I Press
the Reset Button to Reboot?
Even though your mouse or keyboard seems to be dead, this does not neces-
sarily mean that everything in your system has crashed. Therefore, you
should not immediately reach for the reset button.
In case it’s the GUI desktop that’s hung, press Ctrl+Alt+Backspace to kill the X
server and restart it. If this works, you should see a graphical login screen
from which you can log in again.
Figure 20-1:
From KDE
Center’s
Login
Manager,
you can
enable
auto-login
for a user.
319
Chapter 20: Ten Frequently Asked Questions about SUSE
28_754935 ch20.qxp 11/7/05 10:17 PM Page 319
If restarting X does not help, press Ctrl+Alt+F2 and see if you can get a text
console with a login prompt. If you see the login prompt, login with your
username and password. Then type su - and type the root password to
become root. After that, type reboot to safely reboot the PC.
If you don’t get a text console by pressing Ctrl+Alt+F2, try to log in to the
system from another machine on the network (type ssh followed by your
SUSE Linux system’s IP address). You can become root by typing su - and
then type reboot to reboot the PC. Of course, this last option works only if
you have multiple PCs in a local area network.
If nothing works, just wait some time, make sure that there is no hard drive
activity (many PCs have a light that blinks when the hard drive is active; the
hard drive also makes noise that you may be able to hear), and then press
the reset button.
How Can I Schedule a Command
to Run Every 30 Minutes?
You can run a command or a script (which is a file containing other com-
mands) every so often by using crontab. You schedule recurring jobs by
placing job information in a file with a specific format and submitting this file
with the crontab command. A program called crond checks the job infor-
mation every minute and executes the recurring jobs at the specified times.
Because the crond runs recurring jobs, such jobs are also referred to as
cron jobs.
To submit a cron job, follow these steps:
1. Prepare a shell script (or an executable program in any programming
language) that can perform the recurring task you want to perform.
You can skip this step if you want to execute an existing program
periodically.
2. Prepare a text file with information about the times when you want
the shell script or program (from Step 1) to execute, and then submit
this file by using crontab.
You can submit several recurring jobs with a single file. Each line with
timing information about a job has a standard format with six fields —
the first five specify when the job runs, and the sixth and subsequent
fields constitute the actual command that runs. For example, here is a
320
Part V: The Part of Tens
28_754935 ch20.qxp 11/7/05 10:17 PM Page 320
line that executes the myjob shell script in a user’s home directory
every 30 minutes:
0,30 * * * * $HOME/myjob
3. Suppose the text file jobinfo (in the current directory) contains the
job information. Submit this information to crontab with the follow-
ing command:
crontab jobinfo
That’s it! You are set with the cron job. From now on, the cron job runs at
regular intervals (as specified in the job information file), and you receive
mail messages with the output from the job.
To verify that the job is indeed scheduled, type the following command:
crontab -l
The output of the crontab -l command shows the cron jobs currently
installed in your name. To remove your cron jobs, type crontab -r.
How Can I Find All the Huge Files
on My SUSE Linux System?
You can type a one-line incantation to do this job for you. Here are the steps:
1. If you are at a graphical desktop such as KDE or GNOME, open a ter-
minal window.
2. Type su - and then enter the root password to become root.
3. Now type the following command (change 50000k, which stands for
50,000KB or about 50MB, to whatever you consider to be a large file):
find / -xdev -type f -size +50000k -ls | sort -n -k 7,7 >
bigfiles
This command line starts with the find command to find the files
whose size exceeds 50,000KB (that’s what the option -size +50000k
means). The part after the vertical bar (|) sorts the files by size, and >
bigfiles means the output is saved in a file named bigfiles in the
current directory. The end result is that the list of large files, sorted by
size, would be in a file named bigfiles in the current directory. To
view the list, type more bigfiles.
321
Chapter 20: Ten Frequently Asked Questions about SUSE
28_754935 ch20.qxp 11/7/05 10:17 PM Page 321
Where Can I Find More SUSE RPMs?
Software for SUSE Linux is usually distributed in the form of RPM files. That’s
why it’s common to refer to the software as RPM. You would want to find
RPMs that are meant for SUSE Linux (as opposed to RPMs meant for Red Hat
or Fedora). One good place to look for SUSE RPMs is the Packman site at the
following URL:
/>This site organizes the RPMs by category such as Finance, Games, Graphics,
Internet, Multimedia, and so on. You can browse the RPMs by category or
search by keyword. After downloading an RPM file, you can install it by using
YaST or the rpm command (see Chapter 18 for more information).
For maximum convenience in finding software for SUSE Linux, you can add
the packman server as an installation source in YaST. See the “Adding a
Software Source to YaST” section in Chapter 18 for more information.
In addition to the packman site, here are three more Web sites where you can
search for RPMs:
/> /> />Try them in the order listed, but start with the packman site first.
322
Part V: The Part of Tens
28_754935 ch20.qxp 11/7/05 10:17 PM Page 322