macbook for dummies phần 8 pot
Bạn đang xem bản rút gọn của tài liệu. Xem và tải ngay bản đầy đủ của tài liệu tại đây (698.3 KB, 27 trang )
266
Part V: Sharing Access and Information
24_04859X ch16.qxp 7/20/06 10:39 PM Page 266
Chapter 17
Working Well with Networks
In This Chapter
ᮣ Choosing between wired and wireless networks
ᮣ Sharing an Internet connection
ᮣ Collecting the bits and pieces for a wireless connection
ᮣ Gathering the stuff you need for a wired connection
ᮣ Making the network connection
ᮣ Protecting your Mac with a firewall
I
n my book (get it — my book), network access ranks right up there with
air conditioning and the microwave oven. Like other “taken for granted,
but I can’t imagine life without them” kinds of technologies, it’s hard to imag-
ine sharing data from your laptop with others around you without a network.
Sure, I’ve used a sneakernet (the old-fashioned term for running back and
forth between computers with a floppy disk to copy files), but these days,
Apple computers don’t even have floppy drives. (And no self-respecting com-
puter should still have one.)
Nope, networking is here to stay. Whether you use it to share an Internet con-
nection, challenge your friends to a relaxing game of WWII battlefield action,
or stream your MP3 collection to other computers using iTunes, you’ll
wonder how you ever got along without one. In this chapter, I fill you in on all
the details you need to know to get your new MacBook or MacBook Pro
hooked up to a new (or an existing) network.
If you have just your Mac and an Internet connection (either through a dialup
modem or a high-speed DSL/cable modem) and you have no plans to add
another computer or a network printer, a network isn’t necessary.
25_04859X ch17.qxp 7/20/06 10:40 PM Page 267
Should You Go Wired or Wireless?
If you decide that you indeed need a network for your home or office, you
have another decision to make: Should you install a wired network (which
involves running cables between your computers) or a wireless network
(which doesn’t require any computer-connecting cables)?
Your first instinct is probably to choose a wireless network for convenience.
After all, this option allows you to eliminate running cables behind furniture
(or in the ceiling of your office building). Ah, but I must show you the advan-
268
Part V: Sharing Access and Information
What exactly is the network advantage?
If you have other family members with comput-
ers or if your laptop is in an office with other
computers, here’s just a sample of what you can
do with a network connection:
ߜ Share an Internet connection: This is
the
major reason why many families and most
small businesses install a network.
Everyone can simultaneously use the same
DSL or cable Internet connection on every
computer on the network.
ߜ Copy and move files of all sizes: Need to
get a 4GB iDVD project from one Mac to
another? With a network connection, you
can accomplish this task in just minutes.
Otherwise, you’d have to burn that file to a
DVD-R or use an external hard drive. A net-
work connection makes copying as simple
as dragging the project folder from one
Finder window to another.
ߜ Share documents across your network:
Talk about a wonderful collaboration tool.
For example, you can drop a Word docu-
ment or Keynote presentation file in your
Public folder and ask for comments and
edits from others in your office.
ߜ Stream music: With iTunes, you can share
your MP3 collection on your laptop with
other Macs and PCs on your network. Your
ears can’t tell the difference!
ߜ Play multiplayer games: Invite your friends
over and tell ’em that you’re hosting a
LAN
party,
the techno-nerd term for a large gath-
ering of game players, connected through
the same network, all playing the same multi-
player game. (Suddenly you’ll see firsthand
just how devious a human opponent can
be.) Each participant needs to buy a copy of
the same game, naturally, but the fun you’ll
have is worth every cent you spend. Don’t
forget the chips!
If your laptop isn’t within shouting distance of
an existing network and you don’t plan on
buying any more computers, a network isn’t for
you. Because the whole idea of a network is to
share documents and applications with others,
a lone Mac hanging out in your home with no
other computers around won’t need a network.
25_04859X ch17.qxp 7/20/06 10:40 PM Page 268
tages to a wired network as well. Table 17-1 gives the lowdown to help you
make up your mind.
Table 17-1 Network Decision-Making
Function Wireless Networks Wired Networks
Speed Moderate Much Faster
Security Moderate Better
Convenience Better Worse
Compatibility Confusing standards Easier to understand
Cables Few (or none) Required
Now for the biggest decision of all: Should you choose a wired network, a
wireless network, or a combination of both? Here are the advantages of each
type of network:
ߜ Wired: A wired network offers two significant perks over a wireless
network:
• Faster speeds: Wired networks that are compatible with your Mac
are up to twice as fast as the fastest 802.11g wireless connections.
The performance of a wireless connection is reduced by both inter-
ference (from structures such as concrete walls and household
appliances such as some wireless phones and microwave ovens)
and distance.
• Better security: A wired network doesn’t broadcast a signal that can
be picked up outside your home or office, so it’s more secure.
Hackers can attack through your Internet connection. Hence the
“Use Your Firewall!” section, later in this chapter.
ߜ Wireless: A wireless connection has only one advantage, but it’s a big
one: convenience.
Accessing your network anywhere in your home or office — without
cables — is so easy. Plus, you can easily connect to all sorts of wireless
devices, such as a wireless printer. (By using an AirPort Express mobile
Base Station, even your home stereo can get connected to your MP3 col-
lection on your laptop.)
269
Chapter 17: Working Well with Networks
25_04859X ch17.qxp 7/20/06 10:40 PM Page 269
Be a Pal — Share Your Broadband!
Time to see what’s necessary to share an Internet connection — in this sec-
tion, I cover two methods of connecting your network to the Internet. And
before you open your wallet, keep in mind that you may be able to use your
Mac to share your broadband connection across your home network . . . that
is, when you’re not doing the road warrior thing!
Using your laptop as a sharing device
You can use your Mac laptop to provide a shared wireless Internet connec-
tion across your network, using either
ߜ A broadband DSL or cable connection
ߜ A dialup modem
You should try sharing a dialup modem Internet connection only if you
have no other option. A dialup modem connection can’t handle the data
transfer speeds for more than one computer to access the Internet com-
fortably at one time. And today’s Mac laptops no longer come with inter-
nal modems. Sharing a dialup connection just isn’t practical.
Your laptop uses OS X Tiger’s built-in Internet connection sharing feature
to do the job, but naturally your Mac must remain turned on to allow Inter-
net sharing. I show you how to do this in the upcoming section “Internet
connection.”
270
Part V: Sharing Access and Information
It’s easy to graft wireless access
to a wired network
Are you caught in the middle between wired and
wireless networking? Or perhaps you’re already
using a wired network but would be absolutely
thrilled by the idea of sitting on your deck in the
sunshine whilst checking your e-mail on your
laptop. By using both technologies, you can get
the faster transfers of a wired network between
all the computers in your office.
That is the configuration I use in my home office.
My family gets all the convenience a wireless
network offers, and everyone can connect to
the Internet from anywhere in our house. On the
other hand, my office computers have the faster
performance and tighter security of a wired net-
work.
Sassy
indeed!
25_04859X ch17.qxp 7/20/06 10:40 PM Page 270
Using a separate Internet sharing device
If you decide to use a dedicated Internet sharing device (often called an
Internet router) to connect to your cable or DSL modem, you’ll have to buy
the additional hardware. But your laptop doesn’t have to remain turned on
just so everyone can get on the Internet.
Internet routers can include either wired or wireless network connections —
many include both.
Setting up an Internet router is a simple matter. The configuration usually
involves a number of different settings in System Preferences that vary
according to the model of router you’re installing. Grab a Diet Coke, sit down
with the router’s manual, and follow the installation instructions you’ll find
there.
Most Internet routers offer a DHCP server, which automatically assigns IP
addresses, and I strongly recommend that you turn on this feature! (You dis-
cover more about DHCP later in the chapter, in the sidebar titled “The little
abbreviation that definitely could.”)
What Do I Need for a Wireless
Connection?
Most normal folks — whom I define as those who have never met a network
system administrator, and couldn’t care less — think that connecting to a net-
work probably involves all sorts of arcane chants and a mystical symbol or
two. In this section, I provide you with the shopping list that you need to set
up a network or connect to a network that’s already running.
If your laptop came with built-in AirPort Extreme wireless support (as all cur-
rent models do) and you already have an AirPort Extreme or Express base
station, you’re set to go. Otherwise, hold on tight as I lead you through the
hardware requirements for wireless networking.
The maximum signal range of any wireless network can be reduced by inter-
vening walls or by electrical devices such as microwave ovens and wireless
phones that can generate interference.
271
Chapter 17: Working Well with Networks
25_04859X ch17.qxp 7/20/06 10:40 PM Page 271
Laptop hardware
Connecting a laptop to an existing wireless network requires only a single
piece of hardware: an AirPort Extreme wireless card. (Remember, you need to
buy an AirPort card only if you’re using an older Mac laptop that didn’t come
with built-in wireless hardware.) To wit:
ߜ If your laptop arrived with AirPort Extreme wireless hardware, you’re
ready to go.
ߜ If you need to add wireless support to your laptop, you need an AirPort
Extreme card.
After the card is safely ensconced in the confines of your laptop’s sleek case,
you can skip to the next section.
You can use some PC-compatible 802.11g cards in your Mac laptop, but not
all wireless cards are supported. Plus, you’ll have to do a little additional con-
figuration dancing to join an AirPort Extreme network. (Unfortunately, the
passwords used by the two types of hardware are incompatible.) For the
whole story, visit www.apple.com/support/ and search for article number
106864, entitled “AirPort Extreme: Getting an equivalent network password.”
I bought an AirPort Extreme card, thus avoiding any additional work. Sounds
like a Mark’s Maxim!
If you don’t want the hassle of tweaking PC hardware to accommodate your
Mac laptop, buy Apple hardware and software.
Base stations
If you decide that you want to build your own network, you eschew cables, or
you want to add wireless support to your existing wired network, you need a
base station. The base station can act as a bridge between computers using
wireless and your existing wired network, or a base station can simply act as
a central switch for your wireless network.
You can use either a cool Apple Base Station or a boring 802.11g generic wire-
less base station. However, the Apple hardware requires less configuration
and tweaking.
Apple base stations
As listed in Table 17-2, your laptop can work with three Apple base station
models for wireless networking:
272
Part V: Sharing Access and Information
25_04859X ch17.qxp 7/20/06 10:40 PM Page 272
ߜ AirPort Extreme: I recommend AirPort Extreme if your network needs
• The faster 802.11g transfer speeds
• The enhanced antenna, which provides greater range
ߜ AirPort Express: I recommend AirPort Express, shown in Figure 17-1, if
you want to
• Carry your wireless base station with you (it’s much smaller than
Apple’s other base stations)
• Connect your home stereo for wireless music streaming using the
AirTunes feature in iTunes
ߜ AirPort (discontinued): You might find the original AirPort base station
on eBay or at a garage sale. Go ahead and pick it up if you want to save
cash, unless you’re considering multiplayer gaming or high-speed file
transfers over your wireless network.
The 802.11g standard used by the AirPort Extreme and AirPort Express
base stations delivers a connection that’s several times faster than the
old AirPort base station’s 802.11b.
Table 17-2 Apple Wireless Network Base Stations
Feature AirPort Extreme AirPort Express AirPort
Price $200 $130 $80 (used)
Users (maximum) 50 10 50
802.11g support Yes Yes No
802.11b support Yes Yes Yes
LAN Ethernet jack Yes Yes Yes
(high-speed Internet
connection)
WAN Ethernet jack Yes No No
(wired computer
network)
Stereo mini-jack No Yes No
USB printer port Yes Yes No
Maximum signal range 150 feet (standard) 150 feet 100 feet
(approximate) 250 (with add-on
antenna)
AC adapter Separate Built-in Separate
273
Chapter 17: Working Well with Networks
25_04859X ch17.qxp 7/20/06 10:40 PM Page 273
The names of Apple’s base stations are irritatingly similar; Apple usually
does a better job in differentiating their product names. Jot down the
name of your model on a Stickie on your laptop’s desktop so you don’t get
confused.
Installing an Apple base station is simple:
1. If you have a DSL or cable modem, connect it to the Ethernet LAN jack
on the base station.
2. If you have a wired Ethernet computer network, connect it to the WAN
(wide area network) jack on the base station.
3. If you have a USB printer, connect it to the USB port on the base
station.
I cover the steps to share a printer in the “Printer: section.
4. Connect the power cable from the AC power adapter.
AirPort Express has a built-in AC adapter, so you just plug AirPort
Express into the wall.
5. Switch on your base station.
6. Run the installation software provided by Apple on your Mac.
Non-Apple base stations
If your wireless base station was manufactured by another company besides
Apple, the installation procedure is almost certainly the same. (Naturally, you
should take a gander at the manufacturer’s installation guide just to make
sure, but I’ve added many different brands of these devices and used the
same steps for each one.)
Figure 17-1:
The AirPort
Express
portable
base
station.
274
Part V: Sharing Access and Information
25_04859X ch17.qxp 7/20/06 10:41 PM Page 274
However, I should note that there is an extra hurdle to connecting to a non-
Apple base station using an AirPort or AirPort Extreme card. More on this in
the next section. For now, just remember that I recommend using Apple wire-
less hardware with your Mac whenever possible. It’s a little easier!
Creating or joining a wireless network
As far as I’m concerned, there are only two types of base stations on the
planet: Apple and non-Apple (which includes all 802.11b and 802.11g base-
stations). In these two sections, I relate what you need to know to get
onboard using either type of hardware.
AirPort
To create or join a wireless network that’s served by any flavor of Apple base
station, follow these steps on each Mac with wireless support:
1. Click the System Preferences icon on the dock.
2. Click the Network icon.
3. From the Show pop-up menu, choose AirPort.
4. Select the Show AirPort Status in Menu Bar check box.
5. Click the Apply Now button.
6. Click the AirPort status icon on the Finder menu bar.
7. From the AirPort menu, choose an existing network connection that
you’d like to join.
Some wireless networks might not appear in your AirPort menu list. These
are closed networks. You can’t join a closed network unless you know the
exact network name (which is far more secure than simply broadcasting the
network name). To join a closed network, follow these steps:
1. Select Other from the AirPort menu.
2. Type the name of the network.
3. Enter the network password, if required.
To disconnect from an AirPort Extreme network, click the AirPort menu and
either choose Turn AirPort Off or connect to another AirPort network.
Non-Apple base stations
If you’re using an AirPort card to connect to a non-Apple base station, you
need to follow a specific procedure that takes care of the slightly different
password functionality used by standard 802.11b/g hardware.
275
Chapter 17: Working Well with Networks
25_04859X ch17.qxp 7/20/06 10:41 PM Page 275
To read or print the latest version of this procedure, fire up Safari and visit
www.apple.com/support/ — search for the number 106250 (the Apple
Knowledge Base article number). This article provides the details on how to
convert a standard wireless encrypted password to a format that your
AirPort card can understand.
What Do I Need for a Wired Connection?
If you’re installing a wired network, your Mac laptop already comes with most
of what you need for joining your new cabled world. You just connect the
hardware and configure the connection. Don’t forget that you also need cables
(check the sidebar titled “Can I save money by making my own cables?”) and
an inexpensive Ethernet switch or hub. (If you’re using an Internet router or
other hardware sharing device, it likely has a built-in 4- or 8-port hub.)
Laptop hardware
Your Ethernet 10/100/1000 port (which looks like a slightly oversized modem
port) is located in the line of ports on the side of your laptop, ready to accept
a standard Ethernet Cat5 cable with RJ-45 connectors. If you’re connecting to
an existing wired network, you need a standard Cat5 Ethernet cable of the
necessary length — I recommend a length of no more than 25 feet, because
cables longer than that are often subject to line interference (which can slow
down or even cripple your connection). You also need a live Ethernet port
from the network near your Mac. Plug the cable into your laptop, and then
plug the other end into the network port.
276
Part V: Sharing Access and Information
Can I save money by making my own cables?
You can either purchase premade Cat5 cables,
or you can (try) to make your own. However, you
most definitely
don’t
save money by making
your own cables — at least, not if you’re con-
necting computers that are located within 25
feet or so of one another. I strongly recommend
that you buy premade Cat5 Ethernet cables
(which come in a number of standard lengths)
for two important reasons:
ߜ You can be guaranteed that the cables
work.
ߜ You don’t have to build the things yourself.
Nothing is harder to troubleshoot than a shorted
or faulty Ethernet cable — that’s the voice of
experience talking there.
If you’re wiring multiple rooms in your house or
office, you have to install your own cabling.
That’s when I suggest you either call your local
computer store for help or enlist the aid of
someone you know who has successfully
installed Ethernet cable. If you’re building a
home, you can get your home wired for an
Ethernet network at the same time as the AC
wiring is installed — it’s expensive, but if you’re
a computer maven you’ll budget that cost!
25_04859X ch17.qxp 7/20/06 10:41 PM Page 276
Network hardware
If you don’t know your hub from your NIC, don’t worry — I provide you
with a description of the hardware you need for your wired network in this
section.
Components
If you’re building your own wired network, you need
ߜ A central connection gizmo: You can use either a hub or a switch (which
is faster and slightly more expensive). The gizmo’s job is to provide
more network ports for the other computers in your network. They typi-
cally come in 4- and 8-port configurations.
As I mentioned earlier in this chapter, most Internet routers (sometimes
called Internet sharing devices) include a built-in hub or switch, so if
you’ve already invested in an Internet router, make doggone sure that it
doesn’t come equipped with the ports you need before you go shopping
for a hub or switch!
ߜ A number of Cat5 Ethernet cables: The number is determined by how
many computers you’re connecting.
Many companies sell do-it-yourself networking kits that contain everything you
need for a small four-computer network, including cables and a hub. These
kits are a great buy (typically selling for less than $100), but most include a
PC Ethernet NIC (Network Interface Card) that your laptop doesn’t need. (If
you have a PC that doesn’t have a network card, you can use the card in that
computer.) If you don’t need an Ethernet NIC for any of your computers, look
for a do-it-yourself kit that comes with just the cables and the hub or switch
(these usually go for $50 or a little less). I recommend Linksys kits.
Connections
After you assemble your cables and your hub or switch, connect the Ethernet
cables from each of your computers to the hub or switch, and then turn on
the hub. (Most need AC power to work.) Check the manual that comes with
your hub to make sure that the lights you’re seeing on the front indicate
normal operation. Colors vary by manufacturer, but green is usually good.
Huzzah!
When your hub is powered on and operating normally, you’re ready to config-
ure Mac OS X for network operation. (Now you can add network technician to
your rapidly growing computer résumé!)
277
Chapter 17: Working Well with Networks
25_04859X ch17.qxp 7/20/06 10:41 PM Page 277
Joining a wired Ethernet network
After all the cables have been connected and your central connection gizmo
is plugged in and turned on, you’ve essentially created the hardware portion
of your network. Congratulations! (Now you need a beard and suspenders.)
With the hardware in place, it’s time to configure Tiger. In this section, I
assume you’re connecting to a network with an Internet router, hub, or
switch that includes a DHCP server.
Follow these steps on each Mac running Mac OS X that you want to connect
to the network:
1. Click the System Preferences icon on the dock.
2. Click the Network icon (under Internet & Network).
3. From the Show pop-up menu, choose Built-in Ethernet.
4. From the Configure IPv4 pop-up menu on the TCP/IP tab, choose
Using DHCP (see Figure 17-2).
5. Click the Apply Now button.
Enjoy automatic goodness as Mac OS X connects to the DHCP server to
obtain an IP address, a subnet mask, a gateway router IP (Internet proto-
col) address, and a Domain Name System (DNS) address. (Without a
DHCP server, you’d have to add all this stuff manually. Ugh.)
Figure 17-2:
All hail
DHCP, the
magical
networking
fairy!
278
Part V: Sharing Access and Information
25_04859X ch17.qxp 7/20/06 10:41 PM Page 278
A few seconds after clicking the Apply Now button, the DHCP informa-
tion provided by your network should appear. You might also notice that
the DNS Servers field is empty, but fear not because Mac OS X is using
DNS server information provided by the DHCP server.
6. Press Ô+Q to quit System Preferences and save your settings.
You’re on!
Connecting to the Network
All right! Now the hardware is powered up, the cables (if any) are installed
and connected, and you’ve configured Tiger. You’re ready to start (or join)
the party. In this section, I show you how to verify that you’re connected, and
how to share data and devices with others on your network.
Verifying that the contraption works
After you have at least two computers on a wired or wireless network, test
whether they’re talking to each other over the network by pinging them. (No,
I didn’t make up the term, honest.) Essentially, pinging another computer is
like yelling, “Are you there?” across a crevasse.
To ping another computer on the same network from any Mac running Tiger,
follow these steps:
1. Open a Finder window, click Applications, and then click Utilities.
2. Double-click the Network Utility icon to launch the application.
3. Click the Ping tab.
4. In the Please Enter the Network Address to Ping text field, enter the
IP address of the computer that you want to ping.
If you’re pinging another Mac running Tiger, you can get the IP address
of that machine by simply displaying the Network pane within System
Preferences, which always displays the IP address. If you’re trying to
ping a PC running Windows XP and you don’t know the IP address of
that machine, click Start, right-click My Network Places, and then click
Properties. From the Network Connections window, right-click your
Local Area Network connection icon and choose Status. Click the
Support tab, and the IP address of that PC is proudly displayed.
5. Select the Send Only x Pings radio button and enter 5 in the text field.
279
Chapter 17: Working Well with Networks
25_04859X ch17.qxp 7/20/06 10:41 PM Page 279
6. Click the Ping button.
• Yay!: If everything is working, you should see results similar to
those shown in Figure 17-3, in which I’m pinging my Windows
server at IP address 192.168.1.106, across my wired Ethernet
network.
The address 192.168.1.xxx is a common series of local network IP
addresses provided by Internet routers, hubs, and switches with
DHCP servers, so don’t freak if you have the same local IP address.
• Nay: If you don’t get a successful ping, check your cable connec-
tions, power cords, and Mac OS X settings. Folks using a wireless
connection might have to move closer to the network base station
to connect successfully, especially through walls.
Sharing stuff nicely with others
It works . . . by golly, it works! Okay, now what do you do with your all-new
shining chrome network connection? Ah, my friend, let me be the first to
280
Part V: Sharing Access and Information
The little abbreviation that
definitely
could
You know, some technologies are just
sassy
. (So
much for my uber-tech image.) Anyway, these
well-designed technologies work instantly, you
don’t have to fling settings around like wrapping
paper on Christmas day, and every computer on
the planet can use them: Mac, Windows, Linux,
and even the laptops used by funny-looking
folks from Roswell, New Mexico.
Dynamic Host Configuration Protocol,
or DHCP
for short, is about as sassy as it gets. This proto-
col enables a computer to automatically get all
the technical information necessary to join a net-
work. Let me hear you say,
“Oh yeah!”
Just
about every network device on the planet can
use DHCP these days, including Internet routers,
hubs, switches, and (go figure) Mac OS X.
Today’s networking hardware and operating sys-
tems provide a
DHCP server,
which flings the
proper settings at every computer on the net-
work all by itself
.
Your Mac just accepts the set-
tings and relaxes in a placid networking nirvana.
In this book, you can bet the farm that I assume
you want to use DHCP and that your network
hardware supports it as well — remember, vir-
tually all networking stuff made in the last few
years can use DHCP. That way, I won’t spend 30
pages leading you through the twisting alley-
ways of manual network settings. (If you’re
really into such things, I spend those 30 pages
and explain every single techno-wizard detail in
my book
Mac OS X Tiger All-in-One Desk
Reference For Dummies
, [Wiley]. It’s about 800
pages long — hence the comprehensive angle.)
If you’re connecting to an existing network, tell
the network administrator that you’re taking the
easy route and using DHCP. One word of warn-
ing, however: Adding more than one DHCP server
on a single network causes a civil war, and your
system will lock up tight. Therefore, before adding
hardware with a DHCP server to an existing net-
work, ask that network administrator to make
sure that you aren’t making a mistake.
25_04859X ch17.qxp 7/20/06 10:41 PM Page 280
congratulate you, and the first to show you around! In this section, I cover
the most popular network perks. (And the good news is that these perks
work with both wired and wireless connections.)
Internet connection
If your DSL or cable modem plugs directly into your Mac (instead of a dedi-
cated Internet sharing device or Internet router), you might ponder just how
the other computers on your wireless network can share that spiffy high-
speed broadband connection. Tiger comes to the rescue!
Follow these steps to share your connection:
1. Click the System Preferences icon on the dock.
2. Click the Sharing icon (under Internet & Network).
3. Click the Internet tab.
4. From the Share Your Connection From pop-up menu, choose Built-in
Ethernet.
5. Select the AirPort check box (in the To Computers Using list).
Tiger displays a warning dialog box, stating that connection sharing
could affect your ISP or violate your agreement with your ISP. I’ve never
heard of this happening, but if you want to be sure, contact your ISP and
ask the good folks there.
Figure 17-3:
Look, Ma,
I’m pinging!
281
Chapter 17: Working Well with Networks
25_04859X ch17.qxp 7/20/06 10:41 PM Page 281
6. Click OK in the warning dialog box to continue.
7. Click Start to enable Internet sharing.
8. Click the Close button to exit System Preferences.
Sharing an Internet connection wirelessly (without an Internet router or a
dedicated hardware device) through Mac OS X requires your laptop to
remain on continuously. Because most laptop owners are nomadic in nature,
this isn’t likely to be a permanent solution, but I want you to be aware that
your laptop can do double-duty as a wireless Internet router.
You can share a dialup modem Internet connection, but don’t be surprised if
you quickly decide to shelve the idea of sharing a 56 Kbps connection. Those
dinosaurs are s-l-o-w beyond belief.
Files
You can swap all sorts of interesting files with other Macintosh computers on
your network. When you turn on Personal File Sharing, Tiger lets all Macs on
the network connect to your laptop and share the files in your Public folder.
Follow these steps to start sharing files and folders with others across your
network:
1. Click the System Preferences icon on the dock.
2. Click the Sharing icon.
3. Click the Services tab.
4. Enable the connections for Mac and Windows sharing.
• If you want to share files with other Macs on your network, select the
Personal File Sharing check box.
Other Mac users can connect to your computer by clicking Go on
the Finder menu and choosing the Network menu item. The
Network window appears, and your Mac is among the choices.
• If you want to share files with networked PCs running Windows, select
the Windows Sharing check box.
Windows XP users should be able to connect to your Mac from
their My Network Places window (or, with pre-XP versions of
Windows, from the Network Neighborhood). Those lucky Windows
folks also get to print to any shared printers you’ve set up. (The
following section covers shared printers.)
5. Click the Close button to exit System Preferences.
Tiger conveniently reminds you of the network name for your laptop at the
bottom of the Sharing pane.
282
Part V: Sharing Access and Information
25_04859X ch17.qxp 7/20/06 10:41 PM Page 282
Printers
Boy, howdy, do I love describing easy procedures, and sharing a printer on a
Mac network ranks high on the list! You can share a printer that’s connected
to your Mac (or your AirPort Extreme or AirPort Express base station) by fol-
lowing these very simple steps:
1. Click the System Preferences icon on the dock.
2. Click the Print & Fax icon (under Hardware).
3. Click the Sharing tab.
4. Select the Share These Printers with Other Computers check box.
5. Click the printers that you want to share.
6. Click the Close button to exit System Preferences.
A printer that you share automatically appears in the Print dialog box on
other computers connected to your network.
A Web site
Web jockeys tell you that Mac OS X is a great platform for running a Web site
that you can access from either the Internet or your local network. In fact, it’s
ridiculously easy to engage the mind-boggling power of Tiger’s Apache Web
server. (Keep in mind, however, that your Mac must always be on and con-
nected to the Internet; otherwise, your Web pages won’t be available to your
folks in Schenectady.) Road warriors on the move can still use a Web server
on a laptop from time to time, though — for example, you might want to
demonstrate a Web site you’ve created to a client or offer files for download-
ing from your site over your client’s network.
To begin serving Web pages, follow these steps:
1. Click the System Preferences icon on the dock.
2. Click the Sharing icon.
3. Click the Services tab.
4. Select the Personal Web Sharing check box.
5. Click the Close button to exit System Preferences.
To check out the default HTML page that ships with Apache, launch Safari
and visit this URL, replacing username in the address with your username:
http://127.0.0.1/~username/
283
Chapter 17: Working Well with Networks
25_04859X ch17.qxp 7/20/06 10:41 PM Page 283
To add pages to your Web server, navigate to the Sites folder that resides in
your Home folder. Because this is the root of your Apache Web server, the
files that you add to this folder are accessible from your Web server.
Don’t forget that folks connecting to your Web site across the Internet must use
your public IP address, while others on the same network you’re connected to
can use your laptop’s private IP address! (The 127.0.0.1 IP address that I just
mentioned is a special address that allows your laptop to connect with itself.
Rather egocentric, but it works.) Your Mac’s IP address appears in the Built-in
Ethernet description on the Network pane in System Preferences. If you’re
using an Internet router or Internet connection sharing device, your public IP
address might be different. Check the documentation for the device to deter-
mine how to find your public IP address. If you’re unsure about what IP address
to use on a “foreign” network, ask the company’s network administrator.
Use Your Firewall!
The following Mark’s Maxim, good reader, isn’t a request, a strong recommen-
dation, or even a regular Maxim — consider it an absolute commandment
(right up there with Get an antivirus application now).
Turn on your firewall now.
By connecting your network to the Internet, you open a door to the outside
world. As a consultant to several businesses and organizations in my home
town, I can tell you that the outside world is chock-full of malicious individu-
als who would dearly love to inflict damage on your data or take control of
your laptop for their own purposes. Call ’em hackers, call ’em delinquents, or
call ’em something I can’t repeat, but don’t let them in!
Oh, and it’s a bad idea to take a client’s network security for granted while
you’re on the road. (They might not have a copy of this book.) You still need
that protection.
Tiger comes to the rescue again with the firewall built into Mac OS X. When
you use this, you essentially build a virtual brick wall between you and the
hackers out there (both on the Internet and even within your local network).
Follow these steps:
1. Click the System Preferences icon on the dock.
2. Click the Sharing icon.
3. Click the Firewall tab.
284
Part V: Sharing Access and Information
25_04859X ch17.qxp 7/20/06 10:41 PM Page 284
4. Click Start to activate your firewall.
5. Click the Close button to exit System Preferences.
Tiger even keeps track of the Internet traffic that you do want to reach your
laptop, such as Web page requests and file sharing. When you activate one of
the network features that I demonstrate in the preceding section, Tiger auto-
matically opens a tiny hole (called a port by net-types) in your firewall to
allow just that type of communication to your Mac.
For example, if you decide to allow FTP access on the Services pane (in
System Preferences, on our old friend the Sharing pane), Tiger automatically
enables the check box to allow FTP access on the Firewall panel. (You can
also control which ports are active directly from the Firewall panel.)
You can also add ports for applications that aren’t on the firewall’s Allow list —
this includes third-party Instant Messaging clients and multiplayer game
servers. Click New, and then click the Port Name pop-up menu to display the
default list of external network applications (which includes applications
such as ICQ, IRC, and Retrospect). From here, you have two options:
ߜ If the application is listed, you’re in luck: Click it and then click OK to
open the default ports for that application.
ߜ If the application isn’t listed, click Other and type the TCP port and UDP
port listed in the application’s documentation. Click OK to open the
ports you specified.
285
Chapter 17: Working Well with Networks
25_04859X ch17.qxp 7/20/06 10:41 PM Page 285
286
Part V: Sharing Access and Information
25_04859X ch17.qxp 7/20/06 10:41 PM Page 286
Chapter 18
Making Friends
with Wireless Devices
In This Chapter
ᮣ Using Bluetooth for wireless connections
ᮣ Adding wireless keyboards and mice
ᮣ Moving data amongst devices with iSync
ᮣ Printing over a Bluetooth wireless connection
L
et’s talk cordless. Your Mac is already pretty doggone all-inclusive
because everything that most other computers string together with
cords has been integrated into the laptop’s case, including the monitor and
speakers. Depending on the connection options that you choose when you
buy your laptop (or what you’ve added since), the only cord that you
absolutely need might be your AC power cord.
For most of us, this introduces an entirely new realm of possibilities . . . and
that results in more questions. Exactly how do other wireless devices com-
municate with your Mac? Can you really share the data on your laptop with
your cell phone or your PDA? Can you sit in the comfort of your overstuffed
recliner and watch a DVD from 15 feet away?
In this chapter, I describe to you what’s cooking in the world of wireless
devices. I won’t delve into wireless Ethernet networking between your Mac and
other computers — that’s covered in depth in the confines of Chapter 17 —
and I won’t discuss the Apple remote in this chapter, because it’s covered in
Chapter 10. However, I do cover the wireless Bluetooth connections that you
can make with other devices besides computers.
26_04859X ch18.qxp 7/20/06 10:40 PM Page 287
Bluetooth: Silly Name for Cool
Technology
Originally, wireless computer connections were limited to IR (short for infra-
red) and 802.11b (the original Wi-Fi specification for wireless Ethernet net-
works). This was fine — after all, what were you gonna connect to your Mac
besides other computers? Ah, but progress marches on.
A little Danish history
Enter the explosion in popularity of modern cell phones and personal digital
assistants (PDAs). In 1998, a consortium of big-name cell phone, PDA, and
computer laptop manufacturers decided that their products needed a
method of communicating with each other. This new wireless standard
needed to be inexpensive and consume as little battery power as possible, so
designers decided to keep the operational distance limited to a maximum of
about 30 feet. Plus, the idea was to keep this new wireless system as hassle-
free as possible: Everyone agreed that you should simply be able to walk
within range of another device, and the two would link up immediately and
automatically. Thus Bluetooth was born!
Bluetooth has been incorporated into a range of peripherals and devices,
including
ߜ Cell phones
ߜ PDAs
ߜ Laptops
ߜ Wireless computer peripherals such as keyboards and mice
ߜ Printers
ߜ Music players
ߜ Headphones
Does the name Bluetooth sound faintly like Viking-speak to you? It should.
For some absolutely ridiculous reason, the companies that developed the
Bluetooth standard decided to name their creation after the tenth century
Danish king Harald Blatand, nicknamed Bluetooth, who succeeded in joining
Denmark and Norway in a political alliance. Hence the rather Viking and
runic-looking Bluetooth symbol. (Geez, these folks need to take a day off.
Read comic books, or play with a Slinky. Something.)
288
Part V: Sharing Access and Information
26_04859X ch18.qxp 7/20/06 10:40 PM Page 288
Is your Mac Laptop Bluetooth-ready?
Danish royalty aside, you still need to know whether your Mac is ready for a
Bluetooth connection. At the time of this writing, all of Apple’s laptop offer-
ings come with internal Bluetooth hardware, but if you’re using an older Mac
laptop without Bluetooth built-in, you’re currently out of the Bluetooth loop.
However, you don’t need to pitch your faithful Mac if it doesn’t yet talk to the
pirate! You can add Bluetooth capability to your computer with a simple USB
Bluetooth adapter. The USB Bluetooth adapter from Belkin (www.belkin.
com) sells online for about $30. It includes automatic data encryption, which
is necessary only if there’s a hacker within about 30 to 60 feet of your com-
puter, but more security is always better in my book. The adaptor can link
with up to seven other Bluetooth devices simultaneously. (Come to think of
it, there were a lot of people within 30 feet of my MacBook Pro during my last
LAN party bash. I guess this stuff really is important!)
Tiger and Bluetooth, together forever
You’d expect a modern, high-tech operating system like Mac OS X to come
with Bluetooth drivers. You’d be right, but Apple has gone a step further:
Tiger comes with a System Preferences pane and a utility application to help
your Mac connect with the Bluetooth devices that are probably hanging out
in your coat pockets.
The Bluetooth pane in System Preferences allows you to
ߜ Set up new Bluetooth devices: Click the Devices tab and then click
Setup New Device to run the Bluetooth Setup Assistant, which config-
ures Bluetooth devices for use with Tiger.
By following the device-specific onscreen instructions, you can choose to
set up a number of common Bluetooth toys, including a keyboard, mouse,
cell phone, and printer — or you can work with other types of devices by
choosing Other. The Setup Assistant searches for your Bluetooth device
and makes sure that it’s ready to party with your laptop.
Your Bluetooth device must be in range and discoverable (more on this
in the next section) before you run the Bluetooth Setup Assistant.
ߜ Configure Bluetooth connections: Click the Sharing tab to create,
remove, enable, or disable your Bluetooth connections, using them as
virtual serial ports (for the simple transfer of data) or virtual modems
(for bidirectional transfers, such as using an Internet connection
through a Bluetooth cell phone). The two types of data exchange that
you can enable or disable from this tab are
289
Chapter 18: Making Friends with Wireless Devices
26_04859X ch18.qxp 7/20/06 10:40 PM Page 289
• File transfers: Bluetooth devices can browse the folder that you
specify and receive files from your Mac.
• File exchanges: Your laptop can browse and receive files from
Bluetooth devices.
These openings to the outside world are presented as individual connec-
tions in the Service Name list, and you can toggle them on and off indi-
vidually. You can also specify whether a Bluetooth port is encrypted.
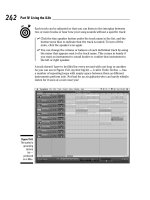
Figure 18-1 shows an active Bluetooth virtual modem that’s set up to
allow my laptop to sync up with my Palm Pilot, using the Bluetooth-PDA-
Sync service.
If you know you won’t be using Bluetooth devices while you’re on the road,
disabling a Bluetooth service on a laptop can help conserve battery power.
The other Bluetooth resource that you can use is the standalone application
Bluetooth File Exchange. (Yes, you can call it BFE if you like. I do whenever
possible.) You’ll have to launch BFE the old-fashioned way — it’s located in
your Utilities folder, inside your Applications folder. Much like a traditional
FTP application, double-clicking the Bluetooth File Exchange icon presents
you with a file selection dialog box — you’re choosing the file(s) you want to
send to the connected Bluetooth device! You can also elect to browse the
files on a networked Bluetooth device so that you can see what the owner of
that device is offering.
Figure 18-1:
You can
add, delete,
enable or
disable
Bluetooth
ports from
the Sharing
tab.
290
Part V: Sharing Access and Information
26_04859X ch18.qxp 7/20/06 10:40 PM Page 290