macbook for dummies phần 4 ppt
Bạn đang xem bản rút gọn của tài liệu. Xem và tải ngay bản đầy đủ của tài liệu tại đây (1.85 MB, 52 trang )
Spotlight matches only those items that include all your search text:
Therefore, if you enter just the word horse, you’re likely to get far more
matches than if you enter a word string, such as horse show ticket.
If you add metadata to your documents (such as the Comments field in a
Word document or the keywords embedded in a Photoshop image), Spotlight
can match that information as well. Other recognized file formats include
AppleWorks documents, Excel spreadsheets, Keynote presentations, Pages
documents, and third-party applications that offer a Spotlight plug-in.
Spotlight works so seamlessly — and so doggone fast — because it’s literally
built into the core of Tiger (unlike that other operating system that begins
with a W, which uses a separate program to search and can take a couple of
minutes to return just matching filenames). Spotlight’s integration into the
heart of Tiger allows those high-IQ Apple developers (and even smart folks
outside the company) to easily use it elsewhere within Tiger — more on this
later in the chapter.
Searching for all sorts of things
with Spotlight
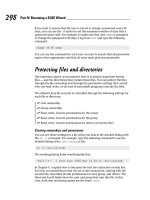
To begin a Spotlight search, display the Spotlight box, click in it, and start
typing. As soon as your finger presses the first key, you’ll see matching items
start to appear. Check out Figure 7-2, in which I typed only a single character.
(No need to press Return, by the way. This is all automatic from here on.) As
you continue to type, Spotlight’s results are updated in real-time to reflect the
new characters.
Spotlight displays what it considers the top 20 matching items within the
Spotlight menu itself. These most relevant hits are arranged into categories
such as Documents, Images, and Folders. You can change the order in which
categories appear (using the Spotlight pane in System Preferences, which I
cover a bit later in this chapter).
Using internal magic, Spotlight presents the Top Hit category (with what it con-
siders the single most relevant match) at the top of the search results, as also
shown in Figure 7-2. You’ll find that the Top Hit is often just what you’re looking
for. To open or launch the Top Hit item from the keyboard, press Ô+Return.
Didn’t find what you were after? Click the X icon that appears at the right side
of the Spotlight box to reset the box and start over.
If all you know about the item you’re searching for is what type of file it is —
for example, you know it’s a QuickTime movie, but you know nothing about
the title — just use the file type, such as movies, all by itself as the keyword
in the Spotlight field. This trick works with image files and audio files, too.
103
Chapter 7: Sifting through Your Stuff
12_04859X ch07.qxp 7/20/06 10:42 PM Page 103
Here’s another trick that’s built into Spotlight: You can type a relative time
period — such as yesterday, last week, or last month — and Spotlight will
match every item that was created or received within that period. That’s 100
percent sassy!
Working with matching stuff
After you run a fruitful search, and Spotlight finds the proverbial needle in
your system’s haystack, what’s next?
Just click the item — that’s all it takes. Depending on the type of item, Tiger
does one of four things:
ߜ Launches an application
ߜ Opens a specific pane in System Preferences (if the match is the name of
a setting or contained in the text on a Preferences pane)
ߜ Opens a document or data item, such as an Address Book card
ߜ Displays a folder in a Finder window
Figure 7-2:
A Spotlight
menu
search
takes as
little as one
character.
104
Part II: Shaking Hands with Mac OS X
12_04859X ch07.qxp 7/20/06 10:42 PM Page 104
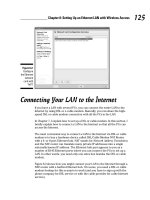
To see all sorts of useful info about each Spotlight menu item, click the Show
All item (above the Top Hit listing) to expand your Spotlight menu into the
Spotlight Results window, as shown in Figure 7-3. From the keyboard, you can
press the Results window shortcut key, which you can set from System
Preferences (more on this in a page or two).
The category groups in the upper-right side of the Results window allow you
to group your results by different categories. You can also specify how items
are sorted within each group by clicking the option you want under the Sort
Within Group By heading. Spotlight displays images as thumbnails to make
them easier to differentiate.
To display the details about any item in the list (without selecting it, which
closes the Results window), click the Info icon (lowercase italic i in a circle)
at the right side of the item entry. After you locate the item you want, click it
to open, launch, or display it, just like you would in the Spotlight menu.
Use the filter settings in the column at the right to display or hide items by
the date they were created or last saved (the When section) or by their
source (such as your hard drive or Home folder).
Tweaking Spotlight in System Preferences
The System Preferences window boasts a new Spotlight icon, which you can
use to customize what search matches you’ll see and how they’ll be presented.
To adjust these settings, click the System Preferences icon on the dock (look
for the light switch) and then click the Spotlight icon (under Personal).
Figure 7-3:
The
Spotlight
Results
window
offers more
ways to
group and
sort your
matches.
105
Chapter 7: Sifting through Your Stuff
12_04859X ch07.qxp 7/20/06 10:42 PM Page 105
Configuring the Search Results settings
From the Search Results tab of the Spotlight Preferences pane, you can
ߜ Choose your categories: To disable a category (typically, because you
don’t use those types of files), select the check box next to the category
to clear it.
ߜ Specify the order in which categories appear within Spotlight: Drag
the categories into the order that you want them to appear in the
Spotlight menu and Results window.
ߜ Select new Spotlight menu and Spotlight Results window keyboard
shortcuts: In fact, you can enable or disable either keyboard shortcut, as
you like. Click the pop-up menu to choose a key combination.
Marking stuff off-limits
Click the Privacy tab to add disks and folders that should never be listed as
results in a Spotlight search. The disks and folders that you add to this list
won’t appear even if they match your search string. This safeguard can come
in handy for organizations (such as hospitals) that are required by law to pro-
tect their patient or client data. You can also select a removable hard drive
here, which is often stored in a safe, after-hours.
To add a private location, click the Add button (which bears a plus sign) and
navigate to the desired location. Then click the location to select it and then
click Choose. (If you already have the location open in a Finder window, you
can drag folders or disks directly from the window and drop them into the list.)
Other Search Tools Are Available Too
For a few years now, the Finder window toolbar has featured a Search box and
Tiger has included a Find dialog box, but even the older Search features in
Tiger have been updated to take advantage of Spotlight technology. Now you
can use file types (such as image or movie) and relative time periods (such as
yesterday and last week) in the Finder window Search box and Find displays!
I typically use the Finder window Search box if I need to do a simple file or
folder name search — it works the same as using the Spotlight search field.
Just begin typing, and use the X button in the Search box to reset the field. To
choose a specific location for your search — such as your Home folder or a
hard drive volume — click the desired button along the top of the Search
results display. The Finder window automatically turns into a Results display.
106
Part II: Shaking Hands with Mac OS X
12_04859X ch07.qxp 7/20/06 10:42 PM Page 106
Tiger also includes the oldest Search method in the book: the Find display. (It
used to be a dialog box all by itself, but now the Find controls are displayed
in the Finder window, so it’s more of an extension to the Finder window.)
Choose File➪Find or press Ô+F to display the Find controls. From here, you
can click pop-up menus to choose a specific filename or portion of a file-
name. Other modifiers include the file type, content, label color, file size, and
the last date the file was opened. Again, click the location buttons at the top
of the window to choose where to search.
The Find display, however, is a little more sophisticated than the toolbar
Search box. You can click the plus (+) button next to a search criterion field
in the Find display to add another field, allowing for matches based on more
than one condition. Click the minus (–) button next to a search criterion field
to remove it.
After you find a match, both of these older search methods work the same:
Click the item once to display its location, or double-click it to launch or open
it. Files can also be moved or copied from the Results and Find displays with
the standard drag and Option+drag methods. You can return to the more
mundane Finder window display by clicking the Back button on the toolbar.
These older search methods can also do one thing that Spotlight doesn’t
offer: You can use them to create a new Smart Folder. Click the Save button in
either the Finder window Search Results or the Find display. You’ll be
prompted to specify the name and location for the new Smart Folder and
whether it should appear in the Finder window sidebar. After you create the
folder, Tiger automatically updates the contents of the Smart Folder with
whatever items match the criteria you’ve saved. You’ll never have to search
using the same text or criteria again! (Each icon in a Smart Folder is a link to
the file or folder, so nothing gets moved, and no extra space is wasted with
multiple copies of the same items.) You can work with the files and folders
inside a Smart Folder as if they were the actual items themselves.
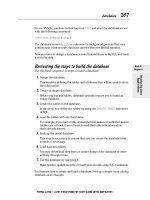
Putting Sherlock on the Case
No chapter on searching in Mac OS X would be complete without that famous
Internet sleuth, Sherlock (as shown in Figure 7-4). Conan Doyle himself would
be proud indeed if he could see just how much information Tiger’s Sherlock
application can pluck from Web pages, Internet search engines, and all sorts
of content providers.
Each channel, or search type, in Sherlock has a different function. To see a
short description of what each can do, just click the Channels button. In this
section, I demonstrate how to use three of the most useful channels to track
down the information you need.
107
Chapter 7: Sifting through Your Stuff
12_04859X ch07.qxp 7/20/06 10:42 PM Page 107
Okay, I know you’re going to roll your eyes, but I have to remind you that you
need an Internet connection to use Sherlock. Otherwise, Sherlock is about as
useful as a pair of swim fins in the Sahara.
Searching that darn Internet for data
and pictures
If you’re using Safari, check out the Google search box conveniently located
in the Safari toolbar. (Still, Sherlock can perform the same duties if you
choose the Internet channel.) You’ll find Sherlock in your Applications folder
on your laptop’s boot drive. (Click the Applications icon in the sidebar that
appears in any Finder window to open your Applications folder.) After you
double-click the Sherlock icon to launch the application, follow these steps to
track down specific information from Web sites around the world, using a
number of Internet search engines:
1. Click the Internet channel button.
2. Type the phrase Elvis Parade into the Topic or Description box, and
then click the Search button (yep, it’s the button with the magnifying
glass).
To force a search for an exact phrase, surround it with quotes.
3. When you find the perfect match for your search, click that entry to
display the summary text.
I’ll bet you didn’t know there were so many parades featuring Elvis
impersonators, did you?
Figure 7-4:
Elementary,
dear reader.
If it’s on the
Internet, I’ll
wager
Sherlock
can find it!
108
Part II: Shaking Hands with Mac OS X
12_04859X ch07.qxp 7/20/06 10:42 PM Page 108
4. To display the entire Web page in all its glory, double-click the entry.
Sherlock launches Safari (or whatever you’ve installed as a default
browser).
Getting movie information in the
new millennium
Ready to take in a good movie? Yep, you guessed it, Sherlock can help! To
search local theaters for information on a movie — and watch the trailer to
boot — follow these steps:
1. Click the Movies channel button.
2. Click the Movies button to search by movie name.
You can also search by theater name by clicking the Theaters button. To
filter the results you’ll get, enter a different city/state combination or Zip
code in the Find Near box.
3. Click the Showtime pop-up menu and then select today’s date.
4. When you find a listing that looks good, click that entry to display the
summary text.
Sherlock automatically downloads a thumbnail of the movie poster (and,
if available, the QuickTime movie trailer). If you have a broadband or
network Internet connection, click the Play button in the QuickTime
viewer window to watch the trailer.
5. In the center column, click the theater you want to display a list of the
show times for the selected film.
Keep an eye on my stocks, Watson!
What better stock to monitor than Apple? I use the Stocks channel all the
time to keep up on the latest news and information on a number of stocks.
Follow these steps to monitor a stock:
1. Click the Stocks channel button.
2. In the Company Name or Ticker Symbol box, type Apple (or its ticker
symbol, AAPL).
(I would check Microsoft’s stock, but it hasn’t been doing so well
recently.)
109
Chapter 7: Sifting through Your Stuff
12_04859X ch07.qxp 7/20/06 10:42 PM Page 109
3. Press Return or click the Search button.
4. To display the text of a news item (or a link to the story on the Web),
click the desired headline.
Sherlock displays the text of the news item in the summary section, and
Safari launches automatically to display Web pages.
5. To switch to another stock you’ve recently been watching, click the
stock entry in the list at the top of the window.
Like any other public-access stock ticker, the quotes you see on the Stocks
channel are delayed 15 minutes. (Go figure.)
110
Part II: Shaking Hands with Mac OS X
12_04859X ch07.qxp 7/20/06 10:42 PM Page 110
Part III
Connecting and
Communicating
13_04859x pt03.qxp 7/20/06 10:42 PM Page 111
In this part . . .
Y
ou want to do the Internet thing, don’t you? Sure you
do — and in this part, I describe and demonstrate
your Safari Web browser. You also find out about Apple’s
.Mac Internet subscription service, and how you can
store, back up, and synchronize your data online. Finally,
this part fills you in on connecting important stuff such as
printers and scanners, as well as how you can use your
cool-looking Apple remote and your laptop’s built-in iSight
Webcam.
13_04859x pt03.qxp 7/20/06 10:42 PM Page 112
Chapter 8
Taking Your Laptop on Safari
In This Chapter
ᮣ Identifying the major controls in Safari
ᮣ Jumping to a site and navigating the Web
ᮣ Searching for information and recently visited sites
ᮣ Recognizing secure connections
ᮣ Specifying a home page
ᮣ Putting bookmarks to work
ᮣ Staying current with an RSS feed
L
ooking for that massive Microsoft monster of a Web browser on your
MacBook Pro? You know, the one that practically everyone uses in the
Windows world. What’s it called? I forget the name.
You see, I use a Mac laptop, and I proudly surf the Web using a lean, mean —
and very fast — browser application. That’s Safari, of course, and it just
keeps getting better with each new version of Mac OS X. Safari delivers the
Web the right way, without the wait.
If you need a guide to Safari, this is your chapter. Sure, you can start using it
immediately, but wouldn’t you rather read a few pages so you can surf like a
power user?
It’s Not Just Another Web Browser
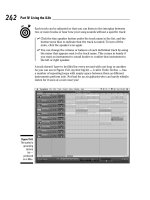
Safari could almost be mistaken for a Finder window! Figure 8-1 illustrates the
Safari window, with the most important controls and whatnots marked. To
launch Safari, click the spiffy-looking compass icon on the dock.
14_04859X ch08.qxp 7/20/06 10:38 PM Page 113
Let’s begin with introductions all around to the stuff in Figure 8-1:
ߜ Previous and Next buttons: Click the Previous button (left-facing triangle)
to surf backwards — no small feat on water but no big deal here. Safari
simply returns you to the last page you visited, and each additional click
takes you back one page further. If you’ve moved one or more pages back-
ward, you can click the Next button (right-facing triangle) to move for-
ward through those same pages again.
ߜ Reload button: Clicking this button (circular arrow) reloads, or refreshes,
the current page, updating the page with the latest information from the
Web server. This feature is useful for Web sites that change periodically,
such as www.cnn.com or your stockbroker’s Web site.
Previous
Show all bookmarks
Next
Status
Reload
Add a bookmark
Address box
Google search box
Bookmarks bar
Page window
Figure 8-1:
The Web
doesn’t get
any better
than this —
the default
Safari
window.
114
Part III: Connecting and Communicating
14_04859X ch08.qxp 7/20/06 10:38 PM Page 114
ߜ Add a Bookmark button: Click this button (a plus sign) to add the cur-
rent page to your collection of bookmarks, which are favorite sites that
you return to regularly. (More about bookmarks later in the section
“Organizing favorite spots with bookmarks.”)
ߜ Address box: You can enter a Web site’s address (URL) manually in this
box, or you can drag a Web address from another application here to
jump directly to that page.
ߜ Google search box: One of the slicker features of Safari, this box (look
for the magnifying glass) allows you to search Google for keywords that
you type without having to visit www.google.com first.
ߜ Show All Bookmarks button: Clicking this button, which looks like an
open book, displays (or hides) a special screen from which you can
organize your bookmark collections and select a specific bookmark. You
can also add or remove bookmarks from the bookmarks bar and
Bookmarks menu from this screen.
ߜ Bookmarks bar: This button strip (which appears below the Safari tool-
bar) allows you to jump directly to your most important bookmarks.
ߜ Page window: No surprises here! This window displays the contents of
the current Web page, including all sorts of stuff such as links to other
pages, images, animated graphics, pop-up windows (if you want them),
and anything else that appears on a Web page.
ߜ Status bar: Not particularly flashy, but I like the status bar nevertheless
because it updates you with information on what you’re doing, what’s
currently loading, or what will load if you click a link.
Handling Basic Safari Chores
Sure, you’re likely saying, “Mark, I already know this stuff. I can operate a Web
browser blindfolded — while listening to The Best of Air Supply, even.” I know
that most browsers work in the same way, and Safari shares most of those
mechanics. However, I’m a thorough guy (just ask my editors). Therefore, just
in case you’ve never used a browser before, let me show you how to surf.
And no giggling from the Peanut Gallery.
Entering Web addresses
The most mundane method of crossing the Web and visiting a specific site is
manually typing the Web page address — more technically called a URL,
short for Uniform Resource Locator — directly into the address box. Click the
tiny image icon that appears at the beginning of the address box, start typing,
and then press Return after you enter the entire address. Boom, you’re there.
115
Chapter 8: Taking Your Laptop on Safari
14_04859X ch08.qxp 7/20/06 10:38 PM Page 115
However, other methods of entering addresses are a bit easier than all that
hunt-and-peck action:
ߜ Click a link: If the page that’s currently displayed includes an under-
lined link to another page, you can click the colored link text to jump to
that page.
Links can also be attached to images. You know when you’re over a link
because the mouse cursor changes to a pointing hand.
ߜ Use the Google search box: A Google results page contains links to Web
pages that match your search criteria. (More on Google later in the
upcoming section, “It’s a snap to search with Google.”)
ߜ Double-click an HTML file: If an application saves an HTML file on your
drive, you can display that page by double-clicking the file icon to make
Safari launch and load the page automatically. (HTML is the computer
“language” of Web pages. When you visit a Web site on the Internet,
you’re actually receiving a series of commands that tell Safari what text
to display and how to display it. These commands can also be saved as
a file to your hard drive.)
ߜ Click a bookmark: Bookmarks can appear on the Bookmarks menu or the
bookmarks bar, and a single click automatically sends you to that site.
ߜ Click a Web address icon: A Web address icon looks like a spring-loaded
@ symbol. By default, the Tiger dock contains the perfect example. On
116
Part III: Connecting and Communicating
Tabs: Love ’em or leave ’em
Safari offers an alternate method of display-
ing multiple Web pages — Tabbed browsing
mode. With Safari open, just choose Safari➪
Preferences to display the Preferences dialog
box and then click the Tabs button. From here,
select the Enable Tabbed Browsing check box
to turn on tabs.
In
Tabbed browsing mode,
Safari doesn’t open
a new window or replace the current Web page
when you click a link. Instead, a tab represent-
ing the new page appears under the bookmarks
bar, and you can click it to switch pages.
However, you have to open a link or a bookmark
as a tab by holding down the Ô key while you
click. Otherwise, Safari acts as it usually does
and replaces the contents of the window with
the new page.
In fact, this area below the bookmarks bar
becomes a separate strip called the
tab bar.
To
remove a tabbed page from the tab bar, click the
X button next to the tab’s title. (If less than two
tabs are active, the tab bar automatically disap-
pears, unless you’ve enabled the Always Show
Tab Bar check box on the Tabs pane of the
Preferences dialog box.)
To be honest, I’m not a huge fan of tabs because
I tend to surf the Web in a linear fashion and
don’t often keep multiple windows open.
(Evidently, Apple thinks that most people fall in
the same category because Tabbed browsing is
disabled by default.) However, if you do a lot of
comparison shopping or research, or you find
yourself with a dozen Safari windows open at
once, tabs might be just the ticket for you.
14_04859X ch08.qxp 7/20/06 10:38 PM Page 116
the right side of the dock, you see a Web address icon. Clicking that icon
takes you to the Mac OS X home page on the Apple Web site, as shown in
Figure 8-2. You can drag any Web address to the right side of the dock (to
the right of the vertical line) to create your own dock Web address icon.
ߜ Drag-and-drop; cut-and-paste: You can cut or copy a Web address from a
document and paste it into the Safari address box. Often you can drag-
and-drop an address into the address box as well.
Putting the toolbar to work
You can specify which controls — buttons — should appear on the Safari
toolbar. For example, if you don’t use the Add a Bookmark button very often,
you can hide it to make room for another control that sees more action:
ߜ To add a toolbar control: Choose View➪Customize Address Bar.
A sheet appears in which you can drag controls to and from the toolbar.
ߜ To return to the default set of Safari toolbar controls: Drag the preset
default group back to the toolbar.
Click this Web address icon to launch Safari
Figure 8-2:
Add a Web
page to the
dock.
117
Chapter 8: Taking Your Laptop on Safari
14_04859X ch08.qxp 7/20/06 10:38 PM Page 117
Although I discuss most of the Safari toolbar buttons earlier in this chapter,
two or three don’t appear on the default toolbar configuration. You can see
them in Figure 8-3. Here’s a rundown on the controls that you can add to the
toolbar:
ߜ Home: Click this button (which looks like a house) to return immediately
to your home page. To find more on selecting a home page, see the
“Putting down roots with a new home page” section, later in this chapter.
ߜ AutoFill: This button (look for the pencil) is great if you do a lot of
online shopping or regularly fill out forms online. Click AutoFill, and
Safari does its best to automatically complete online forms with the
information that you provide in the AutoFill section of the Safari
Preferences dialog box. (Choose Safari➪Preferences to display this
dialog box.) You can choose to AutoFill with data from your personal
Address Book card, and you can also specify whether AutoFill should
take care of names and passwords.
AutoFill works its magic for anyone who’s sitting at the keyboard. If your
Mac is in a public location and you can’t guarantee that you’ll be the one
using it (or you’re worried about security in general), fill out forms manu-
ally. We’re talking about your personal information here — even your
login names and passwords, if you choose!
Don’t provide any personal information to any Web site unless the
connection is secure. Skip to the upcoming section, “Using secure
connections.”
ߜ Text size: These two buttons (small and large capital As) allow you to
decrease or increase the point size of the text on your Web pages. This
feature is great for those who prefer larger text for better readability.
118
Part III: Connecting and Communicating
What about downloading?
The default Safari configuration can handle just
about any type of download file you throw at it,
including movies, MP3 audio, disk images, and
executable applications. Just click the down-
load link, and the Downloads window pops up
to keep you informed of the status of the trans-
fer. Things work the way they’re supposed to,
even the first time you run Safari after you
unpack your new laptop.
However, I am going to persist in reminding you
about the possibility of malicious files and the
damage they can do to your system. These
include viruses,
Trojan horses
(applications that
appear to be harmless but are designed to do
Very Bad Things), and Java applets. Here are
the rules:
Never download or run any applica-
tion from a Web site that you don’t trust, and
always run an antivirus application to scan any-
thing you download. ’
Nuff said.
14_04859X ch08.qxp 7/20/06 10:38 PM Page 118
ߜ Bug: Strange name, but a click of the Bug button (um, look for the
spider-ant critter) helps Apple improve Safari! If you visit a Web page
that doesn’t display properly in Safari (hence the name Bug, which is
developer-speak for an error in an application), click this button to dis-
play a sheet in which you can describe the problem. When you then
click Submit, your Bug report is automatically sent to the hard-working
Apple developers responsible for Safari, who check out the page them-
selves to see whether they can correct what’s wrong for a future version
of Safari. In fact, the Bug feature is one of the reasons why Apple was
able to fine-tune Safari’s compatibility so quickly after the browser was
introduced.
ߜ Print Page: Click this icon (printer, natch) to print the current page dis-
played in Safari.
Home
Autofill
Bug
Text size
Figure 8-3:
The lesser-
known
buttons on
the Safari
toolbar.
119
Chapter 8: Taking Your Laptop on Safari
14_04859X ch08.qxp 7/20/06 10:38 PM Page 119
Searching for Specific Web Sites
I honestly can’t imagine how anyone could find anything on the Web without
today’s modern Web search engines. In my opinion, the best online Web
search on the Internet can be found at the familiar Google.com home page.
I’ve been using Google now for the last several years (long before it became
oh-so trendy and fashionable). There’s no better way to find that one Web
page that offers a complete listing of the hair stylists Elvis used in 1958.
However, searching isn’t always about where you’re going — sometimes, it’s
more important to look where you’ve been. If you need to search through the
Web sites that you visited in the recent past and return to a specific page,
you need to comb Safari’s History list.
Finally, Safari allows you to find specific text within the current page. And
believe me, with some of the humongous, 23-screen behemoth pages that I’ve
recently visited, you really appreciate the ability to zero in on the phrase ripe
avocado in two or three seconds!
In this section, I jaw about all three of these search resources. Read along,
and you’ll be well prepared to search the Web sites behind you, under you,
and in front of you.
It’s a snap to search with Google
Before Safari arrived on the scene, Mac owners had to bookmark Google.com,
or make Google their home page — or, in the worst case, actually type the
address manually. (Oh, the horror!) The designers and bigwigs at Apple knew
that they wanted to beat Microsoft at the browser game, so they added the
Google search box to the Safari toolbar . . . and knocked the pitch right out of
the ballpark.
To search for something, simply click your mouse cursor on the Google search
box on the Safari toolbar, type a word or short phrase, and press Return. Figure
8-4 illustrates the result of a search that I did using the phrase Stradivarius vio-
lins. If I had wanted to narrow the search to the most relevant pages, I could
have enclosed the search text in quotes — “Stradivarius violins” — to search
for precisely that text.
Looking back with the History list
Safari’s History list records any page visit. Click the History menu at any
time to
120
Part III: Connecting and Communicating
14_04859X ch08.qxp 7/20/06 10:38 PM Page 120
ߜ Return to your home page: You can also press Ô+Shift+H at any time.
ߜ Mark a page for SnapBack: The first page that you open in a window (or
the page that appears when you click a bookmark) is automatically set
as the SnapBack page.
• To return immediately to the SnapBack page, just click the orange
SnapBack button that appears at the right end of the Address box.
• To mark the active page as the SnapBack page, you can choose
Mark Page for SnapBack from the History menu. (For example,
if you were visiting the Apple site and you decide that you’d
rather SnapBack to the Support page instead of the Apple
welcome page, you would display the Support page and choose
this command.)
ߜ Visit pages ordered by date: You see a number of submenus, including
Earlier Today and then previous days. To view the History list for an ear-
lier date, move your mouse pointer over the desired date and then click
the desired page.
ߜ Clear the list: If you want to clear the History list — for security reasons
or just to remove old entries — you can do so from the History menu.
Figure 8-4:
The results
of a Google
search for
the finest
violins.
121
Chapter 8: Taking Your Laptop on Safari
14_04859X ch08.qxp 7/20/06 10:38 PM Page 121
Searching the current page
You can always press Ô+F (or choose Edit➪Find➪Find) to display the Find
dialog box. Type the word or phrase that you’re looking for in the Find box
and then click Next to display each occurrence in order, all the way to the
bottom of the page. To search upward to the top of the page, click Previous.
Safari highlights any match that it finds and jumps to that spot within the
page. Convenient indeed.
Safari Power User Tips and Tools
Safari is easy to use and handles simple Web surfing as well as any other
browser — click here, click there, and you’re navigating the Web. But what
about the features that a power user needs? They’re here as well!
In this section, I mention the most popular features among the experienced
Mac surfing set.
Putting down roots with a new home page
You have a number of different ways to jump to your home page, but how
do you set your home page in the first place? Follow these steps to move in to
your new home page:
1. Visit the page that you want to use as your home page.
2. Choose Safari➪Preferences.
The Safari Preferences dialog box appears.
3. Click Set to Current Page.
4. Click the Close button (which carries an X) in the Preferences dialog
box to return to your (new) home page.
Organizing favorite spots with bookmarks
Bookmarks make it easy to return to your favorite hangouts in cyberspace.
122
Part III: Connecting and Communicating
14_04859X ch08.qxp 7/20/06 10:38 PM Page 122
Sometimes a technology author has to use the same word over and over and
yet even over again. In this section, I claim the world record for using the
term bookmark — it’s a small triumph, but I take whatever comes my way.
To set a bookmark for the current page, just click the Add a Bookmark button
on the Safari toolbar, which looks like big plus sign. (There’s high intelligence
at work here, I’m telling you.)
Figure 8-5 illustrates the sheet that appears, in which you can
ߜ Enter a name for the bookmark.
ߜ Specify whether you want the bookmark to appear in the bookmarks bar,
the Bookmarks menu, or an existing Bookmarks folder.
To return to a bookmark, use one of these methods:
ߜ Click a bookmark button on the bookmarks bar.
ߜ Click the Bookmarks menu and select a bookmark.
ߜ Press a Bookmark keyboard shortcut. Safari assigns a keyboard short-
cut to the keys that appear on the bookmarks bar. For example, press-
ing Ô+1 is the same as clicking the first Bookmark button on the
bookmarks bar.
ߜ Click the Show All Bookmarks button at the left side of the bookmarks
bar. A full-screen Bookmark library appears (see Figure 8-6), in which
you can drag-and-drop all your bookmarks to the bookmarks bar, the
Bookmarks menu, or to collection folders that you can create.
Collection folders are great for organizing; I have more than 200 book-
marks, and I’d need a separate computer to keep track of ’em if I didn’t
use collections. Anyway, you can Control-click (or right-click) on any
bookmark in the Bookmarks screen to display the pop-up menu, and
then click Open to display the page. To close the Bookmarks screen,
just click the Show All Bookmarks button in the Safari toolbar a second
time.
Your Address Book appears as a collection folder in the Bookmarks library
screen. You can click this collection to immediately access all Web sites
stored as contact information in your Address Book; then you can create
bookmarks directly from those sites.
I now hereby close my record-setting bookmark section. Thank you.
123
Chapter 8: Taking Your Laptop on Safari
14_04859X ch08.qxp 7/20/06 10:38 PM Page 123
Figure 8-6:
The
Bookmarks
library
screen in
action.
Figure 8-5:
Creating
a new
bookmark —
heady,
powerful
stuff.
124
Part III: Connecting and Communicating
14_04859X ch08.qxp 7/20/06 10:38 PM Page 124
Using secure connections
I love shopping on the Web, but I’m always cautious — and you should be,
too. Safari indicates that your connection to the current Web page is secure
(or encrypted) by displaying a padlock icon in the upper-right corner of the
Safari window, as shown in Figure 8-7.
Here comes the only rule that you have to remember about secure connec-
tions in Safari. (In fact, it’s a Mark’s Maxim.)
Never — I mean never — enter any valuable personal or financial information
on a Web page unless you see the secure connection padlock symbol.
This type of information includes
ߜ Obvious things such as your credit card number, address, and telephone
number
ߜ Not-so-obvious things such as your Social Security number and a login/
password combination
Padlock
Figure 8-7:
eBay
provides a
secure
connection
when you’re
entering
your ID and
password.
125
Chapter 8: Taking Your Laptop on Safari
14_04859X ch08.qxp 7/20/06 10:38 PM Page 125
If a site doesn’t provide a secure connection and asks you for personal infor-
mation, find another spot in cyberspace to do your business. Your identity
should remain yours.
Reading RSS feeds
Almost time to exit stage right, but before leaving this discussion of Safari, I
want to cover a feature that’s new with Tiger: Safari now has the ability to
receive RSS (short for RDF Site Summary) newsfeeds. A Web site that pro-
vides RSS content sends updated news or information in a short headline
format — almost like the old AP and UPI teletype machines that newspapers
once used. You can recognize RSS Web addresses by their feed:// prefixes.
Safari displays RSS headlines in a list format. They’re easy to scan with a
glance, with no popup advertisements or unnecessary graphics, either.
A square blue RSS icon appears at the right side of the address box to let you
know that the Web server you’re visiting has RSS feeds available. Click this
RSS icon to display the newsfeed provided by that Web server.
The RSS feature has its own pane in the Safari Preferences dialog box, in
which you can specify the time delay before Safari checks for updated arti-
cles. You can also assign a color to new articles, which is a great help for
those who like to ride the latest tech wave (like I do). RSS feeds can be book-
marked just like a typical Web page, too, and Apple provides a number of RSS
sites as a default drop-down list on the bookmarks bar.
126
Part III: Connecting and Communicating
14_04859X ch08.qxp 7/20/06 10:38 PM Page 126
Chapter 9
.Mac Is .Made for Mac Laptops
In This Chapter
ᮣ Understanding online storage
ᮣ Opening a new .Mac account
ᮣ Using your iDisk
ᮣ Backing up your hard drive using .Mac
R
eaders often ask me to name my favorite reasons why they should
switch — that is, why should a Windows user who thinks all is well
move to the Apple universe? Of course, I always mention the superior hard-
ware and how much of a better job Tiger does as an operating system. But
here’s my favorite selling point: “Apple simply does things right the first time,
and everyone else plays catch-up.”
And then I pose this question: “What if you could reach a hard drive with 1GB
of your files over any Internet connection — anywhere in the world — and it
just showed up on your desktop automatically?” Usually, I get a thoughtful
silence after that one, and another person decides to learn more — about
Apple’s .Mac online hosting service, that is. In this chapter, I save you the
trouble of researching all the benefits of .Mac. Heck, that’s one of the reasons
why you bought this book, right?
Where Is My .Mac Stuff Stored?
The question that everyone asks is, “Where is my .Mac stuff stored?” Best
that I answer this one first. I’ll begin with a definition. The online hard drive
offered to .Mac subscribers (read about subscribing in the following section)
is an iDisk, and it’s well integrated into Mac OS X. In fact, if you didn’t know
the background, you might think that iDisk was simply another internal hard
drive. Figure 9-1 illustrates my iDisk icon on my desktop. The Finder window
displays the contents; notice the folders visible there. (More on these folders
later in the chapter.)
15_04859X ch09.qxp 7/20/06 10:41 PM Page 127