BASIC Stamp I Application Notes docx
Bạn đang xem bản rút gọn của tài liệu. Xem và tải ngay bản đầy đủ của tài liệu tại đây (506.51 KB, 126 trang )
Parallax, Inc. • BASIC Stamp Programming Manual 1.9
•
Page 71
BASIC Stamp I Application Notes
1
1: LCD User-Interface Terminal
Introduction. This application note presents a program in PBASIC that
enables the BASIC Stamp to operate as a simple user-interface terminal.
Background. Many systems use a central host computer to control
remote functions. At various locations, users communicate with the
main system via small terminals that display system status and accept
inputs. The BASIC Stamp’s ease of programming and built-in support
for serial communications make it a good candidate for such user-
interface applications.
The liquid-crystal display (LCD) used in this project is based on the
popular Hitachi 44780 controller IC. These chips are at the heart of
LCD’s ranging in size from two lines of four characters (2x4) to 2x40.
How it works. When power is first applied, the BASIC program
initializes the LCD. It sets the display to print from left to right, and
enables an underline cursor. To eliminate any stray characters, the
program clears the screen.
After initialization, the program enters a loop waiting for the arrival of
a character via the 2400-baud RS-232 interface. When a character
arrives, it is checked against a short list of special characters (backspace,
control-C, and return). If it is not one of these, the program prints it on
the display, and re-enters the waiting-for-data loop.
If a backspace is received, the program moves the LCD cursor back one
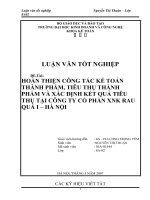
Schematic to accompany program TERMINAL.BAS.
PIC16C56
0
1
2
3
4
5
6
7
+5V Vin
GND
BASIC STAMP
EEPROM
(C) 1992 Parallax, Inc.
PC
231
10k
(contrast)
6
578910
+5
10k
1k
SWITCHES 0–3
22k1k
4
14
13
12
11
SERIAL IN
SERIAL OUT
Vdd Vo R/WVss
DB4
DB5
DB6
DB7
DB0 DB1 DB2 DB3
E
RS
Page 72
•
BASIC Stamp Programming Manual 1.9 • Parallax, Inc.
BASIC Stamp I Application Notes
space, prints a blank (space) character to blot out the character that was
there, and then moves back again. The second move-back step is
necessary because the LCD automatically advances the cursor.
If a control-C is received, the program issues a clear instruction to the
LCD, which responds by filling the screen with blanks, and returning
the cursor to the leftmost position.
If a return character is received, the program interprets the message as
a query requiring a response from the user. It enters a loop waiting for
the user to press one of the four pushbuttons. When he does, the
program sends the character (“0” through “3”) representing the button
number back to the host system. It then re-enters its waiting loop.
Because of all this processing, the user interface cannot receive charac-
ters sent rapidly at the full baud rate. The host program must put a little
breathing space between characters; perhaps a 3-millisecond delay. If
you reduce the baud rate to 300 baud and set the host terminal to 1.5 or
2 stop bits, you may avoid the need to program a delay.
At the beginning of the program, during the initialization of the LCD,
you may have noticed that several instructions are repeated, instead of
being enclosed in for/next loops. This is not an oversight. Watching the
downloading bar graph indicated that the repeated instructions actu-
ally resulted in a more compact program from the Stamp’s point of
view. Keep an eye on that graph when running programs; it a good
relative indication of how much program space you’ve used. The
terminal program occupies about two-thirds of the Stamp’s EEPROM.
From an electronic standpoint, the circuit employs a couple of tricks.
The first involves the RS-232 communication. The Stamp’s processor, a
PIC 16C56, is equipped with hefty static-protection diodes on its input/
output pins. When the Stamp receives RS-232 data, which typically
swings between -12 and +12 volts (V), these diodes serve to limit the
voltage actually seen by the PIC’s internal circuitry to 0 and +5V. The
22k resistor limits the current through the diodes to prevent damage.
Sending serial output without an external driver circuit exploits an-
other loophole in the RS-232 standard. While most RS-232 devices
1: LCD User-Interface Terminal
Parallax, Inc. • BASIC Stamp Programming Manual 1.9
•
Page 73
BASIC Stamp I Application Notes
1
expect the signal to swing between at least -3 and +3V, most will accept
the 0 and +5V output of the PIC without problems.
This setup is less noise-immune than circuits that play by the RS-232
rules. If you add a line driver/receiver such as a Maxim MAX232,
remember that these devices also invert the signals. You’ll have to
change the baud/mode parameter in the instructions serin and serout
to T2400, where T stands for true signal polarity. If industrial-strength
noise immunity is required, or the interface will be at the end of a mile-
long stretch of wire, use an RS-422 driver/receiver. This will require the
same changes to serin and serout.
Another trick allows the sharing of input/output pins between the LCD
and the pushbuttons. What happens if the user presses the buttons
while the LCD is receiving data? Nothing. The Stamp can sink enough
current to prevent the 1k pullup resistors from affecting the state of its
active output lines. And when the Stamp is receiving input from the
switches, the LCD is disabled, so its data lines are in a high-impedance
state that’s the next best thing to not being there. These facts allow the
LCD and the switches to share the data lines without interference.
Finally, note that the resistors are shown on the data side of the
switches, not on the +5V side. This is an inexpensive precaution against
damage or interference due to electrostatic discharge from the user’s
fingertips. It’s not an especially effective precaution, but the price is
right.
Program listing. These programs may be downloaded from our Internet
ftp site at ftp.parallaxinc.com. The ftp site may be reached directly or
through our web site at .
' PROGRAM: Terminal.bas
' The Stamp serves as a user-interface terminal. It accepts text via RS-232 from a
' host, and provides a way for the user to respond to queries via four pushbuttons.
Symbol S_in = 6 ' Serial data input pin
Symbol S_out = 7 ' Serial data output pin
Symbol E = 5 ' Enable pin, 1 = enabled
Symbol RS = 4 ' Register select pin, 0 = instruction
Symbol keys = b0 ' Variable holding # of key pressed.
Symbol char = b3 ' Character sent to LCD.
1: LCD User-Interface Terminal
Page 74
•
BASIC Stamp Programming Manual 1.9 • Parallax, Inc.
BASIC Stamp I Application Notes
Symbol Sw_0 = pin0 ' User input switches
Symbol Sw_1 = pin1 ' multiplexed w/LCD data lines.
Symbol Sw_2 = pin2
Symbol Sw_3 = pin3
' Set up the Stamp’s I/O lines and initialize the LCD.
begin: let pins = 0 ' Clear the output lines
let dirs = %01111111 ' One input, 7 outputs.
pause 200 ' Wait 200 ms for LCD to reset.
' Initialize the LCD in accordance with Hitachi’s instructions for 4-bit interface.
i_LCD: let pins = %00000011 ' Set to 8-bit operation.
pulsout E,1 ' Send data three times
pause 10 ' to initialize LCD.
pulsout E,1
pause 10
pulsout E,1
pause 10
let pins = %00000010 ' Set to 4-bit operation.
pulsout E,1 ' Send above data three times.
pulsout E,1
pulsout E,1
let char = 14 ' Set up LCD in accordance with
gosub wr_LCD ' Hitachi instruction manual.
let char = 6 ' Turn on cursor and enable
gosub wr_LCD ' left-to-right printing.
let char = 1 ' Clear the display.
gosub wr_LCD
high RS ' Prepare to send characters.
' Main program loop: receive data, check for backspace, and display data on LCD.
main: serin S_in,N2400,char ' Main terminal loop.
goto bksp
out: gosub wr_LCD
goto main
' Write the ASCII character in b3 to LCD.
wr_LCD: let pins = pins & %00010000
let b2 = char/16 ' Put high nibble of b3 into b2.
let pins = pins | b2 ' OR the contents of b2 into pins.
pulsout E,1 ' Blip enable pin.
let b2 = char & %00001111 ' Put low nibble of b3 into b2.
let pins = pins & %00010000 ' Clear 4-bit data bus.
let pins = pins | b2 ' OR the contents of b2 into pins.
pulsout E,1 ' Blip enable.
return
' Backspace, rub out character by printing a blank.
1: LCD User-Interface Terminal
Parallax, Inc. • BASIC Stamp Programming Manual 1.9
•
Page 75
BASIC Stamp I Application Notes
1
bksp: if char > 13 then out ' Not a bksp or cr? Output character.
if char = 3 then clear ' Ctl-C clears LCD screen.
if char = 13 then cret ' Carriage return.
if char <> 8 then main ' Reject other non-printables.
gosub back
let char = 32 ' Send a blank to display
gosub wr_LCD
gosub back ' Back up to counter LCD’s auto-
' increment.
goto main ' Get ready for another transmission.
back: low RS ' Change to instruction register.
let char = 16 ' Move cursor left.
gosub wr_LCD ' Write instruction to LCD.
high RS ' Put RS back in character mode.
return
clear: low RS ' Change to instruction register.
let b3 = 1 ' Clear the display.
gosub wr_LCD ' Write instruction to LCD.
high RS ' Put RS back in character mode.
goto main
' If a carriage return is received, wait for switch input from the user. The host
' program (on the other computer) should cooperate by waiting for a reply before
' sending more data.
cret: let dirs = %01110000 ' Change LCD data lines to input.
loop: let keys = 0
if Sw_0 = 1 then xmit ' Add one for each skipped key.
let keys = keys + 1
if Sw_1 = 1 then xmit
let keys = keys + 1
if Sw_2 = 1 then xmit
let keys = keys + 1
if Sw_3 = 1 then xmit
goto loop
xmit: serout S_out,N2400,(#keys,10,13)
let dirs = %01111111 ' Restore I/O pins to original state.
goto main
1: LCD User-Interface Terminal
Page 76
•
BASIC Stamp Programming Manual 1.9 • Parallax, Inc.
BASIC Stamp I Application Notes
Parallax, Inc. • BASIC Stamp Programming Manual 1.9
•
Page 77
BASIC Stamp I Application Notes
1
2: Interfacing an A/D Convertor
Introduction. This application note presents the hardware and soft-
ware required to interface an 8-bit serial analog-to-digital converter to
the Parallax BASIC Stamp.
Background. The BASIC Stamp's instruction pot performs a limited
sort of analog-to-digital conversion. It lets you interface nearly any kind
of resistive sensor to the Stamp with a minimum of difficulty. However,
many applications call for a true voltage-mode analog-to-digital con-
verter (ADC). One that’s particularly suited to interfacing with the
Stamp is the National Semiconductor ADC0831, available from Digi-
Key, among others.
Interfacing the ’831 requires only three input/output lines, and of these,
two can be multiplexed with other functions (or additional ’831’s). Only
the chip-select (CS) pin requires a dedicated line. The ADC’s range of
input voltages is controlled by the VREF and VIN(–) pins. VREF sets the
voltage at which the ADC will return a full-scale output of 255, while
VIN(–) sets the voltage that will return 0.
In the example application, VIN(–) is at ground and VREF is at +5;
however, these values can be as close together as 1 volt without harming
the device’s accuracy or linearity. You may use diode voltage references
or trim pots to set these values.
PIC16C56
0
1
2
3
4
5
6
7
+5V Vin
GND
BASIC STAMP
EEPROM
(C) 1992 Parallax, Inc.
PC
1k
ADC
0831
1
2
3
4
8
7
6
5
CS
Vin(+)
Vin(–)
GND
Vcc
CLK
DO
Vref
0Ð5V in
SERIAL
OUT
Schematic to accompany program AD_CONV.BAS.
Page 78
•
BASIC Stamp Programming Manual 1.9 • Parallax, Inc.
BASIC Stamp I Application Notes
' PROGRAM: ad_conv.bas
' BASIC Stamp program that uses the National ADC0831 to acquire analog data and
' output it via RS-232.
Symbol CS = 0
Symbol AD = pin1
Symbol CLK = 2
Symbol S_out = 3
Symbol data = b0
Symbol i = b2
setup: let pins = 255 ' Pins high (deselect ADC).
let dirs = %11111101 ' S_out, CLK, CS outputs; AD
' input.
loop: gosub conv ' Get the data.
serout S_out,N2400,(#b0,13,10) ' Send data followed by a return
How it works. The sample program reads the voltage at the ’831’s input
pin every 2 seconds and reports it via a 2400-baud serial connection. The
subroutine conv handles the details of getting data out of the ADC. It
enables the ADC by pulling the CS line low, then pulses the clock (CLK)
line to signal the beginning of a conversion. The program then enters a
loop in which it pulses CLK, gets the bit on pin AD, adds it to the received
byte, and shifts the bits of the received byte to the left. Since BASIC
traditionally doesn’t include bit-shift operations, the program multi-
plies the byte by 2 to perform the shift.
When all bits have been shifted into the byte, the program turns off the
ADC by returning CS high. The subroutine returns with the conversion
result in the variable data. The whole process takes about 20 millisec-
onds.
Modifications. You can add more ’831’s to the circuit as follows:
Connect each additional ADC to the same clock and data lines, but
assign it a separate CS pin. Modify the conv subroutine to take the
appropriate CS pin low when it needs to acquire data from a particular
ADC. That’s it.
Program listing. This program may be downloaded from our Internet
ftp site at ftp.parallaxinc.com. The ftp site may be reached directly or
through our web site at .
2: Interfacing an A/D Convertor
Parallax, Inc. • BASIC Stamp Programming Manual 1.9
•
Page 79
BASIC Stamp I Application Notes
1
' and linefeed.
pause 2000 ' Wait 2 seconds
goto loop ' Do it forever.
conv: low CLK ' Put clock line in starting state.
low CS ' Select ADC.
pulsout CLK, 1 ' 10 us clock pulse.
let data = 0 ' Clear data.
for i = 1 to 8 ' Eight data bits.
let data = data * 2 ' Perform shift left.
pulsout CLK, 1 ' 10 us clock pulse.
let data = data + AD ' Put bit in LSB of data.
next ' Do it again.
high CS ' Deselect ADC when done.
return
2: Interfacing an A/D Convertor
Page 80
•
BASIC Stamp Programming Manual 1.9 • Parallax, Inc.
BASIC Stamp I Application Notes
Parallax, Inc. • BASIC Stamp Programming Manual 1.9
•
Page 81
BASIC Stamp I Application Notes
1
3: Hardware Solution for Keypads
Introduction. This application note presents a program in PBASIC that
enables the BASIC Stamp to read a keypad and display keypresses on
a liquid-crystal display.
Background. Many controller applications require a keypad to allow
the user to enter numbers and commands. The usual way to interface a
keypad to a controller is to connect input/output (I/O) bits to row and
column connections on the keypad. The keypad is wired in a matrix
arrangement so that when a key is pressed one row is shorted to one
column. It’s relatively easy to write a routine to scan the keypad, detect
keypresses, and determine which key was pressed.
The trouble is that a 16-key pad requires a minimum of eight bits (four
rows and four columns) to implement this approach. For the BASIC
Stamp, with a total of only eight I/O lines, this may not be feasible, even
with clever multiplexing arrangements. And although the program-
ming to scan a keypad is relatively simple, it can cut into the Stamp’s 255
bytes of program memory.
An alternative that conserves both I/O bits and program space is to use
the 74C922 keypad decoder chip. This device accepts input from a 16-
key pad, performs all of the required scanning and debouncing, and
PIC16C56
0
1
2
3
4
5
6
7
+5V Vin
GND
BASIC STAMP
EEPROM
(C) 1992 Parallax, Inc.
PC
231
10k
(contrast)
6
578910
+5
4
14
13
12
11
10k
all
+5
Matrix keypad (pressing
a key shorts a row
connection to a column)
available
1x16-character LCD module, Hitachi 44780 controller
Vdd Vo R/WVss
DB4
DB5
DB6
DB7
DB0 DB1 DB2 DB3
E
RS
.1µF
1µF
74C922
1
2
3
4
5
6
7
8
9
18
17
16
15
14
13
12
11
10
row 3
row 4
scan
debounce
col 4
col 3
gnd
d0
d1
d2
d3
out enable
data avail
col 1
col 2
Vccrow 1
row 2
Schematic to accompany
program KEYPAD.BAS.
Page 82
•
BASIC Stamp Programming Manual 1.9 • Parallax, Inc.
BASIC Stamp I Application Notes
3: Hardware Solution for Keypads
outputs a “data available” bit and 4 output bits representing the
number of the key pressed from 0 to 15. A companion device, the
74C923, has the same features, but reads a 20-key pad and outputs 5
data bits.
Application. The circuit shown in the figure interfaces a keypad and
liquid-crystal display (LCD) module to the BASIC Stamp, leaving two
I/O lines free for other purposes, such as bidirectional serial communi-
cation. As programmed, this application accepts keystrokes from 16
keys and displays them in hexadecimal format on the LCD.
When the user presses a button on the keypad, the corresponding hex
character appears on the display. When the user has filled the display
with 16 characters, the program clears the screen.
The circuit makes good use of the electrical properties of the Stamp, the
LCD module, and the 74C922. When the Stamp is addressing the LCD,
the 10k resistors prevent keypad activity from registering. The Stamp
can easily drive its output lines high or low regardless of the status of
these lines. When the Stamp is not addressing the LCD, its lines are
configured as inputs, and the LCD’s lines are in a high-impedance state
(tri-stated). The Stamp can then receive input from the keypad without
interference.
The program uses the button instruction to read the data-available line
of the 74C922. The debounce feature of button is unnecessary in this
application because the 74C922 debounces its inputs in hardware;
however, button provides a professional touch by enabling delayed
auto-repeat for the keys.
Program listing. This program may be downloaded from our Internet
ftp site at ftp.parallaxinc.com. The ftp site may be reached directly or
through our web site at .
' PROGRAM: Keypad.bas
' The Stamp accepts input from a 16-key matrix keypad with the help of
' a 74C922 keypad decoder chip.
Symbol E = 5 ' Enable pin, 1 = enabled
Symbol RS = 4 ' Register select pin, 0 = instruction
Parallax, Inc. • BASIC Stamp Programming Manual 1.9
•
Page 83
BASIC Stamp I Application Notes
1
3: Hardware Solution for Keypads
Symbol char = b1 ' Character sent to LCD.
Symbol buttn = b3 ' Workspace for button command.
Symbol lngth = b5 ' Length of text appearing on LCD.
Symbol temp = b7 ' Temporary holder for input character.
' Set up the Stamp's I/O lines and initialize the LCD.
begin: let pins = 0 ' Clear the output lines
let dirs = %01111111 ' One input, 7 outputs.
pause 200 ' Wait 200 ms for LCD to reset.
let buttn = 0
let lngth = 0
gosub i_LCD
gosub clear
keyin: let dirs = %01100000 ' Set up I/O directions.
loop: button 4,1,50,10,buttn,0,nokey ' Check pin 4 (data available) for
' keypress.
lngth = lngth + 1 ' Key pressed: increment position
counter.
let temp = pins & %00001111 ' Strip extra bits to leave only key data.
if temp > 9 then hihex ' Convert 10 thru 15 into A thru F (hex).
let temp = temp + 48 ' Add offset for ASCII 0.
LCD: let dirs = %01111111 ' Get ready to output to LCD.
if lngth > 16 then c_LCD ' Screen full? Clear it.
cont: let char = temp ' Write character to LCD.
gosub wr_LCD
nokey: pause 10 ' Short delay for nice auto-repeat
' speed.
goto keyin ' Get ready for next key.
hihex: let temp = temp + 55 ' Convert numbers 10 to 15 into A - F.
goto LCD
c_LCD: let lngth = 1 ' If 16 characters are showing on LCD,
gosub clear ' clear the screen and print at left edge.
goto cont
' Initialize the LCD in accordance with Hitachi's instructions
' for 4-bit interface.
i_LCD: let pins = %00000011 ' Set to 8-bit operation.
pulsout E,1 ' Send above data three times
pause 10 ' to initialize LCD.
pulsout E,1
pulsout E,1
let pins = %00000010 ' Set to 4-bit operation.
pulsout E,1 ' Send above data three times.
pulsout E,1
pulsout E,1
let char = 12 ' Set up LCD in accordance w/
Page 84
•
BASIC Stamp Programming Manual 1.9 • Parallax, Inc.
BASIC Stamp I Application Notes
gosub wr_LCD ' Hitachi instruction manual.
let char = 6 ' Turn off cursor, enable
gosub wr_LCD ' left-to-right printing.
high RS ' Prepare to send characters.
return
' Write the ASCII character in b3 to the LCD.
wr_LCD: let pins = pins & %00010000
let b2 = char/16 ' Put high nibble of b3 into b2.
let pins = pins | b2 ' OR the contents of b2 into pins.
pulsout E,1 ' Blip enable pin.
let b2 = char & %00001111 ' Put low nibble of b3 into b2.
let pins = pins & %00010000 ' Clear 4-bit data bus.
let pins = pins | b2 ' OR the contents of b2 into pins.
pulsout E,1 ' Blip enable.
return
' Clear the LCD screen.
clear: low RS ' Change to instruction register.
let char = 1 ' Clear display.
gosub wr_LCD ' Write instruction to LCD.
high RS ' Put RS back in character mode.
return
3: Hardware Solution for Keypads
Parallax, Inc. • BASIC Stamp Programming Manual 1.9
•
Page 85
BASIC Stamp I Application Notes
1
4: Controlling and Testing Servos
Introduction. This application note presents a program in PBASIC that
enables the BASIC Stamp to control pulse-width proportional servos
and measure the pulse width of other servo drivers.
Background. Servos of the sort used in radio-controlled airplanes are
finding new applications in home and industrial automation, movie
and theme-park special effects, and test equipment. They simplify the
job of moving objects in the real
world by eliminating much of the
mechanical design. For a given sig-
nal input, you get a predictable
amount of motion as an output.
Figure 1 shows a typical servo. The
three wires are +5 volts, ground,
and signal. The output shaft accepts
a wide variety of prefabricated disks
and levers. It is driven by a geared-
down motor and rotates through 90
to 180 degrees. Most servos can ro-
tate 90 degrees in less than a half second. Torque, a measure of the
servo’s ability to overcome mechanical resistance (or lift weight, pull
springs, push levers, etc.), ranges from 20 to more than 100 inch-ounces.
To make a servo move, connect it to a 5-volt power supply capable of
delivering an ampere or more of peak current, and supply a positioning
Figure 1. A typical servo.
Figure 2. Schematic to accompany program SERVO.BAS.
PIC16C56
0
1
2
3
4
5
6
7
+5V Vin
GND
BASIC STAMP
EEPROM
(C) 1992 Parallax, Inc.
PC
231
10k
(contrast)
6
578910
+5
10k
1k
Toggle Function
4
14
13
12
11
Servo signal in
Servo signal out
1x16-character LCD module, Hitachi 44780 controller
Vdd Vo R/WVss
DB4
DB5
DB6
DB7
DB0 DB1 DB2 DB3
E
RS
Page 86
•
BASIC Stamp Programming Manual 1.9 • Parallax, Inc.
BASIC Stamp I Application Notes
signal. The signal is generally a 5-volt, positive-going pulse between 1
and 2 milliseconds (ms) long, repeated about 50 times per second. The
width of the pulse determines the position of the servo. Since servos’
travel can vary, there isn’t a definite correspondence between a given
pulse width and a particular servo angle, but most servos will move to
the center of their travel when receiving 1.5-ms pulses.
Servos are closed-loop devices. This means that they are constantly
comparing their commanded position (proportional to the pulse width)
to their actual position (proportional to the resistance of a potentiom-
eter mechanically linked to the shaft). If there is more than a small
difference between the two, the servo’s electronics will turn on the
motor to eliminate the error. In addition to moving in response to
changing input signals, this active error correction means that servos
will resist mechanical forces that try to move them away from a
commanded position. When the servo is unpowered or not receiving
positioning pulses, you can easily turn the output shaft by hand. When
the servo is powered and receiving signals, it won’t budge from its
position.
Application. Driving servos with the BASIC Stamp is simplicity itself.
The instruction pulsout pin, time generates a pulse in 10-microsecond
(µs) units, so the following code fragment would command a servo to
its centered position and hold it there:
servo: pulsout 0,150
pause 20
goto servo
The 20-ms pause ensures that the program sends the pulse at the
standard 50 pulse-per-second rate.
The program listing is a diagnostic tool for working with servos. It has
two modes, pulse measurement and pulse generation. Given an input
servo signal, such as from a radio-control transmitter/receiver, it
displays the pulse width on a liquid-crystal display (LCD). A display of
“Pulse Width: 150” indicates a 1.5-ms pulse. Push the button to toggle
functions, and the circuit supplies a signal that cycles between 1 and 2
ms. Both the pulse input and output functions are limited to a resolution
4: Controlling and Testing Servos
Parallax, Inc. • BASIC Stamp Programming Manual 1.9
•
Page 87
BASIC Stamp I Application Notes
1
4: Controlling and Testing Servos
of 10µs. For most servos, this equates to a resolution of better than 1
degree of rotation.
The program is straightforward Stamp BASIC, but it does take advan-
tage of a couple of the language’s handy features. The first of these is the
EEPROM directive. EEPROM address,data allows you to stuff tables of
data or text strings into EEPROM memory. This takes no additional
program time, and only uses the amount of storage required for the
data. After the symbols, the first thing that the listing does is tuck a
couple of text strings into the bottom of the EEPROM. When the
program later needs to display status messages, it loads the text strings
from EEPROM.
The other feature of the Stamp’s BASIC that the program exploits is the
ability to use compound expressions in a let assignment. The routine
BCD (for binary-coded decimal) converts one byte of data into three
ASCII characters representing values from 0 (represented as “000”) to
255.
To do this, BCD performs a series of divisions on the byte and on the
remainders of divisions. For example, when it has established how
many hundreds are in the byte value, it adds 48, the ASCII offset for
zero. Take a look at the listing. The division (/) and remainder (//)
calculations happen before 48 is added. Unlike larger BASICs which
have a precedence of operators (e.g., multiplication is always before
addition), the Stamp does its math from left to right. You cannot use
parentheses to alter the order, either.
If you’re unsure of the outcome of a calculation , use the debug directive
to look at a trial run, like so:
let BCDin = 200
let huns = BCDin/100+48
debug huns
When you download the program to the Stamp, a window will appear
on your computer screen showing the value assigned to the variable
huns (50). If you change the second line to let huns = 48+BCDin/100,
you’ll get a very different result (2).
Page 88
•
BASIC Stamp Programming Manual 1.9 • Parallax, Inc.
BASIC Stamp I Application Notes 4: Controlling and Testing Servos
By the way, you don’t have to use let, but it will earn you Brownie points
with serious computer-science types. Most languages other than BASIC
make a clear distinction between equals as in huns = BCDin/100+48
and if BCDin = 100 then
Program listing. This program may be downloaded from our Internet
ftp site at ftp.parallaxinc.com. The ftp site may be reached directly or
through our web site at .
' PROGRAM: Servo.bas
' The Stamp works as a servo test bench. It provides a cycling servo signal
' for testing, and measures the pulse width of external servo signals.
Symbol E = 5 ' Enable pin, 1 = enabled
Symbol RS = 4 ' Register select pin, 0 = instruction
Symbol char = b0 ' Character sent to LCD.
Symbol huns = b3 ' BCD hundreds
Symbol tens = b6 ' BCD tens
Symbol ones = b7 ' BCD ones
Symbol BCDin = b8 ' Input to BCD conversion/display
routine.
Symbol buttn = b9 ' Button workspace
Symbol i = b10 ' Index counter
' Load text strings into EEPROM at address 0. These will be used to display
' status messages on the LCD screen.
EEPROM 0,("Cycling Pulse Width: ")
' Set up the Stamp's I/O lines and initialize the LCD.
begin: let pins = 0 ' Clear the output lines
let dirs = %01111111 ' One input, 7 outputs.
pause 200 ' Wait 200 ms for LCD to reset.
' Initialize the LCD in accordance with Hitachi's instructions
' for 4-bit interface.
i_LCD: let pins = %00000011 ' Set to 8-bit operation.
pulsout E,1 ' Send above data three times
pause 10 ' to initialize LCD.
pulsout E,1
pulsout E,1
let pins = %00000010 ' Set to 4-bit operation.
pulsout E,1 ' Send above data three times.
pulsout E,1
pulsout E,1
let char = 12 ' Set up LCD in accordance w/
Parallax, Inc. • BASIC Stamp Programming Manual 1.9
•
Page 89
BASIC Stamp I Application Notes
1
gosub wr_LCD ' Hitachi instruction manual.
let char = 6 ' Turn off cursor, enable
gosub wr_LCD ' left-to-right printing.
high RS ' Prepare to send characters.
' Measure the width of input pulses and display on the LCD.
mPulse: output 3
gosub clear ' Clear the display.
for i = 11 to 23 ' Read "Pulse Width:" label
read i, char
gosub wr_LCD ' Print to display
next
pulsin 7, 1, BCDin ' Get pulse width in 10 us units.
gosub BCD ' Convert to BCD and display.
pause 500
input 3 ' Check button; cycle if down.
button 3,1,255,10,buttn,1,cycle
goto mPulse ' Otherwise, continue measuring.
' Write the ASCII character in b3 to LCD.
wr_LCD: let pins = pins & %00010000
let b2 = char/16 ' Put high nibble of b3 into b2.
let pins = pins | b2 ' OR the contents of b2 into pins.
pulsout E,1 ' Blip enable pin.
let b2 = char & %00001111 ' Put low nibble of b3 into b2.
let pins = pins & %00010000 ' Clear 4-bit data bus.
let pins = pins | b2 ' OR the contents of b2 into pins.
pulsout E,1 ' Blip enable.
return
clear: low RS ' Change to instruction register.
let char = 1 ' Clear display.
gosub wr_LCD ' Write instruction to LCD.
high RS ' Put RS back in character mode.
return
' Convert a byte into three ASCII digits and display them on the LCD.
' ASCII 48 is zero, so the routine adds 48 to each digit for display on the LCD.
BCD: let huns= BCDin/100+48 ' How many hundreds?
let tens= BCDin//100 ' Remainder of #/100 = tens+ones.
let ones= tens//10+48 ' Remainder of (tens+ones)/10 = ones.
let tens= tens/10+48 ' How many tens?
let char= huns ' Display three calculated digits.
gosub wr_LCD
let char = tens
gosub wr_LCD
let char = ones
gosub wr_LCD
return
4: Controlling and Testing Servos
Page 90
•
BASIC Stamp Programming Manual 1.9 • Parallax, Inc.
BASIC Stamp I Application Notes
' Cycle the servo back and forth between 0 and 90 degrees. Servo moves slowly ' in
one direction (because of 20-ms delay between changes in pulse width) and quickly
' in the other. Helps diagnose stuck servos, dirty feedback pots, etc.
cycle: output 3
gosub clear
for i = 0 to 9 ' Get "Cycling " string and
read i, char ' display it on LCD.
gosub wr_LCD
next i
reseti: let i = 100 ' 1 ms pulse width.
cyloop: pulsout 6,i ' Send servo pulse.
pause 20 ' Wait 1/50th second.
let i = i + 2 ' Move servo.
if i > 200 then reseti ' Swing servo back to start position.
input 3 ' Check the button; change function if
' down.
button 3,1,255,10,buttn,1,mPulse
goto cyloop ' Otherwise, keep cycling.
4: Controlling and Testing Servos
Parallax, Inc. • BASIC Stamp Programming Manual 1.9
•
Page 91
BASIC Stamp I Application Notes
1
5: Practical Pulse Measurements
Introduction. This application note explores several applications for
the BASIC Stamp's unique pulsin command, which measures the
duration of incoming positive or negative pulses in 10-microsecond
units.
Background. The BASIC Stamp’s pulsin command measures the width
of a pulse, or the interval between two pulses. Left at that, it might seem
to have a limited range of obscure uses. However, pulsin is the key to
many kinds of real-world interfacing using simple, reliable sensors.
Some possibilities include:
tachometer
speed trap
physics demonstrator
capacitance checker
duty cycle meter
log input analog-to-digital converter
Pulsin works like a stopwatch that keeps time in units of 10 microsec-
onds (µs). To use it, you must specify which pin to monitor, when to
trigger on (which implies when to trigger off), and where to put the
resulting 16-bit time measurement. The syntax is as follows:
pulsin
pin, trigger condition, variable
waiting to trigger
triggered on
triggered off
6924 µs
w3 holds 692w3 holds 0
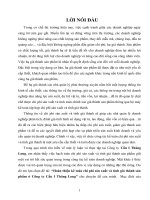
Figure 1. Timing diagram for
pulsin 7,0,w3
.
Page 92
•
BASIC Stamp Programming Manual 1.9 • Parallax, Inc.
BASIC Stamp I Application Notes 5: Practical Pulse Measurements
Pin is a BASIC Stamp input/output pin (0 to 7). Trigger condition is a
variable or constant (0 or 1) that specifies the direction of the transition
that will start the pulsin timer. If trigger is 0, pulsin will start measuring
when a high-to-low transition occurs, because 0 is the edge’s destina-
tion. Variable can be either a byte or word variable to hold the timing
measurement. In most cases, a word variable is called for, because
pulsin produces 16-bit results.
Figure 1 shows how pulsin works. The waveform represents an input
at pin 7 that varies between ground and +5 volts (V).
A smart feature of pulsin is its ability to recognize a no-pulse or out-of-
range condition. If the specified transition doesn’t occur within 0.65535
seconds (s), or if the pulse to be measured is longer than 0.65535 s, pulsin
will give up and return a 0 in the variable. This prevents the program
from hanging up when there’s no input or out-of-range input.
Let’s look at some sample applications for pulsin, starting with one
inspired by the digital readout on an exercise bicycle: pulsin as a
tachometer.
Tachometer. The most obvious way to measure the speed of a wheel
or shaft in revolutions per minute (rpm) is to count the number of
Figure 2. Schematic to accompany listing 1, TACH.BAS.
Q
Q
CLK
D
1/2 4013
11
9
13
12
(ground unused
inputs, pins 8 & 10)
1k
+5
+5
Hall-effect switch
UGN3113U
or
equivalent
To BASIC Stamp
pulsin pin
Magnet on
rotating
shaft or disk
Parallax, Inc. • BASIC Stamp Programming Manual 1.9
•
Page 93
BASIC Stamp I Application Notes
1
revolutions that occur during 1 minute. The trouble is, the user prob-
ably wouldn’t want to wait a whole minute for the answer.
For a continuously updated display, we can use pulsin to measure the
time the wheel takes to make one complete revolution. By dividing this
time into 60 seconds, we get a quick estimate of the rpm. Listing 1 is a
tachometer program that works just this way. Figure 2 is the circuit that
provides input pulses for the program. A pencil-eraser-sized magnet
attached to the wheel causes a Hall-effect switch to generate a pulse
every rotation.
We could use the Hall switch output directly, by measuring the interval
between positive pulses, but we would be measuring the period of
rotation minus the pulses. That would cause small errors that would be
most significant at high speeds. The flip-flop, wired to toggle with each
pulse, eliminates the error by converting the pulses into a train of square
waves. Measuring either the high or low interval will give you the
period of rotation.
Note that listing 1 splits the job of dividing the period into 60 seconds
into two parts. This is because 60 seconds expressed in 10-µs units is 6
million, which exceeds the range of the Stamp’s 16-bit calculations. You
will see this trick, and others that work around the limits of 16-bit math,
throughout the listings.
Using the flip-flop’s set/reset inputs, this circuit and program could
easily be modified to create a variety of speed-trap instruments. A steel
ball rolling down a track would encounter two pairs of contacts to set
and reset the flip-flop. Pulsin would measure the interval and compute
the speed for a physics demonstration (acceleration). More challenging
setups would be required to time baseballs, remote-control cars or
aircraft, bullets, or model rockets.
The circuit could also serve as a rudimentary frequency meter. Just
divide the period into 1 second instead of 1 minute.
Duty cycle meter. Many electronic devices vary the power they deliver
to a load by changing the duty cycle of a waveform; the proportion of
time that the load is switched fully on to the time it is fully off. This
5: Practical Pulse Measurements
Page 94
•
BASIC Stamp Programming Manual 1.9 • Parallax, Inc.
BASIC Stamp I Application Notes 5: Practical Pulse Measurements
approach, found in light dimmers, power supplies, motor controls and
amplifiers, is efficient and relatively easy to implement with digital
components. Listing 2 measures the duty cycle of a repetitive pulse
train by computing the ratio of two pulsin readings and presenting
them as a percentage. A reading approaching 100 percent means that
the input is mostly on or high. The output of figure 2’s flip-flop is 50
percent. The output of the Hall switch in figure 2 was less than 10
percent when the device was monitoring a benchtop drill press.
Capacitor checker. The simple circuit in figure 3 charges a capacitor,
and then discharges it across a resistance when the button is pushed.
This produces a brief pulse for pulsin to measure. Since the time
constant of the pulse is determined by resistance (R) times capacitance
(C), and R is fixed at 10k, the width of the pulse tells us C. With the
resistance values listed, the circuit operates over a range of .001 to 2.2 µF.
You may substitute other resistors for other ranges of capacitance; just
be sure that the charging resistor (100k in this case) is about 10 times the
value of the discharge resistor. This ensures that the voltage at the
junction of the two resistors when the switch is held down is a definite
low (0) input to the Stamp.
Log-input analog-to-digital converter (ADC). Many sensors have
convenient linear outputs. If you know that an input of 10 units
+5
C
unk
100k
10k
Press to
test
To BASIC Stamp
pulsin pin
Figure 3. Schematic for listing 3, CAP.BAS.
Parallax, Inc. • BASIC Stamp Programming Manual 1.9
•
Page 95
BASIC Stamp I Application Notes
1
5: Practical Pulse Measurements
(degrees, pounds, percent humidity, or whatever) produces an output
of 1 volt, then 20 units will produce 2 volts. Others, such as thermistors
and audio-taper potentiometers, produce logarithmic outputs. A Radio
Shack thermistor (271-110) has a resistance of 18k at 10° C and 12k at
20°C. Not linear, and not even the worst cases!
While it’s possible to straighten out a log curve in software, it’s often
easier to deal with it in hardware. That’s where figure 4 comes in. The
voltage-controlled oscillator of the 4046 phase-locked loop chip, when
Figure 4. Schematic for listing 4, VCO.BAS.
F
in
1/2 4046
To BASIC Stamp
pulsin pin
inh
5
1M
10k
0.001µF
Input
voltage
out
V
94
cap
cap
6
7
F
min
F
max
12
11
Input voltage
0
250
500
750
1000
1250
1.0 1.5 2.0 2.5 3.0 3.5 4.0 4.5 5.0
Output value
Figure 5. Log response curve of the VCO.