jQuery in Action phần phần 9 pdf
Bạn đang xem bản rút gọn của tài liệu. Xem và tải ngay bản đầy đủ của tài liệu tại đây (3.49 MB, 47 trang )
214 CHAPTER 7
Extending jQuery with custom plugins
The settings variable is now available to both functions, and we’re finally ready to
complete the implementation of the plugin function. We define the listeners that
we listed earlier with the following code:
settings.thumbnails.click(function(){ showPhoto(this.index); });
settings.photoElement.click(function(){
showPhoto((settings.current + 1) % settings.thumbnails.length);
});
$(settings.nextControl).click(function(){
showPhoto((settings.current + 1) % settings.thumbnails.length);
});
$(settings.previousControl).click(function(){
showPhoto((settings.thumbnails.length + settings.current - 1) %
settings.thumbnails.length);
});
$(settings.firstControl).click(function(){
showPhoto(0);
});
$(settings.lastControl).click(function(){
showPhoto(settings.thumbnails.length - 1);
});
Each of these listeners calls the
showPhoto()
function with a thumbnail index
determined either by the index of the clicked thumbnail, the length of the list, or
computed relative to the current index. (Note how the modulus operator is used
to wrap the index values when they fall off either end of the list.)
We have two final tasks before we can declare success; we need to display the
first photo in advance of any user action, and we need to return the original
wrapped set so that our plugin can participate in jQuery command chains. We
achieve these with
showPhoto(0);
return this;
Take a moment to do a short Victory Dance; we’re finally done!
The completed plugin code, which you’ll find in the file chapter7/photomatic/
jquery.jqia.photomatic.js, is shown in listing 7.6.
(function($){
var settings;
$.fn.photomatic = function(callerSettings) {
settings = $.extend({
photoElement: '#photomaticPhoto',
transformer: function(name) {
Listing 7.6 The complete Photomatic Plugin implementation
Adding new wrapper methods 215
return name.replace(/thumbnail/,'photo');
},
nextControl: null,
previousControl: null,
firstControl: null,
lastControl: null
}, callerSettings || {});
settings.photoElement = $(settings.photoElement);
settings.thumbnails = this.filter('img');
settings.thumbnails.each(function(n){this.index = n;});
settings.current = 0;
settings.thumbnails.click(function(){ showPhoto(this.index); });
settings.photoElement.click(function(){
showPhoto((settings.current + 1) % settings.thumbnails.length);
});
$(settings.nextControl).click(function(){
showPhoto((settings.current + 1) % settings.thumbnails.length);
});
$(settings.previousControl).click(function(){
showPhoto((settings.thumbnails.length + settings.current - 1) %
settings.thumbnails.length);
});
$(settings.firstControl).click(function(){
showPhoto(0);
});
$(settings.lastControl).click(function(){
showPhoto(settings.thumbnails.length - 1);
});
showPhoto(0);
return this;
};
var showPhoto = function(index) {
settings.photoElement
.attr('src',
settings.transformer(settings.thumbnails[index].src));
settings.current = index;
};
})(jQuery);
Boy, it seemed longer than 45 lines when we were working through it, didn’t it?
This plugin is typical of jQuery-enabled code; it packs a big wallop in some
compact code. But it serves to demonstrate an important set of techniques—
using closures to maintain state across the scope of a jQuery plugin and to enable
the creation of private implementation functions that plugins can define and use
without resorting to any namespace infringements.
216 CHAPTER 7
Extending jQuery with custom plugins
You’re now primed and ready to write your own jQuery plugins. When you
come up with some useful ones, consider sharing them with the rest of the jQuery
community. Visit for more information.
7.5 Summary
This chapter introduced us to how we can write code that extends jQuery.
Writing our own code as extensions to jQuery has a number of advantages.
Not only does it keep our code consistent across our web application regardless of
whether it’s employing jQuery
APIs or our own, but it also makes all of the power
of jQuery available to our own code.
Following a few naming rules helps avoid naming collisions between file-
names, as well as problems that might be encountered when the
$
name is reas-
signed by a page that will use our plugin.
Creating new utility functions is as easy as creating new function properties on
$
, and new wrapper methods are as easily created as properties of
$.fn
.
If plugin authoring intrigues you, we highly recommend that you download
and comb through the code of existing plugins to see how their authors imple-
mented their own features. You’ll see how the techniques presented in this chap-
ter are used in a wide range of code and learn new techniques that are beyond the
scope of this book.
Having yet more jQuery knowledge at our disposal, let’s move on to learn-
ing how jQuery makes incorporating Ajax into our Rich Internet Applications
a no-brainer.
217
Talk to the server
with Ajax
This chapter covers
■
A brief overview of Ajax
■
Loading pre-formatted HTML from the server
■
Making general GET and POST requests
■
Making requests with fine-grained control
■
Setting default Ajax properties
■
A comprehensive example
218 CHAPTER 8
Talk to the server with Ajax
It can be successfully argued that no one technology has transformed the land-
scape of the web more in recent years than the adoption of Ajax. The ability to
make asynchronous requests back to the server without the need to reload pages
has enabled a whole new set of user interaction paradigms and made Rich Inter-
net Applications possible.
Ajax is a less recent addition to the web toolbox than many people may realize.
In 1998, Microsoft introduced the ability to perform asynchronous requests
under script control (discounting the use of
<iframe>
elements for such activity)
as an ActiveX control to enable the creation of Outlook Web Access (
OWA).
Although
OWA was a moderate success, few people seemed to take notice of the
underlying technology.
A few years passed, and a handful of events launched Ajax into the collective
consciousness of the web development community. The non-Microsoft browsers
implemented a standardized version of the technology as the
XMLHttpRequest
(
XHR) object; Google began using XHR; and, in 2005, Jesse James Garrett of
Adaptive Path coined the term Ajax (for Asynchronous JavaScript and
XML).
As if they were only waiting for the technology to be given a catchy name, the
web development masses suddenly took note of Ajax in a big way, and it has become
one of the primary tools by which we can enable Rich Internet Applications.
In this chapter, we’ll take a brief tour of Ajax (if you’re already an Ajax guru,
you might want to skip ahead to section 8.2) and then look at how jQuery makes
using Ajax a snap.
Let’s start off with a refresher on what Ajax technology is all about.
8.1 Brushing up on Ajax
Although we’ll take a quick look at Ajax in this section, please note that it’s not
intended as a complete Ajax tutorial or an Ajax primer. If you’re completely unfa-
miliar with Ajax (or worse, still think that we’re talking about a dishwashing liquid
or a mythological Greek hero), we encourage you to familiarize yourself with the
technology through resources that are geared towards teaching you all about Ajax;
the Manning books Ajax in Action and Ajax in Practice are both excellent examples.
Some people may argue that the term Ajax applies to any means to make
server requests without the need to refresh the user-facing page (such as by sub-
mitting a request to a hidden
<iframe>
element), but most people associate the
term with the use of
XHR or the Microsoft XMLHTTP ActiveX control.
Let’s take a look at how those objects are used to generate requests to the
server, beginning with creating one.
Brushing up on Ajax 219
8.1.1 Creating an XHR instance
In a perfect world, code written for one browser would work in all commonly used
browsers. We’ve already learned that we don’t live in that world; things don’t
change with Ajax. There is a standard means to make asynchronous requests via
the JavaScript
XHR object, and an Internet Explorer proprietary means that uses
an ActiveX control. With
IE7, a wrapper that emulates the standard interface is
available, but
IE6 requires divergent code.
Once created (thankfully) the code to set up, initiate, and respond to the
request is relatively browser-independent, and creating an instance of
XHR is easy
for any particular browser. The problem is that different browsers implement
XHR in different ways, and we need to create the instance in the manner appro-
priate for the current browser.
But rather than relying on detecting which browser a user is running to deter-
mine which path to take, we’ll use the preferred technique known as object detec-
tion. In this technique, we try to figure out what the browser’s capabilities are, not
which browser is being used. Object detection results in more robust code because
it can work in any browser that supports the tested capability.
The code of listing 8.1 shows a typical idiom used to instantiate an instance of
XHR using this technique.
var xhr;
if (window.XMLHttpRequest) {
xhr = new XMLHttpRequest();
}
else if (window.ActiveXObject) {
xhr = new ActiveXObject("Msxml2.XMLHTTP");
}
else {
throw new Error("Ajax is not supported by this browser");
}
After creation, the XHR instance sports a conveniently consistent set of properties
and methods across all supporting browser instances. These properties and
methods are shown in table 8.1, and the most commonly used of these will be dis-
cussed in the sections that follow.
With an instance created, let’s look at what it takes to set up and fire off the
request to the server.
Listing 8.1 Object detection resulting in code that can deal with many browsers
Tests to see if
XHR is defined
Tests to see if
ActiveX is present
Throws error if there’s no XHR support
220 CHAPTER 8
Talk to the server with Ajax
1
Table 8.1 XHR methods and properties
Methods Description
abort() Causes the currently executing request to be cancelled.
getAllResponseHeaders() Returns a single string containing the names and values of all
response headers.
getResponseHeader(name) Returns the value of the named response header.
open(method,url,async,
username,password)
Sets the method and destination URL of the request. Option-
ally, the request can be declared synchronous, and a username
and password can be supplied for requests requiring container-
based authentication.
send(content) Initiates the request with the specified (optional) body content.
setRequestHeader(name,value) Sets a request header using the specified name and value.
Properties Description
onreadystatechange Assigns the event handler used when the state of the
request changes.
readyState An integer value that indicates the state of the request
as follows:
■
0—Uninitialized
■
1—Loading
■
2—Loaded
■
3—Interactive
■
4—Complete
responseText The body content returned in the response.
responseXML If the body content is XML, the XML DOM created from the
body content.
status Response status code returned from the server. For example:
200 for success or 404 for not found. See the HTTP
Specification
1
for the full set of codes.
statusText The status text message returned by the response.
1
/>1
Brushing up on Ajax 221
8.1.2 Initiating the request
Before we can send a request to the server, we need to do the following setup steps:
1 Specify the HTTP method such as (POST or GET)
2 Provide the URL of the server-side resource to be contacted
3 Let the XHR instance know how it can inform us of its progress
4 Provide any body content for POST requests
We set up the first two items by calling the
open()
method of XHR as follows:
xhr.open('GET','/some/resource/url');
Note that this method does not cause the request to be sent to the server. It merely
sets up the
URL and HTTP method to be used. The
open()
method can also be
passed a third Boolean parameter that specifies if the request is to be asynchro-
nous (if
true
, which is the default) or synchronous (if
false
). There’s seldom a
good reason not to make the request asynchronous (even if it means we don’t have
to deal with callback functions); after all, the asynchronous nature of the request
is usually the whole point of making a request in this fashion.
Third, we provide a means for the
XHR instance to tap us on the shoulder to
let us know what’s going on; we accomplish this by assigning a callback function
to the
onreadystatechange
property of the XHR object. This function, known as
the ready state handler, is invoked by the
XHR instance at various stages of its pro-
cessing. By looking at the settings of the various other properties of
XHR, we can
find out exactly what’s going on with the request. We’ll take a look at how a typical
ready state handler operates in the next section.
The last steps to initiating the request are to provide any body content for
POST requests and send it off to the server. Both of these are accomplished via the
send()
method. For GET requests, which typically have no body, no body content
parameter is passed as follows:
xhr.send(null);
When request parameters are passed to POST requests, the string passed to the
send()
method must be in the proper format (which we might think of as query
string format) in which the names and values must be properly
URI-encoded. URI
encoding is beyond the scope of this section (and as it turns out, jQuery is going
to handle all of that for us), but if you’re curious, do a web search for the term
encodeURIComponent
, and you’ll be suitably rewarded.
222 CHAPTER 8
Talk to the server with Ajax
An example of such a call is as follows:
xhr.send('a=1&b=2&c=3');
Now let’s see what the ready handler is all about.
8.1.3 Keeping track of progress
An XHR instance informs us of its progress through the ready state handler. This
handler is established by assigning a reference to the function to serve as the
ready handler to the
onreadystatechange
property of the XHR instance.
Once the request is initiated via the
send()
method, this callback will be
invoked numerous times as the request makes transitions through its various
states. The current state of the request is available as a numeric code in the
readyState
property (see the description of this property in table 8.1).
That’s nice, but more times than not, we’re only interested in when the request
completes and whether it was successful or not. So frequently, we’ll see ready han-
dlers implemented using the pattern shown in listing 8.2.
xhr.onreadystatechange = function() {
if (xhr.readyState == 4) {
if (xhr.status >= 200 &&
xhr.status < 300) {
//success
}
else {
//error
}
}
}
This pattern ignores all but the completed state and, once complete, examines
the value of the
status
property to determine if the request succeeded or not.
The
HTTP Specification defines all status codes in the 200 to 299 range as success
and those with values of 300 or above as various types of failures.
We should note one thing about this ready handler; it referenced the
XHR
instance through a top-level variable. But shouldn’t we expect the instance to be
passed to the handler as a parameter?
Well, we could have expected that, but that’s not what happens. The instance
must be located by some other means, and that’s usually a top-level (global)
Listing 8.2 Writing the ready state handler to ignore all but the completed state
Ignores all but
completed state
Branches on
response status
Executes on
success
Executes
on failure
Brushing up on Ajax 223
variable. This could be a problem when we want to have more than one request
firing simultaneously. Luckily, we shall see that the jQuery Ajax
API handily solves
this problem for us.
Let’s explore how to deal with the response from a completed request.
8.1.4 Getting the response
Once the ready handler has determined that the
readyState
is complete and that
the request completed successfully, the body of the response can be retrieved
from the
XHR instance.
Despite the moniker Ajax (where the X stands for
XML), the format of the
response body can be any text format; it’s not limited to
XML. In fact, most of
the time, the response to Ajax requests is a format other than
XML. It could be
plain text or, perhaps, an
HTML fragment; it could even be a text representation
of a JavaScript object or array in JavaScript Object Notation (
JSON) format.
Regardless of its format, the body of the response is available via the
response-
Text
property of the XHR instance (assuming that the request completes suc-
cessfully). If the response indicates that the format of its body is
XML by including
a content-type header specifying a
MIME type of text/xml (or any XML MIME type),
the response body will be parsed as
XML. The resulting DOM will be available in
the
responseXML
property. JavaScript (and jQuery itself, using its selector API) can
then be used to process the
XML DOM.
Processing
XML on the client isn’t rocket science, but—even with jQuery’s
help—it can still be a pain. Although there are times when nothing but
XML will
do for returning complex hierarchical data, frequently page authors will use
other formats when the full power (and corresponding headache) of
XML isn’t
absolutely necessary.
But some of those other formats aren’t without their own pain. When
JSON is
returned, it must be converted into its runtime equivalent. When
HTML is returned,
it must be loaded into the appropriate destination element. And what if the
HTML markup returned contains
<script>
blocks that need evaluation? We’re
not going to deal with these issues in this section because it isn’t meant to be a
complete Ajax reference and, more importantly, because we’re going to find out
that jQuery handles most of these issues on our behalf.
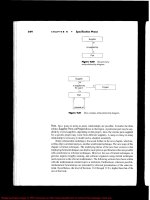
A diagram of this whole process is shown in figure 8.1.
In this short overview of Ajax, we’ve identified the following pain points that
page authors using Ajax need to deal with:
224 CHAPTER 8
Talk to the server with Ajax
■
Instantiating an XHR object requires browser-specific code.
■
Ready handlers need to sift through a lot of uninteresting state changes.
■
Ready handlers don’t automatically get a reference to invoking XHR
instances.
■
The response body needs to be dealt with in numerous ways depending
upon its format.
The remainder of this chapter will describe how the jQuery Ajax commands and
utility functions make Ajax a lot easier (and cleaner) to use on our pages. There
are a lot of choices in the jQuery Ajax
API, and we’ll start with some of the sim-
plest and most often-used tools.
8.2 Loading content into elements
Perhaps one of the most common uses of Ajax is to grab a chunk of content from
the server and stuff it into the
DOM at some strategic location. The content
could be an
HTML fragment that’s to become the child content of a target con-
tainer element, or it could be plain text that will become the content of the tar-
get element.
Let’s imagine that, on page load, we want to grab a chunk of
HTML from the
server using a resource named
/serverResource
and make it the content of a
Figure 8.1 The life cycle of an Ajax request as it makes its way from the client to the server
and back again
Loading content into elements 225
<div>
element with an
id
of
someContainer
. For the final time in this chapter, let’s
look at how we do this without jQuery assistance. Using the patterns we set out
earlier in this chapter, the body of the
onload
handler is as shown in listing 8.3.
The full
HTML file for this example can be found in the file chapter8/list-
ing.8.3.html.
Setting up for the examples
Unlike any of the example code that we’ve examined so far in this book, the code
examples for this chapter require the services of a web server to receive the
requests to server-side resources. Because it’s well beyond the scope of this book
to discuss the operation of server-side mechanisms, we’re going to set up some
minimal server-side resources that send data back to the client without worrying
about doing it for real. We’ll treat the server as a black box; we don’t need or want
to know how it’s doing its job.
To enable the serving of these smoke and mirrors resources, you’ll need to set
up a web server of some type. For your convenience, the server-side resources
have been set up in two formats: Java Server Pages (JSP) and some in PHP. The
JSP resources can be used if you’re running (or wish to run) a servlet/JSP engine;
if you want to enable PHP for your web server of choice, you can use the
PHP resources.
If you want to use the JSP resources but aren’t already running a suitable server,
instructions on setting up the free Tomcat web server are included with the sample
code for this chapter. You’ll find these instructions in the file chapter8/tomcat.pdf.
And don’t be concerned; it’s easier than you might think!
The examples found in the downloaded code are set up to use the JSP resources. If
you want to switch the examples to use PHP, do a search-and-replace of all
instances of the string .jsp with .php. Note that not all server-side resources have
been translated from JSP to PHP, but the existing PHP resources should be enough
to let the PHP-savvy fill in the rest of the resources.
Once you have the server of your choice set up, you can hit the URL http://local-
host:8080/chapter8/test.jsp (to check your Tomcat installation) or http://localhost/
chapter8/test.php (to check your PHP installation). The latter assumes that you
have set up your web server (Apache or any other you have chosen) to use the
example code root folder as a document base.
When you can successfully view the appropriate test page, you’ll be ready to run
the examples in this chapter.
226 CHAPTER 8
Talk to the server with Ajax
var xhr;
if (window.XMLHttpRequest) {
xhr = new XMLHttpRequest();
}
else if (window.ActiveXObject) {
xhr = new ActiveXObject("Msxml2.XMLHTTP");
}
else {
throw new Error("Ajax is not supported by this browser");
}
xhr.onreadystatechange = function() {
if (xhr.readyState == 4) {
if (xhr.status >= 200 && xhr.status < 300) {
document.getElementById('someContainer')
.innerHTML = xhr.responseText;
}
}
}
xhr.open('GET','/serverResource');
xhr.send();
Although there’s nothing tricky going on here, that’s a non-trivial amount of
code; 19 lines or so—even accounting for blank lines that we added for readabil-
ity and one line that we artificially broke in two so that it would fit on the page.
The equivalent code we’d write as the body of a ready handler using jQuery is
as follows:
$('#someContainer').load('/serverResource');
We’re betting that we know which code you’d rather write! Let’s look at the
jQuery command that we used in this statement.
8.2.1 Loading content with jQuery
The simple jQuery statement from the previous section easily loads content from
the server-side resource using one of the most basic, but useful, jQuery Ajax com-
mands:
load()
. The full syntax description of this command is as follows:
Listing 8.3 Using native XHR to include an HTML fragment
Loading content into elements 227
Though simple to use, this command has some important nuances. For example,
when the
parameters
parameter is used to supply the request parameters, the
request is made using the
POST HTTP method; otherwise, a GET request is initi-
ated. If we want to make a
GET request with parameters, we can include them as a
query string on the
URL. But be aware that when we do so, we’re responsible for
ensuring that the query string is properly formatted and that the names and val-
ues of the request parameters are
URI-encoded.
Most of the time, we’ll use the
load()
command to inject the complete
response into whatever elements are contained within the wrapped set, but some-
times we may want to filter elements coming back as the response. If we want to
filter response elements, jQuery allows us to specify a selector on the
URL that
will be used to limit which response elements are injected into the wrapped ele-
ments by suffixing the
URL with a space and pound sign character (#) followed
by the selector.
For example, to filter response elements so that only
<div>
instances are
injected, we write
$('.injectMe').load('/someResource #div');
If the request parameters come from form controls, a helpful command in build-
ing a query string is
serialize()
, whose syntax is as follows:
Command syntax: load
load(url,parameters,callback)
Initiates an Ajax request to the specified URL with optional parameters. A callback function
can be specified that’s invoked when the request completes. The response text replaces the
content of all matched elements.
Parameters
url (String) The URL of the server-side resource to which the request is sent.
parameters (Object) An object whose properties are serialized into properly encoded
parameters to be passed to the request. If specified, the request is made
using the POST method. If omitted, the GET method is used.
callback (Function) A callback function invoked after the response data has been
loaded into the elements of the matched set. The parameters passed to
this function are the response text, the status code, and the XHR instance.
Returns
The wrapped set.
228 CHAPTER 8
Talk to the server with Ajax
The
serialize()
command is smart enough to only collect information from
form control elements in the wrapped set, and only from those qualifying ele-
ments that are deemed successful. A successful control is one that would be
included as part of a form submission according to the rules of the
HTML Speci-
fication.
2
Controls such as unchecked check boxes and radio buttons, dropdowns
with no selections, and any disabled controls are not considered successful and do
not participate in the submission. They are also ignored by
serialize()
.
If we’d rather get the form data in a JavaScript array (as opposed to a query
string), jQuery provides the
serializeArray()
method.
The array returned by
serializeArray()
is composed of anonymous object
instances, each of which contains a
name
property and a
value
property that con-
tain the name and value of each successful form control.
With the
load()
command at our disposal, let’s put it to work solving a com-
mon real-world problem that many web developers encounter.
Command syntax: serialize
serialize()
Creates a properly formatted and encoded query string from all successful form elements in
the wrapped set
Parameters
none
Returns
The formatted query string
2
/>Command syntax: serializeArray
serializeArray()
Collects the values of all successful form controls into an array of objects containing the
names and values of the controls
Parameters
none
Returns
The array of form data
Loading content into elements 229
8.2.2 Loading dynamic inventory data
Often in business applications, particularly for retail web sites, we want to grab
real-time data from the server to present our users with the most up-to-date infor-
mation. After all, we wouldn’t want to mislead customers into thinking that they
can buy something that’s not available, would we?
In this section, we’ll begin to develop a page that we’ll add onto through-
out the course of the chapter. This page is part of a web site for a fictitious firm
named The Boot Closet, an online retailer of overstock and closeout motorcy-
cle boots. Unlike the fixed product catalogs of other online retailers, this inven-
tory of overstock and closeouts is fluid, depending on what deals the proprietor
was able to make that day and what’s already been sold from the inventory.
So it will be important for us to always make sure that we’re displaying the lat-
est info!
To begin our page (which will ignore site navigation and other boilerplate to
concentrate on the lesson at hand), we want to present our customers with a drop-
down containing the styles that are currently available and, on a selection, display
detailed information regarding that style to the customer. On initial display, the
page will look as shown in figure 8.2.
After the page first loads, a pre-loaded dropdown with the list of the styles cur-
rently available in the inventory and labeled fields to show the item data when a
Figure 8.2 The initial display of our item information page
230 CHAPTER 8
Talk to the server with Ajax
style is selected will be displayed. When no style is selected, we’ll display dashes as
a placeholder for the data.
Let’s start by defining the
HTML markup that will create this page structure
as follows:
<body id="bootCloset1">
<img id="banner" src="boot.closet.branding.png"/>
<form action="" id="orderForm">
<div id="detailFormContainer">
<h1>Choose your boots</h1>
<div>
<label>Please choose a style:</label><br/>
<select id="styleDropdown">
<option value="">Please choose a boot style</option>
<option value="7177382">Caterpillar Tradesman Work Boot</option>
<option value="7269643">Caterpillar Logger Boot</option>
<option value="7141832">Chippewa 17" Engineer Boot</option>
<option value="7141833">Chippewa 17" Snakeproof Boot</option>
<option value="7173656">Chippewa 11" Engineer Boot</option>
<option value="7141922">Chippewa Harness Boot</option>
<option value="7141730">Danner Foreman Pro Work Boot</option>
<option value="7257914">Danner Grouse GTX Boot</option>
</select>
</div>
<div id="detailsDisplay"></div>
</div>
</form>
</body>
Not much to it, is there?
We’ve defined all the visual rendition information in an external stylesheet,
and we’ve included no behavioral aspects in the
HTML markup in order to
adhere to the precepts of Unobtrusive JavaScript.
The options for the styles dropdown have been pre-populated. In all the
examples in this chapter, we assume that we’re using server-side resources to
power our web application; communicating with these resources is, after all, the
whole point of Ajax. So even though the example uses a simple
HTML file, we
assume that it was originally generated by some server-side templating resources
such as a
JSP or PHP page and that the product data was dynamically included
from the inventory database (or wherever it’s stored).
Also, the
<div>
container defined (with an
id
of
detailsDisplay
) to hold the
details display is completely empty! We’re going to rely on the server-side tem-
plating resource to provide the dynamic content, so we don’t want to specify it
Loading content into elements 231
here and in the JSP (or PHP) page; having the structure defined in two places
would necessitate keeping them in sync. Bad idea!
On page load, we grab the empty version of the content from the server so
that the structure only needs to be defined in one place. Let’s look at our ready
handler now.
$(function(){
$('#styleDropdown')
.change(function(){
var styleValue = $(this).val();
$('#detailsDisplay').load(
'getDetails.jsp',
{ style: styleValue }
);
})
.change();
});
In this ready handler, we wrap the boot style dropdown and bind a
change
han-
dler
b
to it. In the callback for the change handler, which will be invoked when-
ever a customer changes the selection, we obtain the current value of the selection
by applying the
val()
command to
this
, which in the handler is the
<select>
ele-
ment that triggered the event. We then apply the
load()
command
c
to the
detailsDisplay
element to initiate an Ajax callback to a server-side resource,
get-
Details.jsp
, passing the style value as a parameter named
style
.
As the final act of the ready handler, we call the
change()
command
d
to
invoke the change handler. This issues a request with the default style selection of
“” (the empty string), causing the server-side resource to return the construct that
results in the display that was shown in figure 8.2.
After the customer chooses an available boot style, the page will appear as
shown in figure 8.3.
The most notable operation performed in the ready handler is the use of the
load()
command to quickly and easily fetch a snippet of HTML from the server
and place it within the
DOM as the child of an existing element. This command is
extremely handy and well suited to web applications powered by servers capable
of server-side templating such as
JSP and PHP.
Listing 8.4 shows the complete code for our Boot Closet page, which can be
found in the file chapter8/bootcloset/boot.closet.1.html. We’ll be revisiting this
page to add further capabilities to it as we progress through this chapter.
Wraps style dropdown
and binds change handler
b
Loads data for
selected style
c
Triggers change
handler
d
232 CHAPTER 8
Talk to the server with Ajax
<html>
<head>
<title>Welcome to The Boot Closet™</title>
<link rel="stylesheet" type="text/css" href="boot.closet.css">
<script type="text/javascript"
src=" / /scripts/jquery-1.2.1.js"></script>
<script type="text/javascript">
$(function(){
$('#styleDropdown')
.change(function(){
var styleValue = $(this).val();
$('#detailsDisplay').load(
'getDetails.jsp',
Listing 8.4 The first phase of our Boot Closet retailer page
Figure 8.3 The server-side resource returns a pre-formatted fragment of HTML to display the
boot information.
Making GET and POST requests 233
{ style: styleValue }
);
})
.change();
});
</script>
</head>
<body id="bootCloset1">
<img id="banner" src="boot.closet.branding.png"/>
<form action="" id="orderForm">
<div id="detailFormContainer">
<h1>Choose your boots</h1>
<div>
<label>Please choose a style:</label><br/>
<select id="styleDropdown">
<option value="">Please choose a boot style</option>
<option value="7177382">
Caterpillar Tradesman Work Boot</option>
<option value="7269643">Caterpillar Logger Boot</option>
<option value="7141832">Chippewa 17" Engineer Boot</option>
<option value="7141833">Chippewa 17" Snakeproof Boot</option>
<option value="7173656">Chippewa 11" Engineer Boot</option>
<option value="7141922">Chippewa Harness Boot</option>
<option value="7141730">Danner Foreman Pro Work Boot</option>
<option value="7257914">Danner Grouse GTX Boot</option>
</select>
</div>
<div id="detailsDisplay"></div>
</div>
</form>
</body>
</html>
The
load()
command is tremendously useful when we want to grab a fragment
of
HTML to stuff into the content of an element (or set of elements). But there
may be times when we either want more control over how the Ajax request gets
made, or we need to do something more esoteric with the returned data in the
response body.
Let’s continue our investigation of what jQuery has to offer for these more
complex situations.
8.3 Making GET and POST requests
The
load()
command makes either a GET or a POST request, depending on
whether it’s called with request data, but sometimes we want to have a bit more
234 CHAPTER 8
Talk to the server with Ajax
control over which HTTP method gets used. Why should we care? Because,
maybe, our servers care.
Web authors have traditionally played fast and loose with the
GET and POST
methods, using one or the other without heeding how the HTTP protocol intends
for these methods to be used. The intentions for each method are as follows:
■
GET requests—Intended to be idempotent; the state of the server and the
model data for the application should be unaffected by a
GET operation.
The same
GET operation, made again and again and again, should return
exactly the same results (assuming no other force is at work changing the
server state).
■
POST requests—Can be non-idempotent; the data they send to the server can
be used to change the model state of the application; for example, adding
records to a database or removing information from the server.
A
GET request should, therefore, be used for getting data (as its name implies). It
may be required to send some data to the server for the
GET; for example, to iden-
tify a style number to retrieve color information. But when data is being sent to
the server in order to effect a change,
POST should be used.
WARNING This is more than theoretical. Browsers make decisions about caching
based upon the
HTTP method used; GET requests are highly subject to
caching. Using the proper
HTTP method ensures that you don’t get
cross-ways with the browser’s expectations regarding the intentions of
the requests.
All that being said, jQuery gives us a few means to make GET requests, which
unlike
load()
, aren’t implemented as jQuery commands for a wrapped set. Utility
functions are provided to make various types of
GET requests. As we pointed out in
chapter 1, jQuery utility functions are top-level functions that are namespaced
with the
jQuery
global name or its
$
alias.
Let’s look at each of these functions.
8.3.1 Getting data with jQuery
When we want to fetch some data from the server and decide what to do with it
ourselves (rather than letting the
load()
command set it as the content of an
HTML element), we can use the
$.get()
utility function. Its syntax is as follows:
Making GET and POST requests 235
Let’s look at a simple use of this function as shown in listing 8.5 (which can be
found in the file chapter8/$.get.html).
<html>
<head>
<title>$.get() Example</title>
<link rel="stylesheet" type="text/css" href=" /common.css">
<script type="text/javascript"
src=" /scripts/jquery-1.2.1.js"></script>
<script type="text/javascript">
$(function(){
$('#testButton').click(function(){
$.get(
'reflectData.jsp',
{a:1, b:2, c:3},
function(data) { alert(data); }
);
});
});
</script>
</head>
<body>
<button type="button" id="testButton">Click me!</button>
</body>
</html>
Command syntax: $.get
$.get(url,parameters,callback)
Initiates a GET request to the server using the specified URL with any passed parameters as
the query string.
Parameters
url (String) The URL of the server-side resource to contact via the GET method.
parameters (Object|String) An object whose properties serve as the name/value pairs
used to construct a query string to be appended to the URL, or a preformat-
ted and encoded query string.
callback (Function) A function invoked when the request completes. The response
body is passed as the first parameter to this callback, and the status as
the second.
Returns
The XHR instance.
Listing 8.5 Using $.get() utility function to fetch data from the server
Gets data from
the server
b
236 CHAPTER 8
Talk to the server with Ajax
In this simple page, we create a button and instrument it to initiate a call to
$.get()
b
once it’s clicked. The GET request is made to the server resource at
reflectData.jsp
(which returns a text snippet showing the values that were
passed to it as request parameters), specifying values for request parameters
a
,
b
,
and
c
. The callback is passed the fetched data and can do whatever it wants with
it. In this case, it merely issues an alert displaying that data.
When this
HTML page is loaded into a browser and the button is clicked, we
see the display of figure 8.4.
If the response contains an
XML document, the document will be parsed, and the
data parameter passed to the callback will be the resulting
DOM.
XML is great when we need its flexibility and our data is hierarchical in nature,
but it can be painful to digest. Let’s see another jQuery utility function that’s
quite useful when our data needs are more basic.
8.3.2 Getting JSON data
As stated in the previous section, when an XML document is returned from the
server, the
XML document is automatically parsed, and the resulting DOM is made
available to the callback function. When
XML is overkill or otherwise unsuitable as
a data transfer mechanism,
JSON is often used in its place; one reason is that JSON
is easy to digest in client-side script. Well, jQuery makes it even easier.
For times when we know that the response will be
JSON, the
$.getJSON()
utility
function automatically parses the returned
JSON string and makes the resulting
Figure 8.4 The $.get() utility function fetches data from the server that we can
manipulate as we please, including only showing it in an alert.
Making GET and POST requests 237
JavaScript data item available to its callback. The syntax of this utility function is
as follows:
This function is great for those times when we want to get data from the server
without the overhead of dealing with
XML. Let’s see an example that puts it to
work for us.
Loading cascading dropdowns
When creating Rich Internet Applications, we often encounter the need to set the
options in a dropdown control to values that are dependent on the setting of
some other control, frequently another dropdown. A common example is choos-
ing a state or province from one dropdown that causes a subsequent dropdown to
be loaded with the list of cities in that state or province.
Such a set of controls has come to be known by the term dependent dropdowns—
or, sometimes, cascading dropdowns—and has become a poster child for Ajax; it’s
used as an example in almost every Ajax book in existence, as well as all over the
Internet. In this section, we’ll look at how to solve this canonical problem and cre-
ate a set of elements by leveraging the jQuery
$.getJSON()
utility function.
For this example, we’ll return to The Boot Closet page that we set up in
section 8.2.2 and extend its capabilities. As originally written, the page allows
our customers to find out which boots are available and the detailed informa-
tion associated with the available boots, but they have no way to pick a pair for
Command syntax: $.getJSON
$.getJSON(url,parameters,callback)
Initiates a GET request to the server using the specified URL with any passed parameters as
the query string. The response is interpreted as a JSON string, and the resulting data is
passed to the callback function.
Parameters
url (String) The URL of the server-side resource contacted via the GET method.
parameters (Object|String) An object whose properties serve as the name/value pairs
used to construct a query string to be appended to the URL, or a preformat-
ted and encoded query string.
callback (Function) A function invoked when the request completes. The data value
resulting from digesting the response body as a JSON string is passed as
the first parameter to this callback, and the status as the second.
Returns
The XHR instance.
238 CHAPTER 8
Talk to the server with Ajax
purchase. We like purchases, so our next step is to add controls that let them
pick color and size.
Remember that we’re a closeout business—that means we don’t always have a
full line of any one style available. Only certain colors are available from day to
day, and only certain sizes are available in those colors. So we can’t hard-code lists
of colors and sizes; we need to obtain these lists dynamically from our real-time
inventory database.
To allow the customer to select colors and sizes, we’ll add two dropdowns to
our form: one for color and one for size. The initial appearance of our enhanced
form is shown in figure 8.5, and you can load the
HTML page for this example
from the file chapter8/bootcloset/boot.closet.2.html.
The dropdown element for choosing the boot style is enabled (and pre-filled with
the available styles as we discussed earlier), but the color and size controls are dis-
abled and empty. We can’t pre-fill these dropdowns because we don’t know what
colors to display until a style is picked, and we don’t know what sizes to display
until we know both the style and the color.
Given that, here are the things that we wish to accomplish for these controls:
■
When a style is selected, the color dropdown should be enabled and filled
with the colors available for the selected style.
Figure 8.5 The initial state of the order form with the dependent dropdowns in an empty and
disabled state