Beginning Ajax with PHP From Novice to Professional phần 10 ppt
Bạn đang xem bản rút gọn của tài liệu. Xem và tải ngay bản đầy đủ của tài liệu tại đây (1.11 MB, 50 trang )
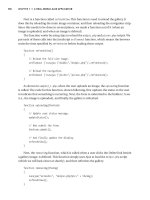
Figure 13-1. The Internet Explorer JavaScript debugger
After several years of Internet Explorer frustration, I was pleased to learn that Firefox
provides a rather effective JavaScript debugging console. When a JavaScript error occurs
in Firefox, precise details of the error are logged into its internal JavaScript console. The
user can then access this console to see a list of all errors that have occurred in a script’s
execution.
While Internet Explorer enjoys giving you nondescript error messages, the JavaScript
console in Firefox (see Figure 13-2) provides a detailed description of the type of error
that occurred (error, warning, or message); the details of the error involved; and even the
file location it occurred at, along with a line number.
While Firefox offers superior JavaScript debugging reporting to Internet Explorer,
Internet Explorer testing remains a necessary task, as there are some differing standards
in use between the two browsers.
As Ajax has the potential to be totally cross-platform, it can help to have a version of
all the major browsers at your disposal when testing your applications. Remember that
just because something works great in one browser, it doesn’t mean that it will work per-
fectly in all browsers. It is important to know who your core audience is and to ensure
that you have code that will work to the advantage of as many of your users as possible
(ideally, all of them).
When you first open the console (click Tools
➤ JavaScript Console), you will notice
a few buttons at the top, an area to enter code, and a listing of any errors that have
occurred. The buttons at the top mainly provide a means of sorting error messages by
type and are pretty self-explanatory. Consider setting the default error reporting level to
All (meaning that all logged messages are displayed).
CHAPTER 13 ■ TESTING AND DEBUGGING206
6676CH13.qxd 9/27/06 12:01 PM Page 206
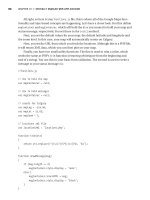
Figure 13-2. Firefox’s JavaScript console
The error message box will catch everything from CSS issues to JavaScript warnings
and errors. Each error generally consists of three pieces. The first piece is displayed in
bold and contains a detailed message of what has gone wrong with the script in question.
The next piece is a URL of the script in which the error occurred, located beneath the
description. The last piece gives the number of the line at which the error occurred; it’s
located to the right of the other two pieces.
Note that the console isn’t cleared between script executions, so you may sometimes
need to click the Clear button and rerun your script to make sure that only the relevant
errors are displayed. If errors were generated by a previous page, they may be still listed
in the console if you don’t clear them first.
By leaving the JavaScript console open at all times, you can quickly and efficiently
debug all JavaScript error messages, as well as keep your CSS clean and functioning prop-
erly. I really don’t know how I would work without this handy little tool, and it is highly
recommended that you make use of it during your JavaScript debugging endeavors.
However, that is not all that Firefox has to offer, thanks to its ingenious extensions feature.
CHAPTER 13 ■ TESTING AND DEBUGGING 207
6676CH13.qxd 9/27/06 12:01 PM Page 207
Firefox Extensions
One of the best features of the Firefox browser is its ability to be extended by third-party
plug-ins, each providing extra functionality not core to the browser. There are a wide
range of these extensions available, including a tool to display your local weather, a tool
to hide advertising from web sites, and of course, what we are interested in, debugging
tools.
We will now take a look at some of the most useful tools available to Firefox users to
help them develop and debug their HTML, CSS, and JavaScript applications.
Web Developer Toolbar
Available from the web developer toolbar is
one of the most popular extensions for Firefox (see Figure 13-3). It offers a wide range of
capabilities, including the ability to control cookies, edit CSS, and highlight various
HTML elements. It allows you to easily resize your browser to other monitor sizes, and it
also provides shortcuts to other Firefox features, such as source code viewing and page
validation.
CHAPTER 13 ■ TESTING AND DEBUGGING208
Figure 13-3. The Firefox web developer toolbar
While most of the toolbar’s features aren’t specific to debugging JavaScript, it
includes an icon that becomes highlighted when a script error occurs on a page. This
allows you to quickly see whether an error occurred in your script.
The DOM Inspector
The DOM is used to represent the structure of an HTML or XML document in tree form.
This allows programmers to easily access any element in a document.
The DOM inspector (pictured in Figure 13-4) lets you browse this tree structure,
allowing you to easily see how the document is constructed. This is a very powerful tool,
letting you see the properties of each element in your document. For instance, you can
see all CSS properties of a chosen element, including its x and y coordinates on your
page, and the order in which CSS styles are applied.
6676CH13.qxd 9/27/06 12:01 PM Page 208
Figure 13-4. The Firefox-based DOM inspector: a crucial debugging tool when getting into
heavy DOM-accessing JavaScript code
This plug-in is shipped with Firefox, but you must manually choose to install it when
you install the browser.
We will be looking closer at the DOM in Chapter 14.
LiveHTTPHeaders
The LiveHTTPHeaders extension (available from )
allows you to watch all the HTTP request and response data as you load pages. Not only
does it show the data for the web pages you load, but it also shows all requests for images
and other files (such as CSS and JavaScript files). This shows all raw request and response
data, including cookies sent and received.
This is especially useful for Ajax development, as you can also see the requests and
responses caused by the
XMLHttpRequest object. This allows you to see if your subrequests
were executed correctly. Additionally, you can then easily copy and paste the request URL
into your browser to see if the subrequest data is returned correctly.
CHAPTER 13 ■ TESTING AND DEBUGGING 209
6676CH13.qxd 9/27/06 12:01 PM Page 209
As an example, let’s take a look at Google Suggest (located at labs.google.com/
suggest
). When you start typing your search query, a list of suggestions are fetched using
Ajax and returned so that you can see some possible search terms containing what you
have already typed.
If you turn on LiveHTTPHeaders and then type Ajax into the search box, you can see
the following request executing internally:
/>GET /complete/search?hl=en&js=true&qu=ajax HTTP/1.1
Host: www.google.com
User-Agent: Mozilla/5.0 (Windows; U; Windows NT 5.1; en-US; rv:1.8.0.6)➥
Gecko/20060728 Firefox/1.5.0.6
Accept: text/xml,application/xml,application/xhtml+xml,text/html;q=0.9,text/plain;➥
q=0.8,image/png,*/*;q=0.5
Accept-Language: en-us,en;q=0.5
Accept-Encoding: gzip,deflate
Accept-Charset: ISO-8859-1,utf-8;q=0.7,*;q=0.7
Keep-Alive: 300
Connection: keep-alive
HTTP/1.x 200 OK
Content-Type: text/html; charset=utf-8
Content-Encoding: gzip
Server: Auto-Completion Server
Cache-Control: private, x-gzip-ok=""
Content-Length: 207
Date: Fri, 25 Aug 2006 02:02:04 GMT
The first line simply shows the full URL to which the request is being sent. The next
block of text is what makes up the HTTP request. That is, it is precisely what Firefox is
sending to Google to fetch the suggestions for the term Ajax. The final block of text is the
response data that Google sends back to Firefox.
Note that the response text doesn’t include that actual returned data—it is only
showing the response headers. Similarly, the request block only shows the request headers.
If you were submitting a
POST form, there would be a bunch of form values submitted that
wouldn’t be listed in LiveHTTPHeaders.
If you enter the request URL directly in your browser (
www.google.com/complete/
search?hl=en&js=true&qu=ajax), you can see the actual data returned by Google (which in
this case is some JavaScript code that is used to populate the suggestion list).
CHAPTER 13 ■ TESTING AND DEBUGGING210
6676CH13.qxd 9/27/06 12:01 PM Page 210
Obviously it can be very useful to see the internal data requested and returned for
debugging and testing your own Ajax applications.
As a side note, a useful feature of LiveHTTPHeaders is that you can filter out the
requests for files—such as images and CSS files, which you generally won’t need to see
while debugging (a page with hundreds of images can make it difficult for you to see the
data you’re looking for).
Venkman JavaScript Debugger
While Firefox’s built-in JavaScript console allows you to see errors and their locations in
your code, it does not provide any actual debugging capabilities. For that you can use
Venkman, Mozilla’s JavaScript debugger (shown in Figure 13-5). You can download this
extension from
www.mozilla.org/projects/venkman.
Figure 13-5. Debugging the Google Suggest page using Venkman
CHAPTER 13 ■ TESTING AND DEBUGGING 211
6676CH13.qxd 9/27/06 12:01 PM Page 211
To use the debugger, you first load the page you want to debug in your browser. Next,
open Venkman by selecting JavaScript Debugger from the Firefox Tools menu. You will
then see a summary of the files loaded for that page. At this point, you can browse the
files for the code you want to debug.
There is a wide range of tools Venkman provides for debugging. These including set-
ting breakpoints (so that code will execute until a breakpoint is reached, and then pause
for you to perform diagnostics), stepping over code (executing one statement at a time,
proceeding through the code as you instruct it to), and interactive sessions (allowing you
to enter code into the debugger and see it execute).
In addition to these tools, you can also see the full scope of variables that are set
(and their values), so you can see whether variables have the values you expect at certain
points of execution. You can also view the call stack, allowing you to see if your functions
were called in the order you expected, and allowing you to trace back an error to its point
of origin.
On the whole, Venkman is a powerful but complex tool to use. If you get into the
habit of using it early on, though, you will find your general development to proceed
much more smoothly.
HTML Validation
While not specific to Ajax development, it is important to use valid HTML (or XHTML)
when developing your web applications, as this provides the greatest cross-browser com-
patibility. Clean, correct HTML code will also make debugging your JavaScript that much
simpler. Note that it is possible for errors in your HTML code to result in errors in your
JavaScript (such as if you miss a closing quote in a HTML attribute).
The HTML Validator extension for Firefox (see Figure 13-6) will check your pages in
real time and let you know in the Firefox status bar if there are any errors in your markup.
You can download this extension from
/>Additionally, when you use the View Source tool in Firefox, HTML Validator will auto-
matically list all the errors and highlight each line in the source where an error occurs.
I would recommend when using this extension that you also periodically use the val-
idator available from the W3C, as I’ve noticed on occasion that there are differences in
validation between the two (this mainly relates to
doctype-specific tags, not major syntax
errors).
CHAPTER 13 ■ TESTING AND DEBUGGING212
6676CH13.qxd 9/27/06 12:01 PM Page 212
Figure 13-6. HTML Validator extends Firefox’s source-viewing capabilities.
Internet Explorer Extensions
A little-known fact about Internet Explorer is that it also supports plug-ins, just as Firefox
does. The reason that this is not as well known is because there are so many development-
related plug-ins for Firefox, whereas most of the plug-ins available for Internet Explorer
are search-related—such as Google Toolbar.
Since I have just discussed some of the extensions available for Firefox, I will now
look at some of the tools available for Internet Explorer.
CHAPTER 13 ■ TESTING AND DEBUGGING 213
6676CH13.qxd 9/27/06 12:01 PM Page 213
Internet Explorer Developer Toolbar
This toolbar is in many respects similar to the Firefox web developer toolbar. Available
from
www.microsoft.com/downloads/details.aspx?familyid=e59c3964-672d-4511-bb3e-➥
2d5e1db91038, it provides tools to outline elements, resize the browser, validate pages, and
display image information (see Figure 13-7).
Figure 13-7. Internet Explorer with the developer toolbar (indicated by DevToolBar) and
DOM explorer loaded, highlighting the Google Suggest logo
This toolbar also adds the DOM explorer to Internet Explorer. This is similar to
Firefox’s DOM inspector, which also allows you to view and modify styles and properties
in real time.
CHAPTER 13 ■ TESTING AND DEBUGGING214
6676CH13.qxd 9/27/06 12:01 PM Page 214
Fiddler
Fiddler (see Figure 13-8) is a free HTTP debugging tool from Microsoft. It logs all the
traffic between Internet Explorer and the web sites that you load. It is similar to Live-
HTTPHeaders for Firefox, except that it isn’t integrated with the browser, and it provides
much more functionality. You can download Fiddler from
www.fiddlertool.com.
CHAPTER 13 ■ TESTING AND DEBUGGING 215
Figure 13-8. Fiddler displays all the information about requested files when a web page is loaded in
Internet Explorer.
When you request the Fiddler web site in Internet Explorer, all files involved in
requesting the page are listed. There are a wide range of options available to view, mostly
on the Session Inspector tab.
On this tab, you can view request and response headers, returned data (if the file is
an image, you can view it), and submitted form data. You can also manually build your
own HTTP requests to execute.
On the whole, this is a very powerful and useful tool, but by default it will only work
for Internet Explorer. Fiddler acts as an HTTP proxy, running on your computer on
port 8888. This means you can get it to work in Firefox as well, by changing the Firefox
proxy settings. To do so, open Firefox and click Tools
➤ Options. On the General tab,
click the Connection Settings button. In the Connection Settings dialog that appears,
check the “Manual proxy configuration” radio button, and enter localhost on port 8888
as your proxy. You’ll need to change this setting back after you finish with Fiddler, other-
wise you may not be able to load any web sites.
6676CH13.qxd 9/27/06 12:01 PM Page 215
Summary
In this chapter, you looked at some of the tools available for testing and debugging
JavaScript in Firefox and Internet Explorer. By no means are these all of the tools avail-
able, but they are among the most popular, and should be sufficient help in nearly all
situations.
To conclude this book, I will move into the last set of techniques necessary to truly
make JavaScript work for you from an Ajax point of view. In Chapter 14, you will be look-
ing at how to manipulate your web pages using DOM. By harnessing the power of DOM,
you can take control of a web page and perform any client-side scripting you might need.
CHAPTER 13 ■ TESTING AND DEBUGGING216
6676CH13.qxd 9/27/06 12:01 PM Page 216
The DOM
The last step in your journey through Ajax- and PHP-based web application develop-
ment revolves around the DOM. The DOM is a representation of all the objects and
elements on a web page. Using a tree structure, all paragraphs, images, links, and other
elements can be directly accessed and manipulated using JavaScript.
One of the key aspects of developing Ajax-based applications is the manipulation of
elements on an HTML page using the DOM. In numerous examples in previous chapters,
we have updated the
innerHTML property of a given div. This is an example of updating an
element’s property via the DOM. This is one of the most basic things you can do using the
DOM; there are, of course, more advanced effects you can achieve, such as dynamically
creating new elements for the HTML page, and removing events. The DOM also allows
you to dynamically update the CSS styles of a given element.
While debugging JavaScript can be tricky enough when working with Ajax-based
server-side requests, working with the DOM can be even more intimidating. To become
an adept DOM wrangler, you must understand how elements relate to each other, what
sorts of attributes and methods are available to use, and how to go about accessing what
is on the page. Throughout this chapter, we will go into basic examples on how to use the
DOM to your advantage and open the door to more advanced techniques.
Accessing DOM Elements
Before you get started manipulating elements in the DOM, you need to know the various
methods for accessing different elements. There are many ways to achieve this, so here
we will just look at the most common methods.
document.getElementById
This is probably one of the functions that you will use the most. If you want to access a
specific element (be it a
div, a link, or an image), you can simply assign it an ID, and then
pass that ID to this method.
217
CHAPTER 14
6676CH14.qxd 9/27/06 12:02 PM Page 217
An ID should only ever be used once in a single document; therefore, calling this
method should only ever refer to at most one element. If you have more than one ele-
ment sharing a given ID, the first element found is returned. Consider the following
HTML snippet:
<input type="text" name="foo" id="myFoo" value="bar" />
<script type="text/javascript">
var elt = document.getElementById('myFoo');
if (elt)
alert(elt.value);
</script>
This code finds the text input element, and then shows its value in an alert box. A
simple check is done here to see if the element was indeed found.
getElementsByTagName
This function returns a collection of elements (rather than just a single element) based
on the type of tag it references. You can then loop over each element as required.
For instance, it you wanted to find all the links in a page and make them bold, you
could use the following code:
<a href="#">Foo</a>
<script type="text/javascript">
var links = document.getElementsByTagName('a');
for (var i = 0; i < links.length; i++) {
links[i].style.fontWeight = 'bold';
}
</script>
You can also call this method on a specific element rather than just the document
object. For example, if you wanted to retrieve the names of all of the images within a spe-
cific
div, you could combine the use of getElementsByTagName with getElementById:
<div id="myDiv">
<img </div>
<script type="text/javascript">
var theDiv = document.getElementById('myDiv');
var theImages = theDiv.getElementsByTagName('img');
CHAPTER 14 ■ THE DOM218
6676CH14.qxd 9/27/06 12:02 PM Page 218
for (var i = 0; i < theImages.length; i++) {
alert(theImages[i].src);}
}
</script>
Accessing Elements Within a Form
Another useful feature of the DOM is the ability to easily access elements within a form,
simply by using the element’s
name attribute on the form object. This can make validation
of forms or accessing of different values very easy. For instance, the following simple
example will display a JavaScript alert box containing the value of the text input box.
<form id="myForm">
<input type="text" name="foo" value="bar" />
</form>
<script type="text/javascript">
var theForm = document.getElementById('myForm');
alert(myForm.foo.value);
</script>
Adding and Removing DOM Elements
By controlling the DOM using JavaScript, it is possible to add new elements to a web
page without having to use a page refresh. This can be handy for creating elements such
as menus, tool tips, and auto-complete features, and is a little more advanced than the
generic hide/show method. While hiding and showing elements works well, the ability to
create, manipulate, and remove elements on the fly means that you do not have to create
the elements from the start; you can work with them as you see fit.
Creating elements in JavaScript involves using the
document.createElement() method.
By passing in the type of element you want to create (by referencing its HTML tag), you
can dynamically set up an element on the screen. You can then manipulate it however
you see fit. The following snippet shows how this can be accomplished:
<style type="text/css">
.newdiv {
background : #f00;
border : 1px solid #000;
width : 50px; height : 50px
}
</style>
CHAPTER 14 ■ THE DOM 219
6676CH14.qxd 9/27/06 12:02 PM Page 219
<a href="#" onclick="createDiv()">Create a div</a>
<script type="text/javascript">
//Function to create a new div element.
function createDiv()
{
// Create the div.
var mydiv = document.createElement('div');
// Set the div's class.
mydiv.className = 'newdiv';
// Append the div to the body.
document.body.appendChild(mydiv);
}
</script>
As you can see, there are several steps involved in creating a new element to add to
your HTML page. First, you create the HTML element using
createElement. In this case,
you created a
div, but if you wanted to create a link instead, you would pass a as the argu-
ment to
createElement. Once the new element has been created, you can manipulate its
properties. In the preceding code, you change its class by changing the
className prop-
erty. This means that if you have a class called
newdiv in your CSS stylesheet, it will be
used to determine the look of the
div (after it has been added to your document). Differ-
ent types of elements have different properties. For instance, if you created a link, you
would then set the
href property to determine the link target.
Once you are finished working with the new element, you use the
appendChild()
method to add the div to the appropriate element. In this case, you want to add it to the
main body of the document, so the
appendChild() method is called from document.body.
Note that this adds it as the last item within that element (so if there were other items
within the element, the new
div would appear after these). If you wanted to add it within,
say, another
div, you could access the div using getElementById, and then call appendChild()
on that element (instead of on body).
In addition to creating new elements, you can also remove elements from a page. Just
like you had to add a new element to an existing element in the page, you must also use
an existing element from which to remove the element. Thankfully, this can be achieved
fairly simply using your unwanted element’s
parentNode attribute, along with the
removeChild() method.
CHAPTER 14 ■ THE DOM220
6676CH14.qxd 9/27/06 12:02 PM Page 220
<div id="myDiv" onclick="removeElement(this)">
Click me to to remove me!
</div>
<script type="text/javascript">
function removeElement(elt)
{
elt.parentNode.removeChild(elt);
}
</script>
Manipulating DOM Elements
As just shown, when creating a new element, you can also manipulate various properties
of all elements. There are many different properties that can be set. Different types of
elements have different properties (such as
href for a link and src for an image), but all
share a common set of properties, such as CSS styling and the various events.
There are many different events that can be handled—such as when a key is pressed,
when the mouse moves over a certain element, or when a form is submitted. It is simply
a matter of writing an event handler (which is just a JavaScript function), and then
assigning this function to the corresponding element’s event.
Here is a simple example of handling events and manipulating an element’s style.
First, you create the
div that you are going to manipulate. Next, you define the init func-
tion, which will execute when the page finishes loading. This function first fetches the
element using
getElementById, then adds an onclick handler to the event.
Finally, you make the
init function run when the page loads. Alternatively, you could
have used
<body onload="init()"> to make this function run.
<div id="myDiv">
Click me to change color!
</div>
<script type="text/javascript">
function init()
{
var mydiv = document.getElementById('myDiv');
CHAPTER 14 ■ THE DOM 221
6676CH14.qxd 9/27/06 12:02 PM Page 221
// handle the mouse click event
mydiv.onclick = function () {
this.style.backgroundColor = '#0f0';
};
}
window.onload = init;
</script>
Manipulating XML Using the DOM
Using what you have just learned about accessing elements in the DOM, you can now
apply this knowledge to XML documents. When we covered Google Maps in Chapter 10,
you returned your map locations in XML back to your script using Ajax. Let’s briefly look
at this again. Consider the following XML data:
<markers>
<marker latitude="50.9859" longitude="-114.058"
locname="Deerfoot Meadows" address="100-33 Heritage Meadows Way SE"
city="Calgary" province="Alberta" postal="T2H 3B8" />
<marker latitude="51.0563" longitude="-114.095"
locname="North Hill S/C" address="1632-14th Ave"
city="Calgary" province="Alberta" postal="T2N 1M7" />
</markers>
When this data is returned via the XMLHttpRequest object, you can access it as an XML
document using
responseXML. This is a special type of object called XMLDocument, which you
can directly apply the DOM functions to, just as you would on your HTML document.
Additionally, you can use the
getAttribute() method on a returned object to get any
attribute data you require. Assume in this example that
request is an XMLHttpRequest
object. You first get all the marker elements, and then show an alert box containing each
marker’s corresponding
locname attribute.
<script type="text/javascript">
var xmlDoc = request.responseXML;
var markers = xmlDoc.documentElement.getElementsByTagName("marker");
for (var i = 0; i < markers.length; i++) {
alert(markers[i].getAttribute("locname");
}
</script>
CHAPTER 14 ■ THE DOM222
6676CH14.qxd 9/27/06 12:02 PM Page 222
Combining Ajax and XML with the DOM
Let’s now take a look at an example that combines what you have learned in this chapter
with Ajax. You will be using the list of locations listed in Chapter 10. Instead of fetching
the locations from a database, you will use static XML (this is done just to simplify the
example).
This example will load the locations in the XML file via Ajax, and then dynamically
create an HTML table with one row per location. Additionally, you will add an option on
each row to delete that respective row.
Listing 14-1 shows the XML that you will be passing via Ajax. Listing 14-2 shows the
HTML file to be loaded in the web browser. Finally, Listing 14-3 shows the JavaScript that
makes all of this work.
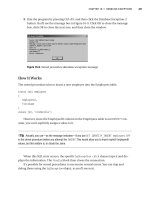
When the code in Listing 14-1 is loaded in your browser, you click the Load locations
button to load the XML and create the HTML table, as shown in Figure 14-1.
Figure 14-1. Once Load locations has been clicked, the table will be created using the DOM.
Listing 14-1. The XML Data Used to Populate the Table (locations.xml)
<markers>
<marker latitude="50.9859" longitude="-114.058"
locname="Deerfoot Meadows" address="100-33 Heritage Meadows Way SE"
city="Calgary" province="Alberta" postal="T2H 3B8" />
CHAPTER 14 ■ THE DOM 223
6676CH14.qxd 9/27/06 12:02 PM Page 223
<marker latitude="51.0563" longitude="-114.095"
locname="North Hill S/C" address="1632-14th Ave"
city="Calgary" province="Alberta" postal="T2N 1M7" />
<marker latitude="51.0947" longitude="-114.142"
locname="Market Mall" address="RO47-3625 Shaganappi Trail NW"
city="Calgary" province="Alberta" postal="T3A 0E2" />
<marker latitude="51.0404" longitude="-114.131"
locname="Westbrook Mall" address="1200 37 St SW"
city="Calgary" province="Alberta" postal="T3C 1S2" />
<marker latitude="51.0921" longitude="-113.919"
locname="Sunridge Mall" address="2525-36TH St NE"
city="Calgary" province="Alberta" postal="T1Y 5T4" />
<marker latitude="51.0469" longitude="-113.918"
locname="Marlborough Mall" address="1240 - 3800 Memorial Dr NE"
city="Calgary" province="Alberta" postal="T2A 2K2" />
<marker latitude="51.1500" longitude="-114.062"
locname="Coventry Hills Centre" address="130 Country Village Rd NE"
city="Calgary" province="Alberta" postal="T3K 6B8" />
<marker latitude="50.9921" longitude="-114.040"
locname="Southcentre Mall" address="100 Anderson Rd NE"
city="Calgary" province="Alberta" postal="T2J 3V1" />
<marker latitude="50.9296" longitude="-113.962"
locname="South Trail" address="4777 130 Ave SE"
city="Calgary" province="Alberta" postal="T2Z 4J2" />
</markers>
Listing 14-2. The HTML File Loaded into the Web Browser (sample14_1.html)
<!DOCTYPE html PUBLIC "-//W3C//DTD XHTML 1.0 Transitional//EN"
" /><html xmlns=" /><head>
<title>Sample 14_1</title>
CHAPTER 14 ■ THE DOM224
6676CH14.qxd 9/27/06 12:02 PM Page 224
<link rel="stylesheet" type="text/css" href="style.css" />
<script type="text/javascript" <script type="text/javascript" src="xmlhttp.js"></script>
</head>
<body>
<h1>Ajax Location Manager</h1>
<div>
<input type="button" value="Load locations"
onclick="loadLocations('locations')" />
</div>
<h2>My Locations</h2>
<div id="locations"></div>
</body>
</html>
Listing 14-3. The JavaScript Used to Load Locations via Ajax and Create an HTML Table
Using the DOM (functions.js)
// functions.js
// locations xml file
var locationsXml = 'locations.xml';
function loadLocations(container)
{
var elt = document.getElementById(container);
elt.innerHTML = 'Loading ';
var xmlhttp = getxmlhttp();
xmlhttp.open('post', locationsXml, true);
xmlhttp.onreadystatechange = function() {
if (xmlhttp.readyState == 4) {
var table = document.createElement('table');
var tbody = document.createElement('tbody');
CHAPTER 14 ■ THE DOM 225
6676CH14.qxd 9/27/06 12:02 PM Page 225
table.appendChild(tbody);
elt.innerHTML = '';
elt.appendChild(table);
var fields = { locname : 'Location Name',
address : 'Address',
latitude : 'Latitude',
longitude :'Longitude' };
var tr = table.insertRow(-1);
for (field in fields) {
var th = document.createElement('th');
th.innerHTML = fields[field];
tr.appendChild(th);
}
var th = document.createElement('th');
th.innerHTML = 'Options';
tr.appendChild(th);
tbody.appendChild(tr);
var xmlDoc = xmlhttp.responseXML;
var markers = xmlDoc.documentElement.getElementsByTagName('marker');
for (var i = 0; i < markers.length; i++) {
var tr = table.insertRow(-1);
for (field in fields) {
var td = document.createElement('td');
td.innerHTML = markers[i].getAttribute(field);
tr.appendChild(td);
}
var btn = document.createElement('input');
btn.type = 'button';
btn.value = 'Delete';
btn.onclick = deleteRow;
CHAPTER 14 ■ THE DOM226
6676CH14.qxd 9/27/06 12:02 PM Page 226
var td = document.createElement('td');
td.appendChild(btn);
tr.appendChild(td);
tbody.appendChild(tr);
}
styleRows(table);
}
}
xmlhttp.send('');
}
function deleteRow()
{
var row = this.parentNode.parentNode;
var table = row.parentNode.parentNode;
removeElement(row);
styleRows(table);
}
function removeElement(elt)
{
elt.parentNode.removeChild(elt);
}
function styleRows(table)
{
var rows = table.getElementsByTagName('tr');
for (var i = 1; i < rows.length; i++) {
if (i % 2 == 0)
rows[i].className = 'alt';
else
rows[i].className = '';
}
}
CHAPTER 14 ■ THE DOM 227
6676CH14.qxd 9/27/06 12:02 PM Page 227
How the Ajax Location Manager Works
First, let’s take a look at the sample14_1.html code. Once again, we’re using the xmlhttp.js
code created previously, to easily create the XMLHttpRequest object.
<!DOCTYPE html PUBLIC "-//W3C//DTD XHTML 1.0 Transitional//EN"
" /><html xmlns=" /><head>
<title>Sample 14_1</title>
<link rel="stylesheet" type="text/css" href="style.css" />
<script type="text/javascript" <script type="text/javascript" src="xmlhttp.js"></script>
</head>
<body>
<h1>Ajax Location Manager</h1>
The following code creates a button that will trigger the loadLocations() JavaScript
function, which will create a table inside the
locations div.
<input type="button" value="Load locations"
onclick="loadLocations('locations')" />
<h2>My Locations</h2>
<div id="locations"></div>
</body>
</html>
Now we will look at the functions.js file. The following code simply defines the URL
from which the
locations XML data is loaded.
// functions.js
// locations xml file
var locationsXml = 'locations.xml';
The following code defines the removeElement() function (described earlier in the
“Adding and Removing DOM Elements” section of the chapter). It simply removes an
element from the DOM.
CHAPTER 14 ■ THE DOM228
6676CH14.qxd 9/27/06 12:02 PM Page 228
function removeElement(elt)
{
elt.parentNode.removeChild(elt);
}
Now you define the deleteRow() function, which is shown in the following block of
code. In order to use this function, you assign to the
onclick event of the Delete button
(which you will create shortly). In this code, this expression refers to the button. It is
located inside a
td element, which is inside a tr element; therefore, the row is defined
by the button’s grandparent node.
You then pass this row to the
removeElement() function to delete it from the table.
Finally, in order to make sure the background of the remaining rows is correct, you call
the
styleRows() function on the table. As an exercise, perhaps try commenting out this
line to see what happens if it is not called.
The table element is the grandparent node of the row, as
tr is inside a tbody element,
which is inside a
table element. You will look more closely at this shortly when you actu-
ally create the table.
function deleteRow()
{
var row = this.parentNode.parentNode;
var table = row.parentNode.parentNode;
removeElement(row);
styleRows(table);
}
The following code defines the styleRows() function, which is a simple function used
to alternate the background color of the table rows. In the CSS file (
style.css), you define
a class called
alt, which sets a gray background. By using the modulo operator (%), you
apply this class to every second row (as well as removing the
className completely from
every other row). As in the
deleteRow() function, a table element is passed to this function.
function styleRows(table)
{
var rows = table.getElementsByTagName('tr');
for (var i = 1; i < rows.length; i++) {
if (i % 2 == 0)
rows[i].className = 'alt';
else
rows[i].className = '';
}
}
CHAPTER 14 ■ THE DOM 229
6676CH14.qxd 9/27/06 12:02 PM Page 229
Now we will look at the loadLocations() function, which contains the bulk of func-
tionality in this application. The actual table is created in the
onreadystatechange callback
handler. The following code first updates the container
div to display a load message, and
then creates and initializes the
XMLHttpRequest object.
function loadLocations(container)
{
var elt = document.getElementById(container);
elt.innerHTML = 'Loading ';
var xmlhttp = getxmlhttp();
xmlhttp.open('post', locationsXml, true);
The following code is the beginning of your table-creation code. This code is exe-
cuted once the
locations.xml file has been downloaded. First, you create a table element,
which is where all the data will be displayed. At this stage, you also create a
tbody element
(short for “table body”). Although you don’t need to create a
tbody tag manually when you
create tables in HTML, you need to do it when creating tables via the DOM. You then add
tbody to table.
xmlhttp.onreadystatechange = function() {
if (xmlhttp.readyState == 4) {
var table = document.createElement('table');
var tbody = document.createElement('tbody');
table.appendChild(tbody);
Now you will create the table’s header row. This simply shows labels at the top of each
column. To simplify this process, you create a simple JavaScript object that maps the
XML field name to a title. This allows you to loop over these fields now and when you
process each row. The following code defines the fields, and then creates a new table row.
The code then loops over the fields and adds a header cell for each field. You then create
an additional column in which you will hold the Delete button. (This wasn’t included in
the
fields object, since it doesn’t map to the XML.) Finally, you add this row to the tbody
element.
// Define the list of XML fields with their corresponding titles.
var fields = { locname : 'Location Name',
address : 'Address',
latitude : 'Latitude',
longitude : 'Longitude' };
CHAPTER 14 ■ THE DOM230
6676CH14.qxd 9/27/06 12:02 PM Page 230