C# Bible 2002 phần 7 ppsx
Bạn đang xem bản rút gọn của tài liệu. Xem và tải ngay bản đầy đủ của tài liệu tại đây (575.83 KB, 60 trang )
and background colors. Because all the controls share this behavior, it makes sense to
encapsulate it in a base class and derive the control-specific functionality in derived classes.
The authors of the control classes found in the .NET Framework took this design approach
when building the classes.
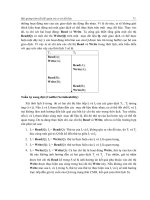
Figure 21-2: Control class hierarchy
Working with controls on a form
Listing 21-7 shows a WindowsForm application that includes a button. The button displays a
message in a message box when clicked.
Listing 21-7: Working with a Button on a Form
using System;
using System.Drawing;
using System.Windows.Forms;
public class MainForm : Form
{
public static void Main()
{
MainForm MyForm = new MainForm();
Application.Run(MyForm);
}
public MainForm()
{
Button MyButton = new Button();
Text = "Button Test";
MyButton.Location = new Point(25, 25);
MyButton.Text = "Click Me";
MyButton.Click += new EventHandler(MyButtonClicked);
Controls.Add(MyButton);
}
public void MyButtonClicked(object sender, EventArgs
Arguments)
{
MessageBox.Show("The button has been clicked.");
}
}
Listing 21-7 illustrates several important concepts that you need to keep in mind when
working with WindowsForms controls. Consider first the form's constructor. It creates a new
object of a Button class and sets its position on the form with the button's Location property.
This property is inherited from the Control class (which means that the property is available to
any control derived from the Control class), and sets the position of the upper-left corner of
the button relative to its container. In Listing 21-7, the button's location is set to a position 25
pixels to the right of the form's left edge and 25 pixels below the top of the form. The position
is set with a new instance of a structure called Point, which is available in the .NET
Framework System.Drawing namespace:
MyButton.Location = new Point(25, 25);
Tip Listing 21-7 uses the Location property to set the positions of the control. Using this
p
roperty to programmatically position controls can be tedious for complicated forms with
many controls. Visual Studio .NET comes with a forms designer that enables you to
visually drag and drop controls onto forms. The designer then generates the equivalent C#
forms code for you, freeing you from the burden of having to code all of the positioning
logic yourself.
The next important concept in Listing 21-7 has to do with event handling for a control.
Control classes support many events that are fired when the user interacts with the control.
Many of these events are found in the Control base class, although the specific control class
handles other events. The most obvious event for a button control would be a Click event.
Buttons on forms are not useful unless they can respond to a user action of clicking the
button.
Controls in the .NET Framework use the standard delegate/event model for supporting their
events. Control events are installed using instances of a delegate called EventHandler. The
EventHandler delegate accepts two arguments, an object specifying the sender of the event
and an object of a class called EventArgs that encapsulates the arguments to the event. The
form code in Listing 21-7 includes a method called MyButtonClicked that models the
EventHandler delegate. This method is used as a new event handler and is wired to the
button's Click event:
MyButton.Click += new EventHandler(MyButtonClicked);
The Form class handles the button's Click event by displaying a message box. A class called
MessageBox supports the display of Windows message boxes. The MessageBox class
contains a static method called Show() that displays a message in a message box.
The last important concept in Listing 21-7 is the statement that adds the control to the form:
Controls.Add(MyButton);
The Controls property is defined in the Control base class (remember that the Form class is
derived from the Control class). It is an object of a class called ControlsCollection and
manages a list of child controls that are managed by the current control. WindowsForms code
must add controls to their containing form's Controls collection before they can actually be
used.
Working with Resources
In Windows, resources are defined as pieces of data that are part of an application but do not
affect the execution of the code. These resources may include icons, bitmaps, and strings. The
WindowsForms system enables you to store your resources in a separate file during
development and include them into an assembly when the application needs to be distributed.
The main advantage to keeping your application's resources in a separate resource repository
is to aid in development. If you embed all of your strings inside your C# code, for example,
then only someone familiar with C# would know where to look to change the string values. If
you write your application using English strings and then need to change your application to
display the strings in German, you must read through your source code and change all of the
strings. If you keep your strings in a separate string table file, you can hand that separate file
off to a translator, who can translate the English strings to the German equivalents without
changing your C# source code. In your application, your code will say "read a string from the
string table," rather than hardcoding the string in your application.
Working with string resources
String resources are defined in a separate text file, which should have an extension of .txt. The
file should contain a set of key/value pairs, separated by an equals sign. The key for each
string should be a unique name for the string that you will use in your C# code to reference it.
The actual string value follows the equals sign.
You can place comments in your string table files. Comments start with the pound symbol
and extend to the end of the line.
Listing 21-8
shows a sample string table file. The file contains one string whose key name is
Message and whose value is Hello from the string table!
Listing 21-8: A Sample String Table Text File
#=============
# String Table
#=============
Message = Hello from the string table!
String table files must be compiled into an assembly so that they can be read from your C#
applications. The files are compiled into an assembly using a tool called ResGen. The ResGen
tool ships with the .NET Framework SDK. It is a console application that reads in the text file
and outputs a binary representation of the table with an extension of resources. If the string
table in Listing 21-8 were written to a text file called Listing21-8.txt, you could compile the
string table using the following command line:
resgen Listing21-8.txt
This produces a file called Listing21-8.resources. After you build a resources file for your
application, you can compile it into your assembly by using the /res argument to the C#
compiler, as shown in the following command line:
csc /res:string.resources /out:test.exe test.cs
This command line instructs the C# compiler to create an executable called test.exe from the
C# source file test.cs. It also instructs the C# compiler to embed the resources found in the
string.resources file within the test.exe executable. Because the resources are embedded in the
executable, you need only ship the executable when you deliver your application. The binary
resource file will not be needed at runtime.
After the resources are embedded into your application, you can read the resources from your
C# code. Listing 21-9 is a modification of Listing 21-7, in which the message shown in the
message box is read from a string resource.
Listing 21-9: Reading from a String Resource
using System;
using System.Drawing;
using System.Windows.Forms;
using System.Resources;
using System.Reflection;
public class MainForm : Form
{
public static void Main()
{
MainForm MyForm = new MainForm();
Application.Run(MyForm);
}
public MainForm()
{
Button MyButton = new Button();
Text = "Button Test";
MyButton.Location = new Point(25, 25);
MyButton.Text = "Click Me";
MyButton.Click += new EventHandler(MyButtonClicked);
Controls.Add(MyButton);
}
public void MyButtonClicked(object sender, EventArgs Arguments)
{
ResourceManager FormResources = new ResourceManager("StringTable",
Assembly.GetExecutingAssembly());
string Message;
Message = FormResources.GetString("Message");
MessageBox.Show(Message);
}
}
Listing 21-9 is compiled with a string table resource whose text file contents are as follows:
#=============
# String Table
#=============
Message = The button has been clicked.
This text file is named StringTable.txt and is compiled into a binary resource file called
StringTable.resources with the following command line:
resgen StringTable.txt
This command produces a file called StringTable.resources. This resource is linked into the
application when the main C# code is compiled with the following command line:
csc /res:StringTable.resources Listing21-9.cs
You can read resources into your C# applications using a .NET Framework class called
ResourceManager, which is found in a namespace called System.Resources. The code in
Listing 21-9
creates a new ResourceManager object to manage the resources embedded into
the executable. The constructor takes two arguments:
• The base name of the binary resource file that contains the resource being loaded. You
need to specify this name even though you don't need the physical file because your
assembly groups the resources into blocks and names the blocks using the base name
of the original binary resource file.
• A reference to the assembly that contains the resources being loaded. This parameter
is a reference to an object of a class called Assembly, which is found in the
System.Reflection namespace. Because the resources being loaded are embedded in
the assembly being executed, calling the static method GetExecutingAssembly()
returns a reference to the current assembly.
After the ResourceManager object is initialized, strings can be loaded from the manager using
a method called GetString(). This method takes one string argument: the key name of the
string being retrieved. The method returns the value of the string named by the key.
Working with binary resources
Text-based string tables are not the only resources that you can embed in your assemblies.
You can also embed binary resources, such as graphics and icons. Binary resources are
encoded using BASE64 encoding into a specially formatted XML document. The XML
document has an extension of .resx and is compiled into a resource file using resgen. From
there, you can use the methods in the ResourceManager class to work with your binary
resources just as you do with your text resources.
Unfortunately, the .NET Framework SDK does not include a tool for generating XML
documents with BASE64 encoding, given binary file inputs. However, Visual Studio .NET
contains support for embedding binary resources into your assemblies.
Summary
This chapter took a look at the basics of the development process for building WindowsForms
applications in C#. It investigated some fundamental classes, such as the Application class,
which manages the WindowsForms application as a whole, and the Forms class, which
manages a form within the application. You also took a tour through the WindowsForms
control class architecture and walked through the assembly attributes that can add version and
descriptive information to the assembly.
The .NET Framework contains a rich set of classes for building WindowsForms applications.
The WindowsForms subsystem is comprised of several classes; unfortunately, space
limitations don't permit a full description of them all in this book. You can examine the
documentation for each of the WindowsForms classes. Use the concepts explained in this
chapter to start your investigation of all of the classes in the WindowsForms namespace.
Chapter 22: Creating Web Applications
with WebForms
In This Chapter
The last decade witnessed unprecedented growth of the Internet as a business platform.
Today, the majority of business models are centered around or at least include the concept of
the Internet. The focus, therefore, has shifted from desktop applications to Web-based
applications. This shift has highlighted the need for technologies that can simplify Web-based
application development.
To build Web applications, the .NET Framework includes ASP.NET, which is the next
version of ASP 3.0. You can build applications in ASP.NET by using Visual Basic .NET or
Visual C# as the server-side scripting language. Visual C# enables programmers to develop
powerful Web-based applications. More importantly it helps programmers combat
increasingly accelerated cycle times, because it enables them to do more with fewer lines of
code and fewer errors, which reduces the cost of a project considerably.
Although all that you need for creating ASP.NET Web applications is a text editor, such as
Notepad, you will probably use a development platform, such as Visual Studio .NET. Visual
Studio .NET provides an extensive set of tools for designing Web pages. In comparison to
earlier Web programming languages, in which you had to do extensive coding, Visual Studio
.NET provides the What You See Is What You Get (WYSIWYG) interface. This interface
enables you to drag and drop controls onto WebForms, which you can then program in Visual
C#. By programming in Visual Studio .NET, you can separate code and HTML content on a
WebForm. This makes it very easy to separate programming logic from presentation logic,
which enables you to focus on implementing the functionality of the project, rather than the
presentation of data.
In this chapter, you learn to create an ASP.NET Web application by using Visual C#. While
creating the application, you design a WebForm that uses server controls, such as labels, text
boxes, list boxes, hyperlinks, and buttons. Finally, you learn to handle events that are
generated by server controls.
Basics of ASP.NET Web Applications
ASP.NET Web applications are applications that are deployed on Web servers. These
applications comprise one or more WebForms that are programmed either in Visual C# or
Visual Basic .NET.
In this section, you learn about the features and advantages of ASP.NET Web applications
and how Visual C# enables you to create ASP.NET applications. You also learn about how
ASP.NET applications are different from ASP 3.0 applications.
New features in ASP.NET
ASP.NET includes several new features that were not present in ASP 3.0. These features are
briefly described in this section.
Execution in the .NET Framework environment
In comparison to earlier Web-programming languages, applications in Visual C# (and other
Visual Studio .NET languages) execute in the .NET framework environment. Thus, these
applications are independent of the client browsers, and function in the same manner on all
client platforms.
Another advantage that using a different runtime for ASP.NET is that ASP 3.0 applications
can coexist with ASP.NET applications. Thus, you can deploy ASP 3.0 and ASP.NET Web
sites on the same Web server.
Introduction of WebForms
WebForms are the foundation of a Web-based application. They are used by the Web
application to interact with the user. A WebForm can include a number of server controls,
such as text boxes, labels, list boxes, radio buttons, check boxes, and buttons, all of which
facilitate the interaction of the user with the application.
A WebForm consists of two components: the user interface (UI) and the programming
(application) logic. The user interface is the visual component of a WebForm; it consists of
HTML and controls specific to the Web application. The user interface is the container for the
text and the controls that need to be displayed on the Web page. It is specified in a file with
the .aspx extension.
The programming logic of a Web application in ASP.NET is contained in a separate file that
contains the code to handle the user's interaction with the form. This file is known as the
code-behind file. When a form written in C# executes, the code-behind file dynamically
generates the HTML output of the page. The code-behind file in C# has an .aspx.cs extension.
The advantage of separating code from content is that the programmer need not concentrate
on the logic that is used to display the output. The Web designer can handle this task.
Integration with Visual Studio .NET
Visual Studio .NET is the rapid application-development tool for ASP.NET. Visual Studio
.NET offers complete integration with ASP.NET and enables you to drag and drop server
controls and design WebForms as they should appear when a user views them. Some of the
other advantages of creating ASP.NET applications in Visual Studio .NET are summarized in
the following list:
• Visual Studio .NET is a Rapid Application (RAD) tool. Instead of adding each control
to the WebForm programmatically, it helps you to add these controls by using the
toolbox, saving programming effort.
• Visual Studio .NET supports custom and composite controls. You can create custom
controls that encapsulate a common functionality you might need to use in a number
of applications, just as you use the ASP.NET Web controls provided by Visual Studio
.NET.
Introduction of server controls
Apart form the HTML controls that existed in the days of ASP 3.0, ASP.NET introduces
server controls that are components of a Web application that are executed at the server end
and encapsulate the functionality of the application.
HTML controls refer to the HTML elements that you can use in your WebForms. Normally,
when the HTML controls are sent to the server through the browser, the server considers the
HTML controls to be opaque. That is, the server does not process them. However, by
converting these controls into HTML server controls, they can be exposed to the server for
processing. By using attributes, such as ID and RUNAT, you can convert the HTML controls
to HTML server controls. You can add these controls to a WebForm by using the HTML tab
of the toolbox.
Server controls, on the other hand, are completely transparent to the application and enable a
developer to handle events at the server-side to manage the Web application.
Apart from the conventional text box and button controls, this category of controls also
includes the validation controls. Validation controls are programmable controls that help you
validate user input. For example, you can use these controls to validate the value of a field or
the pattern of characters entered by the user. To validate user input, you need to attach these
controls to the input controls.
Composite and user controls
If you want to replicate a set of controls on a number of pages, one option is that you draw
controls on each form separately. This is not a very useful option. However, another option
provided by ASP.NET is by way of user and composite controls.
User controls are ordinary WebForms that have been converted to controls by removing the
<HTML> and <FORM> tags of the control. Thus, they represent a unit of code and layout
that can be imported into another WebForm.
Another set of controls provided by ASP.NET is composite controls. Composite controls are a
set of controls that have been compiled into a library. To use composite controls, you can
include a reference to the library as you include references to other libraries.
Controls commonly used in WebForms
The basic task of designing a Web application is to add controls to a WebForm. Some of the
most commonly used controls on a WebForm are Label, TextBox, CheckBox, RadioButton,
ListBox, DropDownList, HyperLink, Table, Button, and ImageButton. The following sections
discuss these controls briefly.
Label control
You use the Label control to display static text in a WebForm. Users cannot edit the text in a
Label control. When you add a Label control, the text Label appears as its caption. However,
by setting the Text property of the control, you can modify the control's caption.
You can set the properties of the Label control at runtime in the code-behind file (.cs file). For
example, you may want to change the text of a label when a user clicks a button. You can do
so by using the following code:
Label1.Text="Welcome"
In the preceding code, Label1 is the ID of the Label control for which you want to change the
identification. If you want the Label control to disappear when a user clicks a button, you can
use the following code:
Label1.Visible=False
TextBox control
The TextBox control is used to get information, such as text, numbers, and dates, from users
in a WebForm. By default, a TextBox control is a single-line control that enables users to type
characters in a single line only. However, you can also set the TextBox control as a multiline
control. A multiline text box displays multiple lines and allows text wrapping.
A TextBox control can also be used to accept passwords. A TextBox control that is used to
accept passwords masks the characters typed by users, displaying them as asterisks (*).
You can set the appearance of a TextBox control by using its properties, such as BackColor or
ForeColor. You can also change the TextMode property of a TextBox control to determine
whether a TextBox control functions as a text box to accept a password, a single line of text,
or multiple lines of text.
CheckBox and CheckBoxList controls
Check boxes enable users to select one or more options from a given set of options. You can
add check boxes to a WebForm by using the CheckBox or CheckBoxList control. The
CheckBox control represents a single check box, whereas the CheckBoxList control
represents a collection of several check boxes. To add these controls to the form, simply drag
them onto the form from the toolbox.
After adding the CheckBoxList control, you need to add a list of items to it. To do so, perform
the following steps:
1. In the Properties window, click the ellipsis button for the Items property of the
CheckBoxList control. The ListItem Collection Editor dialog box opens.
N
ote
If the Properties window is not open, press F4. You can also select View →
Properties Window, on the menu bar.
2. In the ListItem Collection Editor dialog box, click Add to create a new item. A new
item is created and its properties are displayed at the right side of the dialog box.
3. Verify that the item is selected in the Members list, and then set the item properties.
Each item is a separate object and has the following properties:
o Selected: Represents a Boolean value that indicates whether the item is
selected.
o Text: Represents the text to be displayed for the item in the list.
o Value: Represents the value associated with the item. The value of a control is
not displayed to the user. However, the server uses the value to process
information from the control. For example, you might set the Text property of
an item as City Name, and the Value property to the postal code of the city, as
a unique identification. When the server processes the information represented
by the City Name field, the text supplied by the text box would be ignored, and
any processing would be based on the corresponding value used by the field.
4. Specify the text to be displayed to the user.
5. Repeat Steps 2-4 to add the required controls to the CheckBoxList control.
6. Click OK to close the ListItem Collection Editor dialog box.
Tip The choice between using the CheckBox control and the CheckBoxList control depends
on specific needs. The CheckBox control provides more control over the layout of the
check boxes on the page. For example, you can set the font and color of the check boxes
individually or include text between different check boxes. On the other hand, the
CheckBoxList control is a better choice if you need to add a series of check boxes.
RadioButton and RadioButtonList controls
Radio buttons provide a set of options from which a user can select. You can add radio
buttons to a WebForm by using either the RadioButton control or the RadioButtonList
control. The RadioButton control represents a single radio button to work with. The
RadioButtonList control is a collection of radio buttons. Radio buttons are seldom used
singly. Instead, they are used in a group. A group of radio buttons provides a set of mutually
exclusive options. This means that only one radio button in a group can be selected. A set of
radio buttons can be grouped in the following two ways:
• You can add a set of RadioButton controls to your page and assign them manually to a
group. You can use the GroupName property to do so.
• You can add a RadioButtonList control to the page. The radio buttons in the control
are automatically grouped, so you don't need to manually group them.
After adding a RadioButtonList control to the WebForm, you need to add the radio buttons.
You can do so by using the Items property in the same way as you do for the CheckBoxList
control.
ListBox control
The ListBox control represents a collection of list items. The control enables users to select
one or more items from the list. You can add the individual list items using the Items
property. You can also specify whether a user can select multiple items from a list of just a
single item by using the SelectionMode property of the ListBox control.
DropDownList control
The DropDownList control enables users to select an item from a set of predefined items -
each item being a separate object with its own properties. You can add items to a
DropDownList control by using its Items property. Unlike the ListBox control, you can select
only one item at a time, and the list of items remains hidden until a user clicks the drop-down
button.
HyperLink control
The HyperLink control enables users to navigate from one WebForm to another in an
application. It also enables users to navigate to a URL that might be associated with the
control. With the HyperLink control, either text or an image can act as a hyperlink. When a
user clicks the control, the target WebForm or the URL opens. The following code snippet
illustrates how to set the NavigateUrl property:
Hyperlink1.NavigateUrl="";
Table, TableRow, and TableCell controls
You use a table to display information in a tabular format. You can add a table to a WebForm
by using the Table control. This control can display information statically by setting the rows
and columns at design time. However, you can program the Table control to display
information dynamically at runtime.
Two other table-related controls that you can use on a WebForm are TableRow and
TableCell. Use the TableRow control to declare a row, and use the TableCell control to
declare cells in a table.
To understand how the Table, TableRow, and TableCell controls are related to one another,
add a Table control to your WebForm (drag it from Solution Explorer) and perform the
following steps to add rows and cells to the table:
1. In the Properties window, click the ellipsis button for the Rows property of the Table
control. The TableRow Collection Editor dialog box opens.
2. In the TableRow Collection Editor dialog box, which represents the TableRow
control, click Add to create a new row. A new row is created and its properties are
displayed at the right side of the dialog box.
3. Verify that the row is selected in the Members list, and then click the ellipsis button
for the Cells property to add a cell for the row. The TableCell Collection Editor dialog
box opens.
4. In the TableCell Collection Editor dialog box, which represents the TableCell control,
click Add to create a new cell. A new cell is created and its properties are displayed at
the right side of the dialog box.
5. Specify the text to be displayed in the cell and click OK to close the TableCell
Collection Editor dialog box.
6. Click OK to close the TableRow Collection Editor dialog box.
Notice that after you perform the preceding steps, a 1 x 1 table is added to your form.
Table 22-1 describes some of the properties of the Table, TableRow, and TableCell controls.
Table 22-1: Properties of the Table, TableRow, and TableCell Controls
Property Available with Description
ID Table Represents the unique ID of the control.
Rows Table Represents a collection of TableRow objects. A
TableRow control represents a row in the table.
Cells TableRow Represents a collection of TableCell objects. A
TableCell control represents a cell in a row in a
table.
VerticalAlign TableCell Represents the vertical alignment, such as the
top and bottom of the cell.
HorizontalAlign TableCell Represents the horizontal alignment, such as
left align and right align, of the cell.
ImageButton control
The ImageButton control enables programmers to display images in a WebForm and manage
these images at design time or runtime. This control represents a graphical button, which
enhances the appearance of the WebForm. You can set the ImageUrl property to point to a
specific image.
Button and LinkButton controls
The Button control on a WebForm is used to submit the page to the server. Three types of
server control buttons can be added to a WebForm:
• Button: Represents a standard button.
• LinkButton: Represents a button that causes the page to be submitted to the server. In
addition, it can also act as a hyperlink to another Web page or WebForm.
• ImageButton: This control is covered in the previous section.
Creating and Configuring a Web Application
Visual C# provides the ASP.NET Web Application template to create ASP.NET Web
applications. The ASP.NET Web Application template contains the necessary information for
building, processing, and deploying ASP applications.
Before you create a Web application project, you need to ensure that the following basic
requirements for your Web application are fulfilled on the development platform:
• You should have access to a computer running Microsoft IIS Server
• You should install the IIS Server on an NTFS partition. An NTFS partition improves
the security and performance of the server.
After fulfilling these requirements, you can use Visual Studio .NET to create an ASP.NET
Web application. To create a Web application, perform the following steps:
1. Add an ASP.NET Web application project for your application.
2. Create the user interface of the Web application.
3. Code the application logic.
The steps to create a new project are given in the following section.
Creating a new project
You use the ASP.NET Web Application template to create Web application projects. The
steps for creating a new Web application by using this template are as follows:
1. Select File → New → Project to open the New Project dialog box, which is shown in
Figure 22-1.
Figure 22-1: You can select one or more enterprise templates from the New Project
dialog box.
Tip You can also press Ctrl+Shift+N to open the New Project dialog box.
2. Select Visual C# Projects from the Project Types list.
3. Select ASP.NET Web Application from the Templates list of the New Project dialog
box.
4. Type the project name in the Name box.
5. Type the name of the IIS Server in the Location box, or accept the default location.
The completed New Project dialog box is shown in Figure 22-2.
Figure 22-2: Select a template and specify the name of the application in the New
Project dialog box.
Tip If the Web server is installed on your computer, you can also type http://localhost
in the Location box.
6. Click OK. A dialog box displays briefly while Visual Studio .NET creates the new
ASP.NET Web application. The dialog box is shown in Figure 22-3.
Figure 22-3: Visual Studio .NET creates the new project.
N
ote You may have to wait for some time while ASP.NET creates the project. You should
also ensure that the Web server is turned on, before you create your application. To turn
the Web server on, select Start → Run. In the Run dialog box, type net start iisadmin
and press Enter.
After you create a new Web Application Project, necessary project files - such as
AssemblyInfo.cs, Config.Web, and Global.asax - are created automatically by the Web
Application Wizard, along with the main page file, WebForm1.aspx. Figure 22-4 shows these
files in the Solution Explorer.
Figure 22-4: The Project window shows all the files created by the Web Application Wizard.
A WebForm in Visual Studio .NET has two views - Design view and HTML view:
• Design view: You design the user interface of a WebForm in Design view. Design
view provides two layouts for the WebForm: grid layout and flow layout:
o Grid layout: In grid layout, you can arrange controls on the WebForm based
on the coordinates of each control.
o Flow layout: In flow layout, a WebForm can be designed linearly, as you
design a Microsoft Word document, from top to bottom.
You can switch between different layouts by right-clicking the WebForm and
selecting Properties. On the Property pages, you can select the appropriate layout.
• HTML view: This view represents the corresponding ASP.NET syntax for the
WebForm. You need to click the HTML tab to open HTML view. If the HTML tab is
not visible, you can right-click and select View HTML Source from the shortcut
menu.
Adding controls to the WebForm
You can add controls to a WebForm in two ways:
• Using the toolbox: You can add controls in Design view of the WebForm (the .aspx
file) by using the toolbox included in Visual Studio .NET. Within the toolbox,
different types of controls are categorized under separate tabs, such as WebForms,
HTML, and Data. For example, you can use the HTML tab to create HTML server
controls, and the WebForms tab to create the ASP.NET server controls. All controls
discussed previously belong to the Windows Forms tab of the toolbox. When you use
the toolbox to add Web controls in Design view, the corresponding C# syntax is
automatically generated.
Tip When you use HTML controls, you need to convert them to server controls to
make them available for coding at the server end. You can do so by right-clicking
the required HTML control and selecting the Run As Server Control option from
the shortcut menu. This method enables you to create complex WebForms
conveniently and quickly.
• Using Visual C# syntax to add the controls programmatically: You can also add
Web controls to a WebForm by using the Visual C# syntax. You can use the C#
syntax only in the HTML view of the page (.aspx file). The actual syntax depends on
the type of control that you want to add. For example, the syntax used to add an
HTML textbox control is as follows:
<input id=Text1 Type=text runat="server">
N
ote Visual Studio .NET enables you to add ASP.NET server controls by using an
Extensible Markup Language (XML) tag. The syntax you use to add an
ASP.NET TextBox control is as follows:
<asp:TextBox id=TextBox1 runat="server"></asp:TextBox>
Every control has an ID property that is used to uniquely identify the control. To set the
property of a control at runtime, you need to use the following syntax:
Control_ID.Property=Value
In the preceding syntax:
• Control_ID represents the ID property of the control.
• Property represents the property of the control.
• Value represents the value assigned to the control's property.
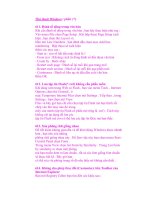
Figure 22-5 displays a WebForm that contains common Web controls, such as labels, text
boxes, hyperlinks, radio buttons, check boxes, and buttons. As you can see, the WebForm is a
user registration form. The form is designed to accept user input in various controls. After
filling out the form, a user can click the Submit button to complete the registration process.
The Submit button opens another WebForm displaying a message along with the user name
entered in the name TextBox control. If the user clicks the Reset button, information filled in
by the user is removed from the controls on the form.
Figure 22-5: The user registration form displays the common controls that can be added to
WebForms.
To create the form displayed in Figure 22-5, follow these steps:
1. Select the WebForm1.aspx form, and press F4 to view the Properties window.
2. In the Properties window, click the Ellipsis button for the bgColor property, and select
Properties. The Color Picker dialog box opens.
3. In the Color Picker dialog box, select a shade of pink and click OK. The color of the
WebForm changes to the color that you specified.
4. Add controls to the form and change their properties, as shown in Table 22-2.
Table 22-2: Controls to Add to the WebForm
Control Properties Placement
Label
Text=Registration Form
Font
Bold=True
Size=Larger
To be placed on the top,
center of the form
Labels for Name, E-Mail,
State, Subscription
The text for each label should be
the same as the caption desired.
One below the other on
the left side of the screen
TextBox ID=txtName Next to the Name label
TextBox ID=txtEmail Next to the E-Mail label
DropDownList
ID=lstState
Items=Arizona,
California, Florida
Next to the State label
CheckBoxList
ID=lstOptions
Items=Books, Magazines
Next to the Subscription
label
Button
ID=BtnSubmit
Text=Reset
Below the Subscription
label
Button
ID=BtnReset
Text=Reset
Next to the Submit button
The interface of your WebForm, shown in Figure 22-6, is ready.
Figure 22-6: Your WebForm should look like this after it is complete.
You add the functionality of the Submit and Reset buttons in the next section. However,
before proceeding, add another form, which displays details about the registered user when he
or she clicks Submit, to the Web application. To add the WebForm, follow these steps:
1. Select Project → Add WebForm. The Add New Item dialog box opens.
Tip If you do not find the Add WebForm menu option under the Project menu, click
anywhere in the Form window and then select the menu option.
2. Select WebForm from the Templates list, specify a name for the WebForm (or retain
the default name), and click Open to create a new WebForm.
You can use the newly added WebForm to display a message to the user. Therefore, you need
to add a Label control to the form. Name the label lblMessage.
Having added controls to the form, you need to respond to the events generated by the
controls on the form to handle user interaction. For example, if a user clicks a Submit button,
the form might need to be processed and the data updated in a database.
The next section describes the procedure to handle events that are generated by controls on a
WebForm.
Handling events
When users interact with different Web controls on a page, events are raised. An event is an
action that can occur on an object or control, which can either be generated by a user action or
by the system. For example, when you click a mouse button or press a key, an event is
generated.
In traditional client forms or client-based Web applications, events are raised and handled on
the client side. In Web applications, events are raised either on the client or on the server.
However, the events generated are always handled on the server. ASP.NET server controls
support only server-side events, whereas HTML server controls support both server-side and
client-side events.
Understanding round-trips
WebForms are processed on the server. For example, consider a user registration form. When
a new user specifies a value for the registration name, the server must ensure that the
registration name supplied by the user is unique. You can ensure that the registration name is
unique by trapping the Click event of a button and querying the user name against a data
source. Whenever a user interaction requires processing on the server, the WebForm is
submitted to the server and processed, and then the output is returned to the client through a
browser. This sequence of processing information on the server is called the round-trip
process, as shown in Figure 22-7.
Figure 22-7: The round-trip process
Most user interactions with the server controls result in round-trips. Because a round-trip
involves sending the WebForm to the server and then displaying the processed form in the
browser, the server control events affect the response time in the WebForm. Therefore, the
number of events available in a WebForm's server controls should be as few as possible.
Usually, these are limited to the Click events.
N
ote Events that occur quite often in scripting languages, such as OnMouseOver, are not
supported by server controls. However, some server controls support events that occur
when the value of the control changes.
Table 22-3 describes the commonly occurring events associated with different ASP.NET
server controls.
Table 22-3: Events Associated with ASP.NET Server Controls
Control(s) Event Description
TextBox TextChanged Occurs when the focus moves out
of the control.
RadioButton and CheckBox CheckedChanged Occurs when you click the
control.
RadioButtonList,
CheckBoxList, ListBox, and
DropDownList
SelectedIndexChanged Occurs when you change the
selection in the list.
Button, LinkButton, and Click Occurs when you click the
Table 22-3: Events Associated with ASP.NET Server Controls
Control(s) Event Description
ImageButton button. This event causes the
form to be submitted to the
server.
In a WebForm, by default, only the Click event of Button, LinkButton, and ImageButton
server controls can cause the form to be submitted to the server for processing. In this
scenario, the WebForm is posted back to the server. When the change events are generated by
other controls, they are captured and cached. They do not cause the form to be submitted
immediately. It is only when the form is posted back due to a button-click that all cached
events are raised and processed. There is no particular sequence for processing these change
events on the server. However, the Click event is processed only after all the other change
events are processed.
Understanding event handlers
When an event is raised, it needs to be handled for further processing. The procedures that are
executed when an event occurs are known as event handlers. Event handlers can be created
automatically or manually.
When you handle events automatically, double-clicking a control in Design view of the
WebForm (.aspx file) creates an event handler. For example, the following code is generated
when a button, btnSubmit, is double-clicked. You can then write the code in the event handler
in the function that's generated by Visual Studio .NET:
Public void btnSubmit_Click(Object sender, System.EventArgs e)
{
}
In the preceding code, the procedure btnSubmit_Click is the event handler for the Click event
of the button. The procedure takes two arguments. The first argument contains the event
sender. An event sender is an object, such as a form or a control, that can generate events. The
second argument contains additional information associated with an event, such as the x and y
coordinates of the position at which a mouse button is clicked.
To create an event handler manually, you select it from the drop-down list in the Properties
window.
You are now ready to implement event handling for the WebForm shown in Figure 22-7
.
When you click the Submit button, a new page (WebForm2.aspx, in our case) should be
displayed, which shows a welcome message along with the name of the registered user. To
implement this functionality, you need to write the following code in the Click event of the
Submit button of the WebForm1.aspx WebForm:
private void BtnSubmit_Click(object sender, System.EventArgs e)
{
Response.Redirect("WebForm2.aspx?strName="+ txtName.Text);
}
Tip To code the event for the Submit button, double-click the button in Design view.
In the preceding code, the Redirect method of the HttpResponse class redirects the user to the
WebForm2.aspx page and passes the value of the txtName parameter to the destination page.
After passing the value of the text box txtName, you need to initialize WebForm2 to handle
the string passed from the registration form. To do so, WebForm2.aspx should have following
code in the Load event:
private void Page_Load(object sender, System.EventArgs e)
{
lblMessage.Text="Hi! " + Request.QueryString.Get("strName");
}
Tip To code the Load event for the WebForm2.aspx form, double-click the form in Design
view.
In the preceding code, the value stored in the strName variable is set as the caption of the
label lblMessage in the WebForm2.aspx file. When the user clicks the Submit button on
WebForm1.aspx, he or she is redirected to the WebForm2.aspx page, as shown in Figure 22-
8.
Figure 22-8: When a user is redirected to another page, the name of the user is passed in the
query string.
When the user clicks the Reset button, an event must be generated that removes all the
controls filled in by the user in WebForm1.aspx. To implement this functionality, you code
the Click event of the Reset button as follows:
private void BtnReset_Click(object sender, System.EventArgs e)
{
txtName.Text="";
txtEmail.Text="";
lstState.ClearSelection();
lstOptions.ClearSelection();
}
In the preceding code, when the Reset button in the registration form is clicked, the form is
reinitialized to its original state.
Handling data postback
As mentioned earlier, a WebForm is posted back to the server only when a Button,
LinkButton, or ImageButton control is clicked. After the form is posted to the server, it is
processed at the server. You can handle data postback corresponding to the click of a button
in one of the following ways:
• Write an event handler for the Click event of the button.
• Write the event handler for the Load event of the WebForm. The Load event is
generated when the form is loaded. You can use the IsPostBack property in the Load
event to determine whether the page has been processed for the first time or by a
button click. The following code depicts the event handler for a WebForm's Load
event:
• protected void Page_Load(object sender, EventArgs e)
• {
• if (!IsPostBack)
• {
• //Evals true first time browser hits the page
• }
}
Using the view state
In traditional Web applications, whenever a Web page is processed at the server, the page is
created from scratch. The server discards the current page information after it processes the
information and sends the page to the client (browser). Because the page information is not
preserved on the server, the Web pages are called stateless. However, the ASP.NET
framework works around this limitation and can save the state information of the form and its
controls. To manage state information, Visual Studio .NET provides the following options:
• Save View state: You can save the view state of server controls to an object. In each
round-trip, the state of the server control can be loaded from the saved state, so that
the user can view all options that he or she selected previously.
• StateBag: The StateBag class is the storage mechanism for server controls. This class
provides properties to store information in key-value pairs. For example, if you want
to store data specified by a user for a page, you can use an instance of the StateBag
class to store this data.
Each server control includes an EnableViewState property. When you set this property to true,
the state of the control is retained between round trips on the server. Thus, if the user has
selected one or more options from a list, the options will be retained through round trips to the
server.
Summary
In this chapter, you learned to create a simple Web application by using Visual C# in the
ASP.NET framework. You learned the basics of ASP.NET and how you can create Web
applications in Visual C#.
ASP.NET includes a separate runtime environment that manages the execution of ASP.NET
applications. It also includes new server components, referred to as WebForms, which
encapsulate the functionality of a Web page. You can add one or more server controls to a
WebForm. Server controls are responsible for displaying data to users and processing user
interactions.
You created a Web application project and added a WebForm to it. When creating an
application, you used the ASP.NET Web application template to create a solution and add an
ASP.NET project to the solution. Next, you designed a Web page by using common Web
controls, such as the controls that represent labels, text boxes, list boxes, hyperlinks, buttons,
and so on. Finally, you learned to handle events that are generated by controls on the
WebForm.
Chapter 23: Database Programming with
ADO.NET
In This Chapter
ADO.NET is the newest data access technology and is part of the .NET Framework.
ADO.NET builds and improves upon previous data access technologies. Microsoft's foray
into universal data access started with open database connectivity (ODBC). The idea behind
this ODBC technology - to create a standard way to access databases programmatically - has
been used in all subsequent data access technologies coming from Redmond, Washington
(where Microsoft's headquarters are located). In the case of ODBC, this standard method is
documented as the ODBC API (Application Programmer's Interface). Any database vendor
wanting to claim compliance with the ODBC standard is responsible for building the software
that translates an ODBC call (made in accordance with the API) into a native database call.
Such software is called an ODBC driver and is the bridge between a generic client application
and a specific database. Through this approach, the application programmers are shielded
from having to learn how to use a specific vendor's database API. All an application
programmer needs to know is how to write client applications using the ODBC API. This
improves productivity, and enables you to write a program that can be used with different
databases.
However, the ODBC API was originally designed primarily with C application programmers
in mind, and was difficult to use in other languages (such as Visual Basic). This eventually
led to the introduction of Active Data Objects (ADO), a data access technology designed for
use with any language that supports Microsoft's Common Object Model (COM). ADO
introduced a simple object model that made accessing data in MS Windows programs a
straightforward task. In addition, ADO introduced the concept of disconnected recordsets as a
way to transport data between the tiers of a distributed application. The low-level API behind
ADO is called OLE DB. This API is designed for C++ programmers and is what database
vendors typically use to write OLE DB providers (the preferred term for OLE DB drivers, the
software that translates ADO calls into native database calls). Microsoft has also written an
OLE DB provider for OBDC. This provider enables you to issue ADO calls against any
ODBC-compliant database.
As this chapter shows you, ADO.NET keeps an object model that is similar to ADO and
improves on the concept of disconnected recordsets by providing a way to bundle more
information into an ADO.NET object called a dataset. In fact, ADO.NET was designed with
the disconnected data in mind, because this stateless approach works best for distributed
Internet applications. In this chapter, you learn how to use ADO.NET to manipulate data. If
you are familiar with ADO, many of the concepts will look familiar, and even the code will
not be completely unfamiliar.
Understanding the Dataset Classes and Their Relatives
This section examines the ADO.NET classes. If you are familiar with ADO, you will
recognize many of the concepts presented here. Be aware, however, that some ADO concepts
have come a long way in ADO.NET and are considerably expanded from their original forms.
Let's start with the new kid on the block: the DataSet class and its relatives.
DataSet expands on the recordset concept found in ADO. As given away by its name, ADO's
recordset is an abstraction of a set of records, such as the resulting data retrieved by issuing a
SQL Select statement. A recordset can actually contain more than one set of records, but the
records are independent of one another and must be processed sequentially by calling
NextRecordSet(). ADO.NET's DataSet is an abstraction of an entire database. Not only can a
DataSet contain more than one set of records (appropriately called a DataTable), you can
define relationships between DataTables. Table 23-1 describes all the DataSet-related classes.
Like the ADO classes, the ADO.NET classes make extensive use of collections: the DataSet
class contains a collection of DataTables; the DataTable class contains a collection of
DataColumns, and so on.
Table 23-1: DataSet and Related Classes
Class Description
DataSet An in-memory cache of data, which may consist of several related
DataTables. Designed for disconnected use in distributed
applications.
DataTable A container of data, which may consist of several DataColumns.
Each row of data is contained in a DataRow.
DataRow A specific row of data in a DataTable
DataColumn The definition of a column (name, data type, etc.) in a DataTable
DataRelation A relationship between two DataTables within a DataSet,
typically used to represent foreign-key relationships
Constraint A restriction on one or more DataColumns, used to represent
constraints such as uniqueness
DataColumnMapping Maps the column names from the table in a database to the
column names of the DataTable in the DataSet
DataTableMapping Maps the table names in a database to the names of the
DataTables in the DataSet
DataView A customized view of a DataTable that can be used for sorting,
filtering, and searching
ADO's RecordSet gradually evolved as the standard way to marshal data between tiers of a
distributed application. DataSet takes over this role in ADO.NET and provides a number of
methods to reconcile the in-memory cache of the data with its source data in the database.
These methods include AcceptChanges(), GetChanges(), HasChanges(), HasErrors(), and
RejectChanges(). These methods enable you to retrieve any changes in the form of a changed
DataSet, inspect the changes for errors, and decide whether to accept or reject the changes. At
the end of this process, you can update the source data in the database with a simple call to the
Update() method.
Understanding OLE DB and SQL Server Support
ADO.NET contains two sets of similar classes. One set is a generic set of classes that can be
used to access all databases that have OLE DB providers. A second set of classes has been
fine-tuned for Microsoft's flagship database, SQL Server. The names of the generic classes all
start with OleDb. The SQL Server-specific classes all begin with Sql. Each generic class has a
corresponding SQL Server-specific class. For example, the class you use to execute SQL
statements against SQL Server is called SqlCommand. The generic class is called
OleDbCommand.
N
ote If you look at any code that was designed with the first public beta of the .NET
Framework, you see code with the Ado prefix. This prefix was changed to OleDb
starting with beta 2.
This chapter uses the generic classes, even when accessing a SQL Server database. When
writing your own applications accessing SQL Server, you need to decide whether to use the
speedier SQL Server specific classes or the more generic classes that enable you to switch
database vendors simply by changing the connection string. The trade-off is speed versus
portability. The SQL Server classes directly call the native database layer. The generic classes
use OleDb and go through a COM layer before calling the native database layer. The
overhead of an extra layer results in a decrease in performance.
The DataSet classes are used in conjunction with both the OLE DB provider and the SQL
Server provider. Table 23-2
lists the provider-specific classes. Many of these look familiar to
a trained ADO eye.
Table 23-2: DataSet and Related Classes
SQL Server Provider
Class
OLE DB Provider
Class
Description
SqlCommand OleDbCommand A class wrapper for a SQL statement. The
class can manage both direct SQL
statements such as a SELECT, UPDATE,
DELETE, or INSERT state-ment and a
stored procedure call.
SqlCommandBuilder OleDbCommandBuilder Used to generate SQL SELECT, UPDATE,
DELETE, or INSERT statements
SqlDataConnection OleDbConnection A connection to a database
SqlDataAdapter OleDbDataAdapter A set of SELECT, UPDATE, DELETE, or
INSERT statements and a connection to a