Handbook Of Shaft Alignment Episode 1 Part 5 pps
Bạn đang xem bản rút gọn của tài liệu. Xem và tải ngay bản đầy đủ của tài liệu tại đây (1.17 MB, 30 trang )
It is important for the personnel who maintain rotating machinery to have a basic under-
standing of how machinery should be supported and what problems to look for in
their foundations, baseplates, and frames to insure long-term alignment stability in their
machinery.
In addition to the machinery to ground or structure interface, attention must also be
directed to any physical attachments to the machinery such as piping, conduit, or ductwork.
It is desirable to insure that these attachments produce the minimum amount of force on the
machinery to also insure good stability. This chapter will hopefully provide the reader with
the basic foundation design principles and some techniques to check equipment in the field to
determine if problems exist with the foundation and frame, or the interface between the
machinery and the foundation, or piping and conduit attached to the machine itself.
3.1 VARYING COMPOSITION OF EARTH’S SURFACE LAYER
The best place to start this discussion is at the bottom of things. All of us realize that there is a
major difference in stability as we walk along a sandy beach and then step onto a large rock
outcropping. Different soil conditions produce different amounts of firmness. Since rotating
machinery could potentially be placed anywhere on the planet, the soil conditions at that
location need to be examined to determine the stability of the ground. For new installations
or where foundations have shifted radically, it may be a good idea to have boring tests
conducted on soils where rotating machinery foundations will be installed. Table 3.1 shows
safe bearing load ranges of typical soils. The recommended maximum soil load from a
combination of both static and dynamic forces from the foundation and attached machinery
should not exceed 75% of the allowable soil bearing capacity as shown in Table 3.1.
3.2 HOW DO WE HOLD THIS EQUIPMENT IN PLACE?
I suppose someone has attempted to sit a motor and a pump on the ground, connected by the
shafts together with a coupling, and started the drive system up without bolting anything
down. My guess is that they quickly discovered that the machines started moving around a
little bit after start up, then began moving around a lot, and finally disengaged from each other
hopefully without sustaining any damage to either of the machines. Maybe they tried it again
and quite likely had the same results. I am sure they finally came to the conclusion that this
TABLE 3.1
Soil Composition
Bearing Capacities of Soils:
Safe Bearing Capacity
Type of Soil t/ft
2
MPa
Hard rock (e.g., granite, trap, etc.) 25–100 2.4–9.56
Shale and other medium rock (blasting for removal) 10–15 0.96–1.43
Hardpan, cemented sand and gravel, soft rock (difficult to chisel or pick) 5–10 0.48–0.96
Compact sand and gravel, hard clay (chiseling required for removal) 4–5 0.38–0.58
Loose medium and coarse sand medium clay (removal by shovel) 2–4 0.20–0.38
Fine loose sand 1–2 0.10–0.20
Piotrowski / Shaft Alignment Handbook, Third Edition DK4322_C003 Final Proof page 90 29.9.2006 5:53pm
90 Shaft Alignment Handbook, Third Edition
was not going to work for long periods of time and decided to ‘‘hold the machines’’ in their
starting position somehow. How are we going to do this exactly? What should we attach them
to? How about some wood? No, better yet, something like metal or rock, something that is
strong.
Our rotating equipment needs to be attached to something that will hopefully hold it in a
stable position for long periods of time. I have seen just about every possible configuration
you can imagine. Even the scenario mentioned above. The most successful installations
require that the machinery be attached to a stable platform that enables us to detach one
or more of the machines from its platform in the event that we want to work on it at another
location. Classically we attach and detach our equipment with threaded joints (i.e., bolts and
nuts). You could, I suppose, glue or weld the machines to their platform, and it would just be
a little more difficult to detach them later on.
The devices that we have successfully attached our machinery to are baseplates, soleplates,
or frames. There are advantages and disadvantages to each choice. The baseplates, sole-
plates, or frames are then attached to a larger structure, like a building, ship, aircraft and
automotive chassis, or Earth. There are many inventive ways of attaching rotating machinery
to transportation mechanisms (e.g., boats, motorcycles, airplanes), and design engineers are
still coming up with better solutions for these types of machinery-to-structure interface
systems. Our discussion here will concentrate on industrial machinery.
The vast majority of rotating machinery is either held in position by a rigid foundation
(monolithic), attached to a concrete floor, installed on an inertia block, or held in position on
a frame. There are advantages and disadvantages to each design. There are also good ways
and poor ways to design and install each of these methods to keep our machinery aligned and
prevent them from bouncing all over the place when they are running. In summary, machines
are attached to intermediary supports (i.e., baseplates, soleplates, and frames) that are then
attached to structures (i.e., buildings, floors, foundations). Figure 3.1 shows a typical rigid
FIGURE 3.1 Rigid foundation for induced draft fan.
Piotrowski / Shaft Alignment Handbook, Third Edition DK4322_C003 Final Proof page 91 29.9.2006 5:53pm
Foundations, Baseplates, Installation, and Piping Strain 91
foundation design, Figure 3.2 shows a typica inertial block (aka floating) design, and
Figure 3.3 shows a typical frame design.
3.2.1 BASEPLATES
Baseplates are typically either cast or fabricated as shown in Figure 3.4 and Figure 3.5.
A fabricated baseplate is made using structural steel such as I-beams, channel iron, angle,
structural tubing, or plate, cutting it into sections, and then welding the sections together. It is
not uncommon to replace structural steel with solid plate to increase the stiffness of the base
similar to Figure 3.6.
3.2.1.1 Advantages
1. Most commonly used design for industrial rotating machinery
2. Provides excellent attachment to concrete foundations and inertia blocks assuming the
anchor bolts were installed properly and that the grout provides good bonding
3. Can be flipped upside down and grout poured into the cavity before final installation
FIGURE 3.2 Spring isolated inertia block with motor and pump.
FIGURE 3.3 Frame supporting a belt drive fan.
Piotrowski / Shaft Alignment Handbook, Third Edition DK4322_C003 Final Proof page 92 29.9.2006 5:53pm
92 Shaft Alignment Handbook, Third Edition
FIGURE 3.4 Cast baseplate.
FIGURE 3.5 Fabricated baseplate.
FIGURE 3.6 Weak structural steel was replaced with solid plate on this baseplate.
Piotrowski / Shaft Alignment Handbook, Third Edition DK4322_C003 Final Proof page 93 29.9.2006 5:53pm
Foundations, Baseplates, Installation, and Piping Strain 93
4. Machinery can be placed onto the baseplate prior to installation and roughly aligned in
the lateral and axial directions to insure that the foot bolt locations are drilled and
tapped accurately to hopefully prevent a bolt bound condition or incorrect shaft end to
shaft end spacing
5. Equipment mounting surfaces can be machined flat, parallel, and coplanar prior to
installation
6. Some designs include permanent or removable jackscrews for positioning the machinery
in the lateral and axial directions
3.2.1.2 Disadvantages
1. Usually more expensive than using soleplates or frames
2. Equipment mounting surfaces are frequently found not to be flat, parallel, and coplanar
prior to installation
3. Difficult to pour grout so it bonds to at least 80% of the underside of the baseplate
4. Possibility of thermally distorting baseplate using epoxy grouts if pour is thicker
than 4 in.
5. Frequently installed with no grout
3.2.2 SOLEPLATES
Soleplates are effective machinery-mounting surfaces that are not physically connected
together. Figure 3.7 shows a soleplate being prepared for grouting on a medium-sized fan
housing. They are typically fabricated from carbon steel and there are usually two or more
soleplates required per concrete foundation or inertia block. Correct installation is more
FIGURE 3.7 Soleplate being prepared for grouting.
Piotrowski / Shaft Alignment Handbook, Third Edition DK4322_C003 Final Proof page 94 29.9.2006 5:53pm
94 Shaft Alignment Handbook, Third Edition
tedious than baseplates due to the care required to insure that the individual soleplates are in
level and in the same plane. On larger machinery where the soleplates can be six or more feet
apart, using machinist levels is not going to work effectively and either optical or laser
alignment tooling is recommended to get the plates level and in the same plane. Ideally the
soleplates should be level to 1 mils=ft (1 mils ¼ 0.001 in.), and there should not be a deviation
of more than 5 mils at any point on all soleplates from being coplanar. Figure 3.8 shows an
optical jig transit used to level and plane the soleplates shown in Figure 3.7.
3.2.2.1 Advantages
1. Works best for large machinery where a contiguous baseplate would be too heavy or
cumbersome
2. Somewhat easier to properly grout to concrete foundation or inertia block
3.2.2.2 Disadvantages
1. More difficult to insure that surfaces of soleplates are flat, coplanar, and parallel
3.2.3 FRAMES
Frames are typically constructed from structural steel such as channel iron, I-beams, angle
iron, or structural tubing and are often custom made for each application. The frames are
then attached to a larger structure such as a building frame, floor, or concrete foundation.
They are classically not as rigid as equipment mounted to baseplates or soleplates and
frequently will exhibit higher level of vibration amplitude. However, it is common to provide
vibration isolation from the structure or floor with springs or damping isolators (e.g., rubber
FIGURE 3.8 Optical jig transit being used to level a soleplate.
Piotrowski / Shaft Alignment Handbook, Third Edition DK4322_C003 Final Proof page 95 29.9.2006 5:53pm
Foundations, Baseplates, Installation, and Piping Strain 95
mounting isolators). Due to the fact that most frames are welded construction, the surfaces
that the machinery attaches to are often not coplanar or parallel to each other. Figure 3.9
through Figure 3.11 show a variety of rotating machinery mounted on frames.
3.2.3.1 Advantages
1. Most practical design for machinery that cannot be attached to Earth or building
structures
2. Used in situations where excessive floor loads are exceeded with concrete construction
3. Easier to fabricate and install than rigid foundations or inertia blocks
3.2.3.2 Disadvantages
1. Due to the low frame-to-machinery weight ratio, vibration levels are typically higher
than equipment located on rigid foundations or inertia blocks
2. Subject to more rapid deterioration from environment
3. Difficult to insure flatness of machinery-mounting surfaces during construction
4. Excitation of structural natural frequency more prevalent with this design
FIGURE 3.9 Motors and pumps sitting on structural steel frames. The unistrut used for the motors is
not recommended.
FIGURE 3.10 Main lube oil pump coupled to outboard end of motor sitting on a fabricated frame
bolted to the motor’s end bell.
Piotrowski / Shaft Alignment Handbook, Third Edition DK4322_C003 Final Proof page 96 29.9.2006 5:53pm
96 Shaft Alignment Handbook, Third Edition
3.2.4 MONOLITHIC RIGID FOUNDATIONS
Rigid foundations are typically found at the ground level. The basic design of a rigid
foundation is shown in Figure 3.12. Their sole purpose is to provide an extremely stable
platform for the rotating machinery with no intention of supporting any other object but the
machinery that is placed on it except perhaps piping, ductwork, or conduit that attaches to
the machines in the drive system. Effectively, the rigid foundation consists of a poured
reinforced concrete block with anchor bolts that have been imbedded in the concrete.
FIGURE 3.11 Series of water bearings held in place on a dredge frame.
Reinforcement rods
Concrete foundation
Grout
Baseplate or
soleplate
Pipe (allows for slight
anchor bolt adjustment)
Nut (see alternative ways for leveling)
Frost line
75% of total
pedestal
height
Anchor bolt
imbedded in
concrete
Concrete
Isolation matting
(if desired)
Protective sleeve
FIGURE 3.12 (See color insert following page 322.) Section view of a typical rigid foundation.
Piotrowski / Shaft Alignment Handbook, Third Edition DK4322_C003 Final Proof page 97 29.9.2006 5:53pm
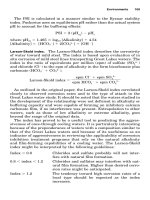
Foundations, Baseplates, Installation, and Piping Strain 97
Reinforcement rods should be spaced no more than 12 in. apart, using a minimum rod size of
1=2 in. (12.7 mm). The concrete should be rated at a compressive strength of 4000 psi for 28 d.
Once the concrete has set to at least 50% cure (typically 7 d for most concrete) the baseplate or
soleplates are set into a level and coplanar condition slightly above the top of the concrete
(usually 1–2 in.). The baseplate is then grouted to the concrete foundation as illustrated
in Figure 3.12.
Here are some basic design ‘‘rules of thumb’’ for concrete foundations:
1. Whenever possible, mount every machine in the drive system on the same foundation.
2. The mass of the foundation should be three to five times the mass of centrifugal
machinery it supports and five to eight times the mass of reciprocating machinery
it supports.
3. The width of the foundation should be 1.5 times the distance from ground level to the
centerline of rotation.
4. Use baseplates or soleplates to attach the machinery to the concrete foundation.
3.2.4.1 Advantages
1. Provides a stable platform to attach rotating machinery using the surrounding soil to
absorb motion or vibration
2. Ability to design foundation mass to effectively absorb any vibration from attached
machinery and isolate residual motion by segregating the foundation block with vibra-
tion absorptive material preventing transmission of vibration to surrounding area
3.2.4.2 Disadvantages
1. If located outdoors, eventually degradation of foundation imminent especially if located
in geographical area where climatic conditions change radically throughout the year
2. For machinery with attached, unsupported piping or ductwork, extreme forces from
improper fits can occur causing damage to machinery
3. Potential settling of foundation causing instability and potential transmission of forces
from attached piping
3.2.4.3 Tips for Designing Good Foundations
1. Insure that the natural frequency of the foundation–structure–soil system does not
match any running machinery frequencies or harmonics (such as 0.43Â,1Â,2Â,3Â,
4Â, etc.) with the highest priority being placed on staying þ20% away from the
operating speed of the machinery sitting on the foundation being considered. Also
watch for potential problems where running speeds of any machinery nearby
the proposed foundation might match the natural frequency of the system being
installed.
2. In case the calculated natural frequency of the structure does not match the actual
structure when built, design in some provisions for ‘‘tuning’’ the structure after erection
has been completed such as extension of the mat, boots around vertical support
columns, attachments to adjacent foundations, etc.
3. Minimize the height of the centerline of rotation from the baseplate.
4. Rotating equipment that will experience large amounts of thermal or dynamic move-
ment from off-line to running conditions should be spaced far enough apart to insure
that the maximum allowable misalignment tolerance is not exceeded when the shafts
Piotrowski / Shaft Alignment Handbook, Third Edition DK4322_C003 Final Proof page 98 29.9.2006 5:53pm
98 Shaft Alignment Handbook, Third Edition
are located in the off-line position. Refer to Chapter 16 for more details on off-line to
running machinery movement.
5. Design the foundation and structure to provide proper clearances for piping and
maintenance work to be done on the machinery, and provisions for alignment of the
machine elements.
6. Install removable jackscrew devices on the baseplate for moving (i.e., aligning) equip-
ment in all three directions: vertically, laterally, and axially. If jackscrews will not be
used, provide sufficient clearance between baseplate and rotating equipment for inser-
tion of hydraulic jacks for lifting equipment during shim installation or removal.
7. Provide vibration joints or air gaps between the machinery foundation and the sur-
rounding building structure to prevent transmission of vibration.
8. If possible, provide centrally located, fixed anchor points at both the inboard and
outboard ends on each baseplate in a drive train to allow for lateral thermal plate
expansion. Insure there is sufficient clearance on the casing foot bolt holes to allow for
this expansion to occur without binding against the foot bolts themselves.
3.2.4.4 Tips for Installing Foundations and Rotating Machinery
1. Select a contractor having experience in installing rotating machinery baseplates and
foundations or provide any necessary information to the contractor on compaction of
base soils, amount and design of steel reinforcement, preparing concrete joints during
construction, grouting methods, etc.
2. If the concrete for the entire foundation is not poured all at once, be sure to chip away
the top 1=4 in. to 1=2 in. of concrete, remove debris, keep wet for several hours (or days if
possible), allow surface to dry and immediately apply cement paste before continuing
with an application of mortar (1–6 in.) and then the remainder of the concrete. If not
done, the existing concrete may extract the water from the freshly poured concrete too
quickly and proper hydration (curing) of the new concrete will not occur.
3. Use concrete vibrators to eliminate air pockets from forming during the pouring process
but do not over vibrate, causing the larger concrete particles to settle toward the bottom
of the pour.
4. Check for baseplate distortion prior to installing the baseplate. Optical alignment
or laser tooling equipment can be used to measure this. Mounting pads should be
machined flat and not exceed 2 mils difference across each individual pad (i.e., machin-
ery foot contact point). If there is more than one pad that each individual machine will
come into contact with, insure that those pads are coplanar within 5 mils. Insure that the
contact points for each machine are parallel to the contact points for every other
machine on that baseplate within 10 mils=ft. If the baseplate is slightly distorted it may
be possible to stress relieve by oven baking or vibratory shakers. If the distortion is
excessive, the contact surfaces may have to be machined flat, coplanar, and parallel.
5. Sandblast the underside of the baseplate. If sandblasting is unreasonable, grind at least
90% of the surface to bare metal. If cement-based grout is going to be used, coat with
inorganic zinc silicate primer as per coating manufacturers specifications to prevent
corrosion and provide good bonding to cement-based grout. The primer should not
exceed 5 mils in coating thickness. If epoxy-based grout is going to be used, do not coat
with primer and grout within 48 h of sandblasting to insure that excessive oxidation does
not occur to the sandblasted surface.
6. Insure that the baseplate has leveling jackscrews at each of the anchor bolt locations.
Try not to use wedges to level the baseplate. If jackscrews were not provided, weld 3=4 in.
or 1 in. fine threaded nuts to the outside perimeter of the baseplate near the anchor bolts
Piotrowski / Shaft Alignment Handbook, Third Edition DK4322_C003 Final Proof page 99 29.9.2006 5:53pm
Foundations, Baseplates, Installation, and Piping Strain 99
to use with jackscrews for precise leveling. Optical or laser alignment equipment should
be used to check levelness particularly for medium and large machinery drive systems. A
machinist level could be used on smaller baseplates but additional precautions need to
be taken to insure that all of the mounting points for each machine are coplanar (i.e., it
is possible to have two level surfaces not in the same plane).
7. For large baseplates with two or more bulkheads, grout one bulkhead section at a time.
Apply grout through a 4–6 in. diameter hole centrally located in each section. Provide at
least 1 in. diameter vent holes near the corners of each section. Allow a minimum of 48 h
cure time before setting rotating equipment onto base.
8. Protect the foundation from any radiant heat generated from machinery, steam, or hot
process piping by insulation or heat shields where possible.
3.2.5 BASEPLATES ATTACHED TO CONCRETE FLOORS
Similar in design to the monolithic rigid foundation, foundations attached to concrete floors
require a slightly different approach in their design and installation. To a certain extent,
the concrete floor now acts as the ‘‘foundation.’’ There are three different approaches to
attaching machinery to concrete floors:
1. A baseplate that is grouted by traditional methods to a concrete floor or a raised
concrete pad as shown in Figure 3.13.
2. A baseplate that is pregrouted prior to installation and is then bonded to a concrete
floor or a raised concrete pad as shown in Figure 3.14.
3. A solid metal baseplate is bonded to a concrete floor or a raised concrete pad that is also
bonded to the concrete floor as shown in Figure 3.15.
If the machinery is going to be mounted to a floor at ground level, holes (usually 4–6 in. in
diameter) should be cored through the concrete floor for the anchor bolts. The top surface of
the floor should then be chipped away (i.e., scarified), a form built, reinforcement rods set in
place, anchor bolts positioned, and a raised concrete block poured.
Reinforced concrete floor
Reinforced concrete slab
Concrete
bonding
glue
Anchor bolt
Protective
sleeve
Fabricated structural steel baseplate
Leveling screw
Cementious grout Epoxy groutor
Air vent
hole
Grout
pour
hole
Air vent
hole
FIGURE 3.13 A baseplate that is grouted to a concrete floor or pad using traditional grouting methods.
Piotrowski / Shaft Alignment Handbook, Third Edition DK4322_C003 Final Proof page 100 29.9.2006 5:53pm
100 Shaft Alignment Handbook, Third Edition
3.2.5.1 Advantages
1. Provides a stable platform to attach rotating machinery using a large concrete
floor mass
2. Installation costs slightly less than cutting out a section of the floor, digging a hole,
building a frame, pouring concrete for a monolithic foundation
3.2.5.2 Disadvantages
1. If located outdoors, eventually degradation of foundation imminent especially if
located in geographical area where climatic conditions change radically throughout
the year
Concrete
bonding
glue
Anchor bolt
Protective
sleeve
Fabricated structural steel baseplate
Leveling screw
Air vent
hole
Grout
pour
hole
Air vent
hole
Epoxy grout
Pregrouted with either
cementious grout or epoxy grout
Reinforced concrete floor
Reinforced concrete slab
FIGURE 3.14 A pregrouted baseplate bonded to a concrete floor or pad.
Reinforced concrete floor
Reinforced concrete slab
Concrete
bonding
glue
Anchor bolt
Fabricated baseplate
Solid steel plate
Protective
sleeve
Epoxy grout
FIGURE 3.15 Solid metal baseplate bonded to a concrete floor or pad.
Piotrowski / Shaft Alignment Handbook, Third Edition DK4322_C003 Final Proof page 101 29.9.2006 5:53pm
Foundations, Baseplates, Installation, and Piping Strain 101
2. Possibility of anchor bolts pulling out, loosening, or breaking if proper precautions are
not taken during the installation of the anchor bolts
3. Possibility of baseplate (or soleplates) and the concrete slab loosening and degrading
rapidly if care is not taken to properly bond the baseplate to the concrete slab to the
concrete floor
4. For machinery with attached, unsupported piping or ductwork, extreme forces from
improper fits can occur causing damage to the machinery
5. Limited ability to isolate any vibration in the machinery from the surrounding environment
6. Possibility of absorbing vibration from other machinery in the immediate vicinity
3.2.6 ANCHOR BOLTS
Figure 3.16 shows various anchor bolt designs. Anchor bolts are imbedded in the concrete
and serve as the device that secures the baseplate or soleplates to the concrete mass. The best
designs incorporate a sleeve that allows the bolt to stretch properly when tightened and also
allows for some minor positional changes if the anchor bolts do not index to the holes in the
baseplate or soleplate as shown in the bottom two diagrams in Figure 3.16. The anchor bolts
should be at least four anchor bolt diameters from the outside edge of the concrete, should be
of sufficient size and strength (ASTM A36 or ASTM A575-M1020), the anchor bolt should
be able to resist chemical attack or oxidation, the washer should conform to ANSI B18.22.1,
lock washer should not be used, and nuts should be heavy hex, full size, and conform to
ANSI B18.2.2.
Concrete
Pipe sleeve enables
proper stretch on
bolts and allows for
slight adjustments to
anchor bolt
FIGURE 3.16 Various anchor bolt designs. (Courtesy of Unisorb, Jackson, Michigan. With permission.)
Piotrowski / Shaft Alignment Handbook, Third Edition DK4322_C003 Final Proof page 102 29.9.2006 5:53pm
102 Shaft Alignment Handbook, Third Edition
If the machinery is going to be mounted on a floor above ground level where there is access
from underneath the floor surface, holes should be drilled completely through the floor for
the anchor bolts. Whether the machinery is going to be set onto a monolithic foundation at
ground level, or onto a floor, properly positioning the anchor bolts is of extreme importance.
To insure that the anchor bolts maintain their desired position, it is a good idea to set the
baseplate onto a wooden template, mark where the anchor bolts will be, drill holes into
the template, and then place the template on top of the wooden form to assist in correctly
positioning and holding the anchor bolts in position when the concrete is poured.
3.2.7 INERTIA BLOCKS
Also known as concrete ‘‘slabs,’’ machinery ‘‘pallets,’’ or equipment ‘‘skids,’’ these founda-
tions are typically constructed from structural steel, such as channel iron, I-beams, angle iron,
or structural tubing, and concrete is poured into the interior of the structural skeleton
(Figure 3.17). They can be rigidly attached to the building structure or floor or more
commonly, be isolated from the structure or floor with springs or damping isolators (e.g.,
rubber mounting isolators). The inertia block could hold a single drive system or several drive
systems. The usual purpose of this design is to isolate any vibration emanating from the
machinery to the floor or building where it is attached.
3.2.7.1 Advantages
1. If concrete slab and baseplate act as a single unit with sufficient stiffness, this design
provides a stable platform to attach rotating machinery, allowing the whole assembly to
move in the event outside forces such as piping strain are bearing on unit
2. Ability to somewhat isolate any vibration from attached machinery to surrounding
structure or other machinery in nearby area
3.2.7.2 Disadvantages
1. Slightly more difficult to construct, install, and maintain than rigid foundations
2. If excessive amount of vibration exists on machinery for prolonged periods of time,
potential damage may occur to the machinery or attached piping
FIGURE 3.17 Inertia block for motor—fan drive. (Courtesy of Unisorb, Jackson, Michigan. With
permission.)
Piotrowski / Shaft Alignment Handbook, Third Edition DK4322_C003 Final Proof page 103 29.9.2006 5:53pm
Foundations, Baseplates, Installation, and Piping Strain 103
3. Potential degradation of support springs or isolators
4. Frequently more difficult to align machinery and keep aligned for long periods
3.2.8 CEMENT,CONCRETE, AND GROUT BASICS
Since rigid foundations and inertia block design incorporate concrete or other types of
pourable liquid to solid media, it is important to have a rudimentary understanding of
these basic building materials. Concrete is typically a mixture of inert materials and cement.
Grout can be cement based or epoxy based. Cement-based grout is typically a mixture of sand
and cement. Epoxy-based grout can be pure epoxy consisting of a resin and a hardener
(curing agent) or it can be mixed with inert material such as sand, steel shot (small round steel
balls), fly ash, etc.
The inert materials in concrete are typically stone and sand but a wide variety of other
materials can be used. The word ‘‘cement’’ is from the Latin verb ‘‘to cut’’ and originally
referred to stone cuttings used in lime mortar. Lime consists of CaO (60%–67%), silica (SiO
2
,
17%–25%), alumina (Al
2
O
2
, 3%–8%), and small amounts of iron oxide, magnesia, alkali
oxides, and sulfuric anhydride. Cements may be naturally occurring (lime) or manufactured
by crushing anhydrous calcium silicate–bearing rock into powder and then heated to around
15008F. Manufactured cement is often called portland cement. There are six basic types of
cement set forth in ASTM specification C150-61, shown in Table 3.2.
The cement, typically limestone, clay, or shale, acts as a glue to bond the inert materials
together by mixing water with the cement and the aggregates. When the water migrates
through the mixture and eventually evaporates, the cement and aggregates chemically bond
together by hydration and hydrolysis to form a continuous block. The ratio of water and
cement is critical to proper curing insuring that adequate strength is attained. Too much
water will cause the paste to be too thin and will be weak when hardened. An U.S. engineer,
Duff Abrams, developed the water cement ratio law in the 1920s and it is still widely used
today. The proportion of a typical concrete mixture is shown in Table 3.3.
Compressive strengths of concrete can range from 1000 to 10,000 psi with a density of
around 150 lb=ft
3
. A compressive strength for concrete typically used in foundations for
machinery is between 3000 and 5000 psi.
A ‘‘slump test’’ is used to determine the consistency of concrete. A standard slump cone is
filled with concrete, smoothed off at the top of the cone, and then the cone is lifted vertically
clearing the top of the concrete pour allowing the concrete in the cone to slump downward.
The measured distance in inches from the original to the final level of the concrete mass is
then observed. Concrete slump values for concrete used in machinery foundations should
range from 3 to 5 in.
TABLE 3.2
Types of Cements
Type Name Description
1 Normal General purpose
2 Modified Low heat of hydration (curing) desired
3 High early strength High strength required at an early age
4 Low heat of hydration Typically used in dams to reduce cracking and shrinkage
5 Sulfate resistant Used when exposed to soils with a high alkali content
6 Air entrained Used when severe frost action present
Piotrowski / Shaft Alignment Handbook, Third Edition DK4322_C003 Final Proof page 104 29.9.2006 5:53pm
104 Shaft Alignment Handbook, Third Edition
Proper curing of the concrete requires that the water remain in the mixture for an
acceptable period of time to insure that the chemical reaction of the cement is completed.
Spraying small amounts of water on the concrete mass, laying wet burlap or plastics sheeting
over top of the mass will insure that the rate of water loss is minimal. Pouring concrete in
extremely hot temperatures (908F–1208F) may cause the water to evaporate too quickly.
Pouring concrete in extremely cold temperatures (below 328F) will cause the water to expand
when frozen and produce a very porous mixture with diminished compressive strength.
Temperatures down to 258F may be acceptable since curing of the concrete mixture is slightly
exothermic but the mass should be insulated to entrain any heat during cure. The complex
chemical reaction that occurs in the concrete takes place over several months of time.
Concrete compressive strengths typically attain 70%–80% of their final value 6–8 d after the
initial pour.
3.2.9 REINFORCED CONCRETE
Concrete is ten times stronger in compression than in tension and must therefore be re-
inforced by imbedding steel reinforcement rods in the concrete mixture during the pour to
prevent cracking when subjected to tensile loads. The amount of reinforcement in a founda-
tion varies and should be taken into careful consideration during the design phase. Pre-
stressed concrete is made by placing the reinforcement rods or cables in tension prior to
pouring the concrete mixture. The amount of reinforcement rods in concrete foundations
should be approximately 18% of the cross-sectional area of the concrete. Reinforcement rod
sizes have been standardized and are approximately the diameter of the bar in 1=8 in.
increments (i.e., a #4 bar is 1=2 in. in diameter). The maximum recommended rod spacing
should not exceed 12 in. and there should be at least 2–3 in. of concrete covering the outer
reinforcement rods to prevent corrosion of the rods.
3.2.10 GROUTING
Grouting is typically used as the final binding medium between the machinery baseplate or
soleplates and the concrete foundation. There are two basic classes of grout, cement based
and epoxy based, as shown in Figure 3.18 and Figure 3.19. Proper mixing of the grout is
essential to obtain the necessary strength. Be sure to carefully read the mixing instruction
from the manufacturer when using any product.
3.2.10.1 Traditional Grouting Methods
Once the baseplate or soleplates are in position, a wooden form is then built on the upper
surface of the concrete foundation to contain the grout as it is poured into the cavity.
Grouting can be done in either a one-step or a two-step procedure. The most common
method is to use a two-step grouting process as illustrated in Figure 3.20. One of the problems
TABLE 3.3
Component Ratios of Low- and High-Strength Concrete
Low Strength (%) High Strength (%)
Water 15 20
Cement 7 14
Aggregates 78 66
Piotrowski / Shaft Alignment Handbook, Third Edition DK4322_C003 Final Proof page 105 29.9.2006 5:53pm
Foundations, Baseplates, Installation, and Piping Strain 105
with a two-step procedure is that a poor bond could occur between the mating surface of the
first grout pour and the second grout pour if cement-based grouts are used. The single-pour
method shown in Figure 3.21 requires a little more time and effort in building a form that will
prevent the grout from oozing out under the baseplate but produces a continuous block of
FIGURE 3.18 Cement-based grout. (Courtesy of Unisorb, Jackson, Michigan.)
FIGURE 3.19 Epoxy-based grout. (Courtesy of Unisorb, Jackson, Michigan.)
Piotrowski / Shaft Alignment Handbook, Third Edition DK4322_C003 Final Proof page 106 29.9.2006 5:53pm
106 Shaft Alignment Handbook, Third Edition
grout. Cement-based grouts do not bond well to wood, which is a good thing when dismantl-
ing the form after the grout has hardened. Bear in mind that cement-based grouts do not
bond too well to metal either, like the underside of the baseplate or soleplate. That is why it is
suggested that the underside of the baseplate or soleplate be coated with a zinc-based primer,
which will bond to the cement better than bare or rusty metal will. However, if the zinc-based
primer applied too thickly, it can delaminate from the metal. The goal is to completely fill the
Neorene
protective
sleeve
Baseplate
Levelling
screw
Air vent
hole
Grout
pour
hole
Air vent
hole
Silicone sealant or putty
Wooden
perimeter
form
Epoxy grout
Reinforced concrete foundation
Concrete bonding glue
Anchor bolt
Cementious grout
First grout pour
Second grout pour
FIGURE 3.20 Two-step grouting process. (Note: If epoxy grout is used, liberally coat the surfaces of the
wooden form with paste wax.)
Anchor bolt
Reinforced concrete foundation
Concrete bonding glue
Neorene
protective
sleeve
Baseplate
Levelling
screw
Cementious grout Epoxygrout or
Air vent
hole
Grout
pour
hole
Air vent
hole
Silicone sealant or putty
Wooden
perimeter
form
Wooden top
plate
FIGURE 3.21 One-step grouting process. (Note: If epoxy grout is used, liberally coat the surfaces of the
wooden form with paste wax.)
Piotrowski / Shaft Alignment Handbook, Third Edition DK4322_C003 Final Proof page 107 29.9.2006 5:53pm
Foundations, Baseplates, Installation, and Piping Strain 107
cavity between the baseplate or soleplate, with no air pockets, and solid bonding between the
baseplate or soleplate and the concrete foundation. Figure 3.22 shows a motor and multistage
pump, which was grouted with cement-based grout.
3.2.10.2 Suggested Grouting Procedure
1. Planning: Prepare a materials list of all the required components (grout, wood, bracing,
pump, hose, water, mixing tools, vibrators, etc.). Plan an adequate amount of time to
perform the job. Instruct the personnel on the task at hand. Are there enough vent holes
in the base or frame for venting trapped air? Has the concrete foundation cured
completely? Is the machinery base in the position you want it in and is it leveled and
not warped? Will the base lift up when grout is pumped under it?
2. Machinery base, frame: and concrete preparationInsure that all contact surfaces on the
undersides of the machinery base or frame are clean, rust free, and oil free. If possible,
metal surfaces should be sand blasted and primed if you are using a cement-based grout.
The concrete surface should also be clean, dust free, and oil free. If you are using a
cement-based grout and do not plan on applying a concrete bonding glue to the top
surface of the foundation, the concrete surface should be soaked with water for at least
24 h prior to grout placement to insure dry concrete does not extract the water in the
grout mix at an excessive rate preventing proper cure. Prior to pouring grout, remove
any puddles of water.
3. Building the form: Construct a form (typically wood) around the perimeter of the
machinery base or soleplate to be grouted (Figure 3.23). Insure that there is adequate
clearance between the machinery base or soleplate and the form to allow for placement
of grout and access for pumping or pushing the grout completely under the base. Build
the form with a number of pouring points around the perimeter. Insure that there are
numerous vent holes of adequate size (at least 1 in. diameter) to discharge trapped air
during the pour. If you are using epoxy-based grouts, insure that there are at least two to
three coats of paste wax on all of the wooden form surfaces that will be exposed to the
grout so the form does not permanently bond to the grout. Insure that the forms are
adequately anchored. It is suggested that the baseplate or soleplates be protected with
plastic sheeting or masking tape.
4. Mix the grout: Carefully follow the manufacturer’s recommended mixing instructions.
FIGURE 3.22 Cement-based grout used for motor and pump baseplate.
Piotrowski / Shaft Alignment Handbook, Third Edition DK4322_C003 Final Proof page 108 29.9.2006 5:53pm
108 Shaft Alignment Handbook, Third Edition
5. Pour the grout: Insure that the grout is flowing under all areas of the form removing
entrapped air at all points. Vibrators can be used with most of the cement-based grouts
but not on epoxy grouts.
6. Allow adequate time for the grout to cure.
7. Remove forms.
8. Torque the anchor bolts to their final value after the grout has cured completely.
9. Tap the top surface of the baseplate with a hammer to detect any voids that may have
occurred. Voids will have a distinctive hollow sound. There should be at least 80%
adhesive surface contact. Voids larger than 3 in. in diameter should have epoxy injected
into them. Define the perimeter of the void, drill, and tap a hole on one side of the void,
and install a grease fitting. Drill a hole on the other side of the void perimeter to enable
air to escape when injecting the void with an epoxy-filled grease gun or epoxy pump.
Figure 3.24 shows epoxy grout being injected into voids on the baseplate.
3.2.11 PREGROUTED AND SOLID METAL BASEPLATES
Getting the grout to bond to the underside of a cast or fabricated baseplate is quite a difficult
task since we are fighting against gravity. Cement-based grouts do not want to bond to metal
very well anyway and the chances of getting air pockets between the underside of the
baseplate and the top of the grout is quite likely even if adequate vent holes are provided.
Since gravity is the problem here, why not turn things around and make it the solution?
FIGURE 3.23 Wooden form for grouting soleplates.
FIGURE 3.24 Injecting epoxy-based grout into voids in baseplate.
Piotrowski / Shaft Alignment Handbook, Third Edition DK4322_C003 Final Proof page 109 29.9.2006 5:53pm
Foundations, Baseplates, Installation, and Piping Strain 109
Prior to installing the baseplate, just flip the baseplate upside down and pour the grout into
it so good bonding is achieved. That is the concept behind pregrouted baseplates. This sounds
simple to do but several precautions must be addressed.
The underside of the baseplate must be clean and oil free. The best way to do this is sand
blasting the surface. Baseplates that have been designed to pour the grout from above
will need to have both the grout pour holes and vent holes plugged. Dowels will have to
be installed where the anchor bolts will go through the grout and the baseplate. With
the baseplate flipped upside down, adequate supports need to be provided to prevent the
baseplate from distorting due to the weight of the grout. A cement-based grout can be used
but there is still the bonding issue to the underside of the baseplate. To get the cement-based
grout to bond, an epoxy adhesive should be applied to the underside of the base prior to
pouring the cement-based grout. Epoxy-based grouts could also be used and since flow ability
is no longer an issue, an aggregate (e.g., pea gravel) can be added to the epoxy grout to reduce
the cost and the shrinkage problem. If a cement-based grout is used, it should be kept wet and
covered for at least 3 d to allow for proper curing. At that time, an epoxy resin can be applied
to the surface of the grout to prevent contamination and water evaporation.
Once the grout has cured, the mounting surfaces on the baseplate can then be checked for
parallelism and coplanar surfaces. In the event that the baseplate is distorted, the mounting
surfaces can then be machined prior to installation. The baseplate is then set into its
foundation and grouted into its final position using the one-step grouting procedure described
in Figure 3.21.
An alternative to pregrouted baseplates is to use a solid metal baseplate. Although not
many rotating machinery baseplates are constructed this way, the ones that have seem to
work very well. For smaller machinery (i.e., 75 hp or smaller), 1.5 to 2 in. thick plates are
recommended. For medium size machinery (i.e., 75 to 1000 hp), 3 to 4 in. thick plates
are recommended. Indeed, the solid plate is heavier than a cast or fabricated baseplate (unless
it is been pregrouted, then there is not much difference in weight). Compared to the expense of
fabricating a baseplate from structural steel, sandblasting, painting, pregrouting, and
then possibly having to machine the contact surfaces prior to installation, solid plates
are frequently less labor intensive and cheaper to install. Instead of having jackscrews at
each anchor bolt, sacrificial leveling devices could be installed at each anchor bolt as shown
in Figure 3.25.
Reinforced concrete floor
Reinforced concrete slab
Concrete
bonding
glue
Anchor bolt
Baseplate
Protective
sleeve
Epoxy grout
Leveling
device
FIGURE 3.25 Section view of solid baseplate with leveling device at anchor bolts.
Piotrowski / Shaft Alignment Handbook, Third Edition DK4322_C003 Final Proof page 110 29.9.2006 5:53pm
110 Shaft Alignment Handbook, Third Edition
3.2.12 CASE HISTORY OF INSTALLING A BASEPLATE USING EPOXY-BASED GROUT
Figure 3.26 shows the concrete foundation for a pump and turbine drive system. The
top 1=8 in. to 1=4 in. of the concrete was chipped away (scarify) so the epoxy would bond
to the aggregate, not the sand and portland cement that floated to the top during final
floating of the concrete. Figure 3.27 shows a close-up of one of the anchor bolts.
Figure 3.28 shows the baseplate and the rigging used to lift and move the baseplate into
position. The baseplate was flipped over on its side and the paint on the underside of the top
plate was ground off so the epoxy grout could bond to the metal, not the paint as shown in
Figure 3.29. Notice that there are several structural steel cross members placed under each of
the pump and turbine mounting feet locations. After the paint was removed, any paint dust
and metal chips were blown off and the underside of the baseplate was wiped clean with a rag.
Figure 3.30 shows a bead of silicone sealant applied to the anchor bolts to prevent the
epoxy from flowing into the anchor bolt sleeve imbedded in the concrete. A neoprene sleeve is
installed over each anchor bolt to prevent the epoxy grout from adhering to the anchor bolt as
shown in Figure 3.31, Figure 3.32 shows a protective covering put onto the anchor bolt
threads and Figure 3.33 shows the concrete foundation ready to have the baseplate set onto it.
Prior to setting the baseplate, final preparations were made to the baseplate. Figure 3.34
shows the top surfaces of each foot being cleaned with ScotchBrite to remove any rust. A fine
flat file was then used to remove any burrs on the top surface and used to bevel the outside
FIGURE 3.26 Scarifying the top surface of a concrete foundation.
FIGURE 3.27 Close-up of one of the anchor bolts.
Piotrowski / Shaft Alignment Handbook, Third Edition DK4322_C003 Final Proof page 111 29.9.2006 5:53pm
Foundations, Baseplates, Installation, and Piping Strain 111
FIGURE 3.28 Rigging used to lift and move the baseplate into position.
FIGURE 3.29 Paint on underside of baseplate removed to insure good bonding with epoxy.
FIGURE 3.30 Sealant applied to anchor bolt to prevent grout from entering the protective sleeve.
Piotrowski / Shaft Alignment Handbook, Third Edition DK4322_C003 Final Proof page 112 29.9.2006 5:53pm
112 Shaft Alignment Handbook, Third Edition
FIGURE 3.31 Neoprene sleeve to protect threads on anchor bolt.
FIGURE 3.32 Protecting the threads.
FIGURE 3.33 Ready to set baseplate onto concrete foundation.
Piotrowski / Shaft Alignment Handbook, Third Edition DK4322_C003 Final Proof page 113 29.9.2006 5:53pm
Foundations, Baseplates, Installation, and Piping Strain 113
edges as shown in Figure 3.35. The flat file was then used to bevel each edge of the mounting
pads as shown in Figure 3.36. A tap was ran through each of the jackscrew holes and an
antiseize compound applied to the jackscrew threads as shown in Figure 3.37. Any dirt and
dust was then blown off the top of the baseplate and the surface wiped clean with a rag.
The baseplate was then lifted and carefully positioned over the anchor bolts as shown in
Figure 3.38. Each jackscrew was set onto stainless steel disks with a ‘‘V’’ coned into the top of
each disk for the jackscrew to set into as shown in Figure 3.39.
Figure 3.40 shows a top view drawing of the baseplate indicating how each foot pad was
labeled. A precision machinists level was then used to roughly level the baseplate, then an
optical jig transit was set up and elevations were taken on all eight mounting pads as shown in
Figure 3.41 through Figure 3.44. The line of sight of the jig transit was set slightly above the
tops of the pump foot pads so readings could be taken on the 10 in. optical scale targets
located there. A 20 in. scale target was then used on the turbine foot pads since there was
a 17 in. offset in elevation between the pump foot pads and the turbine foot pads. We decided
to set the ‘‘shoot for’’ elevation on the pump pads at 0.800 in. and the turbine foot pads
at 17.800 in.
We were unable to level the baseplate by adjusting only the jackscrews. The greatest
amount of difficultly in positioning the foot pads at the ‘‘shoot for’’ elevation occurred
between the pump pads (B and G) and the turbine pads (C and H). To position the pads at
these locations, we had to distort the baseplate by alternately tightening down on an anchor
FIGURE 3.34 Cleaning the top surfaces of each mounting point.
FIGURE 3.35 Removing burrs with a flat file.
Piotrowski / Shaft Alignment Handbook, Third Edition DK4322_C003 Final Proof page 114 29.9.2006 5:53pm
114 Shaft Alignment Handbook, Third Edition