microsoft press windows workflow foundation step by step phần 2 doc
Bạn đang xem bản rút gọn của tài liệu. Xem và tải ngay bản đầy đủ của tài liệu tại đây (727.81 KB, 47 trang )
23
Chapter 2
The Workflow Runtime
After completing this chapter, you will be able to:
■ Be able to host the workflow runtime in your applications
■ Understand the basic capabilities of the WorkflowRuntime object
■ Know how to start and stop the workflow runtime
■ Be able to connect to the various workflow runtime events
When you execute tasks in the Workflow Foundation (WF) environment, something needs to
oversee that execution and keep things straight. In WF, that something is an object known as
WorkflowRuntime. WorkflowRuntime starts individual workflow tasks. WorkflowRuntime fires
events for different situations that pop up while your tasks execute. And WorkflowRuntime
keeps track of and uses pluggable services you can hook in to the execution environment.
(We’ll look at some of these pluggable services starting in Chapter 5, “Workflow Tracking.”)
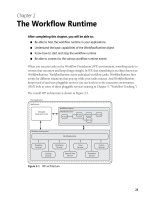
The overall WF architecture is shown in Figure 2-1.
Figure 2-1 WF architecture
Host Application
Activity
Activity
Activity
Activity
Activity
Threading
Services
Persistence
Services
Timer
Services
Custom
Services
Tracking
Services
External Data
Services
Transaction
Services
Managed
Application Code
Workflow Environment
WorkflowRuntime
WorkflowRuntime
Workflow Instance
AppDomain
24 Part I Introducing Windows Workflow Foundation (WF)
WF and your application execute concurrently. In fact, WF requires your application as a host.
The host application might be a Windows Forms application, a console application, an
ASP.NET Web application, or even a Windows service. The WF runtime and your application
execute together in a .NET AppDomain, and there can be only one instance of
WorkflowRuntime per AppDomain. Attempting to create a second instance of WorkflowRuntime
in a single AppDomain results in an InvalidOperationException.
You build workflow applications—“workflows”—by creating logical groupings of activities.
These logical groupings work to complete the workflow task you require. When you host the
workflow runtime, you essentially hand the workflow your activities and tell it to execute
them. This results in a workflow instance. The workflow instance is a currently executing
workflow task, which is itself composed of logically grouped activities. And, as you recall from
the first chapter, activities can execute code you provide as well as make decisions based on
input data. We’ll cover workflow instances in the next chapter and activities in the chapters
to follow.
Hosting WF in Your Applications
In the last chapter, we used the Microsoft Visual Studio workflow project template to build a
basic workflow application for us. And in practice you would likely do just that. But if you’re
like me, just executing wizards and such is fine only if you understand the code they’re insert-
ing. After all, the code is yours to maintain and understand once the code generator’s job is
complete.
So what does it take to host WF in your application? Well, aside from building the workflow
tasks that WF is to run (that’s your job), all you really need to do is reference the WF assem-
blies and provide the necessary code to bring WorkflowRuntime into execution, start it, and
manage the operational conditions you’re interested in managing. In that sense, hosting WF
isn’t a lot different from using other .NET assemblies. The operational condition management
amounts to handling events that the runtime will fire from time to time given specific condi-
tions, such as when the runtime goes idle or an instance sustains an unhandled exception.
There is quite a list of available events you can handle, and we’ll see some of those a bit later
in the chapter, with still others introduced in Chapter 5, “Workflow Tracking,” and Chapter 6,
“Loading and Unloading Instances.”
Note
WF can be hosted in a variety of applications, including Microsoft Windows Forms
and Windows Presentation Foundation applications, console applications, ASP.NET Web
applications, and Windows Services. The basic process remains the same as far as WF is
concerned for all of these (very different) host application types.
For now, though, let’s build a basic .NET console application and host the workflow runtime
ourselves. This will help make the code the Visual Studio workflow project template inserts a
little less mysterious.
Chapter 2 The Workflow Runtime 25
Creating a basic console application
1. Start Visual Studio 2005 as you did in the previous chapter.
2. From the File menu, select New and then Project.
3. When the New Project dialog box appears, expand the Visual C# tree control node and
then select Windows from the Project Types pane.
4. Select Console Application from the Templates pane.
5. In the Name field, type WorkflowHost.
6. In the Location field, type \Workflow\Chapter2.
Note
Remember that the path \Workflow represents the path you are using to store
the book’s sample applications.
7. Click OK to create the WorkflowHost project.
At this point, we have a basic console application, but of course it does nothing interesting.
Now let’s begin adding workflow components. Speaking personally, I truly love the Visual
Studio IntelliSense functionality. But for that to take effect, you have to first reference the
assemblies IntelliSense will interpret to help you write code. So a great place to start is to
reference the workflow assemblies before adding any code. This way, when we do add code,
we can take advantage of the Visual Studio code assistance capabilities.
Adding the workflow assembly references
1. In the Visual Studio Solution Explorer pane, right-click the References tree node and
select Add Reference.
Tip
Selecting Add Reference from the Visual Studio Project menu achieves the same
result.
26 Part I Introducing Windows Workflow Foundation (WF)
2. This activates the Add Reference dialog box. Using the vertical scrollbar’s thumb control,
scroll down until you find System.Workflow.Runtime. Select that using a single mouse
click.
3. Click OK to add the reference.
Visual Studio has now added the workflow runtime reference you’ll need to execute workflow
tasks. What we’ve not done is actually bring the workflow runtime into execution. To do that,
we need to add some code to our application—here’s what we’ll do.
Hosting the workflow runtime
1. If it’s not already open, open the Program.cs file for editing as you did in the previous
chapter.
2. Locate the following code (which is located at the top of the source file):
using System;
using System.Collections.Generic;
using System.Text;
3. Add the following line of code, just after the System.Text line:
using System.Workflow.Runtime;
4. Locate the Main method, and add the following line of code after the opening curly
brace:
WorkflowRuntime workflowRuntime = new WorkflowRuntime();
5. For now, we’ll just compile the program to make sure there are no errors. We’ll use this
application throughout the chapter, so keep Visual Studio running, or reload this appli-
cation as necessary while progressing through the chapter. To compile, select Build
WorkflowHost from the Visual Studio Build menu.
Chapter 2 The Workflow Runtime 27
A Closer Look at the WorkflowRuntime Object
Now that we have an instance of WorkflowRuntime created in our WorkflowHost application,
it’s time to take a brief look at how we interact with this object. Like most useful objects,
WorkflowRuntime exposes a set of methods and properties we use to control the workflow
runtime environment. Table 2-1 lists all the WorkflowRuntime properties, while Table 2-2 lists
the methods we typically use.
There are more methods associated with WorkflowRuntime, but the methods shown in
Table 2-2 are the ones most commonly used and the ones we’ll focus on both here and in the
remainder of the book. There are also a number of events WorkflowRuntime will raise at vari-
ous times during workflow execution, but we’ll examine those a bit later in the chapter.
Table 2-1 WorkflowRuntime Properties
Property Purpose
IsStarted Used to determine whether the workflow runtime has been
started and is ready to accept workflow instances. IsStarted is false
until the host calls Star tRuntime. It remains true until the host calls
StopRuntime. Note you cannot add core services to the workflow
runtime while it is running. (We’ll address starting services in
Chapter 5.)
Name Gets or sets the name associated with the WorkflowRuntime. You
cannot set Name while the workflow runtime is running (that is,
when IsS tarted is true). Any attempt to do so will result in an
InvalidOperationException.
Table 2-2
WorkflowRuntime Methods
Method Purpose
AddService Adds the specified service to the workflow runtime. There are lim-
itations regarding what services can be added as well as when.
We’ll look at services in more detail starting in Chapter 5.
CreateWorkflow Creates a workflow instance, including any specified (but
optional) parameters. If the workflow runtime has not been
started, the CreateWorkflow method calls StartRuntime.
GetWorkflow Retrieves the workflow instance that has the specified workflow
instance identifier (which consists of a Guid). If the workflow
instance was idled and persisted, it will be reloaded and executed.
StartRuntime Starts the workflow runtime and the workflow runtime services
and then raises the Started event.
StopRuntime Stops the workflow runtime and the runtime services and then
raises the Stopped event.
28 Part I Introducing Windows Workflow Foundation (WF)
Basically, then, working with WorkflowRuntime involves calling a few simple methods and
handling some events of interest. There is a significant limitation WorkflowRuntime imposes,
however, which we’ll look at next.
Building a Workflow Runtime Factory
I mentioned this previously in the chapter, but it is important enough to mention again—there
can be only a single instance of WorkflowRuntime per AppDomain. And because the majority
of .NET applications use only a single AppDomain, it necessarily follows that you can gener-
ally use only a single instance of WorkflowRuntime in your application.
Whenever I hear “use only a single instance,” I naturally think of using a combination of the
singleton and factory patterns. The singleton pattern, if you’re unfamiliar with patterns, is sim-
ply a mechanism for assuring that no matter how many times your application requests
instances of the singleton object, only one instance of the singleton is ever given out. This is
typically done for objects that are considered “expensive” to create, such as objects that con-
sume a large number of resources or take a significant amount of time to be created.
The concept of a singleton, which is to say only a single object is ever created and handed to
your application, dovetails nicely with the factory pattern. The factory pattern involves an
intermediate object that’s used to create instances of other objects. Most of us, for example,
don’t build our own cars. Instead, we purchase them from the automobile manufacturer, at
least indirectly. (Many of us, I’m sure, wish we could buy them directly!)
The combination of the singleton and factory is powerful because the factory can make sure
only a single instance of the singleton object is ever created. This is perfect for our needs,
because within our application it’s entirely possible that different pieces of the application
might try to load and start the workflow runtime (independent application modules, for
instance). Let’s see how we might create a WorkflowRuntime factory.
Creating the WorkflowRuntime factory object
1. We’ll need to add a new class to our WorkflowHost poject. To do that, right-click on the
project name (WorkflowHost) in the Visual Studio Solution Explorer and select Class
from the Add menu item.
Tip
Selecting Add Class from the Visual Studio Project menu achieves the same
result.
Chapter 2 The Workflow Runtime 29
2. The Add New Item dialog box should now appear, and because we requested that a new
class be created, the Class item in the Templates pane should already be selected. There-
fore, we’ll only need to name the source file (which indirectly also names the object we’re
creating). Type WorkflowFactory.cs into the Name field and click Add.
3. As we did with the main application source file, Program.cs, we’ll need to add the using
directive for the workflow assembly to the top of the WorkflowFactory source file. The
WorkflowFactory source file should be open for editing because we just created it, but
if not, open it for editing using the techniques we used for opening Program.cs in the
previous chapter. To add the using directive, locate this code at the top of the
WorkflowFactory.cs file:
using System;
using System.Collections.Generic;
using System.Text;
30 Part I Introducing Windows Workflow Foundation (WF)
After the using directive for System.Text, add the following line:
using System.Workflow.Runtime;
4. The using directive introduces the workflow runtime assembly to our source file, but it
does little more. We need to add the code to represent the singleton object to the
WorkflowFactory class. To do that, locate the WorkflowFactory class definition:
class WorkflowFactory
{
}
Not much of a class yet! But we’ll fix that. Just after the opening curly brace of the class
definition, add these lines of code:
// Singleton instance of the workflow runtime.
private static WorkflowRuntime _workflowRuntime = null;|
// Lock (sync) object.
private static object _syncRoot = new object();
5. Notice that the field _workflowRuntime is initialized to null. Our factory will sense this
and create a new instance of WorkflowRuntime. If workflowRuntime is not null, our factory
won’t create a new instance but will hand out the existing instance. To do this, we’ll need
to add a method designed to create and return our singleton object. Moreover, we’ll
make the method static so that objects requesting the workflow runtime object don’t
need to create instances of the factory. To do this, we’ll add the following code just after
the _syncRoot field:
// Factory method.
public static WorkflowRuntime GetWorkflowRuntime()
{
// Lock execution thread in case of multi-threaded
// (concurrent) access.
lock (_syncRoot)
{
// Check for startup condition.
if (null == _workflowRuntime)
{
// Not started, so create instance.
_workflowRuntime = new WorkflowRuntime();
} // if
// Return singleton instance.
return _workflowRuntime;
} // lock
}
6. Almost there! When the Visual Studio class template builds a new class, it omits the
public keyword on the class definition, making it a private class. Because we want other
classes to be able to request instances of WorkflowRuntime, we’ll need to make the factory
class public. While we’re at it, we’ll also mark the class as static to prevent direct
Chapter 2 The Workflow Runtime 31
instantiation (it’s a factory class, after all). To make all this happen, we’ll change the
class definition from this
class WorkflowFactory
to this:
public static class WorkflowFactory
With WorkflowFactory in hand, any part of your application can request the workflow runtime
without getting slammed with an InvalidOperationException. Later, starting in Chapter 5,
we’ll make slight revisions to this class to account for other startup services we might want
to include.
Tip
I like placing all the startup and shutdown code in this factory because it puts all the
runtime initialization code in one place, making future changes and maintenance easier. No
matter what object requests access to the workflow runtime, we know the runtime has been
initialized according to our design.
Starting the Workflow Runtime
Of course, no sooner have you created your WorkflowFactory object than I’ll ask you to modify
it. I’ve done this intentionally because I wanted to single out how the workflow runtime is
started. Referring back to Table 2-2, we see that there is a method called StartRuntime, and
making that method call from within our factory object makes a lot of sense. External objects
requesting the workflow runtime object (presumably to create new workflow instances) do
not need to deal with or worry about the initialization state of the runtime environment. We
have a one-stop place to establish the environment as required by our application. The exter-
nal objects requesting the workflow runtime object can simply use it without making further
changes to the environment as they receive it.
Calling StartRuntime is not absolutely required. If we were to create a workflow instance,
StartRuntime would be called internally for us. And if all we ever did was create an instance of
WorkflowRuntime, I probably wouldn’t worry about calling StartRuntime explicitly. Once we
add services, however (starting in Chapter 5), I think the explicit call makes a lot of sense, if
only for code-maintenance purposes and to ensure the runtime environment’s state is prop-
erly established as the workflow runtime object is passed out to whoever asks for it.
So let’s make the slight change to our factory object and call StartRuntime directly.
Starting the workflow runtime
1. With Visual Studio running and WorkflowFactory.cs open for editing, locate this line of
code:
_workflowRuntime = new WorkflowRuntime();
32 Part I Introducing Windows Workflow Foundation (WF)
2. Following this line of code, add this new line:
// Start the runtime.
_workflowRuntime.StartRuntime();
Stopping the Workflow Runtime
If there is a way to start the workflow runtime, it makes sense that there is a way to stop it as
well. And in fact there is. Looking back at Table 2-2, we see there is a StopRuntime method that
matches, and countermands, StartRuntime. Calling StopRuntime unloads all executing work-
flows and services and shuts down the runtime environment. Of course, the appropriate place
to call StopRuntime is just prior to or during your application shutdown logic, or as the
AppDomain is being torn down.
Tip
Just as calling StartRuntime is not mandatory (but not a bad idea), calling StopRuntime
also isn’t mandatory (but is similarly a good idea). As the WF runtime assembly unloads,
StopRuntime is called automatically.
Note You cannot call StopRuntime once the WorkflowRuntime object is marked as disposed.
Doing so results in an ObjectDisposedException. Depending on the timing of your application
termination, this might be something to watch out for.
A great place to provide for this is in the WorkflowFactory object. Let’s modify WorkflowFactory
to automatically shut the workflow runtime down for us.
Stopping the workflow runtime
1. With Visual Studio running and WorkflowFactory.cs open for editing, locate this line of
code:
_workflowRuntime = new WorkflowRuntime();
2. Prior to this line of code, add these lines of code:
// Provide for shutdown
AppDomain.CurrentDomain.ProcessExit += new
EventHandler(StopWorkflowRuntime);
AppDomain.CurrentDomain.DomainUnload += new
EventHandler(StopWorkflowRuntime);
3. Then add the StopWorkflowRuntime to the WorkflowFactory class:
// Shutdown method
static void StopWorkflowRuntime(object sender, EventArgs e)
{
if (_workflowRuntime != null)
{
Chapter 2 The Workflow Runtime 33
if (_workflowRuntime.IsStarted)
{
try
{
// Stop the runtime
_workflowRuntime.StopRuntime();
}
catch (ObjectDisposedException)
{
// Already disposed of, so ignore
} // catch
} // if
} // if
}
The entire listing for the WorkflowFactory object is shown in Listing 2-1. We’ll not make any
further changes until Chapter 5.
Listing 2-1 The Complete WorkflowFactory Object
using System;
using System.Collections.Generic;
using System.Text;
using System.Workflow.Runtime;
namespace WorkflowHost
{
public static class WorkflowFactory
{
// Singleton instance of the workflow runtime
private static WorkflowRuntime _workflowRuntime = null;
// Lock (sync) object
private static object _syncRoot = new object();
// Factory method
public static WorkflowRuntime GetWorkflowRuntime()
{
// Lock execution thread in case of multi-threaded
// (concurrent) access.
lock (_syncRoot)
{
// Check for startup condition
if (null == _workflowRuntime)
{
// Provide for shutdown
AppDomain.CurrentDomain.ProcessExit += new
EventHandler(StopWorkflowRuntime);
AppDomain.CurrentDomain.DomainUnload += new
EventHandler(StopWorkflowRuntime);
// Not started, so create instance
_workflowRuntime = new WorkflowRuntime();
// Start the runtime
34 Part I Introducing Windows Workflow Foundation (WF)
_workflowRuntime.StartRuntime();
} // if
// Return singleton instance
return _workflowRuntime;
} // lock
}
// Shutdown method
static void StopWorkflowRuntime(object sender, EventArgs e)
{
if (_workflowRuntime != null)
{
if (_workflowRuntime.IsStarted)
{
try
{
// Stop the runtime
_workflowRuntime.StopRuntime();
}
catch (ObjectDisposedException)
{
// Already disposed of, so ignore
} // catch
} // if
} // if
}
}
}
Now that we have a workflow runtime factory, let’s modify our main program to use it.
Using the workflow runtime factory object
1. With Visual Studio running and Program.cs open for editing, locate this line of code:
WorkflowRuntime workflowRuntime = new WorkflowRuntime();
2. Replace this line of code with the following:
WorkflowRuntime workflowRuntime = WorkflowFactory.GetWorkflowRuntime();
Subscribing to Workflow Runtime Events
It might seem like there isn’t a lot to WorkflowRuntime, at least from a methods and properties
perspective. You can start it, you can stop it, and you can ask it to initiate workflow instances.
That’s about it.
It’s a bit more interesting than that, however, and you begin to see the complexity of the
runtime environment when you look at the events WorkflowRuntime exposes. Table 2-3
doesn’t provide an exhaustive list, but it does indicate the events you’ll use most often.
Chapter 2 The Workflow Runtime 35
We’ll look at additional events WorkflowRuntime exposes as we progress through Chapters 4
and 5 as well.
As we add handlers for these events, you begin to see the same code (or nearly the same code)
that you saw when Visual Studio generated the sequential workflow console application we
built in the previous chapter. For one thing, to see the effects of these events, we’ll need to stop
the main application thread for awhile. To do this, both we and Visual Studio use a kernel-
based automatic reset event. In a moment, we’ll type in some code to use a few of these events.
From time to time, glance back at the first chapter’s PCodeFlow’s Program.cs file and compare
what’s there with what we’ll type here. Although it’s not identical, you’ll find the same ingre-
dients in both applications.
Note
For clarity, I’ll avoid the use of anonymous methods as I add code to this chapter’s
WorkflowHost application. PCodeFlow, on the other hand, uses anonymous methods. (They
were placed there by Visual Studio when PCodeFlow’s Program.cs file was created.) The
functionality of each, however, is the same.
Handling workflow runtime events
1. With Visual Studio running and WorkflowHost’s Program.cs source file open for
editing, locate the line of code we added to call our WorkflowFactory:
WorkflowRuntime workflowRuntime = WorkflowFactory.GetWorkflowRuntime();
2. If you’ve worked with .NET delegates, this code will look familiar. What we need to do
is to add event handlers for the events we’re interested in observing. Let’s add handlers
for the workflow idled and workflow completed events for now. We can add other han-
dlers later as we need them. With that in mind, type in the following line of code after the
line from step 1:
workflowRuntime.WorkflowIdled += new
EventHandler<WorkflowEventArgs>(workflowIdled);
Table 2-3 WorkflowRuntime Events
Event Purpose
Started Raised when the workflow runtime is started.
Stopped Raised when the workflow runtime is stopped.
WorkflowCompleted Raised when a workflow instance has completed.
WorkflowIdled Raised when a workflow instance enters the idle state. When
workflow instances go idle, you have the opportunity to unload
them from memory, store them in a database (in case they’re
waiting for a long-running task), and bring them back into
memory at a later time. We’ll tackle this in Chapter 6.
WorkflowTerminated Raised when a workflow instance is terminated. The workflow can
be terminated by the host through a call to the Ter m in a te method
of a workflow instance, by a Ter min a te activity, or by the workflow
runtime when an unhandled exception occurs.
36 Part I Introducing Windows Workflow Foundation (WF)
Tip As it happens, Visual Studio can add the handler for you. Nice! Here’s how it
works: After you type the equal sign (=), press the tab key to let IntelliSense add the
EventHandler keyword and name. It will leave the name highlighted. Without changing
the highlight, type in the name you want to use (workflowIdled in the preceding
example). Then just press the Tab key when Visual Studio prompts you, and Visual
Studio will insert the handler with the matching name immediately below whatever
procedure you are coding. Of course, you can always modify the handler method
name after the handler has been inserted into your code if you need to.
3. Following the code you just added, type in this line of code to add the handler for
workflow completion:
workflowRuntime.WorkflowCompleted += new
EventHandler<WorkflowCompletedEventArgs>(workflowCompleted);
4. And now add the handler for the WorkflowTerminated event:
workflowRuntime.WorkflowTerminated += new
EventHandler<WorkflowTerminatedEventArgs>(workflowTerminated);
5. If you compile and run WorkflowHost, the application should compile and execute.
But there is no workflow executed because we didn’t ask the workflow runtime to start
a workflow instance. (We’ll add this in the next chapter.) In preparation, though, let’s
add some code. First, we’ll add the automatic reset event we’ll need to stop the main
thread long enough for the workflow events to fire (so that we can observe them).
The AutoResetEvent class is perfect for the job. Following the two lines of code you just
typed in (in steps 3 and 4), add these lines of code. (We’ll define the waitHandle object
in the next step.)
Console.WriteLine("Waiting for workflow completion.");
waitHandle.WaitOne();
Console.WriteLine("Done.");
6. We’ll need to create the _waitHandle object, so add this static class member just prior to
the Main method:
private static AutoResetEvent waitHandle = new AutoResetEvent(false);
7. AutoResetEvent is exported by System.Threading, so add the using directive to the list at the
top of the Program.cs source file:
using System.Threading;
8. The three event handlers (created by Visual Studio 2005) both contain “not imple-
mented yet” exceptions. We need to get rid of those and implement some code. Locate
the first handler we added, workflowIdled, and replace the exception you find there with
the following lines of code:
Console.WriteLine("Workflow instance idled.");
Chapter 2 The Workflow Runtime 37
9. We’ll perform a similar edit to the workflowCompleted handler. Replace the “not
implemented yet” exception with this:
Console.WriteLine("Workflow instance completed.");
waitHandle.Set();
10. The workflowTerminated handler rounds out the set of handlers. Replace the “not
implemented yet” exception with the code you see here:
Console.WriteLine("Workflow instance terminated, " +
"reason: '{0}'.",e.Exception.Message);
waitHandle.Set();
The completed main application is shown in Listing 2-2.
Listing 2-2 The Complete WorkflowHost Application
using System;
using System.Collections.Generic;
using System.Text;
using System.Workflow.Runtime;
using System.Threading;
namespace WorkflowHost
{
class Program
{
private static AutoResetEvent waitHandle =
new AutoResetEvent(false);
static void Main(string[] args)
{
WorkflowRuntime workflowRuntime =
WorkflowFactory.GetWorkflowRuntime();
workflowRuntime.WorkflowIdled +=
new EventHandler<WorkflowEventArgs>(workflowIdled);
workflowRuntime.WorkflowCompleted +=
new EventHandler<WorkflowCompletedEventArgs>
(workflowCompleted);
workflowRuntime.WorkflowTerminated +=
new EventHandler<WorkflowTerminatedEventArgs>
(workflowTerminated);
Console.WriteLine("Waiting for workflow completion.");
waitHandle.WaitOne();
Console.WriteLine("Done.");
}
static void workflowTerminated(object sender,
WorkflowTerminatedEventArgs e)
{
Console.WriteLine("Workflow instance terminated, " +
"reason: '{0}'.",e.Exception.Message);
waitHandle.Set();
}
static void workflowCompleted(object sender,
38 Part I Introducing Windows Workflow Foundation (WF)
WorkflowCompletedEventArgs e)
{
Console.WriteLine("Workflow instance completed.");
waitHandle.Set();
}
static void workflowIdled(object sender,
WorkflowEventArgs e)
{
Console.WriteLine("Workflow instance idled.");
}
}
}
What are we missing? A workflow to execute! We’ll dive into workflow instances in the next
chapter. For now, though, if you execute this application, it hangs. Why? The events we
tapped into never fire because we never execute a workflow instance. That means the event
handlers never handle the events. And because of that, waitHandle is never tripped—the appli-
cation hangs forever (or until you terminate it yourself). We’ll revisit this application in the
next chapter when we add a workflow instance and execute it.
Chapter 2 Quick Reference
To Do This
Host the workflow runtime in
your application
Add a reference to the
System.Workflow.Runtime
assembly. Create a single
instance of
W orkflowRuntime
per AppDomain, and start the runtime by
calling
WorkflowRuntime.StartRuntime
or by creating a workflow instance.
Stop the workflow runtime Call WorkflowRuntime.StopRuntime, or simply exit the host (that is, tear
down the AppDomain).
Monitor workflow health and
status
Subscribe to the various workflow runtime events. Chapter 5 covers Sql-
Trac kin gSe r v ice , which is used to gather even more workflow health and
status information.
Subscribe to workflow runtime
events
Workflow runtime events are no different from other .NET object events,
and they are subscribed to as any event would be subscribed to.
39
Chapter 3
Workflow Instances
After completing this chapter, you will be able to:
■ Initiate a workflow instance, both with and without startup parameters
■ Determine the status of your running workflow instances
■ Stop workflow instances
■ Determine why your workflow instances were idled or terminated
The workflow runtime, when it comes right down to it, is really there for one purpose—
supporting your workflow-based tasks. Workflow tasks, called instances when they are
executing, are the heart of the workflow system. They’re why the workflow runtime exists in
the first place.
A workflow instance is composed of one or more activities. (We’ll look at the various activities
starting in Chapter 7, “Basic Activity Operations.”) The primary activity, or root activity is
referred to as the workflow definition. The workflow definition normally acts as a container for
the other activities that will actually do the work.
Note
A workflow definition is what you ask the workflow runtime to execute, whereas an
instance is an executing workflow definition. There is a distinct difference. One is executing
and the other is not. However, I’ll use the terms interchangeably throughout this chapter, and
even in the rest of the book, because in the end we’re interested in executing software, not
just in writing it. Besides, “instance” rolls off the tongue more easily than does “workflow
definition.”
Where do instances come from? They come from you. You have problems to solve and soft-
ware to write to solve those problems, and if workflow processing fits the needs of your appli-
cation requirements, at least part of the software you’ll write is the workflow task or tasks that
the workflow runtime will execute for you. Microsoft provides the workflow runtime. You
provide the rest. After all, it’s your application.
Windows Workflow Foundation (WF) is there to help. Not only will WF execute the work-
flow instances you create, but it will also help you create them. WF has a rich graphical
designer that’s there to help you lay out workflow software in much the same way as you build
ASP.NET Web forms, Windows Forms, or Windows Presentation Foundation software. You
roll the mouse cursor over the Toolbox, select one of the many activity items you find there,
drag that item over to the design surface, and drop it. If the item has configurable properties,
you can tailor those to suit your purpose using the Microsoft Visual Studio Properties pane.
40 Part I Introducing Windows Workflow Foundation (WF)
We used the workflow designer briefly in Chapter 1, “Introducing Microsoft Windows Work-
flow Foundation,” and we’ll use it again here. After all, working with WF is all about building
workflow tasks, and the workflow visual designer is a huge part of that development process.
Note
Although we won’t look at rehosting the workflow visual designer in this book, you
can host the workflow visual designer in your own applications, outside Visual Studio. How-
ever, we will look in some detail at creating our own custom activities and how we integrate
those into the workflow visual designer’s Toolbox in Chapter 13, “Custom Activities.”
Workflow instances are like any other piece of software. They begin executing and run until
they hit some terminal condition. Maybe all the rows of the database have been processed, or
all the files the instance is supposed to crunch have been crunched. Or the documents the
workflow routed to the various approval authorities were returned, approved or disapproved,
and that process has been completed. There is a natural starting place and one or more natu-
ral stopping places.
Instances can sustain errors. Exceptions. And maybe you handled those exceptions and
maybe you didn’t (oops). In some cases, maybe you didn’t want to handle exceptions because
the workflow runtime reports the stoppage of an instance differently if it sustains an unhan-
dled error and you’ll deal with it then.
Sometimes, a workflow process can take a long, long time to complete. For example, maybe a
process places an order for parts and then waits for the order to be received. The number and
type of parts are confirmed before the workflow terminates. Depending on the type of part, it
might take days, weeks, and even months to receive the order. So should a workflow instance
remain active in memory for days, weeks, or months? What happens if the server crashes or
the power goes out in the meantime? Do you lose your workflow instance? Your data? Your
application state?
Workflow instances can also participate in transactions, and to be honest, this is a critical
piece of the workflow puzzle for those of us writing business software. Imagine a workflow
process that coordinates financial transactions between the accounting department and the
shipping department while awaiting approval from the department heads of research and
design and engineering. Any time we deal with funds, we’re probably also dealing with trans-
actions so that if anything goes wrong in the process, the money is left in a known place. Just
participating in a long-running transaction is an amazing feat, but handling failure conditions
is even more amazing. (We’ll see how transactions are handled in Chapter 15, “Workflows
and Transactions.”)
So working with workflow instances and the activities that instances are composed of is an
important part of workflow processing. It’s no surprise, then, that WF has strong support for
building workflow instances as well as executing them. We’ll start by looking at the
WorkflowInstance object.
Chapter 3 Workflow Instances 41
Introducing the WorkflowInstance Object
WorkflowInstance is the WF object that gives your individual workflow task context. This is the
object you use to find out how things are going with your process. Just as we have methods
and properties to control the workflow runtime, so too do we have methods and properties
we can use to interact with our workflow instances. Table 3-1 lists most of the WorkflowIn-
stance properties, while Table 3-2 lays out the commonly used methods. We’ll look at addi-
tional properties and methods in Chapter 5, “Workflow Tracking.”
Table 3-1 WorkflowInstance Properties
Property Purpose
InstanceId Gets the unique identifier for the workflow instance (a Guid).
WorkflowRuntime Gets th e WorkflowRuntime for this workflow instance.
Table 3-2
WorkflowInstance Methods
Method Purpose
ApplyWorkflowChanges Applies changes to the workflow instance specified by the
WorkflowChanges object. This allows you to modify the workflow
(add, remove, or change activities) while it’s executing, although
the workflow instance is suspended while the dynamic changes
are being made.
GetWorkflowDefinition Retrieves the root activity for this workflow instance.
Resume Resumes execution of a previously suspended workflow instance.
If the workflow instance is not in the suspended state, nothing
happens. If the workflow instance is in the suspended state, the
workflow runtime raises the WorkflowResumed event just before
the workflow instance execution is resumed.
Start Starts the execution of the workflow instance, calling
ExecuteActivity on the root activity of this workflow instance.
(We’ll start putting activities under the microscope in the next
chapter.) If Start encounters an exception, it terminates the work-
flow instance by calling Te r mi n at e with the Message property of
the exception passed as the reason for the termination.
Suspend Synchronously suspends the workflow instance. If the workflow
instance is already suspended, nothing happens. If the instance is
running, the workflow runtime suspends the workflow instance,
sets SuspendOrTerminateInfoProperty to the string (reason)
passed into Suspend, and raises the WorkflowSus pended event.
42 Part I Introducing Windows Workflow Foundation (WF)
There are more methods associated with WorkflowInstance than I’ve shown here. We’ll look at
those in more detail when we persist workflow instances to a Microsoft SQL Server database
in Chapter 6, “Loading and Unloading Instances.”
Let’s build a workflow task and see how we kick it off.
Starting a Workflow Instance
Before we can start a workflow instance, we must have a workflow task for WF to execute.
In the first chapter, we asked Visual Studio to create a workflow-based project for us that auto-
matically included a raw workflow task we modified to validate U.S. and Canadian postal
codes. We could, if we wanted, go back to that project and physically copy the workflow
source code, or we could reference the resulting assembly PCodeFlow.exe and try to use the
workflow we created directly. And, in practice, you might do that.
In this case, however, we’re attempting to learn to write workflow applications. What fun is
swiping existing workflow code when we can build new? Let’s simulate a long-running task
by using a sequential workflow that contains a delay. We’ll execute some code prior to the
delay to pop up a message box. After the delay, we’ll again pop up a message box to indicate
our work has finished. (We’ll know our workflow instance finished anyway because
WorkflowHost handles the WorkflowCompleted event, but this way we get to write a bit
more workflow code.) As we progress through the book, our examples will become more
detailed and richer, but for now because we’re still new to it, we’ll keep the examples on the
“type in less code” side to concentrate more on the concept than on improving typing skills.
Note
Remember, a sequential workflow is one that executes activities one after another. This
process is in contrast to a state machine workflow, which executes activities based on state
transitions. If this sounds like so much nonsense right now, don’t worry. We’ll get into all this
in the next chapter.
Ter m i na t e Synchronously terminates the workflow instance. When the
host requests termination of the workflow instance, the workflow
runtime kills the instance and tries to persist the instance’s final
state. Then WorkflowInstance sets SuspendOrTerminateInfoProp-
er ty to the string (reason) passed into Ter mi n a te . Finally, it raises
the WorkflowTerminated event and passes reason in the Message
property of a WorkflowTerminatedException contained in the
WorkflowTerminatedEventArgs. If another, different, exception is
raised during persistence, the workflow runtime passes that
exception in WorkflowTerminatedEventArgs instead.
Table 3-2
WorkflowInstance Methods
Method Purpose
Chapter 3 Workflow Instances 43
Adding a sequential workflow project to the WorkflowHost solution
1. If Visual Studio isn’t running, start Visual Studio 2005 as you did in the previous
chapters. If the WorkflowHost project isn’t loaded, select it from the Visual Studio
Recent Projects menu, which you can access from the main File menu. Visual Studio will
grind for a moment as it reloads WorkflowHost for editing.
2. We could, if we wanted, add a workflow-based class directly into our WorkflowHost
project. This is precisely what Visual Studio did when it created the PCodeFlow applica-
tion in Chapter 1. Instead of simply adding a workflow component to our existing Work-
flowHost application, however, let’s add an entirely new workflow project to our
solution. To do that, select Add and then New Project from the Visual Studio File menu.
This will activate the Add New Project dialog box.
Note
It’s generally a better practice to build your workflow into separate assemblies.
For one thing, it neatly compartmentalizes your code along assembly lines. But for
another, at the time this was written there is a bug in WF that prevents you from
executing secondary workflows from within a primary workflow if the two workflows in
question are in the same assembly.
3. When the Add New Project dialog box appears, expand the Visual C# tree node and
then select Workflow from the Project Types pane.
44 Part I Introducing Windows Workflow Foundation (WF)
4. Select Sequential Workflow Library from the Templates pane.
5. In the Name field, type LongRunningWorkflow.
6. In the Location field, type \Workflow\Chapter3.
Note
Remember that the path \Workflow represents the file system directory path
you are using to store the book’s sample applications.
7. Click OK to add the LongRunningWorkflow project to your WorkflowHost solution.
Visual Studio then adds the new library assembly project to our solution and opens the work-
flow visual designer in preparation for creating our workflow task. Just to give you the big pic-
ture, we’re going to add three activities to this new workflow task—two Code activities and one
Delay activity. The Delay activity will be sandwiched between the Code activities, allowing us to
pop up message boxes before and after the delay. We’ll delay a fixed amount of time at first,
but we’ll later modify the workflow task to accept a delay value we specify when we initiate the
workflow.
Building the simulated long-running sequential workflow
1. With the workflow visual designer active, move the mouse cursor to the Visual Studio
Toolbox and allow it to expand. If the workflow visual designer is not showing, select
Workflow1.cs from the LongRunningWorkflow project in the Solution Explorer pane
and click the Solution Explorer’s View Designer button.
Chapter 3 Workflow Instances 45
2. Select Code from the Toolbox, and drag the Code activity component onto the workflow
designer’s surface.
As the mouse approaches the area marked “Drop Activities to Create a Sequential
Workflow,” the designer view changes slightly to indicate that you can drop the Code
activity component on the designer surface.
46 Part I Introducing Windows Workflow Foundation (WF)
3. Release the mouse button to drop the Code activity component into the sequential
workflow.
4. As we did in the first chapter, we’re going to add some code to our workflow task via the
Code activity. If the Code activity’s properties aren’t showing in the Visual Studio Proper-
ties pane, click the Code activity you just inserted into your workflow once to select it.
This will bring this activity’s properties into view.
5. Click the ExecuteCode property to activate the property drop-down edit box, which
allows us to name the event that will fire when the code in the Code activity is to be
executed.
Chapter 3 Workflow Instances 47
6. Type PreDelayMessage. This adds the event to the workflow code. Later, we’ll modify
the code and show a message box. For now, though, we’ll continue working in the work-
flow visual designer because we need to add two more activities.
7. Select Delay from the Toolbox, and drag the Delay activity component onto the workflow
designer’s surface. Drop it below the Code activity that we just placed there.
Note
A sequential activity, such as the one we’re working with here, executes
activities in order. The order is determined by the activity’s location in the workflow
visual designer. The activity at the top of the designer’s window is executed first, with
other activities executed in order as you progress toward the bottom of the designer
window. We’ll revisit this process in the next chapter.
8. We’ll need to establish a delay value for our Delay activity to use. To do that, we change
the TimeoutDuration property in the Visual Studio Properties pane. If the Delay activity’s
properties aren’t showing in the Visual Studio Properties pane, as you did with the Code
activity, click the Delay activity you just inserted into your workflow once to select it.
Change the last two zeros (“00”) to “10”, which means the Delay activity will wait 10
seconds before allowing workflow processing to continue.