microsoft press windows workflow foundation step by step phần 6 potx
Bạn đang xem bản rút gọn của tài liệu. Xem và tải ngay bản đầy đủ của tài liệu tại đây (560.64 KB, 35 trang )
Chapter 8 Calling External Methods and Workflows 179
10. This activates the Browse And Select A .NET Type dialog box. Select Workflow2 in the left
pane, which displays the Workflow2 type in the right pane. Select the Workflow1 type
(Workflow2.Workflow1 is the fully qualified name) in the right pane and click OK.
11. Visual Studio then examines the Workflow2 workflow and displays its graphical
representation inside the InvokeWorkflow activity in the visual workflow designer.
12. The workflow implementations are now complete, so we can add them as references to
the main WorkflowInvoker application. From Solution Explorer, right-click the Work-
flowInvoker project and select Add Reference. When the Add Reference dialog box
appears, click the Projects tab. Select both Workflow1 and Workflow 2 from the list and
click OK.
180 Part II Working with Activities
13. Next add the code to create and start the instance. Locate this line of code in
Program.cs:
Console.WriteLine("Waiting for workflow completion.");
14. Add this code following the line of code you just located:
// Create the workflow instance.
WorkflowInstance instance =
workflowRuntime.CreateWorkflow(typeof(Workflow1.Workflow1));
// Start the workflow instance.
instance.Start();
15. We’ll now add a small amount of code to the host application simply to tell us when
each workflow completes. Insert the following code in the event handler for
WorkflowCompleted:
if (e.WorkflowDefinition is Workflow1.Workflow1)
Console.WriteLine("Workflow 1 completed.");
else
Console.WriteLine("Workflow 2 completed.");
waitHandle.Set();
The first workflow to complete sets the AutoResetEvent we’re using to force the application to
wait for workflow completion. We could add code to force the application to wait for both
workflows, but for demonstration purposes this should suffice. If you compile and execute
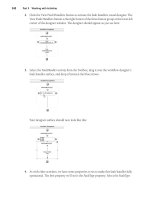
the WorkflowInvoker application, you’ll see console output similar to what you see in
Figure 8-4. If the output messages appear in a slightly different order, don’t be alarmed. This is
the nature of multithreaded programming
Figure 8-4 The WorkflowInvoker application console output
If you want to continue to the next chapter, keep Visual Studio 2005 running and turn to
Chapter 9, “Logic Flow Activities.” It’s one thing to crunch numbers, but we also need tools to
make decisions, and that’s the next topic.
If you want to stop, exit Visual Studio 2005 now, save your spot in the book, and watch your
favorite movie on DVD. Be sure to fast-forward through any boring parts.
Chapter 8 Calling External Methods and Workflows 181
Chapter 8 Quick Reference
To Do This
Design workflow/host data transfers Create an interface with methods designed to pass
the data back and forth. Be sure to add the
ExternalDataExchange attribute, as well as the correla-
tion attributes, as we did in the sample application.
Create the “data available” event arguments Derive an event argument class from
ExternalDataEventArgs, and anoint it with
information you need to pass back and forth.
Create the external data service This is a somewhat complex task in that you must write
a lot of code yourself to manage the data (which can
come from any number of workflow instances). But
in general, you create a class (the connector) that
manages the data (and is plugged into the workflow
runtime because it manages workflow state) and
another class (the service) that the host application (or
invoking workflow) uses to hook the “data available”
event and read (or write) the data.
Create the communications-based activities With your interface in hand, run wca.exe. The wca.exe
tool creates a pair of activities for you: one to send
data to the external (workflow) process and one to
receive data. In this chapter, we looked only at sending
data, but in Chapter 17 we’ll revisit this topic and build
a bidirectional interface.
Receive data in your host application (or
calling workflow)
Using the service class you created, hook the “data
available” event and call the services “read” method.
Invoke secondary workflows Add an instance of InvokeWorkflow to your workflow
process, and provide the data type of the workflow to
be invoked. Note you have to add a reference to the
secondary workflow to accomplish this.
183
Chapter 9
Logic Flow Activities
After completing this chapter, you will be able to:
■ Explain how to execute conditional expressions using the IfElse activity
■ Show how the While activity can be used to execute loops
■ Understand how the Replicator activity simulates a for loop, as well as how it’s used
We’re starting to piece together some of the critical components we’ll need to build real-world
workflows. We’ve seen how to execute code, both within and outside our workflow instances,
and we know how to handle exceptions, suspend processing, and even terminate our work-
flow if things get out of hand. But certainly a major component for any computational system
is the ability to make decisions based on runtime conditions. In this chapter, we begin to
address workflow activities that require us to tackle if/else scenarios as well as basic looping.
Conditions and Condition Processing
By now, it probably won’t surprise you to find that Windows Workflow Foundation (WF)
provides activities for logical process control flow based on runtime conditions. After all, if
WF provides activities to both raise and catch exceptions, why not have activities to ask ques-
tions regarding executing workflow conditions and make decisions based on those findings?
The activities we’ll examine in this chapter include the IfElse activity, the While activity,
and the Replicator activity. The IfElse activity is designed to test a condition and execute a
different workflow path depending on the result of the test. (We actually used this activity in
Chapter 1, “Introducing Microsoft Windows Workflow Foundation,” when we asked whether
or not a given postal code was valid when tested against a regular expression.) The While
activity, perhaps not too surprisingly, is used to perform a while loop. A for loop, however, is
accomplished using something known as the Replicator activity. Let’s start by looking at this
chapter’s sample application.
Note
The conditional processing you’ll do in this chapter is based on the CodeCondition,
which means you’ll write C# code to process the conditional expression. In Chapter 12,
“Policy And Rules,” you’ll use the RuleCondition which uses WF rules-based processing for
conditional expression evaluation. Both are equally valid. I simply chose to include
RuleCondition, in the same chapter I discuss rules-based processing in general.
184 Part II Working with Activities
The Questioner Application
This chapter’s sample application is a Windows Forms application that asks you three
questions, the text for which you can modify. (The question text is stored in the application’s
settings property bag.) You can also indicate whether the questions are dependent or inde-
pendent. You’ll pass the questions and dependency status into the workflow as it begins
execution.
Dependent questions will continue to be asked only if the previous questions were answered
in the affirmative. For example, if you’re asked, “Have you seen the document in question?”
and you have not, it makes little sense to ask, “Do you approve this document?” If the ques-
tions are dependent, the first negative response returns negative for the given response as well
as for all remaining question responses.
Independent questions will always be asked regardless of preceding responses. The question,
“Do you like ice cream?” is unrelated to “Is it raining outside at this time?” Whether you do or
do not like ice cream, the answer to that question is independent of the weather outside. Inde-
pendent questions continue to be asked whether you provide a negative response to an earlier
question or not.
The user interface appears as you see in Figure 9-1. If you modify the text for any of the three
questions, the new question text will automatically be stored in your application settings
property bag. (The same is true of the question type.) The questions are intended to generate
yes/no responses so that the workflow can pass the responses back to the host application as
an array of Boolean values.
Figure 9-1 The Questioner primary user interface
When you click the Execute button, the questions appear in order as message boxes with Yes
and No buttons. Once the workflow has processed all the questions, it returns a Boolean array
to the host application. The host application will examine the array for user-interface display
purposes.
While the workflow is executing, the responses appear as blue balls (as you see in Figure 9-1).
When the workflow task has completed, affirmative responses are shown as green balls and
negative responses are shown as red balls. If all responses were affirmative, the “final answer”
image appears as a green ball. However, if any of the three questions resulted in a negative
response, the final answer appears as an “8 ball.” You can see the application in action in
Figure 9-2.
Chapter 9 Logic Flow Activities 185
Figure 9-2 The Questioner application user interface during execution
The intention is for us to use this application for testing the three activities in this chapter.
The first Questioner iteration will use IfElse activity workflow activities to decide what course
of action to take (affirm or negate a response, and continue based on the dependency setting
if a given response was negative). The second iteration will use the While activity to ask ques-
tions while questions remain to be asked. And the final iteration will use the Replicator activity
to simulate a for loop to ask the questions. For each of these application iterations, we’ll use
the technique shown in the previous chapter to return the responses to the host application.
With that in mind, let’s look at using the IfElse activity.
Using the IfElse Activity
The IfElse activity is designed to simulate an if-then-else conditional expression, and in fact
you’ve used this activity in previous chapters (notably in Chapter 1, where the workflow
decided whether a given postal code was valid).
The IfElse activity requires you to provide a conditional expression, which is actually
implemented as an event handler. The event arguments, of type ConditionalEventArgs, have a
Boolean Result property you set to indicate the results of the conditional expression you build
into the event handler.
Depending on the Result value, the IfElse activity directs workflow execution to one of two
branches. Visually, in the Microsoft Visual Studio workflow visual designer, true executes the
path shown on the left and false executes the path to the right. Both branches are containers
for other activities, allowing you to insert whatever workflow activities are required to process
the information or application flow given the Boolean conditional value. Let’s drag and drop
a few of these into our sample application and give them a try.
Note
As you’ll probably agree after working through this section, the IfElse activity
probably isn’t the best activity you could use to model this workflow. You’ll find activities
better suited for this particular workflow later in the chapter. (In fact, this was intentional
on my part.)
186 Part II Working with Activities
Creating the QuestionFlow workflow using the IfElse Activity
1. Open Visual Studio, and open the Questioner application’s solution from the book
samples. You’ll find the solution in \Workflow\Chapter 9\IfElse Questioner. Simply
click File, then Open, and then finally Project/Solution. Using the resulting Open
Project dialog box, browse your computer’s file system until you find Questioner.sln and
click Open.
2. Scanning Visual Studio Solution Explorer, you should see a solution layout similar to the
one from the previous chapter. The main application files are located in the Questioner
project, while the host communication service files are located in the QuestionService
project. So that you can concentrate on the workflow aspects of this application, I have
already created the service interface, IQuestionService, and executed the wca.exe tool to
create the necessary communication activity, SendReponseDataToHost. To begin, locate
the QuestionFlow project and open the Workflow1.cs file for editing in the Visual Studio
workflow visual designer. Select Workflow1.cs in Solution Explorer, and then click the
View Designer toolbar button as you have in previous chapters.
3. When Workflow1 is ready for editing in the workflow visual designer, drag an IfElse activ-
ity from the Toolbox to the designer’s surface and drop it. This inserts an IfElse activity
item into your workflow.
4. The exclamation mark (!) you see, outlined by the red circle, tells you that more
information is required to compile your workflow. In fact, what’s missing is the
conditional expression itself! Select the left branch of ifElseActivity1 to bring the activity’s
properties into the Visual Studio Properties pane. Select Condition to activate the drop-
down list, and from the list select Code Condition.
Chapter 9 Logic Flow Activities 187
Note You actually have two choices for conditional expressions: code and rules-
based. We’ll use the code-based conditional expression here, saving the rules-based
technique for Chapter 12, “Policy Activities.”
5. Expand the resulting Condition property, type in the value AskQuestion1, and press
Enter. Visual Studio inserts the AskQuestion1 event handler for you and switches to code
view. For now, return to the workflow visual designer so that you can drag more activities
into your workflow.
6. With the Visual Studio workflow visual designer active, drag a CodeActivity onto the
designer’s surface and drop it into the right-hand branch of IfElseActivity1.
188 Part II Working with Activities
7. Assign the code activity’s ExecuteCode property the value of NegateQ1. When Visual
Studio inserts the NegateQ1 event handler and switches to the code editor, again return
to the workflow visual designer to drag one more activity onto the designer’s surface.
8. Repeat steps 6 and 7, but this time drop the code activity into the left branch of
IfElseActivity1.
Assign its ExecuteCode property the value Aff irmQ1. However, when Visual Studio
inserts the AffirmQ1 event handler, do not switch back to the workflow visual designer.
Instead, it’s time to add some code.
Chapter 9 Logic Flow Activities 189
9. We now need to add some properties to the workflow class that we can assign as
parameters when we start our workflow processing. Following the Workflow1 construc-
tor, add the following lines of code to contain the three questions the workflow will ask:
private string[] _questions = null;
public string[] Questions
{
get { return _questions; }
set { _questions = value; }
}
10. We also need to add the Dependent property, which is used to tell whether the questions
are or are not independent of one other. After the code you inserted in the preceding
step, add the following:
private bool _dependent = true;
public bool Dependent
{
get { return _dependent; }
set { _dependent = value; }
}
11. The question responses, as Boolean values, need to be stored somewhere until returned
to the host application. Therefore, following the Dependent property you just inserted,
add this field:
private bool[] _response = null;
12. The _response field is uninitialized, so locate the Workflow1 constructor and add this
code after the InitializeComponent method invocation:
// Initialize return vector.
_response = new bool[3];
_response[0] = false;
_response[1] = false;
_response[2] = false;
190 Part II Working with Activities
13. Now scan down the code file until you find the AskQuestion1 event handler Visual Studio
added for you. To this event handler, add the following lines of code:
// Ask the question!
DialogResult result = MessageBox.Show(Questions[0], "Questioner:",
MessageBoxButtons.YesNo, MessageBoxIcon.Question);
e.Result = (result == DialogResult.Yes);
14. To the NegateQ1 event handler, add this code:
// Negate answer.
_response[0] = false;
if (Dependent)
{
// Negate remaining answers.
_response[1] = false;
_response[2] = false;
}
15. Next, locate the AffirmQ1 event handler and add this code:
// Affirm answer.
_response[0] = true;
16. You have just added the workflow components designed to ask the first question.
However, two more questions remain. For the second question, repeat steps 3 through
8 to add the IfElse activity to the workflow, substituting references to question 1 with
references to question 2. Doing this inserts the event handlers AskQuestion2, NegateQ2,
and AffirmQ2. The workflow visual designer will appear as follows:
Chapter 9 Logic Flow Activities 191
17. Now find the AskQuestion2 event handler and add the following lines of code:
if (_response[0] == false && Dependent)
{
// No need to ask!
e.Result = false;
}
else
{
// Ask the question!
DialogResult result = MessageBox.Show(Questions[1], "Questioner:",
MessageBoxButtons.YesNo, MessageBoxIcon.Question);
e.Result = (result == DialogResult.Yes);
}
18. To the NegateQ2 event handler, add this code:
// Negate answer
_response[1] = false;
if (Dependent)
{
// Negate remaining answer
_response[2] = false;
}
19. And, to the AffirmQ2 event handler, add this code:
// Affirm answer.
_response[1] = true;
20. Repeat steps 3 through 8 once again to add the third question, substituting references
to the first question with references to the third question. Doing this creates the
AskQuestion3, NegateQ3, and AffirmQ3 event handlers. At this point, the workflow
visual designer should appear like so:
192 Part II Working with Activities
21. Locate the AskQuestion3 event handler and insert these lines of code:
if (_response[1] == false && Dependent)
{
// No need to ask!
e.Result = false;
}
else
{
// Ask the question!
DialogResult result = MessageBox.Show(Questions[2], "Questioner:",
MessageBoxButtons.YesNo, MessageBoxIcon.Question);
e.Result = (result == DialogResult.Yes);
}
22. Modify NegateQ3 event handler by adding this code:
// Negate answer.
_response[2] = false;
23. To the AffirmQ3 event handler, add the following:
// Affirm answer
_response[2] = true;
24. Now return to the workflow visual designer. If you move the mouse pointer to the
Toolbox and allow the Toolbox to open, you should find a custom activity called
SendResponseDataToHost. (Note that if the SendResponseDataToHost activity isn’t in the
Toolbox, compile the project and then look again.)
25. Drag an instance of SendResponseDataToHost onto the workflow visual designer, and
drop it after the third question’s IfElse activity, ifElseActivity3.
Chapter 9 Logic Flow Activities 193
26. Because the data to be returned is simply an array of value types (Boolean values), the
process is slightly different than in the previous chapter. Instead of adding a dependency
property to contain the Boolean array, the SendResponseDataToHost activity contains the
data as a field. The user interface to create the field differs from the user interface you
saw in Chapter 7 (in step 8 of the “Creating a workflow using the Throw activity”
procedure). Select the responses property in the Visual Studio Properties pane, and
click the browse (…) button.
This activates the Boolean Collection Editor dialog box.
194 Part II Working with Activities
27. Click the Add button three times, leaving the default values as False, and then click OK.
Visual Studio adds a three-element Boolean array to your code for you in the
Workflow1.designer.cs file.
Tip
In step 28 to follow, you’ll add a CodeActivity to assign the _response field you
added to Workflow1 (in step 11) to the Boolean array we just created for this instance
of SendResponseDataToHost. You could, however, use SendResponseDataToHost’s
response property directly now that we’ve created it. I elected to do things this way only
because it made more sense (from an illustrative standpoint) to show how to add and
work with IfElse activity objects before dealing with the host communication activity.
28. We need to tie the response array we’re using for our question responses to the value the
SendResponseDataToHost activity will use (the property we created in steps 26 and 27).
Therefore, drag a CodeActivity onto the workflow visual designer and drop it between the
third IfElse activity, ifElseActivity3, and the SendResponseDataToHost activity,
sendResponseDataToHost1.
29. Enter the code activity’s ExecuteCode property as CopyResponse.
30. When Visual Studio inserts the CopyResponse event handler and activates the code
editor, insert this code:
// Assign outgoing data.
sendResponseDataToHost1.responses = _response;
31. Compile the entire solution by pressing F6, and correct any compilation errors.
The host application file has already been created, and the appropriate code has been inserted
to execute the workflow as created here. Simply press F5 to execute the application. Does
changing the question Dependency property have any effect when asking questions and
providing negative responses?
Chapter 9 Logic Flow Activities 195
Using the While Activity
If you look back at the preceding section, you’ll note at least two things. First, you certainly
did gain some experience using IfElse activities. And second, it took 31 separate steps to create
the workflow process. There are some programmatical constructs that lend themselves nicely
to if-then-else processing, but this particular application would be better suited to questions
that were asked in a looping construct. And that’s what we’ll look at next. You’ll replace the
workflow you just created with another that uses a while loop.
The WF While activity uses a similar approach to the IfElse activity when processing
conditional expressions. It fires an event to request permission to continue with the loop, and
it uses ConditionalEventArgs to return your decision (again using the Result property).
However, unlike using the IfElse activity, when you are using the While activity, setting Result to
true causes the loop to continue. Setting Result to false breaks the loop. Let’s see how switching
the conditional processing from if-then-else to a while loop simplifies our workflow.
Creating the QuestionFlow workflow using the While Activity
1. Open Visual Studio, and again open the Questioner application’s solution from the book
examples. In this case, you’ll find the solution in \Workflow\Chapter 9\While Ques-
tioner. Click File, then Open, and then finally Project/Solution. Using the Open Project
dialog box, again browse your computer’s file system until you find Questioner.sln and
then click Open.
2. As with the preceding section, the application is essentially complete, including the
creation of the SendResponseDataToHost activity. What remains to be completed is the
workflow processing itself. Look at the Solution Explorer pane and find the
Workflow1.cs file in the QuestionFlow project. Select it in the tree control, and click the
View Designer toolbar button to load it into the Visual Studio workflow visual designer.
3. When Workflow1 is ready for editing in the workflow visual designer, drag an instance of
the While activity from the Toolbox to the designer’s surface and drop it, inserting a
While activity item into your workflow.
196 Part II Working with Activities
4. In a manner similar to the IfElse activity, select the Condition property for the
whileActivity1 activity to activate its drop-down list. From the drop-down list, select Code
Condition.
5. Expand the Condition property, type TestComplete, and press Enter to add the
TestComplete event handler to your workflow code. After Visual Studio inserts the
event handler and switches the user interface to the code editor, return to the workflow
visual designer.
6. With the workflow visual designer active, drag an instance of CodeActivity and drop it
in the center of whileActivity1. Assign the value AskQuestion to the ExecuteCode
property, and return to the workflow visual editor when the AskQuestion event handler
has been added.
Chapter 9 Logic Flow Activities 197
7. So that we can return the Boolean array of question responses back to the host
application, follow steps 24 and 25 of the preceding section to insert an instance
of SendResponseDataToHost. (As before, compile the application first if the SendResponse-
DataToHost activity doesn’t show up in the Toolbar.) Drop the SendResponseDataToHost
activity below whileActivity1 so that it’s executed after the while loop.
8. We also need to repeat steps 9 through 12 from the preceding section to insert the
Questions and Dependent properties, as well as to create and initialize the _response array.
9. Following the declaration of the _response array, add this code to contain our loop
counter:
private Int32 _qNum = 0;
10. Next let’s add the condition test code we’ll need to continue or terminate loop
processing. Scan through the code until you find the TestComplete event handler, and
add the following:
// Check for completion.
if (_qNum >= Questions.Length)
{
// Assign outgoing data.
sendResponseDataToHost1.responses = _response;
198 Part II Working with Activities
// Done, so exit loop.
e.Result = false;
}
else
{
// Not done, so continue loop.
e.Result = true;
}
11. The last bit of code we require is the code to actually ask the questions. In the
Workflow1.cs file, you should find the AskQuestion event handler. Add the following
code to the AskQuestion event handler. If the question’s response is no and the Dependent
property is true, all remaining questions are negated and the loop counter is advanced
such that the next completion test (in TestComplete) will cause the while loop to termi-
nate.
// Ask the question!
DialogResult result = MessageBox.Show(Questions[_qNum], "Questioner:",
MessageBoxButtons.YesNo, MessageBoxIcon.Question);
_response[_qNum] = (result == DialogResult.Yes);
// Check response versus dependency
if (!_response[_qNum] && Dependent)
{
// Negate remaining questions
while (_qNum < Questions.Length)
{
// Negate this question
_response[_qNum] = false;
// Next question
++_qNum;
} // while
} // if
else
{
// Set up for next iteration
++_qNum;
} // else
12. Repeat steps 28 through 30 of the preceding section to tie in a Code activity you will use
to assign the return value array. (Drop the Code activity between the While1 activity and
the SendResponseDataToHost1 activity.)
13. Compile the solution by pressing F6. If you find that any compilation errors are present,
correct them and recompile.
If you take a moment to compare the screen shot from step 7 in this section to the image
from step 28 in the preceding section, it’s easy to see that using the While activity (at least for
this scenario) simplifies the workflow processing tremendously. The entire workflow
wouldn’t even fit in the graphic for the preceding section’s image for step 28!
Chapter 9 Logic Flow Activities 199
If there is a workflow-equivalent while loop, could there also be a workflow-equivalent for
loop? In fact, there is. It’s the Replicator activity, and it happens to be the next topic of
discussion.
Using the Replicator Activity
It would be incorrect to say that the Replicator activity is equivalent to a for loop in C#
processing terms. The C# Language Specification 1.2 tells us the for loop in C# looks like
the following:
for ( for-initializer ; for-condition ; for-iterator ) embedded-statement
embedded-statement is executed until the for-condition evaluates to true (if omitted, it’s assumed
to be true), beginning with for-initializer and executing for-iterator for every iteration. There is
nothing mentioned regarding replication in any of the C# for statement components. With rep-
lication, we envision a cookie-cutter software factory that stamps out exact replicas of the
original code. C# for loops don’t operate in this fashion.
In fact, the cookie-cutter concept isn’t terribly far off the mark when looking at WF’s equiva-
lent for loop activity. If you’re familiar with ASP.NET, you might have used the Repeater control
(a favorite of mine). The ASP.NET Repeater control accepts an item template (and alternatively,
an alternating item template) and replicates it as many times as required, depending on the
number of items in the data object to which it is bound.
The Replicator activity is similar to the ASP.NET Repeater control in that it binds to an IList-
based data source and replicates its embedded (single) child activity, with one child activity
instance per element in the IList-based data source. Yet the Replicator activity is similar to a C#
for statement in some respects because it allows a loop initialization event (similar to for-
initializer), a loop completion event (such as when for-iterator is compared with for-condition),
and a loop continuation event (similar to for-condition). It provides events to indicate the cre-
ation of a replicated (embedded-statement) child activity, so that you can individualize the data
binding, and it fires an event for child activity completion so that you can perform any cleanup
or housekeeping tasks on a per–child activity instance basis.
In a nutshell, the Replicator activity accepts—and requires—a single child activity, which can
be a container activity (such as the Sequence activity), and it fires an initialization event to
kick things off. During the initialization event, you can bind an IList-based collection to the
Replicator activity’s InitialChildData property.
The Replicator activity then replicates the child activity you provided to match the number of
items in your IList-based collection. These child activity instances can then be executed
sequentially or in parallel (by setting the ExecutionType property). The UntilCondition event
fires before each child activity is executed, and you tell the Replicator activity to continue
200 Part II Working with Activities
execution by setting the ConditionalEventArgs Result property to false (true terminates the
loop) when handling UntilCondition. Table 9-1 outlines the Replicator activity properties we
need to be concerned with, while Table 9-2 lists the events we need to handle when using the
Replicator activity in our workflows.
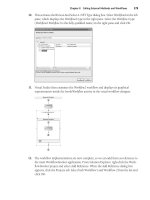
Although Tables 9-1 and 9-2 are useful in describing the properties and events the Replicator
activity exhibits, I think a diagram is also helpful to show the timing. Figure 9-3 provides you
with a basic flowchart showing which events are fired and at what point. (I can hardly believe
I worked so hard to learn Unified Modeling Language only to provide you with a flowchart!)
Table 9-1 Replicator Activity Properties
Method Purpose
ExecutionType Gets or sets the ExecutionType (the enumeration) for the Replicator
activity. The ExecutionType enumeration contains the values Par-
allel and Sequence.
InitialChildData Gets or sets a list of child activity data. This property is similar to
the data-binding properties found in other .NET technologies,
and in fact the object assigned to this property must be based on
IList. The Replicator activity creates child activity instances for each
of the items in the IList-based collection assigned to this property.
Table 9-2 Replicator Activity Events
Method Purpose
ChildCompletedEvent Fired when the child activity instance of the Replicator activity has
completed. This is fired once for each replicated activity.
ChildInitializedEvent Fired when the child activity instance of the Replicator activity has
initialized. This is fired once for each replicated activity.
CompletedEvent Fired when the Replicator activity has completed (that is, when all
replicated instances of the child activity have completed their
execution).
InitializedEvent Fired when the Replicator activity begins to execute. This event is
fired just once, prior to any child activity execution.
UntilCondition Although listed in much of the WF documentation as a property,
UntilCondition represents an event handler in much the same way
the ExecuteCode property represents an event handler to execute
the code associated with a CodeActivity. This event is fired prior to
the execution of each child activity instance. The Conditional-
EventArgs event arguments control the continued execution of
the loop. Assigning Result a value of false allows the next child
activity to execute. Assigning Result a true value causes the
Replicator activity to stop the execution of all subsequent child
activities.
Chapter 9 Logic Flow Activities 201
Figure 9-3 The Replicator activity event sequencing flowchart
The IList-based collection you see in Figure 9-3 is assigned to the InitialChildData property,
either before or during the processing of the Initialized event. The flowchart also doesn’t
illustrate the fact that the replicated child activities (one for each element in the IList-based
collection in InitialChildData) can be executed sequentially or in parallel, depending on the
ExecutionType property setting.
How do you actually use the Replicator activity? From the description so far, it sounds a great
deal more complicated than it really is. In fact, the mechanics aren’t very different than for
other activities. Drag an instance onto the workflow visual designer, assign values for the var-
ious event handlers, and drag a single child activity into the center of the Replicator activity.
This single child activity, like the Replicator activity itself, can be a container (such as a
Sequence activity), so more than one activity can in fact be executed. With these tables and fig-
ures in mind, let’s rebuild the Questioner application using the Replicator activity.
Creating the QuestionFlow workflow using the Replicator Activity
1. If you’ve not already done so, open Visual Studio and open the Questioner application’s
solution from the \Workflow\Chapter 9\Replicator Questioner. Click File, then Open,
and then finally Project/Solution. Using the Open Project dialog box, browse until you
find Questioner.sln and click Open.
Fire
Initialized
Event
IList
Collection
Replicate
Child
Activity
Fire
ChildInitialized
Event
Fire
Completed
Event
Execute
Child
Activity
Done
Fire
ChildCompleted
Event
Test
UntilCondition
ConditionalEventArgs.Result=False
ConditionalEventArgs.Result=True
202 Part II Working with Activities
2. As with both preceding sections, the application is once again essentially complete so
that you can concentrate on the workflow aspects. Select the Workflow1.cs file in Solu-
tion Explorer’s tree control, and click the View Designer toolbar button to load it into the
Visual Studio workflow visual designer.
3. When Workflow1 is ready for editing in the workflow visual designer, drag an instance of
Replicator from the Toolbox to the designer’s surface and drop it. This, of course, inserts
an instance of the Replicator activity into your workflow.
4. In the Visual Studio Properties pane, select the Initialized property and enter
InitializeLoop. Visual Studio inserts the event handler in your code and shifts you to
the code editor. Return to the workflow visual designer so that you can continue setting
properties.
5. For the Completed property, enter LoopCompleted to add the LoopCompleted event
handler to your workflow code. Again return to the workflow visual designer.
Chapter 9 Logic Flow Activities 203
6. In the text area for the ChildInitialized property, enter PrepareQuestion. The
PrepareQuestion event handler will be added to Workflow1’s code base. Return to the
workflow visual designer.
7. Next establish the ChildCompleted event handler by entering QuestionAsked next to
the ChildCompleted property. Return to the workflow visual designer.
8. So that the loop terminates after asking all the questions (or when the questions are
dependent and the user responded negatively), add an event handler by selecting the
UntilCondition property and opening the selection list. Select Code Condition.
204 Part II Working with Activities
9. For the UntilCondition’s Condition property, enter TestContinue. Once again return to
the workflow visual designer.
10. The Replicator activity replicatorActivity1 requires a single child activity. Therefore,
from the Toolbox drag a Code activity and drop it into replicatorActivity1. Designate its
ExecuteCode property to be AskQuestion.