microsoft press windows workflow foundation step by step phần 8 pptx
Bạn đang xem bản rút gọn của tài liệu. Xem và tải ngay bản đầy đủ của tài liệu tại đây (856.15 KB, 61 trang )
Chapter 12 Policy and Rules 273
Rule Conditions
The WF activities that evaluate conditional expressions include the IfElse activity, While
activity, Replicator activity, and ConditionedActivityGroup activity. Each of these activities
requires you to make a true/false decision. In Chapter 9, we used the Code Condition prop-
erty setting, which caused Visual Studio to inject an event handler into our workflow code.
The event arguments, which are of type ConditionalEventArgs, contained a Result property that
we set to true or false, depending on our decision.
However, for each of these conditional decisions, we could have used a Rule Condition
instead. Rule Conditions are rules that evaluate to true or false. “The number of purchased
items exceeds the free shipping threshold,” for example. To clarify this a bit, here is a sample
application that uses a Rule Condition.
Create a new workflow application with Rule Condition conditional evaluation
1. The RuleQuestioner sample application comes in two forms, as the samples have in
previous chapters. The completed form, found in the \Workflow\Chapter12\RuleQues-
tioner Completed\ directory, is great for opening and following along with the text with-
out having to actually type anything. It runs as is. The version to open for editing if you
want to follow along is found in the \Workflow\Chapter12\RuleQuestioner directory.
This version of the application is started for you, but you have the opportunity to type
code and create the workflow. To open either solution, drag its respective .sln file onto an
executing copy of Visual Studio.
2. With the solution open and ready for editing, create a separate sequential workflow
library project as you did in Chapter 3, “Workflow Instances,” in the “Adding a sequen-
tial workflow project to the WorkflowHost solution” procedure. Name this workflow
library RuleFlow and save it in the \Workflow\Chapter12\RuleQuestioner directory.
3. After Visual Studio has added the RuleFlow project, it will open the Workflow1 workflow
for editing in the visual workflow designer. Open the Toolbox, and drag an instance of
the Code activity onto the designer’s surface and drop it. For its ExecuteCode property
value, type AskQuestion.
274 Part II Working with Activities
4. Visual Studio creates the AskQuestion method and switches you to the code editor. In the
AskQuestion method, type this code:
// Ask a question
DialogResult res = MessageBox.Show("Is today Tuesday?", "RuleFlow",
MessageBoxButtons.YesNo, MessageBoxIcon.Question);
_bAnswer = res == DialogResult.Yes;
5. Look for the Workflow1 constructor, and following the constructor, add this code:
private bool _bAnswer = false;
6. Scroll further up and locate the using statements. At the end of the existing list, append
this line:
using System.Windows.Forms;
7. Because MessageBox is supported by System.Windows.Forms, which is not an assembly
automatically referenced by Visual Studio when you create a sequential workflow
project, you need to add a reference. Right-click the References tree node in the RuleFlow
project in Solution Explorer, and select Add Reference from the context menu. Click the
.NET tab, and locate System.Windows.Forms in the list. Select it and then click OK.
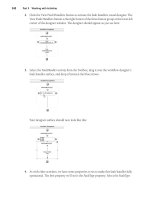
8. Now switch back to the visual workflow designer. Once there, drag an IfElse activity onto
the visual workflow designer’s surface and drop it below the Code activity you just
placed. The red exclamation mark indicates additional work is required, which in this
case means we need to add the condition that triggers the workflow to take the left path
(“true”) or right path (“false”).
Chapter 12 Policy and Rules 275
9. In the visual workflow designer, select the left branch, ifElseBranchActivity1. This acti-
vates its properties in Visual Studio’s Properties pane.
10. Select the Condition property, and click the down arrow to display the selection list of
available conditional processing options. Choose the Declarative Rule Condition option.
11. Expand the Condition property by clicking the plus sign (+) next to the property name.
Once the property expands, click the ConditionName property to activate the Browse ( )
button. Click it.
276 Part II Working with Activities
12. This activates the Select Condition dialog box. Click the New button.
13. This activates the Rule Condition Editor dialog box. In the Condition field, type
System.DateTime.Now.DayOfWeek == System.DayOfWeek.Tuesday and then
click OK.
14. Click OK to dismiss the Select Condition dialog box. Note there is now a condition
named Condition1 in the condition list.
15. At this point, the IfElse activity has a condition to process, but it doesn’t execute any
code! Therefore, drag a Code activity onto the designer’s surface and drop it into the left
branch. For its ExecuteCode property, enter ShowTuesday.
Chapter 12 Policy and Rules 277
16. Visual Studio shifts you to the code editor, where you can provide an implementation for
ShowTuesday. Type this into the ShowTuesday event handler and then return to the visual
workflow designer:
string msg = _bAnswer ?
"The workflow agrees, it is Tuesday!" :
"Sorry, but today IS Tuesday!";
MessageBox.Show(msg);
17. Drag and drop a second Code activity into the right IfElse activity branch. Enter
ShowNotTuesday into its ExecuteCode property.
18. When Visual Studio transfers you to the code editor, type this code into the
ShowNotTuesday event handler and switch back to the visual workflow designer:
string msg = !_bAnswer ?
"The workflow agrees, it is not Tuesday!" :
"Sorry, but today is NOT Tuesday!";
MessageBox.Show(msg);
278 Part II Working with Activities
19. With the workflow now complete, add a reference to the workflow from the RuleQues-
tioner application. Right-click the RuleQuestioner tree control node in Visual Studio’s
Solution Explorer, and select Add Reference. When the Add Reference dialog box
appears, click the Projects tab. Select RuleFlow from the list and click OK.
20. Open Program.cs in the RuleQuestioner project for editing and then look for this line of
code:
// Print banner.
Console.WriteLine("Waiting for workflow completion.");
21. To create a workflow instance, add this code following the line of code you just located:
// Create the workflow instance.
WorkflowInstance instance =
workflowRuntime.CreateWorkflow(typeof(RuleFlow.Workflow1));
// Start the workflow instance.
instance.Start();
22. Compile the solution by pressing F6 or by selecting Build Solution from the main Visual
Studio Build menu. Correct any compilation errors that might be present.
23. Execute the application by pressing F5 (or Ctrl+F5).
If you look closely at step 13, the rule we added has nothing to do with whether the user told
the workflow that today is or is not Tuesday. The rule checked the actual day of the week. It
could have taken the user’s input into account. (I would have added this._bAnswer to the rule
to access the Boolean value.)
You also might wonder why this is better than using a code condition. Actually, it’s not that
one is better than the other (code condition over rule condition). The effect is the same. What
changed is the decision that was made was made using stored rule material, which at run time
could be replaced with different rule material. It’s a powerful concept. It becomes even more
powerful when more than one rule is involved, which is the case with policy. But before we get
to policy, we need to look at forward chaining.
Forward Chaining
If you’ve ever watched cars being assembled, you can’t help but be amazed. They’re actually
quite complex, and the assembly process is necessarily even more complex. Wrapped up in
the assembly process is the concept of an option. Cars have optional components. Maybe
some have satellite radio, or others come with Global Positioning System receivers so that the
driver never becomes lost. Not all cars on the assembly line have every option.
So when a car comes down the line that does have more options than others, the assembly
process often changes. Some options require different wiring harnesses very early in their
assembly. Or they require stronger batteries or different engine components.
Chapter 12 Policy and Rules 279
The point is that the assembly process changes on a per-car basis. At each assembly station,
the line workers (or robots) are told what pieces to assemble. The process that informs them
could easily be envisioned as a workflow process using a rules-based approach. Moreover,
decisions made early affect how decisions will be made later. Some options aren’t compatible
with others, so the assembly process must change as the cars move down the line.
This is the essence of forward chaining. Rules are indelibly linked together, or chained, such
that one rule’s decision affects how rules down the line are evaluated. When we have more
than one rule to deal with, as we will when working with policy, we’ll need to be concerned
with rule dependencies and how we want to handle forward chaining.
Note
The phrase "dependencies between rules” really means that two or more rules share
a common workflow field or property. If no rule shares access to a workflow field or property
with another rule, there is no dependency between these two rules. If there is a dependency,
the problem will be informing the rules engine that dependencies exist, as there are situa-
tions that could mask their existence. (We’ll look at those in this section.)
As I mentioned earlier in the chapter, rules are collected together in a RuleSet. Rules within a
RuleSet can be assigned priorities, and you can specify whether or not they’re active at a par-
ticular point in time (akin to an enabled property). When more than one rule is present, the
rules are processed in the following manner:
1. The list of active rules is derived.
2. The highest priority rule (or set of rules) is found.
3. The rule (or rules) is evaluated, and its then or else actions are executed as necessary.
4. If a rule updates a workflow field or property used by a previous, higher-priority rule in
the list, that previous rule is reevaluated and its actions are re-executed as necessary.
5. The process continues until all rules in the RuleSet have been evaluated, or reevaluated,
as required.
Rules can be forward-chained as a result of three situations: implicit chaining, attributed
chaining, or explicit chaining. That is, rules can be linked and share dependencies because the
workflow runtime ascertained there was a need (implicit chaining), you applied one of the
rules-based attributes to a method (attributed chaining), or you used the Update statement
(explicit chaining). Let’s look briefly at each.
Implicit Chaining
Implicit chaining comes about when fields and properties are updated by a rule when those
fields or properties are clearly read by other rules. For example, consider these rules:
IF this.OrderQuantity > 500 THEN this.Discount = 0.1
280 Part II Working with Activities
And
IF this.Discount > 0 && this.Customer == "Contoso"
THEN this.ShippingCost = 0
The first rule applies a discount if the ordered quantity is greater than 500 units. The second
rule states that if the company is Contoso, the shipping is free if there is also a discount. The
second rule might need to be reevaluated and executed again if the first rule comes into play.
Attributed Chaining
Because methods in your workflow can modify fields and properties without the rules engine
being aware of it, WF provides the rules-based attributes I mentioned previously in the chap-
ter. Looking at the preceding example, with the rules rewritten slightly, attributed chaining
might look like this:
IF this.OrderQuantity > 500 THEN this.SetDiscount(0.1)
And
IF this.Discount > 0 && this.Customer == "Contoso"
THEN this.ShippingCost = 0
Here, the first rule calls a method in the workflow class, SetDiscount, which updates
the Discount property. The rules engine cannot know SetDiscount will change the value of
Discount, so when writing the SetDiscount method, you should use the RuleWrite (or
RuleInvoke) attribute:
[RuleWrite("Discount")]]
private void SetDiscount(decimal discountValue)
{
}
The RuleWrite attribute informs the rule engine that a call to SetDiscount results in the Discount
property being updated. Because this then forms a dependency, the rules will be reevaluated
if the SetDiscount method is called.
Explicit Chaining
The final type of forward chaining is explicit, which is to say your rule uses the Update state-
ment to inform the rules engine that the value of a field or property has changed. The effect of
Update is the same as if the RuleWrite attribute were applied. When calling a workflow
method, the rules engine cannot know whether or not the method made updates to a field or
property that the rules depend on. However, you do know. In that case, you call the workflow
method followed by an Update statement to inform the rules engine of the dependency (and
the change to the underlying data on which the rules engine bases decisions).
Chapter 12 Policy and Rules 281
This might sound odd, but it has value. If you write your own workflows, you should use the
rules-based attributes. However, as workflow-based software grows in popularity and people
begin using third-party workflows, they might find the rules-based attributes haven’t been
applied to the various workflow methods. In that case, they should use the Update statement
to maintain the correct workflow state and keep the rules engine in sync. The rules-based
attributes state changes declaratively, while the Update statement is imperative. You need an
imperative solution when working with precompiled third party software.
Returning to the preceding example, assume the SetDiscount method did not have the
RuleWrite attribute applied. The two rules would then look like this:
IF this.OrderQuantity > 500 THEN this.SetDiscount(0.1)
Update(this.Discount)
And
IF this.Discount > 0 && this.Customer == "Contoso"
THEN this.ShippingCost = 0
Armed with this information, the rules engine is aware that the Discount property has been
updated and will reevaluate the application of the rules accordingly.
Controlling Forward Chaining
You might think that once you initiate rules-based workflow execution you give up control
and allow the rules engine to make all the decisions. Although in most cases this is precisely
what you want, you do have some control over how rule dependencies and forward chaining
are handled.
Table 12-6 contains the three types of forward chaining control you have.
Full chaining allows the rules engine to process rules as it was designed to do, including
implicit and attributed reevaluations as required.
Explicit chaining deactivates implicit and attributed forward chaining, and it places the
burden of notifying the rules engine of dependencies squarely on your shoulders, using
explicit forward chaining. Where the Update statement is used, you have total control over
Table 12-6 Forward Chaining Control Actions
Action Purpose
Full Chaining The default. This action allows the rules engine to process and
reevaluate rules as it deems necessary.
Explicit Chaining When applied, this control action limits forward chaining
behavior to rules that include the Update statement.
Sequential This effectively turns forward chaining off. No dependencies are
evaluated, and rules are applied in order, once per rule.
282 Part II Working with Activities
rule dependencies and reevaluation. Where the Update statement is omitted, the rules engine
makes no attempt to ascertain whether dependencies exist, so rules will not be reevaluated
even if dependencies actually exist. The effect of this is you have total control over forward
chaining, at the cost of added Update statements in your rules. You might do this to increase
performance (because the rules engine doesn’t make what might amount to unnecessary
rules reevaluations), or you might have to do this to eliminate cyclical dependencies in
your rules.
Sequential chaining effectively turns all forward chaining off. Rules are evaluated from top to
bottom in a single pass. If there are dependencies, those dependencies are completely
ignored.
Tip
The judicious use of priority can often control forward chaining quite effectively as well.
Higher-priority rules execute first, so updating fields and properties within higher-priority
rules establishes the values that lower-priority rules will use before the lower-priority rules
execute. As you recall, you establish the priority in the same Visual Studio user interface you
use to create the rule.
Controlling Rule Reevaluation
You also have control over how rules are reevaluated. Table 12-7 lists the modes. An important
thing to keep in mind is that the rule reevaluation modes are applied at the individual rule
level. On a rule-by-rule basis, you can specify the reevaluation behavior for that particular rule.
By always allowing rules to be reevaluated, the rules engine makes decisions that might
change the end result of the rules processing based on interim changes in state. As dependent
field and property values are modified, the rules engine can re-execute rules as necessary to
take those changes into account.
However, sometimes you might not want this to happen, in which case you select Never as
your rule reevaluation mode. Why would you select this reevaluation mode? Well, one
example might include the following:
IF this.Handling < 5.0 && this.OrderQuantity > 500 THEN this.Handling = 0
This rule says, “If the handling charge is less than $5.00 and the order quantity is greater than
500 units, then don’t charge for handling at all.” But what happens when the rule criteria are
Table 12-7 Rule Reevaluation Modes
Mode Purpose
Always The default. This mode allows the rules engine to reevaluate rules
as necessary.
Never When applied, this mode indicates the rule should be evaluated
only once (never reevaluated).
Chapter 12 Policy and Rules 283
met and the handling charge is set to 0? Well, the dependent property Handling has been
updated, so the rule is reapplied! If you guessed that the rule represents an infinite loop, you
guessed correctly. Therefore, applying a reevaluation mode of Never makes sense—once the
handling cost is 0, why evaluate the rule again? Although there might be other ways to write
this particular rule to prevent an infinite loop, the point is you have this reevaluation mode as
a tool in your workflow authoring toolkit.
Using the Policy Activity
Forward chaining is a situation that arises when more than one rule is to be processed. For
Rule Condition situations, this is never the case—there is only one rule. In fact, it’s not even a
complete rule but rather a Boolean expression. However, the Policy activity changes all that.
With the Policy activity, you do have the opportunity to combine multiple rules and you might
(or might not) see the effects of forward chaining.
When you use a Policy activity, rules are aggregated into a collection, and this collection is
maintained by the WF RuleSet object. When you drag and drop an instance of the Policy activ-
ity into your workflow, you’ll need to create a RuleSet object and insert your rules, applying for-
ward chaining control and rule reevaluation modes as necessary. Visual Studio is there to help
with a user interface designed for authoring collections of rules, just as there is one for adding
a single Rule Condition.
To demonstrate the Policy activity, let’s revisit the scenario I outlined in the “Selecting a
Workflow Type” section in Chapter 4. I won’t implement all the rules mentioned there, but
I’ll implement enough to demonstrate the Policy activity in action. The basic set of rules is as
follows:
1. When you receive an order, check the nominal amount of plasticizer you should have on
hand. If you think you have enough, try to fulfill the complete order. If not, prepare to fill
a partial order.
2. If you’re filling a partial order, check to see whether the company accepts partial orders
or requires you to wait until you can produce a full order.
3. If you’re filling a complete order, check the actual level of plasticizer in the tank (some
might have evaporated). If there is enough plasticizer to complete the full order, process
the full order.
4. If there isn’t enough plasticizer to complete the order, process a partial order. (See the
second rule.)
I realize any competent plastics company would know the true level of plasticizer in its tank,
but this is still a good example because there are many conditions in effect. If an order comes
in and we know we can’t fill it, we see whether we can ship a partial order (which we might
or might not be able to do based on agreements with the customer). We could always try to
process orders we know we can fill, but what happens when the amount of plasticizer we
think we have differs from the amount we actually have, and this difference causes a partial
284 Part II Working with Activities
shipment? It’s this scenario I’m interested in demonstrating because it shows the rules
evaluation process in action.
Imagine we’re the plastics manufacturer and we have two major customers, Tailspin Toys and
Wingtip Toys. Tailspin Toys has told us they accept partial shipments, but Wingtip requires
the full order to be delivered. Our workflow will use a Policy activity to apply the rules I out-
lined to these customers, their orders, and the amount of raw material we have on hand,
which might or might not be enough to complete their order. Let’s see this activity in action.
Create a new workflow application with the Policy activity
1. The PlasticPolicy application is again provided to you in two varieties: completed and
incomplete. You can use the completed version, so simply follow along, and you’ll find
it in the \Workflow\Chapter12\PlasticPolicy Completed\directory. The incomplete ver-
sion will require you to work through the steps I’ve outlined here, and you can find it in
the \Workflow\Chapter12\PlasticPolicy\ folder. To open either solution, just drag its
.sln file onto an executing copy of Visual Studio.
2. Once Visual Studio has loaded the PlasticPolicy solution and made it available for
editing, create a separate sequential workflow library project as you did in Chapter 3, in
the “Adding a sequential workflow project to the WorkflowHost solution” procedure.
Name this workflow library PlasticFlow and save it in the \Workflow\Chapter12\ Plas-
ticPolicy directory.
3. After Visual Studio has added the PlasticFlow project, Visual Studio opens the Workflow1
workflow for editing in the visual workflow designer. Open the Toolbox, and drag an
instance of the Policy activity onto the designer’s surface and drop it.
4. Before you actually create the rules to go with the Policy activity you just inserted into
your workflow, you need to add some initialization code and helper methods. To begin,
open Workflow1.cs in the code editor by selecting it in the Solution Explorer tree control
and clicking the View Code toolbar button. Prior to the constructor, type in this code:
private enum Shipping { Hold, Partial };
private decimal _plasticizer = 14592.7m;
private decimal _plasticizerActual = 12879.2m;
private decimal _plasticizerRatio = 27.4m; // plasticizer for one item
private Dictionary<string, Shipping> _shipping = null;
// Results storage
private bool _shipPartial = false;
Chapter 12 Policy and Rules 285
private Int32 _shipQty = 0;
// Order amount
private Int32 _orderQty = 0;
public Int32 OrderQuantity
{
get { return _orderQty; }
set
{
// Can't be less than zero
if (value < 0) _orderQty = 0;
else _orderQty = value;
}
}
// Customer
private string _customer = String.Empty;
public string Customer
{
get { return _customer; }
set { _customer = value; }
}
5. Scroll up in the source file, and add this using statement to the list of other using state-
ments:
using System.Collections.Generic;
6. Then scroll down, and again look for the Workflow1 constructor. Within the constructor,
add this code following the call to InitializeComponent:
// Establish shipping for known customers
this._shipping = new Dictionary<string, Shipping>();
this._shipping.Add("Tailspin", Shipping.Partial);
this._shipping.Add("Tailspin Toys", Shipping.Partial);
this._shipping.Add("Wingtip", Shipping.Hold);
this._shipping.Add("Wingtip Toys", Shipping.Hold);
7. Following the constructor, add these helper methods:
private bool CheckPlasticizer()
{
// Check to see that we have enough plasticizer.
return _plasticizer - (OrderQuantity * _plasticizerRatio) > 0.0m;
}
private bool CheckActualPlasticizer()
{
// Check to see that we have enough plasticizer.
return _plasticizerActual - (OrderQuantity * _plasticizerRatio) > 0.0m;
}
[RuleWrite("_shipQty")]
private void ProcessFullOrder()
{
286 Part II Working with Activities
// Set shipping quantity equal to the ordered quantity.
_shipQty = OrderQuantity;
}
[RuleWrite("_shipQty")]
private void ProcessPartialOrder()
{
// We can ship only as much as we can make
_shipQty = (Int32)Math.Floor(_plasticizerActual / _plasticizerRatio);
}
8. So that you can see the output from the rules processing, activate the visual workflow
designer and click the background of the main sequential workflow. This activates the
Properties pane for the main workflow activity. In the Properties pane, click the Events
toolbar button (the button with the lightning bolt image). In the editable field for the
Completed event, enter ProcessingComplete. This adds an event handler for the Work-
flowComplete event to your workflow code and switches you to the code editor for the
Workflow1 class.
9. Locate the ProcessingComplete method Visual Studio just added, and insert this code:
Console.WriteLine("Order for {0} {1} be completed.", _customer,
OrderQuantity == _shipQty ? "can" : "cannot");
Console.WriteLine("Order will be {0}", OrderQuantity == _shipQty ?
"processed and shipped" : _shipPartial ?
"partially shipped" : "held");
10. Now switch back to the visual workflow designer. It’s time to add some rules. To begin,
select the policyActivity1 object to activate its Properties pane. Click the RuleSetReference
edit control to activate the browse ( ) button.
Chapter 12 Policy and Rules 287
11. Click the browse button to activate the Select Rule Set dialog box. Once the Select Rule
Set dialog box is active, click its New button.
12. Clicking the New button activates the Rule Set Editor dialog box. Click Add Rule to add
a new rule and activate the dialog box controls.
288 Part II Working with Activities
13. You are going to add the first of three rules. Each rule you add comes in three parts:
Condition, Then Actions, and Else Actions (the last of which is optional). In the Condi-
tion field, type this.CheckPlasticizer(). (Note that it’s a method call, so the parentheses
are required.) In the Then Actions field, type this.ProcessFullOrder(). And finally, in
the Else Actions field, type this.ProcessPartialOrder().
14. Click Add Rule again, which adds a second rule to the rule set. To this rule’s
Condition field, type this.CheckActualPlasticizer(). In the Then Actions field, type
this.ProcessFullOrder(). In the Else Actions field, type this.ProcessPartialOrder().
Chapter 12 Policy and Rules 289
15. To insert a third rule, click Add Rule again. In the third rule’s Condition field, add
this._shipping[this._customer] == PlasticFlow.Workflow1.Shipping.Hold &&
this._shipQty != this.OrderQuantity. In the Then Actions field, type this._shipPartial
= False. And in the Else Actions field, add this._shipPartial = True.
16. Click OK to dismiss the Rule Set Editor dialog box. Note there is now a rule named
RuleSet1 in the rule list. Click OK to dismiss the Select Rule Set dialog box.
290 Part II Working with Activities
17. Your workflow is now complete. Although it might seem odd to have an entire workflow
reside in a single activity, in reality you’ve told your workflow what to do by the rules you
provided. In any case, add a reference to the workflow from the PlasticPolicy application.
Right-click the PlasticPolicy tree control node in Visual Studio’s Solution Explorer, and
select Add Reference. When the Add Reference dialog box appears, click the Projects tab
and select PlasticFlow from the list. Click OK.
18. Open Program.cs in the PlasticPolicy project for editing, and then look for the Main
method. Following the opening brace for Main, add this code:
// Parse the command line arguments
string company = String.Empty;
Int32 quantity = -1;
try
{
// Try to parse the command line args
GetArgs(ref company, ref quantity, args);
} // try
catch
{
// Just exit
return;
} // catch
19. Then find this line of code a bit further down in Main:
// Print banner.
Console.WriteLine("Waiting for workflow completion.");
20. Add this code following the line of code you just located:
// Create the argument.
Dictionary<string, object> parms = new Dictionary<string, object>();
parms.Add("Customer", company);
parms.Add("OrderQuantity", quantity);
// Create the workflow instance.
WorkflowInstance instance =
workflowRuntime.CreateWorkflow(typeof(PlasticFlow.Workflow1), parms);
// Start the workflow instance.
instance.Start();
Chapter 12 Policy and Rules 291
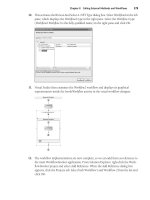
21. In step 18, you added code that calls a method to interpret the command-line parame-
ters. You need to add that method now. Scroll to the end of the Program.cs source file,
and add this method:
static void GetArgs(ref string company, ref Int32 quantity, string[] args)
{
// Preset quantity
quantity = -1;
try
{
// Parse the arguments we must have both a company
// and a quantity.
for (Int32 i = 0; i < args.Length; i++)
{
// Check this argument must have at least
// two characters, "/c" or "/q" or even "/?".
if (args[i].Length < 2)
throw new Exception();
if (args[i].ToLower()[1] == 'c')
{
// Company The company name will be
// located in character position 3 to
// the end of the string.
company = args[i].Substring(3);
} // if
else if (args[i].ToLower()[1] == 'q')
{
// Quantity The quantity will be
// located in character position 3 to
// the end of the string. Note Parse
// will throw an exception if the user
// didn't give us an integer.
quantity = Int32.Parse(args[i].Substring(3));
} // else if
else
{
// "/?" or unrecognized.
throw new Exception();
} // else
} // for
// Make sure we have both a company and a
// quantity value.
if (String.IsNullOrEmpty(company) || quantity == -1)
throw new Exception();
} // try
catch
{
// Display usage
Console.WriteLine("\nPlasticPolicy.exe -");
Console.WriteLine("\tTests Windows Workflow Foundation " +
"rules-based processing\n");
Console.WriteLine("PlasticPolicy.exe /c: /q:\n");
Console.WriteLine("\t- Required Arguments -\n");
Console.WriteLine("/c:<company>\n\tCompany placing order\n");
292 Part II Working with Activities
Console.WriteLine("/q:<quantity>\n\tOrder quantity\n");
throw;
} // catch
}
22. Compile the solution by pressing F6, and correct any compilation errors that might
occur.
We’ll now use this sample application and execute four scenarios. The first scenario is one of
the trickier scenarios for the rules engine to handle: Tailspin Toys is ordering 500 units. This
is a significant number because the assumed plasticizer amount is 14,592.7 (a totally fabri-
cated number for this example), while the actual amount of plasticizer in the tank is 12,879.2
(a number I totally made up!). Because it takes 27.4 units of plasticizer to create a single item
(another value I made up, represented by _plasticizerRatio in Workflow1), the order falls into
that range where on the surface the order can be completed but in reality there isn’t enough
plasticizer. That is, we believe there is enough plasticizer to create 532 items (14,592.7 divided
by 27.4), but looking at the actual level in the tank, we can create only 470 items (12,879.2
divided by 27.4). In the end, we must create a partial shipment.
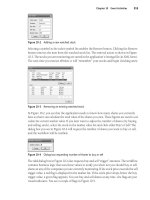
And indeed, if you run the application, providing “Tailspin Toys” as the company name and
“500” as the quantity (command line: PlasticPolicy.exe /c:"Tailspin Toys" /q:500), you see
the output shown in Figure 12-2. Moreover, Tailspin is known to accept partial shipments,
and the workflow indicated that as well.
Note
Because the PlasticPolicy application accepts command-line parameters, you need
either to provide the parameters using the Visual Studio project settings and run the applica-
tion in debug mode or to open a command window and browse to the directory containing
PlasticPolicy.exe and execute the application from there at the command prompt.
Figure 12-2 Tailspin Toys partial shipment
But will the workflow execute correctly if Tailspin ordered, say, 200 items? Let’s find out.
Run the program again with this command line: PlasticPolicy.exe /c:"Tailspin Toys" /q:200.
The results are shown in Figure 12-3.
Chapter 12 Policy and Rules 293
Figure 12-3 Tailspin full and complete shipment
Tailspin is registered as accepting partial shipments. Wingtip Toys, however, wants orders
held until its entire order can be filled. Does the workflow handle Wingtip as well? Moreover,
what if Wingtip’s order fell into that range where we thought we had enough plasticizer but in
reality didn’t? To find out, try this command: PlasticPolicy.exe /c:"Wingtip Toys" /q:500. As
Figure 12-4 shows, we find out we can only partially complete Wingtip’s order. On top of that,
when we accessed our customer preference records, we elected to withhold Wingtip’s order
for the moment.
Figure 12-4 Wingtip Toys partial shipment
To test a final scenario, one where we can meet Wingtip’s needs regardless of the actual
level of plasticizer, at the command prompt type the following command: PlasticPolicy.exe /
c:"Wingtip Toys" /q:200. Wingtip Toys now has ordered 200 items, and indeed, as
Figure 12-5 indicates we can completely fill Wingtip’s order.
Figure 12-5 Wingtip Toys full and complete shipment
294 Part II Working with Activities
The power in a rules-based approach lies in the way rules are processed. Imagine this plastic
policy example being built using several nested IfElse activities coupled with, perhaps, a
ConditionedActivityGroup activity and built imperatively using the visual workflow designer.
(The ConditionedActivityGroup activity would be there to account for the rule reevaluation
when we check the plasticizer level in the tank.) The imperative model just doesn’t work well
in this case, especially considering many nested IfElse activities and priority.
However, a rules-based approach does simplify the processing model. Many nested activities
are rolled into one. Moreover, because the rules are resources, you can swap them out and
replace them with different rules more easily than you can (generally) deploy a new set of
assemblies. You might find that real-world workflows are combinations of imperative and
rules-based approaches. The true goal is to select the proper tool given the situational bounds
within which your workflow must work.
If you want to continue to the next chapter, keep Visual Studio 2005 running and turn to
Chapter 13, “Crafting Custom Activities.” You’ll see there how to create your own activities.
If you want to stop, exit Visual Studio 2005 now, save your spot in the book, and close it.
When I finish a chapter, it’s a high-priority rule of mine to grab a snack. Custom activities
will wait!
Chapter 12 Quick Reference
To Do This
Use a Rule Condition instead of a
Code Condition
In the Condition property for the given conditional activity, select
Declarative Rule Condition and provide the rule.
Use policy in your workflow Drag and drop an instance of the Policy activity into your work-
flow, and edit the RuleSet according to your processing needs.
Indicate dependencies between
rules
Dependencies between rules amount to fields and properties
(workflow state) that are shared between rules. To indicate depen-
dencies that might not be automatically understood by the rules
engine, use any of the rules-based attributes (RuleRead, RuleWrite,
and RuleInvoke) or use the Update statement explicitly.
Deactivate forward chaining Set the forward chaining action to Sequential. Each rule will be
processed once in the order it is stored.
Take control of forward chaining from
the WF rules engine
Set the forward chaining action to Explicit Chaining, and use the
Update statement where fields and property values are modified.
Control how individual rules are
reevaluated
Set the rule reevaluation mode (found in the RuleSet editor) to
either Always or Never. Always allows the rules engine to
reevaluate the rule as necessary. Never allows the rule to be
processed only once and never reevaluated.
295
Chapter 13
Crafting Custom Activities
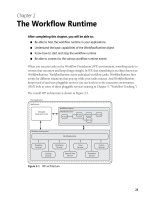
After completing this chapter, you will be able to:
■ Understand what components are necessary to create a fully functional custom
workflow activity
■ Create a basic custom workflow activity
■ Apply validation rules to a basic custom workflow activity
■ Integrate a basic custom workflow activity into the Microsoft Visual Studio visual
workflow designer and Toolbox
As deep and functional as Windows Workflow Foundation (WF) is, it can’t possibly
encompass everything you might want to achieve with your workflows. Even though WF is
still very new to the development community, many freely distributed custom activities are
already available, and you can be sure commercial-grade activities eventually will follow.
In this chapter, you’ll get a look inside WF by creating a new workflow activity, one that
retrieves a file from a remote File Transfer Protocol (FTP) server. You’ll see what pieces are
necessary, as well as what parts are nice to have when building your own activity. You’ll also
dig a little into how activities interact with the workflow runtime.
Note
It won’t be possible to explore every nuance of custom activity development in a
single chapter. There are simply too many details. However, the good news is it’s easy to get
a fully functional activity working without knowing every detail. Where there is more detail, I’ll
provide links to more information.
More About Activities
In Chapter 4, “Introduction to Activities and Workflow Types,” we took an initial look at
activities and discussed topics such as the ActivityExecutionContext, which is used to contain
information about executing activities the workflow runtime needs to access from time to
time. We’ll dig into WF activities a little deeper here.
296 Part II Working with Activities
Activity Virtual Methods
The first thing to know when creating custom activities is what the base class provides you by
way of virtual methods and properties. Table 13-1 shows the commonly overridden methods
for Activity. (There are no virtual properties.)
If you need to handle some specific processing once your activity has been loaded into the
workflow runtime but before it is executing, a great place to do that is in the Initialize method.
You would perform similar out-processing in the Uninitialize method.
The OnActivityExecutionContextLoad and OnActivityExecutionContextUnload methods signify
the activity loading into the workflow runtime and the activity’s removal from it, respectively.
Before OnActivityExecutionContextLoad is called, and after OnActivityExecutionContextUnload is
called, the activity is in an unloaded state from a WF perspective. It might be serialized into a
queue, stored in a database, or even on disk waiting to be loaded. But it does not exist in the
workflow runtime before or after these methods are called.
Cancel, HandleFault, and Compensate are all called when the obvious conditions arise (cancel-
ing, faulting, and compensating). Their primary purpose is to perform any additional work
you want to perform (logging, for example), although Compensate is where you truly imple-
ment your transaction compensation. (See Chapter 15, “Workflows and Transactions.”) Keep
in mind that at the point these methods are called, it’s too late. You can’t revive a transaction
Table 13-1 Commonly Overridden Activity Virtual Methods
Method Purpose
Cancel Invoked when the workflow is canceled.
Compensate This method isn’t actually implemented by the Activity base
class but rather required by the ICompensatableActivity
interface from which many activities derive. Therefore, for
all intents and purposes it is an Activity method. You’ll
implement this method to compensate for failed transac-
tions.
Execute The main activity worker method, Execute, is used to per-
form the work that the activity was designed to perform.
HandleFault Called when internal activity code throws an unhandled
exception. Note there is no way to restart the activity once
this method is invoked.
Initialize Called when the activity is initialized.
OnActivityExecutionContextLoad Called when the activity is handed an ActivityExecutionCon-
text for processing.
OnActivityExecutionContextUnload Called when the activity has finished its workflow process.
The current execution context is being shifted to another
activity.
Uninitialize Called when the activity is to be uninitialized.
Chapter 13 Crafting Custom Activities 297
by the time your activity is asked to compensate for failure, and you can’t undo an unhandled
exception or stop a cancel request. All you can do is perform cleanup or other processing as
required, and in the case of Compensate, actually provide the compensation function for the
failed transaction.
Execute is probably the most overridden Activity virtual method, if only because this is the
method you override to perform the work that the activity was created to perform.
Activity Components
Although it’s certainly true that you’ll need to write the custom activity code itself, fully
developed WF activities carry with them additional code to support non-workflow-related
behavior, mostly to provide a richer developer experience in the visual workflow designer. For
example, you might want to provide a validator object that checks for inappropriate activity
configurations and fires back error messages to that effect. Or you might need to provide a
ToolboxItem or ToolboxBitmap to better integrate with the Visual Studio Toolbox. And believe it
or not, you can actually adjust the way your activity looks when dropped into the visual work-
flow designer through modifications to the activity theme, with which you work using a spe-
cialized designer class. The sample activity in this chapter implements all these things to
demonstrate their purpose and impact.
Execution Contexts
As you might recall, there are two types of activities: basic (single-purpose) and composite
(containers). You might think that the major difference between them is that one is a lone
activity and the other contains embedded activities. And this is certainly one of the major
differences.
But there are other important differences as well, not the least of which is how an activity
works with an execution context. Activity execution contexts, introduced in Chapter 4, are
simply a way for WF to keep track of important things, such as from which workflow queue a
given activity is working. But it also provides a mechanism for activity control and a way for
WF to enforce rules between activities when they’re executing. An interesting aspect of activity
execution contexts is that the context your workflow instance starts with might not be the
context being used inside your custom activity. Activity execution contexts can be cloned and
passed to child activities, which always happens for iterative activities.
But for our purposes here, probably the most important things to remember when creating
custom activities, at least with respect to activity execution context, are that the execution con-
text maintains the current execution status and that when you override the virtual methods
you find in System.Workflow.Activity, only certain status values are valid. Table 13-2 shows
which execution status values apply to the overridden System.Workflow.Activity methods.
Compensate is somewhat of an exception because it’s not a System.Workflow.Activity virtual
method. Rather, it’s the lone method resident in ICompensatableActivity, which is