Visual C++ and MFC Fundamentals programming phần 6 docx
Bạn đang xem bản rút gọn của tài liệu. Xem và tải ngay bản đầy đủ của tài liệu tại đây (1.47 MB, 67 trang )
Visual C++ and MFC Fundamentals Chapter 12: Dialog-Based Windows
© FunctionX, Inc. 359
Practical Learning: Creating a Top-Most Window
1. To create the dialog box with a thin border, check its Static Edge check box or set it
to True
2. To indicate that this dialog can accept dragged files, check its Accept Files check
box or set it to True
12.1.8 Creating the Dialog Resource File
As mentioned already, a dialog box means nothing except for the controls it is created to
host. The controls are listed in a section that starts with the BEGIN and ends with the
END keywords. Here is an example:
IDD_SCHOOL_SURVEY DIALOGEX 0, 0, 340, 268
STYLE WS_CAPTION | WS_SYSMENU | WS_POPUP | DS_MODALFRAME
EXSTYLE WS_EX_TOOLWINDOW
CAPTION “School Survey – For Teachers Only”
FONT 8, “MS Shell Dlg”, 400, 0, 0x1
BEGIN
END
If you design a dialog box and the first object of your application, you must save it before
using it. Even if you had decided to manually create the dialog box as a text file, you
must save it before using it. In both cases, whether saving the dialog box designed or the
text file, saving it results in creating a resource file. This file should have the .rc
extension.
If your resource file is using some identifiers, which is the case for most or all controls
you will use in your application, you must list them in a header file. This file is
traditionally called Resource.h or resource.h. Each identifier must be listed using the
following syntax:
#define Identifier Constant
When you save the resource file, Visual C++ automatically creates the resource header
file and names it resource.h
After saving the resource file, it is still considered external to the application. If you are
using MSVC 6, you must add it to your project. After it has been added to your project,
you can continue working on the dialog box, adding, deleting, or manipulating the
controls. After doing that, if you save the resource, Visual C++ automatically makes the
appropriate changes in the resource and the resource header files.
Practical Learning: Saving the Resource File
1. If you are using MSVC 7, on the Standard toolbar, click the Save All button
If you are using MSVC 6:
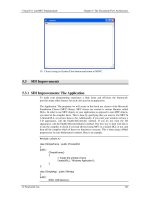
a. To save the dialog box, click the system Close button of the window that holds
the dialog box.
b. This will display a window with a tree view that starts with Script1. Close its
window also.
Chapter 12: Dialog-Based Windows Visual C++ and MFC Fundamentals
360 © FunctionX, Inc.
c. You will receive a message box asking you whether you want to save the script.
Click Yes
d. Locate the ExoDialog1 folder that was used to create the current project.
Display it in the Save In combo box.
Change the name in the File Name with ExoDialog1
e. Click Save
2. To add the resource to your application, on the main menu, click Project -> Add To
Project -> Files…
3. Click ExoDialog1.rc and click OK
4. To verify that the dialog box has been added, in the Workspace, click the
ResourceView tab and expand the ExoDialog1 Resources node. Then expand the
Dialog folder and double-click IDD_EXERCISE_DLG
5. If you are using MSVC 7, on the Standard toolbar, the Save All. Then
12.1.9 Creating a Class for the Dialog
After creating the resource for the dialog box, you must create a class that will be used to
handle its assignment. To do this, you must derive a class from CDialog. In the header
file of the dialog’s class, define an enumerator whose only member is called IDD and
initialize it with the identifier of the dialog box. Because the identifier is listed in the
resource header file, you must include this resource header in the file in which you are
using the dialog’s identifier.
Practical Learning: Create the Dialog’s Class
1. To create a class for the dialog box, open the Exercise.cpp created earlier and add the
following:
#include <afxwin.h>
#include <afxdlgs.h>
#include "resource.h"
class CExerciseApp : public CWinApp
{
public:
Visual C++ and MFC Fundamentals Chapter 12: Dialog-Based Windows
© FunctionX, Inc. 361
BOOL InitInstance();
};
class CExerciseDlg : public CDialog
{
public:
enum { IDD = IDD_EXERCISE_DLG };
};
BOOL CExerciseApp::InitInstance()
{
return TRUE;
}
CExerciseApp theApp;
2. Save All
12.1.10 Dialog Box Methods
A dialog box is based on the CDialog class. As seen above, when creating your dialog
box, you can derive a class from CDialog. The CDialog class itself provides three
constructors as follows:
CDialog();
CDialog(UINT nIDTemplate, CWnd* pParentWnd = NULL);
CDialog(LPCTSTR lpszTemplateName, CWnd* pParentWnd = NULL);
The default constructor, CDialog(), can be used to declare a variable whose behavior is
not yet known or, for one reason or another, cannot yet be defined. When creating your
class, you should also declare at least a default constructor.
The identifier of the dialog box, such as IDD_DIALOG1, can be used as the first
argument, nIDTemplate, of a CDialog() constructor to create a dialog box from an
existing resource.
If you are using a Win32 template to create your dialog box, pass the name of this
template as a string to a CDialog() constructor, lpszTemplateName.
When implementing your default constructor, initialize the parent CDialog constructor
with the IDD enumerator declared in your class. If your dialog box has an owner, specify
it as the pParentWnd argument. If you set it to NULL, the application will be used as the
dialog’s parent.
If you dynamically create objects for your application using your dialog class, it is a good
idea to also declare and define a destructor. This would be used to destroy such dynamic
objects.
Most other methods of a dialog box depend on circumstances we have not yet reviewed
Practical Learning: Creating a Dialog Box
1. Declare a default constructor and a destructor for your dialog class and implement
them as follows:
class CExerciseDlg : public CDialog
Chapter 12: Dialog-Based Windows Visual C++ and MFC Fundamentals
362 © FunctionX, Inc.
{
public:
enum { IDD = IDD_EXERCISE_DLG };
CExerciseDlg();
~CExerciseDlg();
};
CExerciseDlg::CExerciseDlg()
: CDialog(CExerciseDlg::IDD)
{
}
CExerciseDlg::~CExerciseDlg()
{
}
2. Before using the new class, declare a variable of it as follows:
BOOL CExerciseApp::InitInstance()
{
CExerciseDlg Dlg;
m_pMainWnd = &Dlg;
return TRUE;
}
3. Save All
12.2 Modal Dialog Boxes
12.2.1 Dialog-Based Applications
There are two types of dialog boxes: modal and modeless. A Modal dialog box is one that
the user must first close in order to have access to any other framed window or dialog
box of the same application.
One of the scenarios in which you use a dialog box is to create an application that is
centered around a dialog box. In this case, if either there is no other window in your
application or all the other windows depend on this central dialog box, it must be created
as modal. Such an application is referred to as dialog-based
There are two main techniques you can use to create a dialog-based application: from
scratch or using one of Visual C++ wizards. After creating a dialog resource and deriving
a class from CDialog, you can declare a variable of your dialog class. To display your
dialog box as modal, you can call the CDialog::DoModal() method in your
CWinApp::InitInstance() method. Its syntax is:
virtual int DoModal();
This method by itself does nothing more than displaying a dialog box as modal. We will
learn that you can use this method to find out how the user had closed such a dialog box.
Visual C++ and MFC Fundamentals Chapter 12: Dialog-Based Windows
© FunctionX, Inc. 363
Practical learning: Displaying a Modal Dialog Box
1. To display the dialog box as modal, in the InitInstance() event of your CWinApp
derived class, call the DoModal() method using your dialog variable:
#include <afxwin.h>
#include <afxdlgs.h>
#include "resource.h"
class CExerciseApp : public CWinApp
{
public:
BOOL InitInstance();
};
class CExerciseDlg : public CDialog
{
public:
enum { IDD = IDD_EXERCISE_DLG };
CExerciseDlg();
~CExerciseDlg();
};
CExerciseDlg::CExerciseDlg()
: CDialog(CExerciseDlg::IDD)
{
}
CExerciseDlg::~CExerciseDlg()
{
}
BOOL CExerciseApp::InitInstance()
{
CExerciseDlg Dlg;
m_pMainWnd = &Dlg;
Dlg.DoModal();
return TRUE;
}
CExerciseApp theApp;
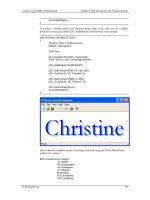
2. Test the application
Chapter 12: Dialog-Based Windows Visual C++ and MFC Fundamentals
364 © FunctionX, Inc.
3. Close it and return to MSVC
12.2.2 The MFC Wizard for a Dialog-Based Application
Microsoft Visual C++ provides an easier way to create an application that is mainly
based on a dialog box. To use this technique, start a new project and specify that you
want to create an MFC Application. In the MFC Application Wizard, set the Application
Type to Dialog Based
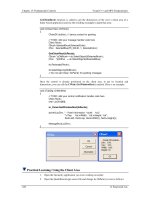
Practical Learning: Using the Wizard to create a Dialog-Based Application
1. On the main menu, click File -> New -> Project
2. In the New Project dialog box, in the Templates list, click MFC Application
3. Set the Project Name to ExoDialog2
Visual C++ and MFC Fundamentals Chapter 12: Dialog-Based Windows
© FunctionX, Inc. 365
4. Click OK
5. In the MFC Application Wizard dialog box, click Application Type and, on the right
side, click the Dialog Based radio button
6. Click User Interface Features and click About Box to remove its check box
7. Under Dialog Title, select the text and replace it with Dialog Box Exercise
8. Click Advance Features to see its content
9. Click Generated Classes
10. In the Generated Classes list, click CExoDialog2App and, in the Class Name, replace
the text with CExerciseApp
11. In the Generated Classes list, click CExoDialog2Dlg
In the Class Name, replace the name with CExerciseDlg
In the .h file edit box, replace the name of the file with ExerciseDlg.h
In the .cpp file edit box, replace the name of the file with ExerciseDlg.cpp
Make sure the Base Class is set to CDialog
Chapter 12: Dialog-Based Windows Visual C++ and MFC Fundamentals
366 © FunctionX, Inc.
12. Click Finish
13. Test the application and return to MSVC
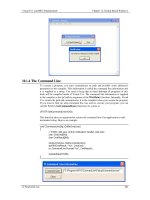
12.2.3 A Modal Dialog Box in an Application
Some applications require various dialog boxes to complete their functionality. When in
case, you may need to call one dialog box from another and display it as modal. Here is
an example:
The Paragraph dialog box of
WordPad is a modal dialog box:
when it is displaying, the user
cannot use any other part of
WordPad unless he or she
closes this object first
Since a dialog box is created using a class, the first thing you must do is to include the
header file of the CDialog object whose box you want to call.
To call one dialog box from another window, select the event (or message) from where
you would make the call. Declare a variable of the other class and use the
CDialog::DoModal() method to display the other object as a modal dialog box.
Calling a dialog box from the menu of a frame-based application is done the same way as
calling it from a dialog box
Visual C++ and MFC Fundamentals Chapter 12: Dialog-Based Windows
© FunctionX, Inc. 367
Practical Learning: Adding a Dialog Box to an Existing Application
1. Start a new MFC Application project named SDIAndDlg
2. Create it as a Single Document and click Finish
3. To add a dialog box, on the main menu, click Project -> Add Resource…
4. In the Add Resource dialog box, double-click Dialog
5. To create a class for the new dialog box, right-click it and click Add Class…
6. In the MFC Class Wizard, specify the Class Name as CExerciseDlg
7. In the Base Class combo box, select CDialog and click Finish
8. Display the menu by double-clicking IDR_MAINFRAME under the Menu folder of
the Resource View tab
9. Click View and click the first empty item under it. Type – and press Enter to add a
separator.
10. In the menu item under the new separator, type &Exercise… and press Enter
11. Right-click the new Exercise menu item and click Add Event Handler…
12. In the Message Type, access the COMMAND item. In the Class List, click
CMainFrame. Accept the Function Handler Name then click Finish Add And Edit
13. Change the file as follows:
#include "stdafx.h"
#include "SDIAndDlg.h"
#include "MainFrm.h"
#include "ExerciseDlg.h"
#ifdef _DEBUG
#define new DEBUG_NEW
#endif
. . .
void CMainFrame::OnViewExercise()
{
// TODO: Add your command handler code here
CExerciseDlg Dlg;
Dlg.DoModal();
}
14. Execute the application. On its main menu, click View -> Exercise…
15. After using the dialog box, close it and close the application to return to MSVC
12.3 Property Sheets and Wizards
12.3.1 Introduction to Property Pages
In some applications, you may want to add many but necessary and useful controls to a
dialog box. You can solve this problem in three main ways:
Chapter 12: Dialog-Based Windows Visual C++ and MFC Fundamentals
368 © FunctionX, Inc.
?? You may have to tremendously increase the width and the height of your dialog
box. Although this solution works sometimes, it may have the disadvantage of
producing a highly crowded dialog box
?? You can hide some controls and display them only when needed, such as in
response to a user clicking a button. The concept of this type of application
involves an unpredictable and non-practical design. It also eventually requires a
lot of coding
?? The third solution involves the user of property pages
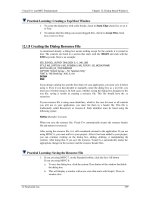
A property page is a dialog box, that can be positioned in front of, or behind of, another.
This has the advantage of providing various dialog boxes that are “physically” grouped as
one entity. Each part is represented by a tab. The tabs are usually positioned in the top
section and each is used to identify a particular page:
To use a property page, the user clicks one. The page clicked besomes positioned in front
of the other(s). The user can click another tab to select a different page:
12.3.2 Creating Property Pages
A property page is designed from a dialog box and it must have the following
characteristics:
?? Style: Child or WS_CHILD
?? Border: Thin or WS_POPUP
Visual C++ and MFC Fundamentals Chapter 12: Dialog-Based Windows
© FunctionX, Inc. 369
?? Title Bar: True or WS_CAPTION
?? System Menu: False or no WS_SYSMENU
?? Visible: False or no WS_VIS IBLE
?? Disabled: True or WS_DISABLED
You can create each property page like that and with the same size. If you create dialog
boxes that have different sizes, the dimensions of the taller and/or wider will be applied
to all the other property pages when they come up.
Visual C++ makes it easy to create resources for property pages by displaying the Add
Resource dialog box, expanding the Dialog node and selecting one of the
IDD_PROPPAGE_X items.
After adding the resource for the property page, as done for a dialog box, you can add a
class for it. Unlike the regular dialog box, a property page is based on the
CPropertyPage class which itself is based on CDialog. The CPropertyPage class is
declared in the afxdlgs.h header file.
Practical Learning: Creating Property Pages
1. Using either MFC AppWizard (exe) or MFC Application, start a New Project named
Geometry
2. Create it as Dialog-Based with no About Box and set the Dialog Title to
Quadrilateral
3. Change the Class Name of the dialog to CQuadrilateral
4. Change the name of the header of the dialog to Quadrilateral.h and the name of the
source file to Quadrilateral.cpp
Chapter 12: Dialog-Based Windows Visual C++ and MFC Fundamentals
370 © FunctionX, Inc.
5. Click Finish
6. On the dialog, click TODO and press Delete three times to delete the TODO line, the
OK and the Cancel buttons
7. While the dialog box is displaying, access its properties.
Change its ID to IDD_QUADRILATERAL
If necessary, change its Caption to Quadrilateral
Change its Style value to Child
Change its Border to Thin
Remove the check mark of the System Menu check box or set it to False
Set its Visible property to False or remove its check mark
If necessary, remove the check mark of the Disabled check box or set it to False
8. Save All
9. From the Controls toolbox, click the Edit Box button and click anywhere in the
dialog box
10. Open the header file of the dialog
Change its base class to CPropertyPage
Change the value of the IDD to IDD_QUADRILATERAL
class CQuadrilateral : public CPropertyPage
{
// Construction
public:
CQuadrilateral(CWnd* pParent = NULL); // standard constructor
// Dialog Data
//{{AFX_DATA(CQuadrilateral)
enum { IDD = IDD_QUADRILATERAL };
// NOTE: the ClassWizard will add data members here
//}}AFX_DATA
11. Change the source file of the CQuadrilateral class as follows:
// Quadrilateral.cpp : implementation file
//
#include "stdafx.h"
#include "Geometry.h"
#include "Quadrilateral.h"
Visual C++ and MFC Fundamentals Chapter 12: Dialog-Based Windows
© FunctionX, Inc. 371
#ifdef _DEBUG
#define new DEBUG_NEW
#undef THIS_FILE
static char THIS_FILE[] = __FILE__;
#endif
/////////////////////////////////////////////////////////////////////////////
// CQuadrilateral dialog
CQuadrilateral::CQuadrilateral(CWnd* pParent /*=NULL*/)
: CPropertyPage(CQuadrilateral::IDD)
{
//{{AFX_DATA_INIT(CQuadrilateral)
// NOTE: the ClassWizard will add member initialization here
//}}AFX_DATA_INIT
m_hIcon = AfxGetApp()->LoadIcon(IDR_MAINFRAME);
}
void CQuadrilateral::DoDataExchange(CDataExchange* pDX)
{
CPropertyPage::DoDataExchange(pDX);
//{{AFX_DATA_MAP(CQuadrilateral)
// NOTE: the ClassWizard will add DDX and DDV calls here
//}}AFX_DATA_MAP
}
BEGIN_MESSAGE_MAP(CQuadrilateral, CPropertyPage)
//{{AFX_MSG_MAP(CQuadrilateral)
ON_WM_PAINT()
ON_WM_QUERYDRAGICON()
//}}AFX_MSG_MAP
END_MESSAGE_MAP()
/////////////////////////////////////////////////////////////////////////////
// CQuadrilateral message handlers
BOOL CQuadrilateral::OnInitDialog()
{
CPropertyPage::OnInitDialog();
SetIcon(m_hIcon, TRUE); // Set big icon
SetIcon(m_hIcon, FALSE); // Set small icon
// TODO: Add extra initialization here
return TRUE; // return TRUE unless you set the focus to a control
}
// If you add a minimize button to your dialog, you will need the code below
// to draw the icon. For MFC applications using the document/view model,
// this is automatically done for you by the framework.
void CQuadrilateral::OnPaint()
{
if (IsIconic())
{
CPaintDC dc(this); // device context for painting
Chapter 12: Dialog-Based Windows Visual C++ and MFC Fundamentals
372 © FunctionX, Inc.
SendMessage(WM_ICONERASEBKGND, (WPARAM) dc.GetSafeHdc(), 0);
// Center icon in client rectangle
int cxIcon = GetSystemMetrics(SM_CXICON);
int cyIcon = GetSystemMetrics(SM_CYICON);
CRect rect;
GetClientRect(&rect);
int x = (rect.Width() - cxIcon + 1) / 2;
int y = (rect.Height() - cyIcon + 1) / 2;
// Draw the icon
dc.DrawIcon(x, y, m_hIcon);
}
else
{
CPropertyPage::OnPaint();
}
}
HCURSOR CQuadrilateral::OnQueryDragIcon()
{
return (HCURSOR) m_hIcon;
}
12. Save All
13. On the main menu, click either Insert -> Resource… (MSVC 6) or Project -> Add
Resource… (MSVC 7)
14. In the Add Resource dialog box, click the + button of Dialog to expand it
15. Click IDD_PROPPAGE_LARGE
16. Click New
17. Delete the TODO line
18. Change the ID of the new dialog to IDD_CIRCULAR and its Caption to Circular
19. On the Controls toolbox, click the Slider button and click anywhere on the
dialog box
20. If you are using MSVC 6, right-click the Circular dialog box and click ClassWizard.
A message box will display. Read it. Select Create A New Class and click OK.
Visual C++ and MFC Fundamentals Chapter 12: Dialog-Based Windows
© FunctionX, Inc. 373
Type CCircular and, in the Base Class combo box, select CPropertyPage
Click OK twice
If you are using MSVC 7, right-click the dialog box and click Add Class…
Type the Class Name as CCircular and, in the Base Class combo box, select
CPropertyPage
Click Finish
21. Add another IDD_PROPPAGE_LARGE property page. Delete its TODO line.
Change its ID to IDD_G3D and its Caption to 3-Dimensions
Chapter 12: Dialog-Based Windows Visual C++ and MFC Fundamentals
374 © FunctionX, Inc.
22. On the Controls toolbox, click the Check Box button and click anywhere on the
dialog
23. Create or Add A New Class for the IDD_G3D dialog box
Name it CGeome3D
Base it on the CPropertyPage class
24. Change the design of the IDR_MAINFRAME icon as follows:
25. Save All
12.3.3 Property Sheets
To implement its functionality, the property pages are put together and kept as an entity
by an object called a property sheet. The property sheet acts as their parent. Like other
controls, we will see that the property pages must be added to a property sheet.
There is no resource to create for a property sheet. A property sheet is based on the
CPropertySheet class, which is not based on CDialog but it provides the same
functionality as dialog. Therefore, a property sheet is sometimes called, or referred to as,
a dialog box. Instead, CPropertySheet is based on the CWnd class. Therefore, to
implement your property page(s), you can simply declare a CPropertySheet variable and
use it to display the application or you can programmatically derive a class from
CPropertySheet. The CPropertySheet class is declared in the afxdlgs.h header file.
If you decide to directly use the CPropertySheet class, declare a variable for it where the
application will need to be displayed or instantiated, which could be in the
CWinApp::InitInstance() event. To display the property sheet, call its DoModal()
method. This could be done as follows:
BOOL CMyApp::InitInstance()
{
CPropertySheet MySheet;
MySheet.DoModal();
}
Visual C++ and MFC Fundamentals Chapter 12: Dialog-Based Windows
© FunctionX, Inc. 375
To specify your property pages as belonging to the property page, declare a variable for
each one of them. Then, call the CPropertySheet::AddPage() method to add each
property page. The syntax of this method is:
void AddPage(CPropertyPage *pPage);
This method takes the variable of each page and adds it as part of the property sheet. Here
is an example:
BOOL CmyApp::InitInstance()
{
CPropertySheet MySheet;
CFirstPage First;
CSecondPage Second;
MySheet.AddPage(&First);
MySheet.AddPage(&Second);
MySheet.DoModal();
}
If you want to have better access to the property sheet as a class, you should derive your
own class from CPropertySheet. You will have the ability to use any or a combination
of these constructors:
CPropertySheet();
CPropertySheet(UINT nIDCaption, CWnd *pParentWnd=NULL, UINT iSelectPage=0);
CPropertySheet(LPCTSTR pszCaption, CWnd *pParentWnd=NULL, UINT iSelectPage=0);
The default constructor is used in the same circumstance as the CPropertySheet variable
declared above. Its allows you to create a CPropertySheet instance and change its
characteristics later. Both the second and the third constructors allow you to specify a
caption for the property. If you want to use the first, create a string with an identifier in a
String Table and use that ID as the argument. Otherwise, when declaring a variable using
the second constructor, you can directly provide a null-terminated string as argument.
If you want to specify a title for the property sheet, you can call the
CPropertySheet::SetTitle() method. Its syntax is:
void SetTitle(LPCTSTR lpszText, UINT nStyle = 0);
The first argument is a null terminated string that will be the new title. If you want the
caption to display the string starting with “Properties for”, pass a second argument as
PSH_PROPTITLE.
Practical Learning: Creating a Property Sheet
1. In the Class View, right-click Geometry and click either New Class or Add -> Add
Class…
2. If you are using MSVC 6, set the Class Type to MFC Class
If you are using MSVC 7, click MFC Class and click Open
Set the name of the class to CGeomeSheet
3. In the Base Class combo box, select CPropertySheet
Chapter 12: Dialog-Based Windows Visual C++ and MFC Fundamentals
376 © FunctionX, Inc.
4. Click OK or Finish
5. Change the source code of the CGeometryApp class as follows:
// Geometry.cpp : Defines the class behaviors for the application.
//
#include "stdafx.h"
#include "Geometry.h"
#include "Quadrilateral.h"
#include "GeomeSheet.h"
#include "Circular.h"
#include "Geome3D.h"
#ifdef _DEBUG
#define new DEBUG_NEW
#undef THIS_FILE
static char THIS_FILE[] = __FILE__;
#endif
/////////////////////////////////////////////////////////////////////////////
// CGeometryApp
BEGIN_MESSAGE_MAP(CGeometryApp, CWinApp)
//{{AFX_MSG_MAP(CGeometryApp)
//}}AFX_MSG
ON_COMMAND(ID_HELP, CWinApp::OnHelp)
END_MESSAGE_MAP()
/////////////////////////////////////////////////////////////////////////////
// CGeometryApp construction
Visual C++ and MFC Fundamentals Chapter 12: Dialog-Based Windows
© FunctionX, Inc. 377
CGeometryApp::CGeometryApp()
{
}
/////////////////////////////////////////////////////////////////////////////
// The one and only CGeometryApp object
CGeometryApp theApp;
/////////////////////////////////////////////////////////////////////////////
// CGeometryApp initialization
BOOL CGeometryApp::InitInstance()
{
AfxEnableControlContainer();
// Standard initialization
#ifdef _AFXDLL
Enable3dControls(); // Call this when using MFC in a
shared DLL
#else
Enable3dControlsStatic(); // Call this when linking to MFC statically
#endif
CGeomeSheet GeoSheet("Geometric Calculations");
CQuadrilateral Quad;
CCircular Circ;
CGeome3D G3D;
GeoSheet.AddPage(&Quad);
GeoSheet.AddPage(&Circ);
GeoSheet.AddPage(&G3D);
m_pMainWnd = &GeoSheet;
int nResponse = GeoSheet.DoModal();
if (nResponse == IDOK)
{
}
else if (nResponse == IDCANCEL)
{
}
// Since the dialog has been closed, return FALSE so that we exit the
// application, rather than start the application's message pump.
return FALSE;
}
6. Test the application
Chapter 12: Dialog-Based Windows Visual C++ and MFC Fundamentals
378 © FunctionX, Inc.
7. Return to MSVC and close the project (MSVC 6: File -> Close Workspace; MSVC
7: File -> Close Solution)
12.3.4 Wizard Pages
A wizard, like a property sheet, is a series of dialog boxes that are considered as one
entity, tremendously saving the available space. When put together, the dialog boxes are
referred to as wizard pages. Like the property pages, the wizard pages can help the
programmer add more Windows controls than a single dialog box with the same
dimension would allocate. While the property pages are positioned one in front of the
others in a z-axis, the wizard pages are positioned so that, when one displays, the others
are completely hidden. While a property page can be accessed by the user clicking its tab
to bring it to the front and send the others to the back, a wizard is equipped with buttons
such as Back or Next.
A wizard is created using the exact same approach as the property sheet. Each involved
dialog box is created with the same properties:
?? Style: Child
?? Border: Thin
?? Title Bar: True
?? System Menu: False
?? Visible: False
?? Disabled: True
Each page is based on the CPropertyPage class. To display the wizard, use the
CPropertySheet class in the exact same way as seen for the property pages above. The
only difference is that, to make this a wizard, you must call the
CPropertySheet::SetWizardMode() method before calling DoModal(). The syntax of
the SetWizardMode() member function is:
void SetWizardMode();
Visual C++ and MFC Fundamentals Chapter 12: Dialog-Based Windows
© FunctionX, Inc. 379
Practical Learning: Creating a Wizard
1. Open Windows Explorer or My Computer and display the contents of the parent
folder that holds the previous exercise
2. In the right frame, right-click Geometry and click Copy
3. Right-click an unoccupied area in the same right frame and click Paste
4. Rename Copy of Geometry to WizardPages
5. Open the WizardPages project or solution
6. Access the CGeometry::InitInstance() event and change it as follows:
BOOL CGeometryApp::InitInstance()
{
AfxEnableControlContainer();
// Standard initialization
#ifdef _AFXDLL
Enable3dControls(); // Call this when using MFC in a shared DLL
#else
Enable3dControlsStatic(); // Call this when linking to MFC statically
#endif
CGeomeSheet GeoSheet("Geometric Calculations");
CQuadrilateral Quad;
CCircular Circ;
CGeome3D G3D;
GeoSheet.AddPage(&Quad);
GeoSheet.AddPage(&Circ);
GeoSheet.AddPage(&G3D);
m_pMainWnd = &GeoSheet;
GeoSheet.SetWizardMode();
int nResponse = GeoSheet.DoModal();
if (nResponse == IDOK)
{
}
else if (nResponse == IDCANCEL)
{
}
// Since the dialog has been closed, return FALSE so that we exit the
// application, rather than start the application's message pump.
return FALSE;
}
7. Test the application
Chapter 12: Dialog-Based Windows Visual C++ and MFC Fundamentals
380 © FunctionX, Inc.
8. Return to MSVC
Visual C++ and MFC Fundamentals Chapter 12: Dialog-Based Windows
© FunctionX, Inc. 381
Chapter 13: Control Design
? Forms
? Dialog Box’ Messages and Events
? Floating Windows
? Control Design
Chapter 12: Dialog-Based Windows Visual C++ and MFC Fundamentals
382 © FunctionX, Inc.
13.1 Forms
13.1.1 Introduction
Like a dialog box, a form is the primary object used to host Windows controls to allow
user interaction with the computer. Like a dialog box, a form does not mean anything
except for the controls it is hosting. This means that a form by itself does not present any
significant functionality but it can be equipped with characteristics that make it a valuable
alternative to other view types.
When using a form, the user typically interacts with the controls it is hosting. These
controls can be positioned anywhere on the form. If there are too many controls or the
controls are positioned so the occupied area is larger than the form can display at one
time, the form would be equipped with scroll bars.
A form is created using the CFormView class which is derived indirectly from CView
through CScrollView.
13.1.2 Form Creation
There are three main ways you can provide a form to an application.
The easiest way to create a form is by using the AppWizard. To do this, when creating
the application, set the Base Class to CFormView. A document/view application would
be created with its view based on the CFormView class. The wizard would have created
a Child window with no borders and no title bar (over all, you should not attempt to
change the properties of this window). Also, if you create an application that supports
databases, AppWizard would create a form that can be used on that database.
If you have already created an application, for example based on CView, you can either
add a form view to the application, change the application's base view class into form
view, or replace its view class with a form view. If you add a form view to the
application, the user would be prompted to select one of both documents when the
applications comes up.
The last option you have, which you should hardly do is to work from scratch in creating
a form view-based application. The reason you should not spend time doing this is the
amount of work involved that would not necessarily improve your application.
Practical Learning: Creating a Form-Based Application
1. Display the New or the New Project dialog box and specify that you want to use
MFC AppWizard or MFC Application
2. Set the Project Name to FormBased1
Visual C++ and MFC Fundamentals Chapter 12: Dialog-Based Windows
© FunctionX, Inc. 383
3. Click OK
4. Specify that you want to create a Single Document type of application