ECLIPSE WEB TOOLS PLATFORM developing java web applications PHẦN 5 pot
Bạn đang xem bản rút gọn của tài liệu. Xem và tải ngay bản đầy đủ của tài liệu tại đây (7.98 MB, 75 trang )
import javax.xml.transform.Result;
import javax.xml.transform.Source;
import javax.xml.transform.Templates;
import javax.xml.transform.Transformer;
import javax.xml.transform.TransformerException;
import javax.xml.transform.TransformerFactory;
import javax.xml.transform.stream.StreamResult;
import javax.xml.transform.stream.StreamSource;
/**
* Servlet implementation class for Servlet: ScheduleServlet
*
*/
public class ScheduleServlet extends HttpServlet implements
javax.servlet.Servlet {
private static final long serialVersionUID = 1L;
protected void doGet(HttpServletRequest request,
HttpServletResponse response)
throws ServletException, IOException {
try {
ServletContext context = getServletContext();
InputStream xsl = context.getResourceAsStream("schedule.xsl");
Source xslSource = new StreamSource(xsl);
TransformerFactory factory = TransformerFactory.newInstance();
Templates templates = factory.newTemplates(xslSource);
Transformer transformer = templates.newTransformer();
InputStream xml = context.getResourceAsStream("schedule.xml");
Source xmlSource = new StreamSource(xml);
PrintWriter out = response.getWriter();
Result htmlResult = new StreamResult(out);
transformer.transform(xmlSource, htmlResult);
response.flushBuffer();
out.flush();
} catch (TransformerException e) {
throw new ServletException(e);
}
}
}
The servlet uses TrAX to apply schedule.xsl to schedule.xml. TrAX uses
the
AbstractFactory creational pattern as described in Chapter 3 of Design
Patterns [Gamma1995] by Erich Gamma et al. This pattern lets you create
a transformer without specifying the concrete implementation class. There
are several Java XSLT implementations, such as Xalan and Saxon, so using
the
AbstractFactory pattern lets your code be independent of the particular
274 CHAPTER 7 • The Presentation Tier
implementation that is configured in your JDK. Using TrAX therefore
makes your code more portable.
The servlet uses the servlet context to get input streams for
schedule.xml
and schedule.xsl. This technique is preferred to directly accessing the file
system since these resources might not be available as loose files. For
example, the servlet engine may be executing the Web application without
unzipping its WAR file. The servlet wraps these input streams as TrAX
source streams. The servlet gets the output writer from the HTTP response
and wraps it as a TrAX result stream.
The servlet creates a transformer from the
schedule.xsl source stream and
then applies it to the
schedule.xml source stream, writing the HTML out-
put to the response result stream.
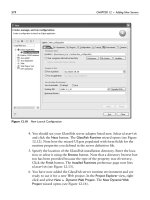
8. Select the servlet, right click, and invoke the Run As
᭤ Run on Server menu
item. The Run On Server wizard opens (see Figure 7.62).
Iteration 6: Servers, Dynamic Web Projects, and Servlets 275
Figure 7.62 Define a New Server
276 CHAPTER 7 • The Presentation Tier
9. You now must create a new server. Although you already added Tomcat to
your workspace, that just specifies where the server runtime is installed. Now
you have to create a configuration for it. A configuration is a list of dynamic
Web projects, which will be deployed to the server, and other information,
such as port numbers. WTP uses the term server to mean a configuration.
The Define a New Server page of the wizard lets you select the server run-
time to use. Since you only have Tomcat installed, leave that as the selected
runtime. You can also set this server to be the default associated with the
project. Click Next to continue. The Add and Remove Projects page is dis-
played (see Figure 7.63).
Figure 7.63 Add and Remove Projects
10. You can select the dynamic Web projects to include in the server. You only
have one project available,
IceHockeyWeb, which has been automatically
added for you since it contains the servlet you want to run. Click the Finish
button. The wizard creates the server, starts it, publishes the
IceHockeyWeb
project to it, and launches the Web browser using the URL mapping for the
servlet (see Figure 7.64). As the server starts, startup messages are displayed
in the Console view.
Iteration 6: Servers, Dynamic Web Projects, and Servlets 277
Figure 7.64 Run On Server—ScheduleServlet.java
11. The wizard created a special new project named Servers to hold the server
you just created (see Figure 7.65). The new server is named
Tomcat v5.0 Server @ localhost-config
The server configuration files are normal project resources, so you view
and edit them using the WTP editors. Doing so, however, requires a
knowledge of server administration. Many of the Tomcat configuration
files contain detailed comments to assist you. Consult the Tomcat docu-
mentation for more details.
12. The new server is also displayed in the Servers view, where you can control
it using pop-up menu items (see Figure 7.66). The Servers view lets you
start, stop, and restart servers, optionally in debug mode. You can also cre-
ate new servers, as well as add and remove their projects.
278 CHAPTER 7 • The Presentation Tier
Figure 7.65 Servers Project
Figure 7.66 Servers View
Summary of Iteration 6
In this iteration you added a server, created a dynamic Web project, and gener-
ated some dynamic content using a servlet. Although it is possible to generate
HTML from a servlet, this practice is discouraged since modifying servlet code
requires the skills of a Java programmer. Instead, HTML should be generated by
JSPs since they can be more easily modified by Web developers. In the next itera-
tion, you’ll generate HTML using a JSP.
Iteration 7: JSP
JSP is the J2EE recommended way to dynamically generate Web pages. You will
normally use JSP to generate HTML; however, you can generate any textual con-
tent, XML for example. JSP is a template language. A JSP document consists of
template text and JSP markup. The template text is sent back to the client
unchanged, but the JSP markup is executed on the server and the results are
inserted into the output stream.
A JSP document has access to Java objects that live in various scopes, includ-
ing application, session, request, and page. Application-scoped objects are acces-
sible by all pages in the Web application. These are like global variables.
Session-scoped objects are accessible by all pages within a single HTTP session.
Recall that an HTTP session consists of a sequence of requests from a Web
browser. A Web application will typically maintain many concurrent sessions.
You’ll explore session objects in the next two iterations. Request-scoped objects
are accessible by all pages within a single request. Typically a servlet will set up
request objects and forward the request to a JSP. Page-scoped objects are accessi-
ble only within a single JSP. These are like local variables.
Server-side Web scripting languages are often interpreted. This means the
server reads and parses the script file on every request, which can result in poor
performance. When a Web browser requests a JSP, the server translates it into a
Java servlet, compiles it, and then executes it. The compilation is only done
when the JSP is first requested or if the JSP has been modified since the last
request. The fact that JSPs are compiled instead of interpreted makes them very
efficient at runtime. You can also precompile JSPs into servlets to avoid the over-
head of compilation in production.
JSP markup consists of directives, tags, and scriptlets. Directives control aspects
of the page. For example, the
page directive can specify that the JSP has access to the
Java session object. Tags are like HTML markup and are suitable for use by non-pro-
grammers. Scriptlets consist of arbitrary Java source code fragments and are suitable
for use by programmers. In general, scriptlets should be kept to a minimum so that
the pages can be easily modified by non-programmers. The recommended design
Iteration 7: JSP 279
pattern for JSP is to use servlets, which should handle the requests, perform detailed
computations, generate results to be displayed, and then forward the request to a JSP
for presentation. Another reason to minimize the amount of Java code in JSP
scriptlets is that it can’t be easily reused elsewhere. You’ll have to copy and paste use-
ful scriptlets from one JSP to another. Copy and paste is a bad development practice
since it increases code bulk and makes maintenance difficult. If you need to correct
an error or make an enhancement, you’ll have to locate every JSP that contains the
scriptlet. If you find yourself copying and pasting scriptlets, you should refactor the
common code into Java source files so it can be reused across multiple JSPs.
A more complete discussion of JSP markup is beyond the scope of this book.
See JavaServer Pages [Whitehead2001] by Paul Whitehead or JSP: JavaServer
Pages [Burd2001] by Barry Burd for good treatments of this topic.
WTP includes a JSP creation wizard and a JSP structured source editor. JSP is
actually a very complex source format since it combines HTML, JavaScript, and
CSS in the template text with the JSP directives, tags, and scriptlets. The JSP edi-
tor provides many advanced features, including syntax highlighting and content
assist for JSP tags as well as full content assist for Java scriptlets.
You can set breakpoints in JSP source files and debug them just like you
debug Java code. You can step from the JSP source code into any Java source
code called by scriptlets and tags. In fact, since JSPs are compiled into servlets,
you are debugging Java code. However, the debugger shows you the JSP source
code instead of the translated Java servlet code. The mapping from the Java
bytecodes back to the original JSP source code has been standardized in JSR 45:
Debugging Support for Other Languages [JSR45].
In this iteration you’ll develop JSPs that allow League Planet users to log in
and out of the Web site. Users are not required to log in, but if they do, then
additional function is available to them. For example, fans can set up interest
profiles, and managers can update game schedules and scores. These functions
require that users identify themselves to the League Planet Web application. The
login state of each user is held in a session variable. We’ll discuss how J2EE man-
ages sessions in the next iteration. Next we describe how to develop the login
and logout JSPs.
For the GET method, the servlet simply forwards the request to either
login.jsp or logout.jsp, which you’ll create next. The servlet determines the
correct JSP by examining the
User object in the session. The getUser method
retrieves the session object from the request. The boolean
true argument on the
getSession method causes a new session object to be created if one doesn't
already exist. The
forward method selects login.jsp if the user is not logged in,
and
logout.jsp if the user is logged in. Note that you make these methods
protected so you can test them later using Cactus (see Iteration 2: Integration
Testing with Cactus section in Chapter 11).
280 CHAPTER 7 • The Presentation Tier
For the POST message, the servlet looks for an action parameter. If the
action is
Logout, the servlet logs out the user. If the action is Login, the servlet
looks for the
userId and password parameters and validates them. The valida-
tion logic here is trivial. The
userId must be at least two characters long and the
password must be guest. In practice, the login request would come over a secure
connection and the password would be checked against a database. If a
validation error occurs, the error message is attached to the request so
login.jsp
can display it. The userId is also attached to the request so it can be redisplayed.
This illustrates the technique of using request-scoped objects.
1. In the Project Explorer, select the
src folder of the IceHockeyWeb project,
right click, and select the New
᭤ Class menu item to create a Java class
named
User in the com.leagueplanet package. This class will be used to
hold the login state of a user. Edit
User.java (see Example 7.13). User is a
simple JavaBean. It contains two properties: a boolean flag that indicates
whether the user is logged in, and a string that holds the user id. The class
also has two methods: one to log in and another to log out.
Example 7.13 Listing of User.java
package com.leagueplanet;
public class User {
private boolean loggedIn = false;
private String userId = "";
public boolean isLoggedIn() {
return loggedIn;
}
public void setLoggedIn(boolean loggedIn) {
this.loggedIn = loggedIn;
}
public String getUserId() {
return userId;
}
public void setUserId(String userId) {
if (userId == null) {
this.userId = "";
} else {
this.userId = userId;
}
}
public void logIn(String userId) {
setLoggedIn(true);
setUserId(userId);
Iteration 7: JSP 281
}
public void logOut() {
setLoggedIn(false);
setUserId("");
}
}
2. Create a new servlet class named LoginServlet in the com.leagueplanet
package using the steps you learned in the previous iteration. Map this
servlet to the URL
/login. Edit LoginServlet.java or import it from the
examples (see Example 7.14). This servlet handles GET and POST methods.
Example 7.14 Listing of LoginServlet.java
package com.leagueplanet;
import java.io.IOException;
import javax.servlet.RequestDispatcher;
import javax.servlet.ServletContext;
import javax.servlet.ServletException;
import javax.servlet.http.HttpServletRequest;
import javax.servlet.http.HttpServletResponse;
import javax.servlet.http.HttpSession;
/**
* Servlet implementation class for Servlet: LoginServlet
*
*/
public class LoginServlet extends javax.servlet.http.HttpServlet implements
javax.servlet.Servlet {
private static final long serialVersionUID = 1L;
protected User getUser(HttpServletRequest request) {
// get the current session or create it
HttpSession session = request.getSession(true);
// get the user or create it and add it to the session
User user = (User) session.getAttribute("user");
if (user == null) {
user = new User();
session.setAttribute("user", user);
}
return user;
}
protected void forward(HttpServletRequest request,
HttpServletResponse response) throws ServletException, IOException {
282 CHAPTER 7 • The Presentation Tier
Iteration 7: JSP 283
User user = getUser(request);
String url = user.isLoggedIn() ? "/logout.jsp" : "/login.jsp";
ServletContext context = getServletContext();
RequestDispatcher dispatcher = context.getRequestDispatcher(url);
dispatcher.forward(request, response);
}
protected void doGet(HttpServletRequest request,
HttpServletResponse response) throws ServletException, IOException {
forward(request, response);
}
protected void doPost(HttpServletRequest request,
HttpServletResponse response) throws ServletException, IOException {
User user = getUser(request);
String userId = request.getParameter("userId");
if (userId == null)
userId = "";
request.setAttribute("userId", userId);
String password = request.getParameter("password");
if (password == null)
password = "";
String action = request.getParameter("action");
if (action == null)
action = "Login";
if (action.equals("Logout")) {
user.logOut();
} else {
if (userId.length() < 2) {
request.setAttribute("userIdMessage",
"User id must have at least 2 characters!");
} else {
if (!password.equals("guest")) {
request.setAttribute("passwordMessage",
"Wrong password! Try using: guest");
} else {
user.logIn(userId);
}
}
}
forward(request, response);
}
}
3. Select the WebContent folder, right click, and select the New ᭤ JSP menu
item. The New JSP wizard opens (see Figure 7.67).
4. Enter the name login.jsp and click the Next button. The Select JSP Template
page of the wizard is displayed (see Figure 7.68).
5. The wizard lets you select a template for the style of JSP you want. You can
select templates that use the traditional JSP markup syntax and that gener-
ate HTML or XHTML pages, or the newer XML-compliant syntax for use
with XHTML. Select the New JSP File (html) template and click the Finish
button. The wizard creates
login.jsp and opens it in the JSP source editor.
Edit it (see Example 7.15). Experiment with content assist as you edit.
Note the first line of
login.jsp, which contains a page directive with the
session="true" attribute. This enables HTTP session tracking. login.jsp
also contains a scriptlet that retrieves the userId and error messages for
the request object. The remainder of the
login.jsp is HTML template
text, except for the small scriptlets that write the
userId and error mes-
sages into the HTML form. This illustrates the technique of server-side
validation.
284 CHAPTER 7 • The Presentation Tier
Figure 7.67 New JSP
Example 7.15 Listing of login.jsp
<%@ page language="java" contentType="text/html; charset=ISO-8859-1"
pageEncoding="ISO-8859-1" session="true"%>
<!DOCTYPE HTML PUBLIC "-//W3C//DTD HTML 4.01 Transitional//EN">
<html>
<head>
<meta http-equiv="Content-Type" content="text/html; charset=ISO-8859-1">
<title>League Planet Login</title>
<link rel="stylesheet" href="schedule.css" type="text/css">
<link rel="stylesheet" href="validator.css" type="text/css">
<%String userId = (String) request.getAttribute("userId");
if (userId == null)
userId = "";
String userIdMessage = (String) request
.getAttribute("userIdMessage");
if (userIdMessage == null)
userIdMessage = "";
String passwordMessage = (String) request
.getAttribute("passwordMessage");
if (passwordMessage == null)
Iteration 7: JSP 285
Figure 7.68 Select JSP Template
passwordMessage = "";
%>
</head>
<body>
<h1>League Planet Login</h1>
<form action="login" method="post">
<table>
<tr>
<th align="right”>User id:</th>
<td><input name="userId" type="text" value="<%= userId %>"></td>
<td><span class="validator"><%= userIdMessage %></span></td>
</tr>
<tr>
<th align="right">Password:</th>
<td><input name="password" type="password" value=""></td>
<td><span class="validator"><%= passwordMessage %></span></td>
</tr>
<tr>
<td colspan="2"> </td>
<td><input name="action" type="submit" value="Login"> <input
name="reset"s type="reset" value="Reset" /></td>
</tr>
</table>
</form>
</body>
</html>
6. Create a second JSP named logout.jsp and edit it (see Example 7.16).
logout.jsp also contains a page directive that enables HTTP session track-
ing. The user session object is retrieved in the HTML
<head> element using
the
<jsp:useBean> tag. The userId is written into the page using the
<jsp:getProperty> tag.
Example 7.16 Listing of logout.jsp
<%@ page language="java" contentType="text/html; charset=ISO-8859-1"
pageEncoding="ISO-8859-1" session="true"%>
<!DOCTYPE HTML PUBLIC "-//W3C//DTD HTML 4.01 Transitional//EN">
<html>
<head>
<meta http-equiv="Content-Type" content="text/html; charset=ISO-8859-1">
<jsp:useBean class="com.leagueplanet.User" id="user" scope="session" />
<title>League Planet Logout</title>
<link rel="stylesheet" href="schedule.css" type="text/css">
</head>
<body>
<h1>League Planet Logout</h1>
<form action="login" method="post">
286 CHAPTER 7 • The Presentation Tier
<table>
<tr>
<th align="right">User id:</th>
<td><jsp:getProperty name="user" property="userId" /></td>
</tr>
<tr>
<td colspan="2"></td>
<td><input name="action" type="submit" value="Logout" /></td>
</tr>
</table>
</form>
</body>
</html>
7. In the Project Explorer, select the LoginServlet in either the src folder or
under the Servlets category of the
IceHockeyWeb item, right click, and select
the Run As
᭤ Run on Server menu item. The project is published, the server
starts, and the Web browser is opened on the URL
http://localhost:8080/icehockey/login
Note that occasionally the server may not have completely started before
the browser requests the servlet, in which case you’ll get a 404 error. To fix
this, restart the server and try again (see the sidebar in Chapter 3, What
Do I Do If I Get a 404?).
The
LoginServlet receives the GET request and forwards it to
login.jsp. The Web browser displays the League Planet Login page (see
Figure 7.69).
8. Enter an invalid
userId and password, and click the Login button to test
the server-side validation logic. Enter a valid
userId, anne for example;
and
password, guest for example; and click the Login button. The Web
browser displays the League Planet Logout page (see Figure 7.70). Note that
logout.jsp correctly retrieved the userId from the session object and dis-
played it in the Web page.
9. Experiment with debugging by setting breakpoints in the servlet and JSP
scriptlets, and repeat the above testing. This time select the Debug
As
᭤ Debug on Server menu item instead of Run As ᭤ Run on Server. The
familiar Java debugging perspective opens.
Iteration 7: JSP 287
288 CHAPTER 7 • The Presentation Tier
Figure 7.69 League Planet Login
Figure 7.70 League Planet Logout
Summary of Iteration 7
In this iteration you used the JSP source editor to generate dynamic Web content.
You also used the JSP debugger to step through your JSP code. You are now
ready to develop both the server and client sides of your presentation layer.
In the next iteration, you’ll use the TCP/IP monitor to view HTTP message
traffic. This tool will help you debug Web applications and understand HTTP
topics such as cookies and sessions.
Iteration 8: Monitoring HTTP Sessions
HTTP Sessions
In the preceding iteration, you explored the use of HTTP session tracking in servlets
and JSPs. HTTP is actually a sessionless protocol, so it is something of an abuse of
terminology to talk about HTTP sessions. In reality, Web application servers layer
virtual HTTP sessions on top of the HTTP protocol. There are several techniques for
accomplishing this. They all boil down to the server sending a session id in some
form to the browser so that the browser sends it back to the server in the subsequent
requests. The server maintains state information associated with the session id and
retrieves that information when it receives a request that contains the session id.
One way to implement session tracking is through URL rewriting and hid-
den form variables. In this approach, every URL that the server sends in a
response is rewritten to include the session id. Also, every HTML form that gets
sent to the server includes a hidden input field that contains the session id. This
ensures that any request back to the server will contain the session id. Using this
approach requires extra steps for the application developer. For example, every
URL must be explicitly rewritten when the response is generated.
A much simpler approach is to use client-side cookies, which were intro-
duced by NetScape Communications. In this approach, the server sends the ses-
sion id using an HTTP Set-Cookie response header, and the browser returns it
using a Cookie request header. For a thorough treatment of cookies, see Cookies
[StLaurent1998a] by Simon St. Laurent.
J2EE includes support for session tracking. If the user has enabled cookie
support, then cookies are used. Otherwise, URL rewriting is used. The servlet
runtime automatically detects whether cookies are enabled and selects the cor-
rect method. However, if cookies are disabled, your application won’t work
correctly unless you explicitly rewrite your URLs using the
encodeURL method
of the
HttpServletResponse class.
Iteration 8: Monitoring HTTP Sessions 289
290 CHAPTER 7 • The Presentation Tier
The TCP/IP Monitor
WTP contains a very useful tool called the TCP/IP Monitor that lets you peek
into the HTTP traffic and see what’s going on. The TCP/IP monitor is especially
useful for understanding Web services and is a central tool for performing WS-I
validation. We’ll discuss that topic later (see Iteration 4: Testing Web Services for
Interoperability section in Chapter 10). Here you’ll use the TCP/IP monitor to
explore session tracking.
It is natural to think of the end product of your work when building a Web
application as the pages that are displayed in a Web browser. However, in a real
sense the true end product of your work is TCP/IP packets of HTTP information
that are sent over the network. You do not normally see these packets in their
raw form, but they carry the content of your Web application. When you deploy
an application that doesn’t necessarily have a client that renders this information
visually, it can be difficult to understand what’s going on and diagnose problems.
This is especially true of Web services where the client is typically another appli-
cation that may not directly display the information to an end user.
The TCP/IP monitor sits between a client and a server, playing the role of
a “man-in-the-middle.” The TCP/IP monitor accepts requests from clients,
forwards those requests to a server, receives the responses, and sends those
responses back to the clients (see Figure 7.71). The TCP/IP monitor records
the messages and allows you to view, modify, resend, and save them.
Figure 7.71 TCP/IP Monitor as a Man-in-the-Middle
TCP/IP
Monitor
Server
TCP/IP
Monitor
Client
Request
Response
Request
Response
The TCP/IP monitor can display the messages either as raw bytes or using
special renderers for XML and image content (for example, so you can view
images and not their binary representation). You can view each message in the
format best suited to it. You can also optionally show or hide the HTTP message
headers.
The TCP/IP monitor can also serve as a handy test client since it allows you
to modify and resend requests. This can save you time while testing since you
don’t have to modify the client to try different data.
You can configure the TCP/IP monitor to work with either local or remote
Web servers. This comes in handy when you are trying to debug a client for an
external Web service. When you use the wizard to create your own Web services,
you can have it automatically configure the TCP/IP monitor for you.
Viewing HTTP Sessions with the TCP/IP Monitor
The developers of League Planet have decided that users must enable cookies to
use the advanced functions of the Web site. Calling the URL rewriting API is too
much work for the developers and is too error prone. In this iteration, you’ll
monitor the HTTP traffic for the
LoginServlet to ensure that session tracking is
working correctly. Do the following:
1. In the Servers view, select the Tomcat server, right click, and select the
Monitoring
᭤ Properties menu item. The Monitoring Ports dialog opens (see
Figure 7.72). If you have any monitors defined from previous work,
remove them now by selecting each one and clicking the Remove button.
Iteration 8: Monitoring HTTP Sessions 291
Figure 7.72 Monitoring Ports
2. Click the Add button to add a TCP/IP monitor to Tomcat. The list of avail-
able ports is displayed (see Figure 7.73).
3. Select the HTTP port. Accept the entries for the Monitor Port (8081) and
the Content type filter (All). The monitor port is the port that the monitor
listens to. It forwards requests to Tomcat and relays replies back the client.
In the process, it records the requests and responses so you can view them.
The content type filter controls the type of content that gets recorded.
Click the OK button. The monitor is created, and the Monitoring Ports dia-
log is redisplayed with the new monitor added (see Figure 7.74).
292 CHAPTER 7 • The Presentation Tier
Figure 7.73 Monitor HTTP Port 8080
Figure 7.74 Monitor Added on Port 8081
4. Select the newly created monitor and click the Start button. The monitor is
now listening to port
8081 and will forward requests received there on to
port
8080. Open a new Web browser window outside of Eclipse to ensure
that a new session will be started. Enter the following URL:
http://localhost:8081/icehockey/login
The TCP/IP Monitor view opens and displays three entries (see Figure 7.75).
Select the TCP/IP Monitor view pull-down menu (down arrow) in the
top right-hand corner, and then select the Show header menu item to dis-
play the HTTP headers. Select the first entry, which is the request for
/icehockey/login. Look at the Response pane and notice the Set-Cookie
header, which contains the new session id. This sends the session id to the
Web browser.
Iteration 8: Monitoring HTTP Sessions 293
Figure 7.75 Set-Cookie HTTP Header
5. Now select the second entry, which is for /icehockey/schedule.css (see
Figure 7.76). Look at the Request pane and scroll down the header widget
to locate the Cookie header that contains the session id. This sends the
session id back to the server, which then correlates the request with the
session. All subsequent requests will contain the session id in a Cookie
header until the Web browser closes. The server will invalidate the session
id if the Web browser is inactive for a preset period of time. If this hap-
pens, the server discards the current session and creates a new one when
the Web browser sends the next request.
6. To stop the TCP/IP monitor, open its preference page, select the monitor,
and click Stop (see Figure 7.77).
Modifying and Resending a Message
As a man-in-the-middle, the TCP/IP monitor simply listens to a conversation.
However, the TCP/IP monitor can also directly participate in a conversation and
send its own requests to a server. This ability to act as a client can help in diagnosing
problems since it allows you to quickly test different requests.
294 CHAPTER 7 • The Presentation Tier
Figure 7.76 Cookie HTTP Header
Figure 7.77 TCP/IP Monitor Preferences
There are two options for resending requests from the TCP/IP monitor. You
can either resend a request exactly as it was sent earlier, or you can modify and
resend the request. Resending an unmodified request is useful when you are
debugging a server problem or if you want to see the effect of a change to the
server. Resending a modified request is useful when you want to understand the
behavior of a server and correct the behavior of a client.
To modify and resend a request, do the following:
1. Right click on the message in the TCP/IP monitor message tree.
2. Invoke the Modify request menu item. A new request appears as a child of
the existing request.
Note that if you want to resend the unmodified request, simply invoke the
Resend request menu item at this point.
3. Edit the request in the Request pane, for example, by changing one of the
input parameters.
4. Right click on the modified message in the message tree and invoke the
Send Modified Request menu item. Your modified request is re-sent and the
result is displayed in the Response pane.
Summary of Iteration 8
In this iteration you used the TCP/IP monitor to view HTTP traffic. This is a
powerful tool for understanding and debugging Web applications. You’ll also
use the TCP/IP monitor in Chapter 10 to validate that Web service messages
comply with Web Service Interoperability (WS-I) profiles.
Summary
In this chapter we have discussed the structure of the presentation tier and the
tools that WTP contains for developing both the client and server portions of it.
Of course, there is much more to the presentation tier than we have gone into
here. For example, we have not touched on the vast subject of J2EE application
frameworks such as Struts, Spring, and JSF. We will discuss WTP plans for JSF
tools at the end of the book (Chapter 17).
At this point you should be comfortable with creating HTML, CSS,
JavaScript, XML, DTD, JSP, and servlets in both static and dynamic Web proj-
ects. You should also be able to control servers and monitor HTTP traffic.
You’re now ready to move on to developing the business logic tier.
Summary 295
This page intentionally left blank
CHAPTER 8
The Business Logic Tier
The business of everybody is the business of nobody.
—Thomas Babington Macaulay
The term business logic tier is suggestive enough—this is the layer where the
business objects and rules are modeled. It is common practice to build applica-
tions with three layers, with each layer hosted on one tier of a three-tier architec-
ture. The business layer lies between the persistence layer, which stores the data,
and the presentation layer, which provides the user interface. In this chapter,
we’ll discuss some of the best practices for developing a business tier and show
how WTP can be used to do this.
Although we offer advice here, you should be aware that there is much
debate over how to build the business tier. Component architectures, the use of
plain (Naked) objects, and service-orientation are some of the most popular
approaches (see [Sessions1997], [Pawson2002]).
Component architectures are a natural evolution of OO concepts. They
offer coarse-grained business-level functions that are easier to understand,
have clear interfaces, and can be distributed over a network. However, compo-
nent architectures are not without problems. The large variety of component
protocols, component interoperability problems, multiple interface languages,
and heavyweight runtime infrastructures, and the complexity of standards and
technologies have long been causes for concern. Service-Oriented Architecture
(SOA) addresses some of the interoperability and integration problems by
offering common standards and protocols, such as XML and HTTP
(see Chapter 10). Consult the large number of excellent resources available
elsewhere for patterns related to business models, uses of component architec-
tures, SOA, and EJBs. We will skip the history here and briefly outline what
we believe works.
297
We believe in OO architectural principles and that objects must be at the
core of components and services. Therefore, our business model, sometimes
referred to as the domain model [Fowler 2003], will be an object model.
Obviously, given the title of this book, we will implement the business model
in Java. Objects capture the business data and rules by encapsulating them as
attributes and behavior. A simple business model may look like a reflection of
the data model. However, as models evolve and get richer, the business layer
contains much more than a representation of a database. The real strength of
objects is how they collaborate using their relationships to accomplish busi-
ness behavior.
A good object model is fine-grained with lots of small, easy-to-understand
objects that have easy-to-understand methods. There should be objects encapsu-
lating significant business concepts and data. Specific extensions and interfaces
should be modeled by subclasses with fine-grained object interfaces. Domain
relationships should be captured in objects by explicit object-to-object relations
and not with database-like primary and foreign key mappings. OO presents a
rich set of strategies and techniques to design a model for your business
[Gamma1995]. Domain complexity is a fundamental aspect of many business
systems. You should not expect OO to make something that is complex simple.
That would be like expecting mathematics to make physics simple. If the busi-
ness is complex, the object model will also be complex. OO will not make the
domain simple, but it will help you model it faithfully. OO is definitely not a bed
of roses. Object models have their associated difficulties but, fortunately, there
are also ways to deal with them [Fowler1999].
Fine-grained domain models impose challenges from two primary perspec-
tives: distribution and application logic.
Domain models built using Plain Old Java Objects (POJO) work well until
you need to distribute the objects. In a fine-grained model, objects make a lot of
small calls to each other. In a distributed system, this causes problems. Remote
calls are expensive. This is where components and services come in handy. They
present course-grained interfaces, or façades, to clients. You also need to handle
security, transactions, reliability, multiple protocols, and heterogeneous environ-
ments. J2EE runtime environments take care of those details. In this chapter, we
solve the distribution problem by using EJBs.
It is important to distinguish between the two aspects of systems that are
captured in the business tier: the domain model and the application logic. Martin
Fowler explains this very nicely in his book [Fowler2003]. The domain model rep-
resents the core business concepts and their behavior. This is different than the
business use cases or the flow of the events. Application logic captures the latter.
Application logic objects capture processes and workflow logic. These usually
298 CHAPTER 8 • The Business Logic Tier