Make a Joomla Template in 5 Easy Steps phần 3 doc
Bạn đang xem bản rút gọn của tài liệu. Xem và tải ngay bản đầy đủ của tài liệu tại đây (787.03 KB, 11 trang )
S T E P
T H R E E :
C R E A T E
O U R
F I R S T
L A Y O U T
The layout you choose has a direct affect on what modules you can use and where they are
positioned, here is a site using two different layouts, the content is unaffected but the
modules available is affected:
As you can see the left layout does not have the right column or the banner.
Now it’s time to get down to business
The Layout Sketch
For this first template I have decided to go for a single column layout. Although this may
not suit your purpose the idea is to pass on the skills you can then use to create the exact
layout you need, plus we will be creating a two and three column site later in the book.
To begin my design process I have made a list of the Joomla modules I want my site to use,
and here it is:
•
•
•
•
•
•
•
18
Top menu
Search box
User login
Latest news
Popular
Pathway
Main content
S T E P
T H R E E :
C R E A T E
O U R
F I R S T
L A Y O U T
So, here is my sketch of the proposed layout:
As you can see there are two extra parts to this outline; the footer and a block just above it
called optional. The footer is an intrinsic part of every Joomla template and needed. The
optional block allows us some flexibility in adding certain modules if we need to later.
Once we have the sketch we need to build an HTML table that serves as the container for
these parts.
19
S T E P
T H R E E :
C R E A T E
O U R
F I R S T
L A Y O U T
The HTML
Here we go back to PHP Designer 2006 and create our
HTML table. When we open PHP Designer 2006 we see a
page of options, you will see a table as shown in the graphic
here.
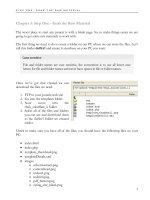
What you need to do is double click on HTML under new
Document. This will bring up a blank page for us to work
with.
Before we add any Joomla tags we need to add in the basic
HTML required and build the table that will hold our layout.
The first thing we need to add is the Joomla head tag. This is
vitally important as it sets the basic page elements for a
Joomla template.
The Joomla head tag looks like this:
Joomla Head Tag
allowed." );?>
html
PUBLIC
"-//W3C//DTD
XHTML
1.0
Transitional//EN"
" /><html xmlns=" /><head>
<?php if ( $my->id ) { initEditor(); } ?>
<meta http-equiv="Content-Type" content="text/html; charset=iso-8859-1" />
<?php mosShowHead(); ?>
echo
"
href=\"$GLOBALS[mosConfig_live_site]/templates/$GLOBALS[cur_template]/css/te
mplate_css.css\" type=\"text/css\"/>" ; ?>icon\" href=\"$GLOBALS[mosConfig_live_site]/images/favicon.ico\" />" ; ?>
</head>
<body>
At this point you really don’t need to know what any of the above does, all you need to do
is make sure it’s at the top of the page. You will find this code in Appendix 1.
Next we need to add in the HTML end tags, these tags should always be the very last things
on your template page, content goes in between them and the head tag. They look like this:
20
S T E P
T H R E E :
C R E A T E
O U R
F I R S T
L A Y O U T
Joomla End Tag
</body>
</html>
So, your PHP Designer page should look like this:
Before we go any further we are going to save this file. We are going to save it in the
duffer1 folder on our PC and overwrite the index.php page that’s already in there, so we
call this file index.php.
Now we need to add in the table we need and we are actually going to be adding multiple
tables nested inside one another. This again simplifies the design process for us beginners.
The first table we add is the main container, it will be one column wide and contain enough
rows to hold the items we have in our sketch. So, we need a row for:
•
•
•
•
•
•
•
Site name
Top menu
user login – popular – latest news
Pathway
Content
Optional
Footer
That means we need a table 1 column wide and 7 rows deep. PHP Designer 2006 makes
this easy for us as it has a little GUI for adding table, so lets walk through the table creation.
21
S T E P
T H R E E :
C R E A T E
O U R
F I R S T
L A Y O U T
In the top row of icons you will see this one
it’s the icon to create and insert a table. So,
make sure you have your cursor in-between the two <body> tags as shown
here.
Next click the table icon and a popup window will appear. That looks like
this.
Adjust the rows so it equals 7, as that’s how many we need. Then click the properties tab
and set the width to 700, as we want our table to be fixed width at 700 pixels, set
cellpadding and cellspacing at 0 and choose centre from the alignment dropdown. It should
look like this:
Now click Ok. What you should see now on your page is this:
22
S T E P
T H R E E :
C R E A T E
O U R
F I R S T
L A Y O U T
You can see we now have rows of HTML and we will be using these for holders of the
Joomla tags. The first row we are going to work with is row 13 from the graphic above, it is
the first row in our table and is going to hold our site name. Luckily Joomla has a tag for
automatically putting the site name into our template, the tag looks like this:
Joomla Site Name Tag
<?php echo $mosConfig_sitename; ?>
We put this tag between the two <td> tags on row 13 so it looks like this:
23
S T E P
T H R E E :
C R E A T E
O U R
F I R S T
L A Y O U T
That will now echo out the sites name from Joomla onto your web page. Next we need to
add the tag for the top menu and search box, as these are two separate tags we are going to
add a table with two columns inside the next row so we can format the layout easier.
This means we are now working with row 16 in PHP Designer 2006. Place your cursor
inside the two <td> tags as shown below:
again. This time we want to add a table with 1 row and
Now click on the add table icon
two columns, we also want this table to be 100% wide, in other words it stretches to the
full width of the main table which is 700 pixels. We do this so if we want to change the
width of our main page we just need to adjust the main table width and everything else
moves with it.
As you can see above we set the width to 100 and check the % box, we also set cellpadding
and spacing to zero. Now we click Ok.
Your page should now look like this:
24
S T E P
T H R E E :
C R E A T E
O U R
F I R S T
L A Y O U T
The new table has been added and can be seen occupying rows 16 to 21. The rows we will
put our next tags in are rows 18 and 19. For this we will use the Joomla user tag, this is
versatile because Joomla is capable of handling up to nine of these, the tag looks like this:
Joomla User Tag
<?php mosLoadModules ( 'user1' ); ?>
If you notice the number ‘1’ after ‘user’ this can be incremented up to ‘9’ to create nine
instances. What we will do is use user1 and user2 for our top menu and search box, our
page now looks like this:
The next row will hold three items, the login form, popular menu and latest news menu, so
we need to move to row 24 and create another table, so make sure your cursor is in
between the two <td> tags on line 24 as below:
25
S T E P
T H R E E :
C R E A T E
O U R
F I R S T
L A Y O U T
again, this time we need a table 100% wide, with one row
And now hit the table icon
and three columns, so it should look like this:
Click the Ok button and the table is created. It will occupy lines 24 to 30 as shown below:
26
S T E P
T H R E E :
C R E A T E
O U R
F I R S T
L A Y O U T
Now we need to add the tags for the three items to be included in this table, that is; login
box, popular and latest news. They go on lines 26, 27 and 28. To do this we just use the
‘user’ tag but we increment the numbers up to make them unique. So, we will use user3,
user4 and user5 as follows:
27
S T E P
T H R E E :
C R E A T E
O U R
F I R S T
L A Y O U T
As you can see above the three Joomla tags are now in place. Now we are getting the hang
of this lets add all of the other Joomla tags, notice the pathway, main body and footer tags
are different to the others. These are unique tags rather than using the ‘user’ tag.
So, we will be working on lines 33, 36, 39 and 42. Line 33 is for the pathway, 36 for the
main body tag, 39 for our optional tag and 42 for the footer tag. Here’s what they look like
once added:
That’s all of the tags in place, so save the file! Remember it should be saved as index.php in
the duffer1 folder on your PC. We now need to upload it, adjust the module positions in
Joomla administrator and take a look. Let’s upload it now using FTP, it needs to be placed
into the templates/duffer1/ folder on your Joomla web site.
28