Make a Joomla Template in 5 Easy Steps phần 5 ppt
Bạn đang xem bản rút gọn của tài liệu. Xem và tải ngay bản đầy đủ của tài liệu tại đây (547.71 KB, 10 trang )
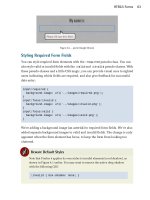
STEP FOUR: ADJUST THE STYLE SHEET
Now we need to change the colour of the border used for the input box so that it matches
our colour scheme. To do this we need to go to line 402 and let’s change the colour to
#0055B3 so it looks like this:
Save the file and upload.
Now if you browse to your site the box should be aligned and in your colours. You will also
notice that the login form input boxes have also changed colour and are now blue to match
the search box.
Next we need to tackle the three columns that hold the login box, popular links and latest
news links.
Login Box, Popular, Latest News
We need to make some major changes to the style for these areas. The background image
behind the titles needs to go and we need to format them so they fit our clean style.
So let’s start with the header row for each of the columns, at present it uses a background
image to give it a silver background. We are going to remove this and instead have a single
one pixel border at the bottom of each header.
To do this we need to edit template_css.css at line 465, we are going to comment out the
‘background’ style, change the text colour to #0055B3, remove the left padding, change the
font size to 14 pixels and finally add our bottom border. The section now looks like this:
40
STEP FOUR: ADJUST THE STYLE SHEET
If we don’t want the words upper case we comment out the ‘text-transform’ line, if you
don’t want them bold comment out the ‘font-weight’ line, it’s pretty simple really.
Next we need to get rid of the red hyperlinks and change their colour. To do this we need
to scroll to line 336, now here you can make them any colour you want, I’m going to use
our blue #0055B3. We also need to change the colour when we hover over the link, so let’s
set this to the orange from our list of colours #FF8000, plus we’ll add an underline to the
hover state. So this class now looks like this:
Next we need to address the image used for the bullets and the fact the lists are very close
to the top of the columns. For this we need to scroll to line 300 and adjust it so it looks like
this:
As you can see we have added margin-top: 10px; to line 301 in the ‘ul’ class and
commented out lines 309 to 313 in the ‘li’ class. We have also changed line 303 to list-style-
type ‘square’ (type needed adding to handle Internet Explorer) for the bullet type. We also
41
STEP FOUR: ADJUST THE STYLE SHEET
added ‘list-style-position’ so that the bullets line up with the left edge of the title. Save the
file and upload, now go and take a look.
As you can see we still have the login box to deal with, especially the login button itself. So,
let’s get to line 386 in the template_css.css file. This sets the attributes for the button and
we’ll change it to look like this:
First we commented out lines 397 to 404, using /* and */ then changed the ‘color’ style to
#0055B3 and we added these five rows to create a button with a white background and a
solid blue 1 pixel border:
border-top: 1px solid #0055B3;
border-right: 1px solid #0055B3;
border-left: 1px solid #0055B3;
border-bottom: 1px solid #0055B3;
background: #fff;
We have also changed the margin to 2 pixels, this is so Internet Explorer (yuk) doesn’t push
the button right up to the previous item. This gives us a button that looks like this:
The final thing we need to do is add some white space below it.
To do this we need to wrap the Joomla PHP tag with another <div> tag and create a new
style at the bottom of our style sheet. So find line 26 in index.php and it will look like this:
42
STEP FOUR: ADJUST THE STYLE SHEET
<td valign="top"><?php mosLoadModules ( 'user3' ); ?></td>
We need to change it to look like this:
As you can see we have added this before the tag:
<div class="duflogin">
And this after the tag:
</div>
Now go to template_css.css and scroll to the very bottom and add this:
.duflogin {
margin-bottom: 20px;
}
It should look like this:
Now save both files and upload them to your website, browse to your web page and do a
hard refresh (Ctrl F5). Next we’ll take a look at the pathway.
The Pathway
The pathway is a breadcrumb menu that tracks a users position relative to the home page.
We need to make a few changes to get this to fit into our design. First we need to edit
index.php and set a <div> tag around the Joomla pathway tag.
43
STEP FOUR: ADJUST THE STYLE SHEET
To do this go to line 33 and change it from:
<td><?php mosPathWay(); ?></td>
To this:
<td><div id="pathway_text"><?php mosPathWay(); ?></div></td>
You can see we have added <div id="pathway_text"> before the Joomla tag and </div>
after it. Now we can go to template_css.css and make some changes to the style that is
already there for the pathway. We find this starting on line 35 and we need to change it to
look like this:
As you can see we have changed line 42 so that it reads ‘border-bottom’ instead of just
‘border’ and we have changed the colour to our blue. Next we added lines 44 and 45 to
change the font size and colour.
That’s the pathway complete, save index.php and template_css.css and upload them to your
website. We are almost finished, next we need to look at the main body area.
The Main Body Area
This is the area that contains all of your site contents. We are going to go through the main
area styles all in one go. We are going to make sure we cover all the items on internal pages
such as FAQ lists and dynamic section and category areas. But let’s get started with page
titles, at present they are still in the original red and that doesn’t fit with the colour of our
site.
44
STEP FOUR: ADJUST THE STYLE SHEET
We need to dive into template_css.css again and navigate to line 434 and change it so it
looks like this:
We have changed line 437 so the colour code is now orange #FF8000.
Next we want to change the component heading, if you browse to the news section of your
site you’ll see it still uses the grey background graphic. You’ll find this on line 417, we will
change it as follows:
As you can see we have commented out the background item. Next we need to adjust the
‘back’ button that appears on each section page. You’ll find this at line 265, change it to the
following:
45
STEP FOUR: ADJUST THE STYLE SHEET
You can see we’ve made some major changes to this button. Next we need to edit the page
navigation for news items and other dynamic content. This is under the pagenav class
found on line 280 and we need to change it to this:
Next we change the table of contents heading that appears with multiple page articles, this
is on line 554 and called table.contenttoc. We change it as follows:
We also need to change the border colour that surrounds these mini table of contents to
#0055B3, we find this on line 543, change as follows:
Now you can save the file and upload it to your web site. If you browse through your site
you will now see that everything is now styled in your colours, you’ve created a really
46
STEP FOUR: ADJUST THE STYLE SHEET
simple, clean design, with no graphics. But much more than that you’ve learned a hell of a
lot about Joomla templates. And it doesn’t stop here.
There’s one more thing we must cover and another couple of things that would be useful
to know. So let’s start with the important stuff.
Bits and Pieces
One thing that we haven’t covered yet is the user menu. We haven’t put it anywhere on our
design and if we have a login box we also need the user menu. So, let’s look at that next.
The first step is to login to your Joomla administrator section and navigate to ‘modules >
site modules’ then select ‘user menu’ and click edit. You need to set ‘show title’ to no and
position to ‘user3’ – this puts it in the same box as our login form, but it’s only visible when
a user is logged in. When you are done it should look like this:
Click save and on the resulting page make sure that the menu is positioned below the login
form, it should look like this:
If the user menu is above the login form hit the little blue arrow to knock it below it. This
is because we want the menu to appear below the users name and logout button when they
are logged in.
If you go to your web sites front page and login using the login form (use your admin
username and password) you will see it looks pretty ugly, something like this:
47
STEP FOUR: ADJUST THE STYLE SHEET
We need to fix this otherwise our users are not going to have a good experience. To do this
we need to go back to template_css.css and find line 567 and change it so it looks like this:
As you can see we have commented out lines 568, 569 and 570, then we comment out lines
577, 578 and 579, finally we comment out line 584. We have then changed the link colours
so that they are blue and turn orange on hover.
48
STEP FOUR: ADJUST THE STYLE SHEET
The final result will now look like this to a logged in user:
The change we have just made will also affect the main menu and other menu.
Finally let’s get rid of those email, PDF and print images that come with the standard
template. What I’ve found is that if you just delete them they are replaced with some nice
graphics, these
in fact. So, FTP into your web site and go to templates > duffer1
> images once in this folder you need to delete these three images:
• emailButton.png
• pdf_button.png
• printButton.png
It’s best to also delete these from the duffer1 folder on your PC as well, as this is important
for the next chapter. Upload the template_css.css file and check out your site. Before we
move on to the next chapter we still have one section to deal with, the optional section.
The Optional Section
If you remember back to our layout we put an ‘optional’ tag at the bottom of the page just
above the footer. The reason I added this was twofold. Firstly, to give us a place on the
page to place an extra item, but also to run through how we can create a custom module
that contains our own text.
So, let’s create a custom module first. This is really easy and all done from the administrator
section.
Login to your Joomla administrator and navigate to modules > site modules. Once there
you will see the graphic navigation buttons at the top right. From here select the
‘new’ button (shown on the right).
When you do this you will be presented with a form to complete, complete this
so it looks like this:
49