microsoft press internet information services iis 70 resource kit phần 8 ppsx
Bạn đang xem bản rút gọn của tài liệu. Xem và tải ngay bản đầy đủ của tài liệu tại đây (2.61 MB, 88 trang )
Part IV
Troubleshooting and Performance
In this part:
Chapter 15: Logging. . . . . . . . . . . . . . . . . . . . . . . . . . . . . . . . . . . . . . . . . . . .535
Chapter 16: Tracing and Troubleshooting . . . . . . . . . . . . . . . . . . . . . . . . .563
Chapter 17: Performance and Tuning . . . . . . . . . . . . . . . . . . . . . . . . . . . . .605
Chapter 15
Logging
In this chapter:
What’s New? . . . . . . . . . . . . . . . . . . . . . . . . . . . . . . . . . . . . . . . . . . . . . . . . . . . . . . . . . 535
Log File Formats That Have Not Changed . . . . . . . . . . . . . . . . . . . . . . . . . . . . . . . . 540
Centralized Logging . . . . . . . . . . . . . . . . . . . . . . . . . . . . . . . . . . . . . . . . . . . . . . . . . . 540
Remote Logging. . . . . . . . . . . . . . . . . . . . . . . . . . . . . . . . . . . . . . . . . . . . . . . . . . . . . . 541
Configuring IIS Logging . . . . . . . . . . . . . . . . . . . . . . . . . . . . . . . . . . . . . . . . . . . . . . . 547
HTTP.sys Logging . . . . . . . . . . . . . . . . . . . . . . . . . . . . . . . . . . . . . . . . . . . . . . . . . . . . . 556
Application Logging . . . . . . . . . . . . . . . . . . . . . . . . . . . . . . . . . . . . . . . . . . . . . . . . . . 557
Folder Compression Option . . . . . . . . . . . . . . . . . . . . . . . . . . . . . . . . . . . . . . . . . . . . 558
Logging Analysis Using Log Parser . . . . . . . . . . . . . . . . . . . . . . . . . . . . . . . . . . . . . . 559
Summary . . . . . . . . . . . . . . . . . . . . . . . . . . . . . . . . . . . . . . . . . . . . . . . . . . . . . . . . . . . . 561
Additional Resources. . . . . . . . . . . . . . . . . . . . . . . . . . . . . . . . . . . . . . . . . . . . . . . . . . 561
On the Disc
Browse the CD for additional tools and resources.
Though not technology’s most fascinating topic, Web server log files are extraordinarily
important. They are a core resource used, for example, as the basis for billing, reliability,
performance, compliance, and forensics. This chapter discusses Internet Information Services
logging and related features in Microsoft IIS 7.0.
What’s New?
In IIS 7.0, as in IIS 6.0, log files are handled by the HTTP.sys kernel mode device driver. No
user code runs in this service because HTTP.sys runs in kernel mode. In general, not a lot has
changed related to logging, but a few differences as well as new opportunities are notable.
You’ll find that many of the enhancements to logging introduced as late as Windows Server
2003 Service Pack 1 (SP1) are included in IIS 7.0. For example, you can use World Wide Web
Consortium (W3C) centralized logging and binary logging; you can use standard log formats
such as W3C extended, National Center for Supercomputing Applications (NCSA), and IIS;
and you can set the custom logging option.
One of the more interesting features in IIS 7.0 is its modular architecture and the Integrated
Pipeline. The Integrated Pipeline is covered in depth in Chapter 2, “Understanding IIS 7.0
535
536
Part IV:
Troubleshooting and Performance
Architecture.” Logging greatly benefits from the flexibility provided by the modularity in IIS 7.0
and the Integrated Pipeline because you can write your own logging module and inject it into
the pipeline. Your custom module can capture just the information needed for your application.
IIS 7.0 incorporates several changes pertinent to logging:
■
You use the IIS Manager to configure logging-related settings.
■
The new configuration system is based on XML.
■
There are a number of new logging configuration options and a new set of status codes.
■
IIS 7.0 provides logging for a new service that enables remote administration of an IIS
7.0 server.
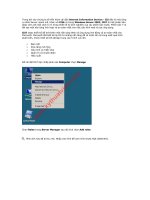
IIS Manager
IIS 7.0 introduces a completely new user interface, the IIS Manager. The IIS Manager makes it
easier to browse and make changes to IIS settings, including log file settings. For example,
if you wanted to implement the centralized logging in IIS 6.0, you had to use ADSUtil.vbs.
Now, the Centralized Logging option is exposed in the IIS Manager, as shown in Figure 15-1.
Figure 15-1 The Centralized Logging option in the IIS Manager.
Chapter 6, “Using IIS Manager,” provides an in-depth look at the IIS Manager.
The XML-Based Logging Schema
IIS 7.0 uses a new configuration system that is XML-based and is very similar to the ASP.NET
configuration system. Each configuration section is defined in XML schema files located in
Chapter 15:
Logging
537
%SystemRoot%\system32\inetsrv\config\schema. Details on the configuration sections are
covered in Chapter 4, “Understanding the Configuration System.” Because information is
defined in XML files, it is easy to determine what attributes, elements, and enums are used.
The schema for IIS 7.0 contains a list of all the configurable options, so looking in the schema
file is a quick way to identify all the configurable settings for any feature, including logging.
The following listing is from the system.applicationHost/log section that is located in
%SystemRoot%\system32\inetsrv\config\schema\IIS_Schema.xml. (Some long lines have
been split to fit on the printed page.) As you can see, the XML clearly defines the names and
data types associated with each item.
<sectionSchema name="system.applicationHost/log">
<attribute name="logInUTF8" type="bool" defaultValue="true" />
<attribute name="centralLogFileMode" type="enum" defaultValue="Site" >
<enum name="Site" value="0"/>
<enum name="CentralBinary" value="1"/>
<enum name="CentralW3C" value="2"/>
</attribute>
<element name="centralBinaryLogFile">
<attribute name="enabled" type="bool" defaultValue="false" />
<attribute name="period" type="enum" defaultValue="Daily">
<enum name="Hourly" value="4"/>
<enum name="Daily" value="1"/>
<enum name="Weekly" value="2"/>
<enum name="Monthly" value="3"/>
<enum name="MaxSize" value="0"/>
</attribute>
validationParameter="1048576,4294967295" />
</element>
<element name="centralW3CLogFile">
<attribute name="enabled" type="bool" defaultValue="true" />
validationType="nonEmptyString" />
<attribute name="period" type="enum" defaultValue="Daily">
<enum name="Hourly" value="4"/>
<enum name="Daily" value="1"/>
<enum name="Weekly" value="2"/>
<enum name="Monthly" value="3"/>
<enum name="MaxSize" value="0"/>
</attribute>
validationParameter="1048576,4294967295" />
538
Part IV:
Troubleshooting and Performance
Method, UriStem, UriQuery, HttpStatus, Win32Status,
ServerPort, UserAgent, HttpSubStatus">
<flag name="Date" value="1"/>
<flag name="Time" value="2"/>
<flag name="ClientIP" value="4"/>
<flag name="UserName" value="8"/>
<flag name="SiteName" value="16"/>
<flag name="ComputerName" value="32"/>
<flag name="ServerIP" value="64"/>
<flag name="Method" value="128"/>
<flag name="UriStem" value="256"/>
<flag name="UriQuery" value="512"/>
<flag name="HttpStatus" value="1024"/>
<flag name="Win32Status" value="2048"/>
<flag name="BytesSent" value="4096"/>
<flag name="BytesRecv" value="8192"/>
<flag name="TimeTaken" value="16384"/>
<flag name="ServerPort" value="32768"/>
<flag name="UserAgent" value="65536"/>
<flag name="Cookie" value="131072"/>
<flag name="Referer" value="262144"/>
<flag name="ProtocolVersion" value="524288"/>
<flag name="Host" value="1048576"/>
<flag name="HttpSubStatus" value="2097152"/>
</attribute>
</element>
</sectionSchema>
Centralized Logging Configuration Options
Following is the logging section defined in the ApplicationHost.config file that controls
Centralized Logging options. You can change this so that your files are stored on another drive
or volume. You can enable options you want and disable whatever options you do not need.
<log>
</log>
SiteDefaults Configuration Options
The SiteDefaults section in the ApplicationHost.config file, shown in the following code,
controls the logging settings that are used when creating new sites. You can configure two
options: the format of the log file and the location in which Failed Request tracing files are
stored.
<siteDefaults>
</siteDefaults>
Chapter 15:
Logging
539
Disable HTTP Logging Configuration Options
In some cases, an IIS administrator does not require log files. If you would like to turn off
httpLogging at the server level, you can disable logging in the IIS Manager. You can also
disable logging at the site level. You might wonder why these options are available. It’s so that
you can disable logging on your test or development machines to reduce the disk space
that unnecessary files use.
You should evaluate your options before disabling httpLogging. Check with your business or
legal department to be certain what your company’s logging requirements and policies are.
The default value for this setting, as shown here, is false.
<httpLogging dontLog="false" />
Note
For more information about the system.webServer/httpLogging option, see the
section titled “Countermeasures” in Chapter 17, “Performance and Tuning.”
Default Log File Location
One of the most significant changes in IIS 7.0 is that the folder where IIS stores WWW logs
has been changed to %SystemDrive%\inetpub\logs\LogFiles. For example, the Default Web
Site would log to C:\inetpub\logs\LogFiles\w3svc1. This means that by default in IIS 7.0, all
log files are stored in a single folder. Note, however, that log files for the legacy built-in File
Transfer Protocol (FTP) and Simple Mail Transfer Protocol (SMTP) services are still located in
%windir%\System32\Logfiles. You can manage these files by using the IIS Manager 6.0, an
MMC console that is installed when you install the legacy FTP service or the SMTP service.
Note
The new FTP Publishing Service for IIS 7.0 stores its log files in %SystemDrive%\
inetpub\logs\LogFiles by default. You need to download and install this add-on, because it
does not ship with IIS 7.0. The x86 and x64 versions are available at . Click
Download and search for “Microsoft FTP Publishing Service for IIS 7.0.”
Default UTF-8 Encoding
By default, IIS 7.0 stores log files by using UTF-8 encoding. This changes the default file
naming convention so that the files start with u_ (for example, u_exYYMMDD.log). Here is
the portion of the IIS_Schema.xml file that sets the UTF-8 encoding option. The default
setting is true.
<sectionSchema name="system.applicationHost/log">
<attribute name="logInUTF8" type="bool" defaultValue="true" />
...
</sectionSchema>
UTF-8 encoding allows for single-byte and multi-byte characters in one string. This encoding
enables you to read text-based logs (for example, logs that use W3C Extended, IIS, and NCSA
540
Part IV:
Troubleshooting and Performance
Common formats) in a language other than English. IIS does not support the UTF-8 format
for the built-in FTP Publishing Service log files. UTF-8 encoding is available in IIS 6.0, but it is
not enabled by default. If you do not want to have your logs use UTF-8 encoding, you can use
ANSI as the format.
New Status Codes
In IIS 7.0, new status codes have been introduced for HTTP and FTP. These additional error
codes provide more details about events and better descriptions of how to fix errors, with
suggestions about what to look for or what procedures to run. Appendix A provides a
complete list of all status codes.
Management Service
IIS 7.0 introduces Management Service, which enables computer and domain administrators
to remotely manage a machine by using the IIS Manager. The Management Service also
enables nonadministrators to control sites and various applications by using the IIS Manager
from a workstation.
This service has its own logs that are used to track information related to the Management
Service. This service is not installed by default. If you install and enable this service, the logs
will be saved in %SystemDrive%\inetpub\logs\WMSvc.
From a logging perspective, you should make sure the Management Service logging is enabled.
The logs can help you audit and troubleshoot issues when clients are connecting to your
server. The Management Service is discussed in depth in Chapter 8, “Remote Administration.”
Log File Formats That Have Not Changed
IIS 7.0 supports all the common logging formats that are available in prior versions of IIS.
There have been no changes in IIS 7.0 to the following log file formats:
■
Microsoft IIS
■
NCSA
■
W3Svc extended
Note
For descriptions, further discussion, and examples of these log formats, go to
and search for “IIS logging formats.”
Centralized Logging
Centralized logging in IIS 7.0 operates the same way as it does in IIS 6.0. However, you can
now configure this option in the IIS 7.0 Manager. To access this feature, go to Administrative
Tools > Internet Information Services (IIS) Manager. Click the computer name and locate
the Logging option listed in the IIS section.
Chapter 15:
Logging
541
Using the Logging option can reduce administrative costs because only one IIS log file is
being maintained. If you use binary logging, the log can be stored in a much smaller file than
the equivalent text log file.
W3C Centralized Logging Format
W3C centralized logging was first introduced in Windows Server 2003 SP1. W3C centralized
logging is a server-level setting. When you enable this feature on a server, all Web sites on
that server are configured to write log data to a central log file. Data is stored in the log file
using the W3C Extended log file format. You can enable this setting through the IIS 7.0
Manager or by using Appcmd. If you use W3C centralized logging, you can view the log file
with a text editor such as Notepad.
Note
W3C centralized logging uses the W3C Extended log format, which includes the following four fields: HostHeader, Cookie, UserAgent, and Referrer. These fields are not available in
centralized binary logging.
Centralized Binary Logging Format
Centralized binary logging is essentially the same as W3C centralized logging, except that
the log file uses a proprietary, binary format. Because the resulting file is binary, it is smaller
than an equivalent text file so that you can conserve disk space. It cannot be read with a text
editor and requires parsing to produce useful information. However, this is easier than you
might think when you use the Log Parser tool, which reads the centralized binary file format
natively. The Log Parser tool is discussed later in this chapter.
Important
The built-in FTP and SMTP services do not support W3C centralized logging.
Remote Logging
IIS 7.0 supports writing log files to a network share. This option enables you to have your log
files stored in real time to a remote computer. For example, suppose that you have a Web farm
configured for logging to a central location. The remote file server could be a server running
DFS (distributed file system). DFS can provide multiple benefits including a central location
to collect your log files and automatic replication of your logs to multiple locations. Having
such a primary collection point can make handling your reporting processes much easier.
Important
When you set up your remote logging environment, make sure the host (A)
and pointer (PTR) DNS records are set up so that authentication and resolution happens
correctly. This can help avoid problems such as Kerberos authentication errors when HTTP.sys
is trying to write log files.
542
Part IV:
Troubleshooting and Performance
You can use either the IIS 7.0 Manager or Appcmd to set up Universal Naming Convention
(UNC) remote logging.
Setting Up Remote Logging by Using the IIS Manager
Following are the steps to enable remote logging by using the IIS Manager:
1. Create a directory called IISLogs on the remote server that will store the log files. This
machine is typically in the same domain as the Web servers. If the remote server is
not in the same domain or is a stand-alone machine, you can use the procedure outlined
in the following sidebar so your files are stored on a remote machine.
Using a NULL Session for Remote Logging
If your remote server will be in a different domain, you can set up a NULL Session to
support remote logging. The following procedure outlines how to set up this environment. If your remote server is not in a different domain, you can skip over the details of
this outline and proceed with step 2 of the procedure for setting up remote logging by
using the IIS Manager.
Before setting up your environment, make sure both machines can resolve each other
using DNS, WINS, or custom entries in the local HOSTS file. This procedure assumes
both servers are Windows Server 2008.
1. Identify two machines, the Web server and the file server. These roles need to be
on separate physical machines.
2. Create a folder called IISLogs on your file server and then create a share and grant
appropriate folder security.
a. Open a command prompt on the file server and type mkdir c:\IISLogs
b. Then type net share IISLogs=c:\IISLogs /Grant:Everyone,FULL
c. Then type cacls c:\IISLogs /G Administrators:F SYSTEM:F Everyone:C
d. When you see the prompt “Are you sure (Y/N)?” type y
e. Processed dir: c:\IISLogs
3. Configure logging on your Web site by typing
appcmd set sites "WebsiteName" -logFile.directory:\\FileServerName\IISLogs
4. Configure Local Security Policy on the file server.
*Programs, Administrative Tools, Local Security Policy, Local Policies, Security Options*
a. Enable:Network access:Let Everyone permissions to apply to anonymous
users.
Chapter 15:
Logging
543
b. Add IISLogs share to the Network access:Shares that can be accessed
anonymously.
5. Browse your Web site on the Web server.
a. Open http://localhost/
6. Open a command prompt on the Web server and type the following command:
netsh http flush logbuffer
7. Check your log files to see if your sample request is listed.
2. Share the IISLogs folder you created in the previous step. Change the share permissions
to—at minimum—enable both the remote machine accounts Administrators group and
the account that is writing the log files full control. Change the NTFS file system (NTFS)
permissions so that the remote machine accounts Administrators have full control and
the account writing the log files has modify permissions. This example assumes that
you are using the NETWORK SERVICE as your application pool account and that the
remote server and Web server are in the same domain.
Note
When the NETWORK SERVICE account accesses a remote resource, it uses the
computer account stored in Active Directory Domain Service as the actual account
accessing the log folder.
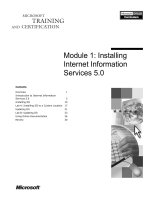
3. In the IIS Manager, navigate to your Web site and type in the UNC path to the server.
To do so, go to Administrative Tools > Internet Information (IIS) Manager. Select the
computer name in the leftmost column and then double-click the Logging icon in
the IIS Section. Type the path to the share in the Directory text box by using the syntax
\\ServerName\ShareName, as shown in Figure 15-2.
Note
You can also use the syntax \\FQDN\ShareName to specify the logging path,
but you might run into issues if you try to use the syntax \\IPAddress\ShareName to
specify the path. The \\IPAddress\ShareName syntax can cause an authentication issue
that prevents the log files from being created. The following is an example of an error
generated when trying to use an IP Address when remote logging is enabled:
Microsoft-Windows-HttpService , LogFileCreateFailed ,
49,
0,
16,
2,
59,
9,
0x0000000000000800, 0x00000004, 0x000005AC,
0,
,
,
{00000000-0000-0000-0000-
000000000000},
,
128277049412643098,
220,
0, 0xC0000022,
"ResponseLogging ", "Site ", "W3C ",
"\dosdevices\UNC\192.168.0.125\UncLogFiles\W3SVC1\u_ex070630.log",
0
544
Part IV:
Troubleshooting and Performance
4. Click Apply.
5. Browse a Web page in your site.
6. Open a command prompt by using elevated credentials and type netsh http flush
logbuffer. If this is the first time entries have been logged, HTTP.sys will create the
folder and a log file. Open the log file in Notepad to confirm your example entries have
been logged.
Figure 15-2 Configuring the Default Web Site to enable remote logging.
Setting Up Remote Logging by Using Appcmd
You can also use Appcmd to update the logfile directory for a specific Web site. The syntax for
configuring UNC remote logging using Appcmd is shown here. (The line has been split to fit it
on the printed page.)
//Appcmd to set the log directory path for Default Web Site
Appcmd set sites "Default Web Site"
-logFile.directory:\\RemoteServerCMD.Contoso.com\LogFiles
Note
To automate configuring remote logging, you could put this example into a script to
which you can pass variables.
Executing this command results in the following output:
SITE object "Default Web Site" changed
Chapter 15:
Logging
545
Remote Logging Using the FTP 7.0 Publishing Service
The FTP 7.0 Publishing Service is an out-of-band add-on that is meant to replace the built-in
FTP service. The FTP 7.0 Publishing Service supports logs stored on a remote computer,
which can enhance your ability to track down security breaches. Imagine a particular machine
is compromised, but you have your logs stored on a remote system. When the infiltrator tries
to cover her tracks by deleting the local log files, those log files will be unavailable because
they are stored on a remote share. If your remote share uses DFS, the log files can even be
replicated to multiple locations. Remote logging with replication can help in your forensic
efforts. To configure the FTP logs to be stored on a remote server, you just have to configure
your remote server that houses your logs files the same as you would configure a Web server.
Figure 15-3 shows the FTP 7.0 Publishing Service configured to log remotely.
Figure 15-3 FTP 7.0 Publishing Service configured to store log files on a remote computer.
Custom Logging
The modular architecture of IIS 7.0 enables you to implement your own logging modules or
extend or replace existing logging options. Your module can be implemented directly into the
request pipeline. Your logging module can be either a native module or a module written
using managed code. You can use any .NET language such as C# or Microsoft Visual
Basic.NET.
546
Part IV:
Troubleshooting and Performance
Direct from the Source
How to Implement a SQL Logging Module
The credit for this demo goes to Carlos Aguilar Mares and Andrew Lin. It shows off
something you can do only with IIS 7.0 and the Integrated Pipeline. You’ll want to
prepare for this demo by doing the following:
■
Download and install Visual Studio Web Developer Express.
■
Download and install SQL Server Express (as part of the previous install).
■
Download and install the SQL Server Management Studio Express.
Note
Complete details for this demo are included on the companion media in
the “Implement a SQL Logging module-details.doc” file and can also be found at
/>
Make sure you’re running Windows Vista or Windows Server 2008 with IIS 7.0 installed
(including ASP.NET or at least .NET extensibility).
To start, build a simple module with a hard-coded connection string. Create the database using SQL Server Management Studio (a script named sqlLogging_CreateDB.sql is
included on the companion media). When the database has been created, create a
module to connect to it. Create an App_Code directory in your Web site/application and
drop in your first sqlLoggingModule.cs code (also included on the companion media).
Before you can use it, you’ll need to register it as a module with IIS. Go to the modules
feature for this site/application and click Add Managed Module. Request a page from
your site and look in the table to see the request logged. It should “just work” if all is well
with the world.
Now add configuration extensibility. To do this, you’ll want to create a new
sqlLogging_schema.xml file (included on the companion media) and drop it in the
\windows\system32\inetsrv\config\schema directory. After you’ve done that, you’ll
need to register it in the \windows\system32\inetsrv\config\ApplicationHost.config
file. Add the following section under sectionGroup name=system.webServer:
<sectionGroup name="system.webServer">
<section name="sqlLogging" overrideModeDefault="Allow" />
You’ll want to make a few changes to your module. First, you need to remove that
horrible hard-coded connection string and add it to your Web.config. Simply edit
Web.config and add it as follows, replacing billsiis7demo with your machine name:
Chapter 15:
Logging
547
Now it’s time to fix your module. First, replace the hard-coded connection string with a
GetConnectionString(httpContext) method. It looks like this:
private string GetConnectionString(HttpContext httpContext)
{
ConfigurationSection section = WebConfigurationManager.GetSection("system.webServer/
sqlLogging");
return (string)section["connectionString"];
}
Don’t forget to add using Microsoft.Web.Administration in your .cs file (you might need
to add a reference to \windows\system32\inetsrv\Microsoft.Web.Administration.dll
first). Not only can you use Microsoft.Web.Administration to read/write to your new
configuration section—just like GetConnectionString(httpContext) does above—but you
also can use Appcmd.exe (our command line tool) and VB/JScript using COM.
And there you have it! A SQL logging module that was built using .NET with 66 lines of
code and an IIS 7.0 configuration section that is scriptable, programmatically accessible,
and usable from the command line.
Bill Staples
Microsoft Product Unit Manager
Carlos Aguilar Mares
Microsoft Senior Development Lead
Configuring IIS Logging
IIS 7.0 provides multiple ways to configure and administer your Web server, and that includes
configuring your log settings. This section covers how to use the built-in graphical user
interface (GUI) as well as command line tools to configure log settings. You’ll learn how to use
the IIS Manager, Appcmd, and Windows PowerShell.
IIS Manager
The IIS Manager is a completely rewritten tool that administrators can use to manage their
Web servers. The intuitive interface enables you to quickly review and adjust all settings,
including those that apply to log files. To access the Logging section of the IIS Manager, follow
this procedure:
1. Go to Administrative Tools > Internet Information Services (IIS) and select the server
name. Figure 15-4 shows the icon for the global Logging section when it is selected.
548
Part IV:
Troubleshooting and Performance
Figure 15-4 The icon for the global Logging section selected in the IIS Manager.
2. Double-click the Logging icon to view the interface through which you can administer
logging settings for the server.
The default settings are shown in Figure 15-5. Because the server node selected is in the
tree in the left pane, these settings are inherited by all Web sites configured on the
server.
Figure 15-5 Default global settings.
Chapter 15:
Logging
549
3. To make changes, select the appropriate drop-down box and select the option you want.
For example, to change the server from site-level logging (creating one log file per site)
to server-level logging (creating one log file per server), select Server in the One Log File
Per drop-down list, as shown in Figure 15-6.
Figure 15-6 Go to the IIS Manager to change logging from site-level
logging to server-level logging.
In IIS 6.0, you need to write a script to change the CentralW3CLoggingEnabled metabase
property. This is one example of how the IIS Manager is more powerful and easier to use than
it was in the previous version of IIS. (For more information about this metabase property, go
to and search for “CentralW3CLoggingEnabled.”)
Note When you configure IIS 7.0 to use server-level logging, the Binary format is selected
by default. To have your server-level log use W3C extended logging, simply select W3C in
the Format drop-down list.
IIS 7.0 also enables you to make changes on individual Web sites. For example, you can click
the Select Fields button to adjust which options are logged for a specific Web site, as shown
in Figure 15-7. In this figure, the Bytes Sent ( sc-bytes ), Bytes Received ( cs-bytes ), Time
Taken ( time-taken ), and Referer ( cs(Referer) ) options have been selected. You can also
adjust the log Directory setting, the Log File Rollover setting, and the Use Local Time For File
Naming And Rollover setting.
550
Part IV:
Troubleshooting and Performance
Figure 15-7
Web site.
Clicking the Select Fields button lets you choose which options are logged for a given
Appcmd
The IIS Manager is a great tool for managing individual settings that use a GUI. Appcmd is a
tool that is intended to perform all administrative functions from a command line. Appcmd
replaces a variety of scripts and tools used in previous IIS versions.
All the logging settings you might need to adjust are located in three sections of applicationHost.config: system.applicationHost/log, system.applicationHost/sites, and system.webServer/httpLogging.
The previous example uses IIS Manager to configure server-level logging. To use Appcmd to
perform this same operation, follow this procedure:
1. Open a command prompt and navigate to the %SystemRoot%\System32\inetsrv folder
where Appcmd is deployed.
Note
If you add this path to your global PATH environment variable, you can execute
Appcmd from any folder location.
2. Execute the following command from the command prompt to list the current settings:
Appcmd list config -section:log
Chapter 15:
Logging
551
Following are the default settings:
<system.applicationHost>
<log>
</log>
</system.applicationHost>
This will display the ApplicationHost.config section where the centralLogFileMode settings are stored.
3. Next execute the following command to configure server-level logging:
Appcmd set config -section:log -centralLogFileMode:CentralW3C
4. After you have executed the command in step 3, execute the following command to list
the current settings and verify the settings have been changed:
Appcmd list config -section:log
The result, showing that the centralLogFileMode has changed to CentralW3C, should
look like the following. (Some lines have been split to fit on the printed page.)
C:\Windows\System32\inetsrv>Appcmd list config -section:log
<system.applicationHost>
<log centralLogFileMode="CentralW3C">
</log>
</system.applicationHost>
C:\Windows\System32\inetsrv>
Notice the log centralLogFileMode="CentralW3C" setting. Before executing the Appcmd set config
command, there was no value listed, because the Site option is the default setting as defined
in the schema.
The section titled “Advanced Appcmd Details” later in this chapter explains how to find out
which options can be set.
As another example, assuming you have already set the global Server attribute, if you want to
adjust the global localTimeRollover setting, use this command:
Appcmd set config -section:log -centralW3CLogFile.localTimeRollover:True
The result should look like this:
Applied configuration changes to section "system.applicationHost/log" for "MACHINE/WEBROOT/
APPHOST" at configuration commit path "MACHINE/WEBROOT/APPHOST"
552
Part IV:
Troubleshooting and Performance
Or, for example, you might want to change the siteDefaults log format to NCSA so that all new
sites will inherit this setting unless otherwise configured on a specific site. You can adjust
the global Format option to NCSA with this command:
Appcmd set config -section:sites -siteDefaults.logFile.logFormat:NCSA
Here’s the result:
Applied configuration changes to section "system.applicationHost/sites" for "MACHINE/
WEBROOT/APPHOST" at configuration commit path "MACHINE/WEBROOT/APPHOST"
Appcmd enables you to quickly use the command line to make changes to your IIS log
settings. You can create a set of scripts that use Appcmd to replace the repetitive changes
typically required when using the IIS Manager GUI. Such scripts can help streamline and
automate your server configuration and deployment.
Appcmd Required for Windows Vista
By default, Windows Vista does not provide a GUI to manage your log files. You need to
use Appcmd to make adjustments to your log file settings. Microsoft has provided an
out-of-band add-on for IIS 7.0 on Windows Vista. To obtain the Vista logging UI add-on,
go to />
Advanced Appcmd Details
Appcmd enables you to perform many advanced operations. Here are some tips for using
Appcmd to configure advanced properties.
When you configure the centralLogFileMode attribute, the only way to view which properties
(also known as enums) are available is to open the IIS_Schema.xml file. It’s not too much
trouble to do this once in a while, but it’s more efficient to use Appcmd to list the available
properties. For example, the following command lists all the properties that can be set in the
system.applicationHost/log section:
//List all properties available the system.applicationHost/log section
Appcmd set config –section:log -?
The output looks like this:
ERROR ( message:-logInUTF8
-centralLogFileMode
-centralBinaryLogFile.enabled
-centralBinaryLogFile.directory
-centralBinaryLogFile.period
-centralBinaryLogFile.truncateSize
-centralBinaryLogFile.localTimeRollover
-centralW3CLogFile.enabled
Chapter 15:
Logging
553
-centralW3CLogFile.directory
-centralW3CLogFile.period
-centralW3CLogFile.truncateSize
-centralW3CLogFile.localTimeRollover
-centralW3CLogFile.logExtFileFlags
)
To adjust a property value, use the following syntax. (You can adjust multiple attributes by
putting a space between each property value.)
Appcmd set config –section:log –property1Name:Value –property2Name:Value
If you are not sure which values are available to set on a particular property, you can use the
following command to find out the values. This example shows how to get all values that
can be set for the centralLogFileMode property:
//Find out which values can be set.
Appcmd set config –section:log –centralLogFileMode -?
The resulting error message lists the valid values, in this case Site, CentralBinary, and
CentralW3C:
ERROR ( message:Unknown attribute "centralLogFileMode"..
Reason: Enum must be one of Site, CentralBinary, CentralW3C. )
You can change the site’s log settings. To list all the properties that are available as well as their
syntax, type this command:
//List all properties available on the Sites section
Appcmd set config -section:sites -?
The output shows all properties related to the Sites section. The options starting with
-siteDefaults.logFile, shown in the next lines of code in bold, enable you to adjust the defaults
inherited by new sites. (Some lines have been split to fit on the printed page.)
C:\Windows\System32\inetsrv>Appcmd set config -section:sites -?
ERROR ( message:-siteDefaults.name
-siteDefaults.id
-siteDefaults.serverAutoStart
-siteDefaults.bindings.
[protocol='string',bindingInformation='string'].protocol
-siteDefaults.bindings.
[protocol='string',bindingInformation='string'].bindingInformation
-siteDefaults.limits.maxBandwidth
-siteDefaults.limits.maxConnections
-siteDefaults.limits.connectionTimeout
-siteDefaults.logFile.logExtFileFlags
-siteDefaults.logFile.customLogPluginClsid
-siteDefaults.logFile.logFormat
-siteDefaults.logFile.directory
-siteDefaults.logFile.period
-siteDefaults.logFile.truncateSize
554
Part IV:
Troubleshooting and Performance
-siteDefaults.logFile.localTimeRollover
-siteDefaults.logFile.enabled
-siteDefaults.traceFailedRequestsLogging.enabled
-siteDefaults.traceFailedRequestsLogging.directory
-siteDefaults.traceFailedRequestsLogging.maxLogFiles
-siteDefaults.traceFailedRequestsLogging.maxLogFileSizeKB
-siteDefaults.traceFailedRequestsLogging.customActionsEnabled
-applicationDefaults.path
-applicationDefaults.applicationPool
-applicationDefaults.enabledProtocols
-virtualDirectoryDefaults.path
-virtualDirectoryDefaults.physicalPath
-virtualDirectoryDefaults.userName
-virtualDirectoryDefaults.password
-virtualDirectoryDefaults.logonMethod
-virtualDirectoryDefaults.allowSubDirConfig
-[name='string',id='unknown'].name
-[name='string',id='unknown'].id
-[name='string',id='unknown'].serverAutoStart
-[name='string',id='unknown'].bindings.
[protocol='string',bindingInformation='string'].protocol
-[name='string',id='unknown'].bindings.
[protocol='string',bindingInformation='string'].bindingInformation
-[name='string',id='unknown'].limits.maxBandwidth
-[name='string',id='unknown'].limits.maxConnections
-[name='string',id='unknown'].limits.connectionTimeout
-[name='string',id='unknown'].logFile.logExtFileFlags
-[name='string',id='unknown'].logFile.customLogPluginClsid
-[name='string',id='unknown'].logFile.logFormat
-[name='string',id='unknown'].logFile.directory
-[name='string',id='unknown'].logFile.period
-[name='string',id='unknown'].logFile.truncateSize
-[name='string',id='unknown'].logFile.localTimeRollover
-[name='string',id='unknown'].logFile.enabled
-[name='string',id='unknown'].traceFailedRequestsLogging.enabled
-[name='string',id='unknown'].traceFailedRequestsLogging.directory
-[name='string',id='unknown'].traceFailedRequestsLogging.maxLogFiles
-[name='string',id='unknown'].traceFailedRequestsLogging.maxLogFileSizeKB
-[name='string',id='unknown'].
traceFailedRequestsLogging.customActionsEnabled
-[name='string',id='unknown'].applicationDefaults.path
-[name='string',id='unknown'].applicationDefaults.applicationPool
-[name='string',id='unknown'].applicationDefaults.enabledProtocols
-[name='string',id='unknown'].virtualDirectoryDefaults.path
-[name='string',id='unknown'].virtualDirectoryDefaults.physicalPath
-[name='string',id='unknown'].virtualDirectoryDefaults.userName
-[name='string',id='unknown'].virtualDirectoryDefaults.password
-[name='string',id='unknown'].virtualDirectoryDefaults.logonMethod
-[name='string',id='unknown'].virtualDirectoryDefaults.allowSubDirConfig
-[name='string',id='unknown'].[path='string'].path
-[name='string',id='unknown'].[path='string'].applicationPool
-[name='string',id='unknown'].[path='string'].enabledProtocols
-[name='string',id='unknown'].[path='string'].virtualDirectoryDefaults.path
-[name='string',id='unknown'].[path='string'].
virtualDirectoryDefaults.physicalPath
-[name='string',id='unknown'].[path='string'].
Chapter 15:
Logging
555
virtualDirectoryDefaults.userName
-[name='string',id='unknown'].[path='string'].
virtualDirectoryDefaults.password
-[name='string',id='unknown'].[path='string'].
virtualDirectoryDefaults.logonMethod
-[name='string',id='unknown'].[path='string'].
virtualDirectoryDefaults.allowSubDirConfig
-[name='string',id='unknown'].[path='string'].[path='string'].path
-[name='string',id='unknown'].[path='string'].[path='string'].physicalPath
-[name='string',id='unknown'].[path='string'].[path='string'].userName
-[name='string',id='unknown'].[path='string'].[path='string'].password
-[name='string',id='unknown'].[path='string'].[path='string'].logonMethod
-[name='string',id='unknown'].[path='string'].[path='string'].
allowSubDirConfig
)
You can also adjust settings for specific Web sites by using the properties starting with
-[name=‘string’,id=‘unknown’].logFile. You simply need to replace the ‘unknown’ value with the
Web site name. Following is an example of how to adjust settings in a specific site. Notice that
the example for the Default Web Site contains double quotation marks. This is necessary to
handle spaces in the Web site name. Remember to change the name and ID when using the
example.
//Example how to set the logFile.directory property with a
//Site with spaces in the name.
C:\Windows\System32\inetsrv>Appcmd set config -section:sites
/[name='"Default Web Site"',id='1'].logFile.directory:c:\wwwlogs
//Example how to setup logFile.directory property with no spaces
//in the Site name.
C:\Windows\System32\inetsrv>Appcmd set config -section:sites
/[name='Contoso.com',id='2'].logFile.directory:c:\wwwlogs
You can also use Windows PowerShell 1.0 to administer your IIS 7.0 server. This section
shows a few examples of setting the Logfile directory value. In the following sample script,
you first load Microsoft.Web.Administration.dll into your Windows PowerShell session. Next,
you assign an instance of the ServerManager object to the $sm variable, which allows you to
query and set Logfile values. (In the following listing, some lines have been split so that they
fit on the printed page.)
//Load the dll into the Powershell session
[System.Reflection.Assembly]::LoadFrom
( "C:\windows\system32\inetsrv\Microsoft.Web.Administration.dll" )
//Load an instance of the Server Manager object into the $sm variable
$sm = new-object Microsoft.Web.Administration.ServerManager
//List Default Web Site LogFile Directory value.
$sm.Sites["Default Web Site"].LogFile.Directory
556
Part IV:
Troubleshooting and Performance
//List SiteDefaults LogFile Directory value.
$sm.SiteDefaults.LogFile.Directory
//Set Default Website LogFile Directory
$sm.Sites["Default Web Site"].LogFile.Directory =
"\\RemoteServer.Contoso.com\Logfiles"
$sm.CommitChanges()
//Set SiteDefaults LogFile Directory
$sm.SiteDefaults.Logfile.Directory = "\\RemoteServer.Contoso.com\Logfiles"
$sm.CommitChanges()
Using Windows PowerShell to administer IIS 7.0 is covered in Chapter 7, “Using Command
Line Tools.” For information about building a cmdlet to administer many common functions
in IIS 7.0, see the following Web site: />Immediately flushing log entries to disk is introduced in Windows Server 2008. The HTTP.sys
service holds requests until they are periodically flushed to disk. When you are troubleshooting an immediate issue, you can use the following netsh command, which can be
especially useful for troubleshooting HTTP.sys-related errors.
//Flush log entries to disk immediately
Netsh http flush logbuffer
HTTP.sys Logging
In IIS 6.0, the HTTP.sys process was introduced and took over logging duties that used to be
handled by Inetinfo.exe. HTTP.sys introduced another log called HTTPERR log. The
HTTPERR logs for Windows Server 2008 are located in the same location as for Windows
Server 2003. The path is %SystemRoot%\System32\LogFiles\HTTPERR. This log records
all errors that are not handed off to a valid worker process, typically responses to clients,
connection time-outs, and orphaned requests. This additional information can help you
troubleshoot HTTP-based errors, which are logged before the request reaches IIS.
Windows Vista and Windows Server 2008 introduce enhancements to the HTTP.sys logging
process. You use ETW (Event Tracing for Windows) to obtain the enhanced information.
Here are steps to start, capture, and display information from an ETW tracing session:
1. Open a command prompt (click Start, select Run, and then type cmd.exe).
2. Start the ETW trace session for HTTP.sys by using the following command:
logman.exe start httptrace -p Microsoft-Windows-HttpService 0xFFFF -o
httptrace.etl –ets
3. Reproduce or perform the steps or tests that need to be traced.
4. To stop the ETW trace session for HTTP.sys, use the following command:
logman stop httptrace –ets