Ubuntu Linux Toolbox 1000+ Commands for Ubuntu and Debian Power Users phần 3 ppsx
Bạn đang xem bản rút gọn của tài liệu. Xem và tải ngay bản đầy đủ của tài liệu tại đây (416 KB, 35 trang )
Table 2-7 shows some of the most useful options for running debsums. See the man
page for
debsums to reveal all detailed information.
Table 2-7: Some Common debsums Options
NOTE For many operations, you won’t need to run this utility as root (using
sudo). Some files may not have read access by regular users, so the use of sudo
will be required if you get a message like this: debsums: can't open at
file /etc/at.deny (Permission denied)
.
If you run
debsums with no options, it will check every file on the system that it knows
about. The output can be redirected to a file if needed for later. The file name
debsums
prints out will be accompanied by an OK status on the right side of the output if the
md5sum checks out for the file. Other messages may be printed out, such as
md5sums
missing
for a certain file, or the word REPLACED if the md5sum does not match. You
will need to be wary of false positives. If you want to use this tool as a baseline for
assessments at a later date, you will want to get everything set up the way you want
and re-generate md5sums for stuff that is missing or incorrect. That way you know
you have the latest info.
This command will check every file on the system against the stock md5sum files. You can see there
are some missing and replaced files. You would want to verify the system does not
already have problems with these files before you re-generate md5sums for everything:
$ debsums
/usr/bin/acpi OK
/usr/share/man/man1/acpi.1.gz OK
/usr/share/doc/acpi/README OK
/usr/share/doc/acpi/AUTHORS OK
debsum command What It Does
debsums -a
Checks all files (including configuration files which
are, by default, left out).
debsums –e
Checks config files for packages only.
debsums –c
Lists only changed files to stdout.
debsums –l
Lists files that don’t have md5sum info.
debsums –s
Lists only errors; otherwise be silent.
debsums <package names> Lists the packages you want debsums to analyze.
42
Chapter 2: Installing Ubuntu and Adding Software
82935c02.qxd:Toolbox 10/29/07 12:56 PM Page 42
/usr/share/app-install/icons/pybliographic.png OK
debsums: no md5sums for bsdutils
debsums: no md5sums for bzip2
debsums: no md5sums for cdrecord
/usr/share/locale-langpack/en_AU/LC_MESSAGES/adduser.mo REPLACED
/usr/share/locale-langpack/en_AU/LC_MESSAGES/alsa-utils.mo OK
If you want to save this info to a file, and to save stdout and stderr messages, redirect
both stdout and stderr streams into a file. We also background the command with a final
ampersand so we can continue working at the shell:
$ debsums &> /tmp/foo &
To check the configuration files distributed with each package for changes, run debsums with the
–a option:
$ debsums –a
/usr/bin/acpi OK
/usr/share/man/man1/acpi.1.gz OK
To only check configuration files, and ignore everything else, use the –e option. This is a good way
to tell if you have inadvertently edited a config file you didn’t want to. You can see
some of the X configuration files have been changed.
$ debsums –e
/etc/X11/Xresources/x11-common OK
/etc/X11/Xsession FAILED
/etc/X11/rgb.txt OK
/etc/init.d/x11-common OK
/etc/X11/Xsession.d/50x11-common_determine-startup OK
/etc/X11/Xsession.d/30x11-common_xresources OK
/etc/X11/Xsession.d/20x11-common_process-args OK
/etc/X11/Xsession.options FAILED
As debsums spits out a lot of information, you may want to see only changed files.
Issuing
debsums with the –c options will do that:
$ debsums –c
debsums: no md5sums for at
debsums: no md5sums for base-files
debsums: no md5sums for bc
43
Chapter 2: Installing Ubuntu and Adding Software
82935c02.qxd:Toolbox 10/29/07 12:56 PM Page 43
With the preceding command, you will see messages being printed for files that have
no md5sum info. You can check for files that have no md5sum info by running
debsums with
the
–l option:
$ debsums -l
at
base-files
bc
binutils
binutils-static
If you want debsums to show only errors, use the –s option to tell debsums to be silent
except for errors:
$ debsums -s
debsums: no md5sums for at
debsums: no md5sums for base-files
debsums: no md5sums for bc
debsums: no md5sums for binutils
To check a specific package, give debsums a package name as an argument:
$ debsums coreutils
/bin/cat OK
/bin/chgrp OK
/bin/chmod OK
This will check only the files listed in that package’s md5sum file in the /var/lib/
dpkg/info
directory, so if the package does not come with an md5sum file, you will
get an error:
$ debsums rsync
debsums: no md5sums for rsync
To generate the missing md5sums data for rsync, use a combination of dpkg, the
md5sum utility, and a little shell scripting. First, use
dpkg -L to ask for a list of all the
files
dpkg knows about, in the rsync package. The list dpkg returns will have other
lines of data in it besides just the file names, so we pipe that output to
grep and filter
out everything that does not start with a slash. On the second line, we have the shell
test whether the line of output from
dpkg is a directory or a file (directories start with a
slash also). If it is a file,
md5sum is run on the line of output, which at this point should
just be a file name. Lastly, all output at the third line is saved into a text file with the
same naming convention as the md5sum files in the
/var/lib/dpkg/info directory.
$ for file in `dpkg -L rsync | grep ^/`; do
test -f "$file" && md5sum "$file";
done > /tmp/rsync.md5sums
44
Chapter 2: Installing Ubuntu and Adding Software
82935c02.qxd:Toolbox 10/29/07 12:56 PM Page 44
What you gain from this command is an md5sum database you can burn to CD-ROM
and use to check your system. If the md5sums are on CD-ROM, they cannot be deleted
accidentally, or be subject to file system problems of a hard disk. If you want to check
your md5sums at a later time, you can use the
md5sum command with the –c option
and feed it the file name of the md5sum data:
$ md5sum -c /tmp/rsync.md5sums
/usr/bin/rsync: OK
/usr/share/doc/rsync/examples/rsyncd.conf: OK
/usr/share/doc/rsync/README.gz: OK
/usr/share/doc/rsync/TODO.gz: OK
To use the rsync.md5sum file with debsums, we need to make one modification that
will cause problems for
md5sum, but is necessary for use with debsums, and that is
removing the leading slash in the file name. We can do this in a text editor, or with a
little more shell scripting:
$ cat /tmp/rsync.md5sums
302916114c29191cd9c8cb51d67ee60a /usr/bin/rsync
To remove the leading slash in front of /usr/bin/rsync, you could use a text editor
or just use the Stream Editor (sed) to do this:
$ sed -e 's# /# #g' /tmp/rsync.md5sums > /tmp/rsync.debsums
$ cat /tmp/rsync.debsums
302916114c29191cd9c8cb51d67ee60a usr/bin/rsync
With the leading slash removed, you can now copy rsync.debsums into the
/var/lib/dpkg/info directory and debsums will be able to use it:
$ sudo mv /tmp/rsync.debsums /var/lib/dpkg/info/rsync.md5sums
$ debsums rsync
/usr/bin/rsync OK
/usr/share/doc/rsync/examples/rsyncd.conf OK
/usr/share/doc/rsync/README.gz OK
Building deb Packages
By rebuilding the .deb file that is used to build a Debian package, you can change it
to better suit the way you use the software (for example, including an md5sum file).
To begin, you need to extract a
.deb file that you want to modify into a working
directory. You then modify the file tree and control files to suit your needs.
For example, you could download and extract the rsync package and control files into
the current directory by typing the following commands (your
$RANDOM directory will
be different of course):
$ aptitude download rsync
45
Chapter 2: Installing Ubuntu and Adding Software
82935c02.qxd:Toolbox 10/29/07 12:56 PM Page 45
Then extract the package contents and the control files from the downloaded file. Note
that the
$RANDOM directory is found by typing /tmp/rsync_ and pressing Tab:
$ sudo dpkg -x rsync_2.6.9-3ubuntu1.1_i386.deb /tmp/rsync_$RANDOM
$ sudo dpkg -e rsync_2.6.9-3ubuntu1.1_i386.deb /tmp/rsync_17197/
Now change to your package directory, where you extracted the .deb file to, and have
a look around. You should see a directory structure that looks very similar to this:
$ cd /tmp/rsync_17197
$ ls -lart
-rwxr-xr-x 1 root root 491 2007-08-17 20:47 prerm
-rwxr-xr-x 1 root root 110 2007-08-17 20:47 postrm
-rwxr-xr-x 1 root root 523 2007-08-17 20:47 postinst
drwxr-xr-x 4 root root 4096 2007-08-17 20:48 usr
drwxr-xr-x 4 root root 4096 2007-08-17 20:48 etc
-rw-r r 1 root root 37 2007-08-17 20:48 conffiles
-rw-r r 1 root root 985 2007-09-02 12:02 control
drwxr-xr-x 4 root root 4096 2007-09-02 12:02 .
drwxrwxrwt 10 root root 4096 2007-09-02 13:24
Now you have to configure the package directory to fit the formats that dpkg will want
for building the
.deb file. This involves creating a subdirectory named rsync_2.6.9-
3cn1.1/DEBIAN
and moving the install files into it. The control file itself is a specially
formatted file that contains header and content fields and is parsed by the package
tools to print out information about the package:
$ sudo mkdir –p rsync_2.6.9-3cn1.1/DEBIAN
$ sudo mv control conffiles prerm postrm postinst rsync_2.6.9-3cn1.1/DEBIAN
You also need to move the etc/ and usr/ directories under the rsync_2.6.9-3cn1.1
directory:
$ sudo mv usr etc rsync_2.6.9-3cn1.1
You should end up with everything filed away correctly, and all that is left is the
rsync_2.6.9-3cn1.1 directory in your current directory.
Now move the md5sums file you made earlier into your
DEBIAN subdirectory and
rename it to
md5sums. This will allow debsums to have some md5sums to check:
$ sudo mv /var/lib/dpkg/info/rsync.md5sums rsync_2.6.9-3cn1.1/DEBIAN/md5sums
Now edit the control file to modify some of the information. You certainly don’t want
to install your modified version of rsync with the same package info as the original.
Open the control file in vi or another editor and change the
Version line to reflect the
one below. You will notice the word
Version has a colon after it; this is the header
field. The information field follows right after it. Be sure to maintain the space after
46
Chapter 2: Installing Ubuntu and Adding Software
82935c02.qxd:Toolbox 10/29/07 12:56 PM Page 46
the colon, and do not put any extra carriage returns or spaces in the file. It is very
picky about formatting.
$ sudo vi rsync_2.6.9-3cn1.1/DEBIAN/control
Version: 2.6.9-3cn1.1
A little farther down, you can add to the Description field. This will show up in the
descriptions whenever someone views the package details. Notice the space right
before the words
fast remote The space is part of the special formatting and is
how
dpkg tells the description text from the multiline header. Be sure to put a space
in the first column if you wrap the description to the next line:
Description: Modified by CN 2007-09-02 to include md5sums.
fast remote file copy program (like rcp)
Now build your new package using dpkg –b and the name of the control file subdi-
rectory you created. You will get a warning about
Original-Maintainer being a
user-defined field. You can safely ignore the warning.
$ sudo dpkg -b rsync_2.6.9-3cn1.1
warning, `rsync_2.6.9-3cn1.1/DEBIAN/control' contains user-defined field
`Original-Maintainer'
dpkg-deb: building package `rsync' in `rsync_2.6.9-3cn1.1.deb'.
dpkg-deb: ignoring 1 warnings about the control file(s)
You now have a new .deb file and can ask dpkg to display information about it. Just
run
dpkg with the –I option to see the new package info:
$ dpkg -I rsync_2.6.9-3cn1.1.deb
new debian package, version 2.0.
size 1004 bytes: control archive= 712 bytes.
970 bytes, 21 lines control
Package: rsync
Version: 2.6.9-3cn1.1
You could install the new rsync package at this point. This exercise is mainly a
demonstration for building a custom package, not necessarily for hacking up the
system needlessly. Nonetheless, the following code shows that this package will
install and act like a regular Debian package. You want
debsums to work also.
Notice
dpkg tells you about the downgrade:
$ sudo dpkg -i rsync_2.6.9-3cn1.1.deb
dpkg - warning: downgrading rsync from 2.6.9-3ubuntu1 to 2.6.9-3cn1.1.
(Reading database 88107 files and directories currently installed.)
47
Chapter 2: Installing Ubuntu and Adding Software
82935c02.qxd:Toolbox 10/29/07 12:56 PM Page 47
Preparing to replace rsync 2.6.9-3ubuntu1 (using rsync_2.6.9-3cn1.1.deb)
Unpacking replacement rsync
Setting up rsync (2.6.9-3cn1.1)
The debsums utility now has some md5sum files to test with, and anywhere your new
rsync package is installed, this will be the same:
$ debsums rsync
/usr/bin/rsync OK
/usr/share/doc/rsync/examples/rsyncd.conf OK
/usr/share/doc/rsync/README.gz OK
You can also ask dpkg to list your rsync package using the –l option to confirm that
the new version is installed:
$ dpkg -l rsync
ii rsync 2.6.9-3cn1.1 Modified by CN 2007-09-02 to include md5sums.
NOTE You can find out more about building .deb files by visiting the Debian
Binary Package Building HOWTO (
/>Binary-Package-Building-HOWTO
). The dpkg-deb man page is also a
good source of info on deb package building.
Summary
Software for Ubuntu and other Debian-based distributions is packaged in the deb for-
mat. The Ubiquity installer is used to initially install Ubuntu. From the Boot menu,
you can boot into a full Ubuntu environment and install from there, or run Ubuntu
from a CD-ROM. To install additional software, you can use the aptitude and APT
utilities to get packages from online repositories. To install packages locally, as well as
build custom Debian packages, you can use the dpkg utility. APT, aptitude, and dpkg
all offer a means to query software. You can verify installed packages by using the
debsums and md5sum utilities.
48
Chapter 2: Installing Ubuntu and Adding Software
82935c02.qxd:Toolbox 10/29/07 12:56 PM Page 48
Using the Shell
The use of a shell command interpreter (usually
just called a shell) dates back to the early days of
the first Unix systems. Besides its obvious use of
running commands, shells have many built-in
features such as environment variables, aliases,
and a variety of functions for programming.
Although the shell used most often with Linux
systems is called the Bourne Again Shell (bash),
other shells are available as well (such as sh, csh,
ksh, tcsh, and others). In many cases, these shells,
such as sh, are really symbolic links to other shell
programs, such as bash. On Ubuntu Linux, sh is a
symbolic link to
/bin/dash. The sh shell is
important as it is called in most shell scripts as
the shell to run scripts. For interactive usage,
bash forms the default shell.
This chapter offers information that will help you use Linux shells, in
general, and the bash shell, in particular.
Terminal Windows and Shell Access
The most common way to access a shell from a Linux graphical interface is
using a Terminal window. From a graphical interface, you can often access
virtual terminals to get to a shell. With no graphical interface, with a text-
based login you are typically dropped directly to a shell after login.
Using Terminal Windows
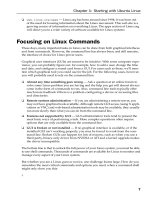
To open a Terminal window from GNOME (the default Ubuntu desktop),
select Applications ➪ Accessories ➪ Terminal. This opens a gnome-terminal
window, displaying a bash shell prompt. Figure 3-1 shows an example of a
gnome-terminal window.
Commands shown in Figure 3-1 illustrate that the current shell is the bash
shell (
/bin/bash), the current user is the desktop user who launched the
window (chris), and the current directory is that user’s home directory
(
/home/chris). The user name (chris) and hostname (localhost) appear
in the title bar.
IN THIS CHAPTER
Accessing the shell
Using command his-
tory and completion
Assigning aliases
Gaining super user
access
Writing simple shell
scripts
82935c03.qxd:Toolbox 10/29/07 1:31 PM Page 49
Figure 3-1: Type shell commands into a gnome-terminal window.
The gnome-terminal window not only lets you access a shell, it also has controls for
managing your shells. For example, click File ➪ Open Tab to open another shell on a differ-
ent tab, click File ➪ Open Terminal to open a new Terminal window, or select Terminal ➪ Set
Title to set a new title in the title bar.
You can also use control key sequences to work with a Terminal window. Open a shell
on a new tab by typing Shift+Ctrl+t, open a new Terminal window with Shift+Ctrl+n, close a tab
with Shift+Ctrl+w, and close a Terminal window with Shift+Ctrl+q. Highlight text and copy
it with Shift+Ctrl+c, then paste it in the same or different window with Shift+Ctrl+v or by click-
ing the center button on your mouse.
NOTE In most applications, such as the OpenOffice.org word processor, Ctrl+c, not
Shift+Ctrl+c, invokes the copy function, and Ctrl+v, not Shif+Ctrl+v, invokes the
paste function. Because Ctrl+c means something special in a shell window (sending a
signal to a program that normally causes it to die), the gnome-terminal window maps
the expected graphical desktop functions using the Shift key as a modifier.
Other key sequences for controlling Terminal windows include pressing F11 to show
the window in full screen mode. Type Ctrl+Shift++ to zoom in (make text larger) or Ctrl+-
(that’s Ctrl and a minus sign) to zoom out (make text smaller). Switch among tabs using
Ctrl+PageUp and Ctrl+PageDown (previous and next tab), or use Alt+1, Alt+2, Alt+3,
and so on to go to tab one, two, or three (and so on). Type Ctrl+d to exit the shell,
which closes the current tab or entire Terminal window (if it’s the last tab).
The gnome-terminal window also supports profiles (select Edit ➪ Current Profile). Some
profile settings are cosmetic (allow bold text, cursor blinks, terminal bell, colors, images, and
transparency). Other settings are functional. For example, by default, the terminal saves
500 scrollback lines (318 kilobytes). Some people like to be able to scroll back further and
are willing to give up more memory to allow that.
If you launch gnome-terminal manually, you can add options. Here are some examples:
$ gnome-terminal -x alsamixer Start terminal with alsamixer displayed
$ gnome-terminal tab tab tab Start a terminal with three open tabs
$ gnome-terminal geometry 80x20 Start terminal 80 characters by 20 lines
$ gnome-terminal zoom=2 Start terminal with larger font
Chapter 3: Using the Shell
50
82935c03.qxd:Toolbox 10/29/07 12:58 PM Page 50
Besides gnome-terminal, there are many other terminal windows you can use. Here
are some examples:
xterm (basic terminal emulator that comes with the X Window
System),
aterm (terminal emulator modeled after the Afterstep XVT VT102 emulator),
and
konsole (terminal emulator delivered with the KDE desktop). The Enlightenment
desktop project offers the
eterm terminal (which includes features such as message logs
on the screen background).
Using Virtual Terminals
When Ubuntu boots in multi-user mode (runlevel 2, 3, or 5), six virtual consoles (known
as tty1 through tty6) are created with text-based logins. If an X Window System desktop
is running, X is probably running in virtual console 7. If X isn’t running, chances are
you’re looking at virtual console 1.
From X, you can switch to another virtual console with Ctrl+Alt+F1, Ctrl+Alt+F2, and so on
up to 6. From a text virtual console, you can switch using Alt+F1, Alt+F2, and so on.
Press Alt+F7 to return to the X GUI. Each console allows you to log in using different
user accounts. Switching to look at another console doesn’t affect running processes
in any of them. When you switch to virtual terminal one through six, you see a login
prompt similar to the following:
Ubuntu 7.04 localhost tty2
localhost login:
Separate getty processes manage each virtual terminal. Type this command to see
what
getty processes look like before you log in to any virtual terminals:
$ ps awx | grep -v grep | grep getty
4366 tty4 Ss+ 0:00 /sbin/getty 38400 tty4
4367 tty5 Ss+ 0:00 /sbin/getty 38400 tty5
4372 tty2 Ss+ 0:00 /sbin/getty 38400 tty2
4373 tty3 Ss+ 0:00 /sbin/getty 38400 tty3
4374 tty1 Ss+ 0:00 /sbin/getty 38400 tty1
4375 tty6 Ss+ 0:00 /sbin/getty 38400 tty6
After I log in on the first console, getty handles my login, and then fires up a bash shell:
$ ps awx | grep -v grep | grep tty
4366 tty4 Ss+ 0:00 /sbin/getty 38400 tty4
4367 tty5 Ss+ 0:00 /sbin/getty 38400 tty5
4372 tty2 Ss 0:00 /bin/login
4373 tty3 Ss+ 0:00 /sbin/getty 38400 tty3
4374 tty1 Ss+ 0:00 /sbin/getty 38400 tty1
4375 tty6 Ss+ 0:00 /sbin/getty 38400 tty6
7214 tty2 S+ 0:00 -bash
Virtual consoles are configured in the /etc/event.d directory. A script appears for each
virtual console, such as
tty1 for the tty1 console, tty2 for the tty2 console, and so on.
51
Chapter 3: Using the Shell
82935c03.qxd:Toolbox 10/29/07 12:58 PM Page 51
NOTE Most other versions of Linux configure the consoles in one file, /etc/
inittab
. The init daemon uses /etc/inittab as its configuration file. Ubuntu
Linux, on the other hand, replaces init with a new program called upstart, which
uses the
/etc/event.d directory to hold its configuration files.
Using the Shell
After you open a shell (whether from a text-based login or Terminal window), the shell
environment is set up based on the user who started the shell. Bash shell settings for all
users’ shells are located in a number of files. You can make your own versions of these
files to override the system settings. There are two types of files holding these settings:
startup files and initialization files.
Bash runs startup files for any shell that is a login shell. These files define settings
that apply across your entire login. Bash runs initialization files for shells run inter-
actively — that is, not running a shell script.
Bash looks for startup files in
/etc/profile (system-wide) or for personal settings
in several dot files in the user’s home directory (if they exist):
.bash_profile,
.bash_login, and .profile.
NOTE Other versions of Linux store the system-wide files in
/etc/profile
and /etc/profile.d/.
Bash looks for initialization files in
/etc/bash.bashrc (system-wide) or for per-
sonal settings in
.bashrc in your home directory.
NOTE Other versions of Linux store the system-wide files in
/etc/bashrc.
When a shell is closed, any commands in the user’s
~/.bash_logout file are executed.
Changing settings in these files permanently changes the user’s shell settings but does
not affect shells that are already running. (Other shells use different configuration files.)
There are a variety of ways in which you can list and change your shell environment.
One of the biggest ways is to change which user you are; in particular, to become the
super user (see “Acquiring Super User Power” later in this chapter).
Using Bash History
The Bourne Again Shell (bash) is the shell used by default by most modern Linux sys-
tems and quite a few other operating systems such as Mac OS X. Built into bash, as with
other shells, is a history feature that lets you review, change, and reuse commands that
you have run in the past. This can prove very helpful as many Linux commands are
long and complicated.
52
Chapter 3: Using the Shell
82935c03.qxd:Toolbox 10/29/07 12:58 PM Page 52
When bash starts, it reads the ~/.bash_history file and loads it into memory. This
file is set by the value of
$HISTFILE.
NOTE See the section “Using Environment Variables” later in this chapter for
more on how to work with shell environment variables such as
$HISTFILE.
During a bash session, commands are added to history in memory. When bash exits,
history in memory is written back to the
.bash_history file. The number of commands
held in history during a bash session is set by
$HISTSIZE, while the number of commands actually
stored in the history file is set by
$HISTFILESIZE:
$ echo $HISTFILE $HISTSIZE $HISTFILESIZE
/home/fcaen/.bash_history 500 500
To list the entire history, type history. To list a previous number of history commands, follow
history with a number. This lists the previous five commands in your history:
$ history 5
975 mkdir extras
976 mv *doc extras/
977 ls -CF
978 vi house.txt
979 history
To move among the commands in your history, use the up arrow and down arrow. Once a
command is displayed, you can use the keyboard to edit the current command like any other
command: left arrow, right arrow, Delete, Backspace, and so on. Here are some other
ways to recall and run commands from your bash history:
$ !! Run the previous command
$ !997 Run command number 997 from history
ls -CF
$ !997 *doc Append *doc to command 997 from history
ls -CF *doc
$ !?CF? Run previous command line containing the CF string
ls -CF *doc
$ !ls Run the previous ls command
ls -CF *doc
$ !ls:s/CF/l Run previous ls command, replacing CF with l
ls -l *doc
Another way to edit the command history is using the fc command. With fc, you open the
chosen command from history using the vi editor. The edited command runs when you
exit the editor. Change to a different editor by setting the
FCEDIT variable (for example,
FCEDIT=gedit) or on the fc command line. For example:
$ fc 978 Edit command number 978, then run it
$ fc Edit the previous command, then run it
$ fc -e /usr/bin/nano 989 Use nano to edit command 989
53
Chapter 3: Using the Shell
82935c03.qxd:Toolbox 10/29/07 12:58 PM Page 53
Use Ctrl+r to search for a string in history. For example, typing Ctrl+r followed by the
string
ss resulted in the following:
# <Ctrl+r>
(reverse-i-search)`ss’: sudo /usr/bin/less /var/log/messages
Press Ctrl+r repeatedly to search backwards through your history list for other occurrences
of the
ss string.
NOTE By default, bash command history editing uses emacs-style commands. If
you prefer the vi editor, you can use vi-style editing of your history by using the
set command to set your editor to vi. To do that, type the following: set -o vi.
Using Command Line Completion
You can use the Tab key to complete different types of information on the command
line. Here are some examples where you type a partial name, followed by the Tab key,
to have bash try to complete the information you want on your command line:
$ tracer<Tab> Command completion: Completes to traceroute command
$ cd /home/ch<Tab> File completion: Completes to /home/chris directory
$ cd ~jo<Tab> User homedir completion: Completes to /home/john
$ echo $PA<Tab> Env variable completion: Completes to $PATH
$ ping <Alt+@><Tab> Host completion: Show hosts from /etc/hosts
@davinci.example.com @ritchie.example.com @thompson.example.com
@localhost @zooey
Redirecting stdin and stdout
Typing a command in a shell makes it run interactively. The resulting process has two
output streams: stdout for normal command output and stderr for error output. In
the following example, when
/tmpp isn’t found, an error message goes to stderr but
output from listing
/tmp (which is found) goes to stdout:
$ ls /tmp /tmpp
ls: /tmpp: No such file or directory
/tmp/:
gconfd-fcaen keyring-b41WuB keyring-ItEWbz mapping-fcaen orbit-fcaen
By default, all output is directed to the screen. Use the greater-than sign (>) to direct
output to a file. More specifically, you can direct the standard output stream (using
>)
or standard error stream (using
2>) to a file. Here are examples:
$ ls /tmp /tmmp > output.txt
ls: /tmpp: No such file or directory
54
Chapter 3: Using the Shell
82935c03.qxd:Toolbox 10/29/07 12:58 PM Page 54
$ ls /tmp /tmmp 2> errors.txt
/tmp/:
gconfd-fcaen keyring-b41WuB keyring-ItEWbz mapping-fcaen orbit-fcaen
$ ls /tmp /tmmp 2> errors.txt > output.txt
$ ls /tmp /tmmp > everything.txt 2>&1
In the first example, stdout is redirected to the file output.txt, while stderr is
still directed to the screen. In the second example, stderr (stream 2) is directed
to
errors.txt whereas stdout goes to the screen. In the third example, the
first two examples are combined. The last example directs both streams to the
everything.txt file. To append to a file instead of overwriting it, use two greater-
than signs:
$ ls /tmp >> output.txt
If you don’t ever want to see an output stream, you can simply direct the output stream
to a special bit bucket file (
/dev/null):
$ ls /tmp 2> /dev/null
TIP Another time you may want to redirect stderr is when you run jobs with
crontab. You could redirect stderr to a mail message that goes to the crontab’s
owner. That way any error messages can be sent to the person running the job.
Just as you can direct standard output from a command, you can also direct standard
input to a command. For example, the following command e-mails the
/etc/hosts file
to the user named chris on the local system:
$ mail chris < /etc/hosts
Using pipes, you can redirect output from one process to another process rather than just files.
Here is an example where the output of the
ls command is piped to the sort com-
mand to have the output sorted:
$ ls /tmp | sort
In the next example, a pipe and redirection are combined (the stdout of the ls command is
sorted and stderr is dumped to the bit bucket):
$ ls /tmp/ /tmmp 2> /dev/null | sort
Pipes can be used for tons of things:
$ dpkg-query -l | grep -i sql | wc -l
$ ps auwx | grep firefox
$ ps auwx | less
$ whereis -m bash | awk ‘{print $2}’
55
Chapter 3: Using the Shell
82935c03.qxd:Toolbox 10/29/07 12:58 PM Page 55
The first command line in the preceding code lists all installed packages, grabs those
packages that have
sql in them (regardless of case), and does a count of how many lines
are left (effectively counting packages with
sql in the name). The second command line
displays Firefox processes taken from the long process list (assuming the Firefox web
browser is running), as well as any process whose command line references
firefox,
such as the command issued in this example. The third command line lets you page
through the process list. The last line displays the word
bash: followed by the path
to the bash man page, and then displays only the path to the man page (the second
element on the line).
Using backticks, you can execute one section of a command line first and feed the output of that
command to the rest of the command line. Here are examples:
$ dpkg-query -S `which ps`
$ ls -l `which bash`
The first command line in the preceding example finds the full path of the ps com-
mand and finds the package that contains that
ps command. The second command
line finds the full path to the
bash command and does a long list (ls -l) of that
command.
A more advanced and powerful way to take the output of one command and pass it as parame-
ters to another is with the
xargs command. For example:
$ ls /bin/b* | xargs dpkg-query -S
To display the command xargs is going to run, use the following:
$ ls /bin/b* | xargs –t dpkg-query -S
dpkg-query -S /bin/bash /bin/bunzip2 /bin/bzcat /bin/bzcmp /bin/bzdiff
/bin/bzegrep /bin/bzexe /bin/bzfgrep /bin/bzgrep /bin/bzip2 /bin/bzip2recover
/bin/bzless /bin/bzmore
bash: /bin/bash
bzip2: /bin/bunzip2
bzip2: /bin/bzcat
bzip2: /bin/bzcmp
bzip2: /bin/bzdiff
bzip2: /bin/bzegrep
bzip2: /bin/bzexe
bzip2: /bin/bzfgrep
bzip2: /bin/bzgrep
bzip2: /bin/bzip2
bzip2: /bin/bzip2recover
bzip2: /bin/bzless
bzip2: /bin/bzmore
In this example, the entire output of ls is passed to a single dpkg-query -S com-
mand. Using the
-t option to xargs, a verbose output of the command line appears
before the command is executed. Now let’s have
xargs pass each output string from
56
Chapter 3: Using the Shell
82935c03.qxd:Toolbox 10/29/07 12:58 PM Page 56
ls as input to individual dpkg-query commands. We define {} as the placeholder for
the string:
$ ls /bin/b* | xargs -t -I{} dpkg-query -S {}
dpkg-query -S /bin/bash
bash: /bin/bash
dpkg-query -S /bin/bunzip2
bzip2: /bin/bunzip2
dpkg-query -S /bin/bzcat
bzip2: /bin/bzcat
dpkg-query -S /bin/bzcmp
bzip2: /bin/bzcmp
dpkg-query -S /bin/bzdiff
bzip2: /bin/bzdiff
dpkg-query -S /bin/bzegrep
bzip2: /bin/bzegrep
dpkg-query -S /bin/bzexe
bzip2: /bin/bzexe
dpkg-query -S /bin/bzfgrep
bzip2: /bin/bzfgrep
dpkg-query -S /bin/bzgrep
bzip2: /bin/bzgrep
dpkg-query -S /bin/bzip2
bzip2: /bin/bzip2
dpkg-query -S /bin/bzip2recover
bzip2: /bin/bzip2recover
dpkg-query -S /bin/bzless
bzip2: /bin/bzless
dpkg-query -S /bin/bzmore
bzip2: /bin/bzmore
As you can see from the output, separate dpkg-query -S commands are run for
each option passed by
ls.
Using alias
Use the alias command to set and list aliases. Some aliases are already set in the system-
wide or user-specific shell initialization files discussed previously. Here’s how to list
the aliases that are currently set:
$ alias
alias cp=’cp -i’
alias ls=’ls color=auto’
alias mv=’mv -i’
alias rm=’rm -i’
Notice that some aliases are set simply as a way of adding options to the default
behavior of a command (such as
mv -i, so that the user is always prompted before
moving a file).
57
Chapter 3: Using the Shell
82935c03.qxd:Toolbox 10/29/07 12:58 PM Page 57
NOTE Ubuntu Linux ships only with the ls alias defined, which turns on color
output when you list files. The other aliases are useful examples you may want to
use, especially since they help you prevent accidental deletion of files.
You can define your own aliases for the current bash session as follows:
$ alias la=’ls -la’
Add that line to your ~/.bashrc file for the definition to occur for each new bash ses-
sion. Remove an alias from the current bash session using the
unalias command, as follows:
$ unalias la Unalias the previously aliased la command
$ unalias -a Unalias all aliased commands
Watching Commands
If you need to keep an eye on a command whose output is changing, use the watch
command. For example, to keep an eye on your load average:
$ watch ‘cat /proc/loadavg’
Every two seconds, watch runs the cat command again. Use Ctrl+c to quit. To change
the refresh rate to 10 seconds, type the following:
$ watch -n 10 ‘ls -l’
To highlight the difference between screen updates, type:
$ watch -d ‘ls -l’
Type Ctrl+c to exit the watch command. Note that files need to change so that differ-
ences can be highlighted.
Watching Files
You can use the watch command to watch the size of a file. For example, to watch a
large ISO file named
mydownload.iso as it downloads, use the following command:
$ watch ‘ls –l mydownload.iso’
To watch the contents of a plain text file grow over time, you can use the tail com-
mand. For example, you can watch as messages are added to the
/var/log/messages
file as follows:
$ sudo tail -f /var/log/messages
Pressing Ctrl+c will exit from the tail command.
58
Chapter 3: Using the Shell
82935c03.qxd:Toolbox 10/29/07 12:58 PM Page 58
Acquiring Super User Power
When you open a shell, you are able to run commands and access files and directories
based on your user/group ID and the permissions set for those components. Many
system features are restricted to the root user, also referred to as the super user.
There are three main ways to acquire super user power:
❑ Log in as the root user.
❑ Temporarily become the root user with the
su command.
❑ Run one command with root user privileges with the
sudo command.
In most cases, you do not want to log in as the root user, as you may accidentally make
changes to your system that you do not intend. Most Linux users either use the
su
command to change to the root user from a normal login or run the sudo command to
execute a single command as the root user.
Ubuntu Linux is set up for users to run the
sudo command. So, in most cases, to run
an administrative command (such as
useradd to add a new user), you would precede
that command with the
sudo command. For example:
$ sudo useradd -m joe As root user, add a new user named joe
By default, Ubuntu restricts the system such that the root user cannot log in. Because
of this, Ubuntu is also not set up to use the
su command, which is normally used on
other Linux systems, to change to the root user.
If you find that you need to run a series of commands as root user, you could type the
following command to open a shell as the root user:
$ sudo bash Open a shell as root user
#
If you decide that you want to add a password for the root user (allowing you to log
in as the root user or use the
su command to temporarily become root), you can also
do that using the
sudo command:
$ sudo passwd root Set the root user’s password
Most Ubuntu desktop users, however, simply use sudo and never set a root password.
Using the su Command
If you did decide at some point to add a password to your root user account, with a
shell open as a regular user, you can use the
su (super user) command to become the
root user. You can also use the
su command to switch to a different, non-root user. The
following sections describe how the
su command works.
59
Chapter 3: Using the Shell
82935c03.qxd:Toolbox 10/29/07 12:58 PM Page 59
Simply using su, as in the following code, doesn’t give you a login shell with root’s
environment:
$ su
Password:*****
# echo $PATH
/usr/local/sbin:/usr/local/bin:/usr/sbin:/usr/bin:/sbin:/bin:/usr/games
/usr/kerberos/sbin:/usr/kerberos/bin:/usr/local/bin:/usr/bin:/bin:/usr/X11R6/bin
:/home/fcaen/bin
After running su, the user still has the user fcaen’s PATH. To enable the root user’s environ-
ment, use the
su command with the dash option (-), as follows:
# exit
$ su -
Password: *****
# echo $PATH
/usr/kerberos/sbin:/usr/kerberos/bin:/usr/local/sbin:/usr/local/bin:/sbin:/bin:/
usr/sbin:/usr/bin:/root/bin
In most cases, use su -, unless you have a very specific reason not to. If no user
is specified,
su defaults to the root user. However, su can also be used to become
other users:
$ su - cnegus
The su command can also be used to execute a single command as a particular user:
$ su -c whoami
Password: ******
root
# su -c ‘less /var/log/messages’
Although in the second example you are logged in as a regular user, when you run
whoami with su -c, it shows that you are the root user. In the directly preceding
example, the quotes are required around the
less command line to identify /var/
log/messages
as an option to less. As seen above, whoami can be useful to determine
which user you’re currently running a command as:
$ whoami
fcaen
Delegating Power with sudo
The sudo command allows very granular delegation of power to users other than the
root user. The sudo facility is a great tool for granting specific escalated privileges when
you have multiple users and logging everything the users do with those privileges.
60
Chapter 3: Using the Shell
82935c03.qxd:Toolbox 10/29/07 12:58 PM Page 60
Unless otherwise specified, sudo runs as root. Ubuntu Linux uses the sudo command
to execute privileged commands, rather than the
su command.
The
sudo command is configured in /etc/sudoers.
WARNING! Never edit this file with your normal text editor. Instead, always use
the
visudo command.
The file
/etc/sudoers is restricted, so you need to use the sudo command to edit the
file. For example:
$ sudo visudo
The visudo command launches an editor, by default the nano editor, discussed
previously.
If you look at the
sudoers file that shipped with your distribution, you’ll see different
empty sections delimited by comments and one active statement:
root ALL=(ALL) ALL
This means that the user root is allowed on any hosts to run any command as any user.
Ubuntu Linux adds the following so that all users who are part of the admin group can
acquire root privileges:
%admin ALL=(ALL) ALL
When you installed Ubuntu Linux, the user account you created was automatically
added to this group. To allow additional users to acquire root privileges, add the fol-
lowing line, setting the first field to a user account on your system:
fcaen ALL= /usr/bin/less /var/log/messages
NOTE The preceding setting allows this user to run the less command with root
privileges. This introduces a security issue, as the
less command can allow this
user to gain more information on the system by examining other system files.
Now fcaen (or whichever user you’ve added) can do the following:
$ sudo /usr/bin/less /var/log/messages
Password:
After fcaen types his own password, he can page through the /var/log/messages
file. A timestamp is set at that time as well. For the next five minutes (by default), that
user can type the command line above and have it work without being prompted for
the password.
61
Chapter 3: Using the Shell
82935c03.qxd:Toolbox 10/29/07 12:58 PM Page 61
Normally, though, you should add such users to the admin group and not create indi-
vidual entries in the
/etc/sudoers file.
Every use of
sudo gets logged in /var/log/secure:
Feb 24 21:58:57 localhost sudo: fcaen : TTY=pts/3 ; PWD=/home/fcaen ; USER=root
; COMMAND=/usr/bin/less /var/log/messages
Next add this line to /etc/sudoers:
fcaen server1=(chris) /bin/ls /home/chris
Now fcaen can do the following:
$ sudo -u chris /bin/ls /home/chris
The sudo command just shown runs as chris and will work only on the host
server1. In some organizations, the
/etc/sudoers file is centrally managed
and deployed to all the hosts, so it can be useful to specify
sudo permissions
on specific hosts.
The
sudo command also allows the definition of aliases, or predefined groups of
users, commands, and hosts. Check the
/etc/sudoers file on your Linux system
for examples of those features.
Using Environment Variables
Small chunks of information that are useful to your shell environment are stored in
what are referred to as environment variables. By convention, environment variable
names are all uppercase (although that convention is not enforced). If you use the
bash shell, some environment variables are set for you from various bash start scripts
covered previously.
To display all of the environment variables, in alphabetical order, that are already set for your
shell, type the following:
$ set | less
BASH=/bin/bash
COLORS=/etc/DIR_COLORS.xterm
COLUMNS=118
DISPLAY=:0.0
HOME=/home/fcaen
HOSTNAME=einstein
The output just shown contains only a few examples of the environment variables
you will see. The
set command lists functions as well. The env command just lists
environment variables.
62
Chapter 3: Using the Shell
82935c03.qxd:Toolbox 10/29/07 12:58 PM Page 62
You can also set, or reset, any variables yourself. For example, to assign the value 123 to the
variable
ABC (then display the contents of ABC), type the following:
$ ABC=123
$ echo $ABC
123
The variable ABC exists only in the shell it was created in. If you launch a command
from that shell (
ls, cat, firefox, and so on), that new process will not see the vari-
able. Start a new bash process and test this:
$ bash
$ echo $ABC
$
You can make variables part of the environment and inheritable by children processes by exporting
them:
$ export ABC=123
$ bash
$ echo $ABC
123
Also, you can concatenate a string to an existing variable:
$ export PATH=$PATH:/home/fcaen
To list your bash’s environment variables:
$ env
When you go to create your own environment variables, avoid using names that are
already commonly used by the system for environment variables. See Appendix B for
a list of shell environment variables.
Creating Simple Shell Scripts
Shell scripts are good for automating repetitive shell tasks. Bash and other shells
include the basic constructs found in various programming languages, such as loops,
tests, case statements, and so on. The main difference is that there is only one type of
variable: strings.
Editing and Running a Script
Shell scripts are simple text files. You can create them using your favorite text editor
(such as vi). To run, the shell script file must be executable. For example, if you
63
Chapter 3: Using the Shell
82935c03.qxd:Toolbox 10/29/07 12:58 PM Page 63
created a shell script with a file name of myscript.sh, you could make it executable
as follows:
$ chmod u+x myscript.sh
Also, the first line of your bash scripts should always be the following:
#!/bin/bash
The # in this case starts a comment. The #! syntax acts as a comment for shells that
don’t understand this special syntax. The
/bin/bash part tells any running shell, be
it bash or another shell, which program should be used to run the script. (Since histori-
cally not all systems came with bash, you will often see
/bin/sh as the command to
run a script.)
As with any command, besides being executable the shell script you create must also
either be in your PATH or be identified by its full or relative path when you run it. In
other words, if you just try to run your script, you may get the following result:
$ myscript.sh
bash: myscript.sh: command not found
In this example, the directory containing myscript.sh is not included in your PATH.
To correct this problem, you can edit your path, copy the script to a directory in your
PATH, or enter the full or relative path to your script. Those four examples, respec-
tively, are shown below:
$ mkdir ~/bin ; cp myscript.sh ~/bin/ ; PATH=$PATH:~/bin
$ cp myscript.sh /usr/local/bin
$ ./myscript.sh
$ /tmp/myscript.sh
Avoid putting a dot (.) into the PATH environment variable to indicate that commands
can be run from the current directory. This is a technique that could result in commands
with the same file name as important, well-known commands (such as
ls or cat),
which could be overridden if a command of the same name exists in the current
directory. This can become a major security issue.
Adding Content to Your Script
Although a shell script can be a simple sequence of commands, shell scripts can also be
used as you would any programming language. For example, a script can produce dif-
ferent results based on giving it different input. This section describes how to use com-
pound commands, such as
if/then statements, case statements, and for/while
loops in your shell scripts.
64
Chapter 3: Using the Shell
82935c03.qxd:Toolbox 10/29/07 12:58 PM Page 64
The following example code assigns the string abc to the variable MYSTRING. It then
tests the input to see if it equals abc and acts based on the outcome of the test. The test
is between the brackets (
[ ]):
MYSTRING=abc
if [ $MYSTRING = abc ] ; then
echo “The variable is abc”
fi
To negate the test, use != instead of = as shown in the following:
if [ $MYSTRING != abc ] ; then
echo “$MYSTRING is not abc”;
fi
The following are examples of testing for numbers:
MYNUMBER=1
if [ $MYNUMBER -eq 1 ] ; then echo “MYNUMBER equals 1”; fi
if [ $MYNUMBER -lt 2 ] ; then echo “MYNUMBER <2”; fi
if [ $MYNUMBER -le 1 ] ; then echo “MYNUMBER <=1”; fi
if [ $MYNUMBER -gt 0 ] ; then echo “MYNUMBER >0”; fi
if [ $MYNUMBER -ge 1 ] ; then echo “MYNUMBER >=1”; fi
Let’s look at some tests on file names. In this example, you can check if a file exists (-e), if
it’s a regular file (
-f), or if it is a directory (-d). These checks are done with if/then
statements. If there is no match, then the else statement is used to produce the result.
filename=”$HOME”
if [ -e $filename ] ; then echo “$filename exists”; fi
if [ -f “$filename” ] ; then
echo “$filename is a regular file”
elif [ -d “$filename” ] ; then
echo “$filename is a directory”
else
echo “I have no idea what $filename is”
fi
Table 3-1 shows examples of tests that you can perform on files, strings, and variables.
Table 3-1: Operators for Test Expressions
Continued
Operator Test Being Performed
-a file Check that the file exists (same as –e)
-b file
Check whether the file is a special block device
65
Chapter 3: Using the Shell
82935c03.qxd:Toolbox 10/29/07 12:58 PM Page 65
Table 3-1: Operators for Test Expressions (continued)
Operator Test being performed
-c file
Check whether the file is a character special device (such as a
serial device)
-d file
Check whether the file is a directory
-e file Check whether the file exists (same as -a)
-f file
Check whether the file exists and is a regular file (for example,
not a directory, socket, pipe, link, or device file)
-g file
Check whether the file has the set-group-id bit set
-h file Check whether the file is a symbolic link (same as –L)
-k file
Check whether the file has the sticky bit set
-L file Check whether the file is a symbolic link (same as -h)
-n string
Check whether the string length is greater than 0 bytes
-O file
Check whether you own the file
-p file
Check whether the file is a named pipe
-r file
Check whether the file is readable by you
-s file
Check whether the file exists and is larger than 0 bytes
-S file
Check whether the file exists and is a socket
-t fd
Check whether the file descriptor is connected to a terminal
-u file
Check whether the file has the set-user-id bit set
-w file
Check whether the file is writable by you
-x file
Check whether the file is executable by you
-z string
Check whether the length of the string is 0 (zero) bytes
expr1 -a expr2
Check whether both the first and the second expressions are true
expr1 -o expr2
Check whether either of the two expressions is true
file1 -nt file2
Check whether the first file is newer than the second file (using
the modification timestamp)
66
Chapter 3: Using the Shell
82935c03.qxd:Toolbox 10/29/07 12:58 PM Page 66