Illustrated WPF phần 9 pot
Bạn đang xem bản rút gọn của tài liệu. Xem và tải ngay bản đầy đủ của tài liệu tại đây (2.05 MB, 59 trang )
CHAPTER 16 ■ TREES, TABS, AND OTHER CONTROLS
381
The DatePicker Control
The DatePicker control allows the user to enter a date either by typing the text in a text box or by using
the DatePicker’s built-in Calendar control. Like the Calendar control, the DatePicker control is included
in WPF 4.0. Figure 16-16 shows screenshots of the DatePicker control.
Figure 16-16. The DatePicker control allows the user two ways to enter a date.
The following is the markup for the DatePicker control shown in Figure 16-16:
<StackPanel>
<DatePicker Name="datePicker" HorizontalAlignment="Left" Width="110"/>
<TextBlock Text="Selected Date" FontWeight="Bold" Margin="5,5,5,2"/>
<TextBlock Margin="20,0"
Text="{Binding ElementName=datePicker, Path=SelectedDate}" />
</StackPanel>
Most of DatePicker’s important properties are for interacting with its built-in Calendar control
and behave the same way. These properties include DisplayDateStart, DisplayDateEnd, BlackoutDates,
and SelectedDate. For example, Figure 16-17 shows a DatePicker with the DisplayDateStart and
DisplayDateEnd properties set.
Figure 16-17. The DatePicker control uses many of the same properties as the Calendar control.
CHAPTER 16 ■ TREES, TABS, AND OTHER CONTROLS
382
The DataGrid Control
The DataGrid control, introduced in WPF 4.0, displays a two-dimensional grid of data, as shown in
Figure 16-18. Although the screenshots in the figure show a very plain grid, the DataGrid gives you
extensive control over many aspects of its appearance.
Figure 16-18. By default, the user can sort a DataGrid on any column.
The DataGrid is a powerful control, with a large number of features. The following are some of
the most important:
• Sorting: You can programmatically sort the rows on a particular column. The user
can sort on a column by clicking its header.
• Column headers: You can display just column headers, just row headers, or both.
• Rearrange columns: You can rearrange the columns programmatically, or the user
can rearrange them by dragging the headers left or right.
• Specialized cell types: The grid supplies specialized column types for text, Buttons,
CheckBoxes, ComboBoxes, and Hyperlinks.
• Customized appearance: You can attach Styles and Templates to the DataGrid, as
well as to most of its components. This gives you a large number of options for
customizing the grid’s appearance.
CHAPTER 16 ■ TREES, TABS, AND OTHER CONTROLS
383
Because of the DataGrid’s large number of features, an exhaustive description is beyond the
scope of this text. Using the DataGrid, however, is fairly simple, once you have the basics. The three basic
things you need to do when creating a DataGrid are the following:
• Create the column descriptions.
• Attach the data.
• Customize the various parts of the grid with Styles, Templates, and Brushes.
Figure 16-19 illustrates the structure of the DataGrid and the four properties for defining the
columns and attaching the data.
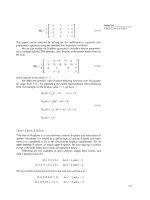
Figure 16-19. The DataGrid requires column definitions and data. The sample program defines four
columns and attaches a List of Person objects to the ItemsSource property.
If the AutoGenerateColumns property is set to True (which is the default value), then WPF
inspects the data and creates columns automatically based on the data. When you use this method,
however, you don’t have control of the appearance of the data in the grid.
Although automatically generating the columns can be useful as an initial pass, or for a quick
prototype, generally you’ll want to create a set of column definitions that specify how to display the data
in the column. To do this, set AutoGenerateColumns to False, and define each column in the DataGrid’s
Columns property, as shown in the following markup. This markup defines two text columns. The first is
bound to a property called FirstName, and the second is bound to a property called LastName.
<DataGrid Name="dg" AutoGenerateColumns="False"> ← Explicitly turn off autogeneration.
<DataGrid.Columns>
<DataGridTextColumn Binding="{Binding FirstName}" Header="First Name"/>
<DataGridTextColumn Binding="{Binding LastName}" Header="Last Name"/>
↑ ↑ ↑
Use the correct type of colum. Bind to the data field. Set the text of the header.
There are four predefined DataGrid column types: DataGridTextColumn,
DataGridCheckBoxColumn, DataGridHyperlinkColumn, and DataGridComboBoxColumn. There is also the
DataGridTemplateColumn, which allows you to specify your own column types.
Since the DataGrid is derived from ItemsControl (through several intermediate classes), you can
attach data to a DataGrid using either its Items property or its ItemsSource property.
CHAPTER 16 ■ TREES, TABS, AND OTHER CONTROLS
384
The following is the markup that produces the DataGrid shown in Figure 16-18. Notice the Width
attributes in the last two column definitions. The first one is set to SizeToHeader, and the last one is set to
*.
The Width property of a DataGrid column can have a numerical value as you’ve seen with Widths
throughout the text. Beyond that, however, it can have several other interesting values, which are the
following:
• Auto: This is the standard automatic sizing mode, which determines the size
necessary to fit all the content.
• SizeToCells: This determines the size necessary to display the content of the data
cells, regardless of the size of the header.
• SizeToHeader: This determines the size necessary to display the header, regardless
of the size of the content of the data cells.
• *: “Star” sizing specifies that this column should take up the remaining width of
the DataGrid or split the remaining width among the other “star-sized” columns.
<StackPanel>
<DataGrid Name="dg" AutoGenerateColumns="False" Margin="10">
<DataGrid.Columns>
<DataGridTextColumn Binding="{Binding FirstName}"
Header="First Name"/>
<DataGridTextColumn Binding="{Binding LastName}"
Header="Last Name"/>
<DataGridCheckBoxColumn Binding="{Binding HasRoadster}"
Header="Has Roadster"
Width="SizeToHeader"/> ← Width
<DataGridTextColumn Binding="{Binding Age}"
Header="Age"
Width="*"/> ← Width
</DataGrid.Columns>
</DataGrid>
</StackPanel>
CHAPTER 16 ■ TREES, TABS, AND OTHER CONTROLS
385
Figure 16-20 illustrates the structure of the example program. The DataGrid defines four
columns, and the data is taken from a List<> of Person objects.
Figure 16-20. The structure of the example program
The following is the code-behind for the program. The Person class, with four properties, is
declared at the top of the file. The Window class, declared at the bottom, creates a List of four Person
objects and assigns the List to the DataGrid’s ItemsSource property.
class Person
{
public string FirstName { get; set; }
public string LastName { get; set; }
public int Age { get; set; }
public bool HasRoadster { get; set; }
public Person(string fName, string lName, int age, bool hasRoadster)
{
FirstName = fName;
LastName = lName;
Age = age;
HasRoadster = hasRoadster;
}
}
public partial class Window1 : Window
{
List<Person> _people = new List<Person>();
public Window1()
{ InitializeComponent();
_people.Add(new Person("Sherlock", "Holmes", 54, false));
_people.Add(new Person("Jane", "Marple", 60, false));
_people.Add(new Person("Nancy", "Drew", 16, true));
_people.Add(new Person("Charlie", "Chan", 50, false));
dg.ItemsSource = _people;
}
}
CHAPTER 16 ■ TREES, TABS, AND OTHER CONTROLS
386
Figure 16-21 illustrates additional properties of the DataGrid control that allow you to
customize its appearance. You can use Brushes, Styles, and Templates to control the appearances of
most of the DataGrid’s parts.
Figure 16-21. Some of the important properties available for formatting the DataGrid control
Figure 16-22 illustrates properties of the DataGrid associated with rows or cells the user selects.
Figure 16-22. Properties of the DataGrid control that deal with selected rows and items
CHAPTER 16 ■ TREES, TABS, AND OTHER CONTROLS
387
Summary
In this chapter, I covered controls that didn’t fit into categories earlier in the text and also three controls
introduced in WPF 4.0.
• The TreeView control is ideal for representing hierarchical collections. It consists
of a set of nodes, where each node can have subnodes, down to arbitrary depth.
• The TabControl is a panel that acts like a file folder, where every tab contains a
different set of content.
• The Calendar control presents the visual display of a calendar, and the user can
select dates on the calendar. You can programmatically restrict the calendar to
show only ranges of dates or to include “blackout” dates, which the user can’t
select. Calendar is new with WPF 4.0.
• The DatePicker control presents a text box for the user to enter a date. At the right
of the text box is an icon that can display the Calendar control, from which the
user can select a date. DatePicker is new with WPF 4.0.
• The DataGrid control is a powerful grid control for displaying data. DataGrid is new
with WPF 4.0.
C H A P T E R 17
■ ■ ■
389
Text and Documents
Text in WPF
An Overview of Flow Documents
The Components of a Flow Document
The Content of a Flow Document
The TextBlock Element
CHAPTER 17 ■ TEXT AND DOCUMENTS
390
Text in WPF
WPF allows programmers to design programs with amazing graphic content with unprecedented ease.
Text, however, still plays an important part in most programs and can even be the dominant component
of some. Programs can use different amounts of text and use it in very different ways. In this chapter,
you’ll learn some of the ways WPF provides for presenting text.
Generally, programs use small amounts of text to label parts of the UI so the user knows what
controls and elements are used for. This is text about the program and is often implemented using the
Label element you saw in Chapter 6. In this case, the text is just an incidental part of the program.
Sometimes, however, the text isn’t about the program; instead, the purpose of the program is to
present the text. For example, you might want to build an application that allows the user to access a set
of documentation. WPF supplies the following ways of presenting this type of text:
• Fixed documents: These are documents where the text is laid out in a fixed format.
The user can page through the document, but regardless of the size of the window,
the pagination and formatting of the document remain unchanged. This is similar
to an Adobe PDF file. I won’t be covering this type of document.
• Flow documents: These documents behave in a manner similar to HTML pages.
When the user changes the size of the window, the hosting program (the browser
in the case of HTML) readjusts the layout of the text to fit the new size and shape
of the window.
• TextBlock elements: These are advanced versions of the TextBox element that
allow you to format the text.
Fixed documents and flow documents are generally used for large amounts of text that span
multiple pages. The TextBlock element is used for small amounts of text that need to be formatted.
CHAPTER 17 ■ TEXT AND DOCUMENTS
391
An Overview of Flow Documents
Before I cover the details of creating flow documents, I’ll show you what they look like and how they
behave. The following are the major points about flow documents:
• The text is automatically paginated to fit the size of the window.
• The text is automatically placed into columns for easy viewing. If the window is
narrow enough that columns would be distracting, WPF places the text in a single
column.
• The text is hosted in a container, which provides built-in tools for navigating and
viewing the document.
Figure 17-1 shows a flow document with text that takes up four screens. The built-in tools
provided by the hosting element are at the bottom of the window. These tools are the following:
• A search box for searching the document for words or phrases
• Page navigation controls for moving back and forth through the document
• Viewing mode controls, which allow the user to select between single-page mode,
two-page mode, and scrolling
• The zoom controls, which allow the user to change the size of the content
All these tools are built-in to the hosting element without any additional work required by the
programmer.
Figure 17-1. The flow document reader adds powerful built-in tools for displaying flow documents.
CHAPTER 17 ■ TEXT AND DOCUMENTS
392
The application’s built-in tools are simple and intuitive to use. The first tool on the left is a
search box that allows the user to search for words or phrases. To make the search box visible, the user
clicks the magnifying glass icon and can then type the text into the text box. Figure 17-2 shows the
search text box.
Figure 17-2. The user can click the magnifying glass to make the search text box visible.
Immediately to the right of the search box are the page navigation controls, which include a left
arrow, a right arrow, and text. The text part of the navigation control shows which page is currently being
displayed, as well as the total number of pages. The right and left arrow buttons allow the user to move
forward and backward through the text.
To the right of the page navigation controls are three icons that represent different ways of
viewing the document. The first icon represents the default form, which consists of a page occupying the
entire window. The page might be displayed in columns, but it is still a single page. This is the form
shown in Figure 17-2.
The second icon represents a “two page at a time” view, where the first page is on the left of the
window and the second page is shown on the right. Each “page” is contained in a bounding box. Figure
17-3 shows this form of display. Notice that the display is almost the same as that in Figure 17-2, except
for the addition of the bounding boxes, and the change in the text in the navigation controls, which now
lists eight pages, rather than four.
Figure 17-3. Two page a time mode
CHAPTER 17 ■ TEXT AND DOCUMENTS
393
The third icon represents the scrolling viewing mode. In this mode, the text isn’t paginated but
is instead scrolled in the window. Figure 17-4 shows this mode. Notice that the page navigation tools
have been removed, and a scroll bar has been placed at the right of the window. This is very similar to
the way HTML is displayed.
Figure 17-4. Scrolling mode removes the page navigation controls and places a scroll bar at the right of
the window.
To the right of the viewing mode icons are the sizing controls. These proportionally control the
size of the contents of the window. These controls consist of a plus button, a minus button and a slider.
Figure 17-5 shows the window when the slider has been dragged to the right to increase the size of the
window content.
Figure 17-5. The size controls comprise a plus button a minus button and a slider control.
CHAPTER 17 ■ TEXT AND DOCUMENTS
394
The Components of a Flow Document
The structure of a flow document application consists of three major parts—the hosting control, the
FlowDocument element, and the actual contents of the document.
• The hosting control determines the viewing mode or modes available to the
application using it. It also determines which built-in tools are available at the
bottom of the window. I’ll explain the three possible types of hosting control
shortly.
• The FlowDocument element is the container that holds the content of the
document.
• The content of the flow document consists of a number of containers that hold
and manage the actual content of the document.
The illustration on the left of Figure 17-6 shows the structure of these major components. The
hosting control contains the FlowDocument element, which contains the actual contents of the document.
The illustration on the right of the figure shows an example of that structure. (Don’t worry about the
details of the content in the example, because I’ll be covering these components shortly.)
Figure 17-6. The three major components of a flow document
CHAPTER 17 ■ TEXT AND DOCUMENTS
395
The Hosting Controls
There are three hosting controls for flow documents—the FlowDocumentReader, the FlowPageViewer, and
the FlowScrollViewer. The first control allows the user to switch between paging and scrolling. The
second two display the text in either paging or scrolling mode. Figure 17-7 shows screenshots of
programs using the second and third hosting controls.
• The FlowDocumentReader is the one you’ve seen throughout this chapter. It
presents the three view icons, allowing the user to switch between the three
different views—one page at a time, two pages at a time, or scrolling.
• The FlowDocumentPageViewer element shows the text only in paging mode.
• The FlowDocumentScrollViewer element shows the text only in scrolling mode.
Figure 17-7. The FlowDocumentPageViewer and the FlowDocumentScrollViewer hosting elements don’t
allow the user to select the viewing mode.
The following markup shows an example of using the FlowDocumentReader hosting control:
The Hosting Control
↓
<FlowDocumentReader x:Class="SimpleFlowDocument.Window1"
xmlns="
xmlns:x="
<FlowDocument>
<Paragraph FontSize="20" FontWeight="Bold"> The Flow
<Run>Simple Flow Document</Run> Document
</Paragraph>
</FlowDocument>
</FlowDocumentReader>
In this example, the FlowDocumentReader is at the root of the element tree, so in the code-behind
you’ll have to change the type of the class from Window to FlowDocumentReader, as shown in the following
code fragment:
public partial class Window1 : FlowDocumentReader
{
CHAPTER 17 ■ TEXT AND DOCUMENTS
396
The Content of a Flow Document
All three of the hosting elements you saw in the previous section require as their content a single
FlowDocument element. The FlowDocument is the container for the content.
A FlowDocument element can contain any number of elements derived from the Block class.
These include the Paragraph, Section, List, Table, and BlockUIContainer classes. Figure 17-8 shows the
part of the object derivation tree containing the classes used in flow documents. Notice that there are
two main branches.
• The Block-derived classes are containers. They can contain any number of the
following:
− Other Block-derived class objects
− Inline-derived class objects
• The Inline-derived classes contain presentation content such as text or UIElement
objects. (The oddly named Run class contains text.)
Figure 17-8. The Block-derived classes are containers for organizing content. The Inline-derived classes
contain actual content such as text or UIElement objects.
CHAPTER 17 ■ TEXT AND DOCUMENTS
397
For example, Figure 17-9 shows the markup for a simple flow document application. The figure
on the right shows the structure of the application. Notice the following about the markup:
• The FlowDocument contains two Paragraph objects.
• Each Paragraph object contains Inline-derived objects containing text.
Figure 17-9. A simple flow document and its structure
Figure 17-10 shows a screenshot of the program shown in Figure 17-9.
Figure 17-10. The FlowDocumentReader hosting element lays out the content of the FlowDocument.
CHAPTER 17 ■ TEXT AND DOCUMENTS
398
Creating a flow document consists, essentially, of mixing, matching, and embedding the
elements of different types. Table 17-1 lists the different element types and their roles.
Table 17-1. The Block-Derived Elements Used in a FlowDocument
Name Description
BlockUIContainer
Hosts, at the Block level, a UIElement such as a Button.
List
Contains a formatted set of list item elements.
Paragraph
Represents a paragraph. It groups sets of Inline elements.
Section
Represents a section. It groups sets of other Block-derived elements.
Table
Represents a table containing a set of rows.
Table 17-2. The Inline-Derived Classes Used in a FlowDocument
Name Description
Bold
Formats the enclosed text in bold font.
Figure
Hosts a figure or other element. You can specify the placement of a Figure in
relation to the flow of the text. A Figure is sizeable and can span more than a
single column.
Floater
Hosts a figure or other element. The placement of a Floater can’t be specified
explicitly, and it is placed wherever the FlowDocument determines there is space for
it.
Hyperlink
Formats the enclosed text as a hyperlink.
InlineUIContainer
Hosts, at the Inline level, a UIElement such as a Button.
Italic
Italicizes the enclosed text.
LineBreak
Forces a new line in the run of the text.
Run
Contains plain text. In markup, text that isn’t inside an Inline-derived element is
assumed by WPF to be a Run element.
Span
Groups other Inline-derived elements. You can use this to apply formatting to a
contiguous set of inline elements.
Underline
Underlines the enclosed text.
CHAPTER 17 ■ TEXT AND DOCUMENTS
399
Not all elements, however, can be arbitrarily embedded in any other type of element. Figure 17-
11 shows the types of elements that can be embedded in various types of elements. For example, a
Paragraph element can contain Runs, LineBreaks, Spans, and so on. Sections, Figures, and Floaters can
contain Paragraphs, Sections, BlockUIContainers, and so on.
Figure 17-11. The containment relationships allowed for various element types
CHAPTER 17 ■ TEXT AND DOCUMENTS
400
The markup in Figure 17-12 illustrates some of these relationships. Some important things to
notice about the markup are the following:
• Titles are created by using a Paragraph element with bold font of a larger size.
• Inline elements such as Bold and Underline can be nested.
Figure 17-12. A simple flow document
CHAPTER 17 ■ TEXT AND DOCUMENTS
401
Figure 17-13 shows the resulting flow document. Notice the titles, and the underlined, bold text.
Notice also that this is a single page with two columns. The FlowDocument automatically lays out the text
in columns when the container window gets wide enough.
Figure 17-13. The appearance of the simple flow document
CHAPTER 17 ■ TEXT AND DOCUMENTS
402
Tables and Lists
You can include tables and formatted lists in a flow document by using the Table and List elements.
These elements are Block-derived classes and can be used wherever a Block-derived class is legal.
Figure 17-14 shows the containment relationships between Table and its subelements and List
and its subelements. Notice that at the innermost level, the content is contained in a Block-derived
element—which of course contains an Inline-derived element.
Figure 17-14. The containment relationships of the Table and List classes
CHAPTER 17 ■ TEXT AND DOCUMENTS
403
Figure 17-15 shows an example of a simple list in a flow document.
Figure 17-15. A simple list and a simple table in flow documents
The following markup produces the simple list.
<FlowDocument>
<Paragraph>This is a simple list.</Paragraph>
<List>
<ListItem>
<Paragraph>Lorem ipsum dolor sit amet </Paragraph>
</ListItem>
<ListItem>
<Paragraph>Nemo enim ipsam voluptatem quia voluptas </Paragraph>
</ListItem>
<ListItem>
<Paragraph>Neque porro quisquam est, qui </Paragraph>
</ListItem>
</List>
</FlowDocument>
CHAPTER 17 ■ TEXT AND DOCUMENTS
404
The following markup produces the simple table shown in Figure 17-16:
<FlowDocument>
<Paragraph>The following is a table of information about
several antique maps.</Paragraph>
<Table>
<Table.Columns>
<TableColumn Width="150"/><TableColumn Width="60"/>
<TableColumn Width="200"/>
</Table.Columns>
<TableRowGroup >
<TableRow FontSize="18" FontWeight="Bold">
<TableCell><Paragraph>Cartographer</Paragraph></TableCell>
<TableCell><Paragraph>Year</Paragraph></TableCell>
<TableCell><Paragraph>Name</Paragraph></TableCell>
</TableRow>
<TableRow>
<TableCell><Paragraph>Seutter</Paragraph></TableCell>
<TableCell><Paragraph>1730</Paragraph></TableCell>
<TableCell>
<Paragraph><Italic>Diversi Globi Terr-Aquei</Italic></Paragraph>
</TableCell>
</TableRow>
<TableRow>
<TableCell><Paragraph>Stoopendahl</Paragraph></TableCell>
<TableCell><Paragraph>1680</Paragraph></TableCell>
<TableCell>
<Paragraph><Italic>Orbis Terrarum</Italic></Paragraph>
</TableCell>
</TableRow>
<TableRow>
<TableCell><Paragraph>Valck</Paragraph></TableCell>
<TableCell><Paragraph>1700</Paragraph></TableCell>
<TableCell>
<Paragraph><Italic>Mappe Monde</Italic></Paragraph>
</TableCell>
</TableRow>
</TableRowGroup>
</Table>
</FlowDocument>
CHAPTER 17 ■ TEXT AND DOCUMENTS
405
Figure 17-16. A simple table