Beginning C# 2005 Databases PHẦN 10 potx
Bạn đang xem bản rút gọn của tài liệu. Xem và tải ngay bản đầy đủ của tài liệu tại đây (1.6 MB, 52 trang )
existing location or the ID of a newly added location if the location name doesn’t already exist. Because
this property might not get set, either deliberately or because of errors, you must be able to give it a
null value, so the Guid value type is not suitable here. Guid? is also not appropriate because it won’t
be recognized in SQL Server. Instead, you use the
SqlGuid class from the System.Data.SqlTypes
namespace:
public class Sprocs
{
[SqlProcedure]
public static int AddStoryLocation(Guid storyId, string location,
out SqlGuid locationId)
{
The code starts by setting the output parameter to a null value (SqlGuid.Null) in case of error:
locationId = SqlGuid.Null;
The remaining code is placed in a try catch structure to accommodate errors. First, a context con-
nection is created, along with an associated
using block:
try
{
using (SqlConnection conn =
new SqlConnection(“context connection=true”))
{
The context connection and story ID are then used to check if the specified story ID refers to an existing
row in the
Story table. The code attempts to obtain the name of the story as a simple test, and executes
the generated command using the
ExecuteScalar() method to retrieve the name:
SqlCommand getStoryCmd = new SqlCommand(
“SELECT Name FROM Story WHERE StoryId = @StoryId”, conn);
getStoryCmd.Parameters.Add(new SqlParameter(“@StoryId”,
SqlDbType.UniqueIdentifier)).Value = storyId;
conn.Open();
string storyName = getStoryCmd.ExecuteScalar() as string;
conn.Close();
The connection remains open only for the minimum time — just while the command executes. That’s
common to all the code in this method, and ensures that the context connection is used as efficiently as
possible.
If there is no story, a name won’t be returned. If that happens, it’s reported using the
SqlContext.Pipe.Send() method that you saw earlier in the chapter, and the method terminates
with the appropriate status report,
ReturnValue.NoStory:
if (storyName == null)
{
SqlContext.Pipe.Send(“No story with an ID of “
+ storyId.ToString() + “ exists. Unable to add location.”);
return (int)ReturnValue.NoStory;
}
451
SQL Server CLR Integration
44063c11.qxd:WroxBeg 9/12/06 10:45 PM Page 451
If the story exists, the next step is to check whether the specified location exists in the Location table.
That uses similar code, but retrieves a GUID ID rather than a string value. Again, the query may return
null, and because you can’t use a Guid variable to store a null value, you use the generic nullable type
Guid? to store the query result:
SqlCommand getLocationCmd = new SqlCommand(
“SELECT LocationId FROM Location WHERE Location = @Location”,
conn);
getLocationCmd.Parameters.Add(new SqlParameter(“@Location”,
SqlDbType.VarChar, 100)).Value = location;
conn.Open();
Guid? existingLocationId = getLocationCmd.ExecuteScalar() as Guid?;
conn.Close();
Generic nullable types have a HasValue property to check for null values. You use it to see if there is an
existing location, and if there is, you set the output
locationId parameter using the Guid?.Value
property:
if (existingLocationId.HasValue)
{
locationId = existingLocationId.Value;
If both the story and location exist, it’s possible that there is already a row in the StoryLocation table
that links these records. To avoid duplication, the next step checks for such a row by filtering the data by
the IDs of the story and location. Again, a
Guid? variable is used to obtain the result:
SqlCommand getStoryLocationCmd = new SqlCommand(
“SELECT StoryLocationId FROM StoryLocation “
+ “WHERE StoryId = @StoryId AND LocationId = @LocationId”,
conn);
getStoryLocationCmd.Parameters.Add(new SqlParameter(“@StoryId”,
SqlDbType.UniqueIdentifier)).Value = storyId;
getStoryLocationCmd.Parameters.Add(new SqlParameter(
“@LocationId”, SqlDbType.UniqueIdentifier)).Value =
locationId.Value;
conn.Open();
Guid? existingStoryLocationId =
getStoryLocationCmd.ExecuteScalar() as Guid?;
conn.Close();
If the StoryLocation table already contains an entry, there’s nothing more to do. That being the case,
the code reports the result and exits, returning the
ReturnValue.LocationExists status code:
if (existingStoryLocationId.HasValue)
{
SqlContext.Pipe.Send(“Story already has the “ + location
+ “ location.”);
return (int)ReturnValue.LocationExists;
}
}
452
Chapter 11
44063c11.qxd:WroxBeg 9/12/06 10:45 PM Page 452
Alternatively, it’s possible that the story exists but the location doesn’t. In that case, you add a new row
to the
Location table and then retrieve the ID of the new row. The second part, retrieving the row ID,
can use the command you created earlier because the location names will match:
else
{
SqlCommand insertLocationCmd = new SqlCommand(
“INSERT INTO Location (Location) VALUES (@Location)“,
conn);
insertLocationCmd.Parameters.Add(new SqlParameter(“@Location”,
SqlDbType.VarChar, 100)).Value = location;
conn.Open();
insertLocationCmd.ExecuteNonQuery();
existingLocationId = getLocationCmd.ExecuteScalar() as Guid?;
conn.Close();
Now that you know the location ID, you can set the output parameter:
locationId = existingLocationId.Value;
The code then sends the client a message to say that a new location has been added. That isn’t essential,
but provides useful feedback. A client receiving the message might want to update cached data from the
Location table. For example:
SqlContext.Pipe.Send(“The “ + location
+ “ location did not exist, it has been added.”);
}
Regardless of whether the location already exists, or whether the location was added, the final database
operation is to add a row to the
StoryLocation table to link the Story and Location table rows. That
uses familiar code:
SqlCommand insertStoryLocationCmd = new SqlCommand(
“INSERT INTO StoryLocation (StoryId, LocationId) “
+ “VALUES (@StoryId, @LocationId)“, conn);
insertStoryLocationCmd.Parameters.Add(new SqlParameter(“@StoryId”,
SqlDbType.UniqueIdentifier)).Value = storyId;
insertStoryLocationCmd.Parameters.Add(new SqlParameter(
“@LocationId”, SqlDbType.UniqueIdentifier)).Value =
locationId.Value;
conn.Open();
insertStoryLocationCmd.ExecuteNonQuery();
conn.Close();
A message is also sent to confirm the addition of the story location:
SqlContext.Pipe.Send(“Story location added.”);
}
}
453
SQL Server CLR Integration
44063c11.qxd:WroxBeg 9/12/06 10:45 PM Page 453
If an exception occurs at any point in the code, the method includes simple exception-handling code to
report the problem and terminate with a status code of
ReturnValue.UnknownError. You could, of
course, include much more error-checking code here to analyze the exception and report in a more spe-
cific way — or perhaps even deal with the error and try accessing the database again. That code isn’t
included here, purely for brevity:
catch (Exception ex)
{
// Return error and status.
SqlContext.Pipe.Send(“An exception occurred. Message: “ + ex.Message);
return (int)ReturnValue.UnknownError;
}
Finally, knowing that everything has gone as planned and that no errors occurred, you can terminate the
method by returning the status code
ReturnValue.OK (which has the integer value 0):
return (int)ReturnValue.OK;
}
}
Okay, so that was quite a lot of code to get through, but again, this method provides a lot of functional-
ity. You could write the same stored procedure in SQL — there is nothing .NET-specific here. However,
the SQL version of the stored procedure would surely be harder to construct because it’s much easier to
write .NET code. .NET code is also relatively easy to debug because you can test it in a client application
first and place it in an assembly for CLR integration only when you are 100 percent sure that it does
what you want it to. Debugging SQL code is notoriously difficult by comparison.
Anyway, having created the assembly, you loaded it into SQL Server and define a stored procedure.
You’ve seen how to define SQL stored procedures in some depth already in this book; the only new
thing here is the use of the
AS EXTERNAL NAME clause to link the stored procedure to your code:
CREATE PROCEDURE dbo.AddStoryLocation
(
@storyId uniqueidentifier,
@location nvarchar(100),
@locationId uniqueidentifier OUTPUT
)
AS EXTERNAL NAME Ex1104.Sprocs.AddStoryLocation
Calling the stored procedure from SQL code also uses familiar syntax. For ease of use, variables are first
declared for the parameters and return value:
DECLARE @storyId uniqueidentifier
DECLARE @location nvarchar(100)
DECLARE @locationId uniqueidentifier
DECLARE @result int
Next, the two input parameters are assigned values:
SET @storyId = ‘da47837d-c6a5-490b-96cf-808137d0e760’
SET @location = ‘Jungle’
And then the stored procedure is executed:
454
Chapter 11
44063c11.qxd:WroxBeg 9/12/06 10:45 PM Page 454
EXEC @result = dbo.AddStoryLocation @storyId, @location, @locationId OUTPUT
To report the results, a SELECT query is used to display both the status code and output parameter:
SELECT @result AS StatusCode, @locationId AS LocationId
To view the messages returned, you had to use the alternate result view by clicking the Messages tab.
I hope you’ll agree that this is a nice programming model, and probably one that you’ll use frequently.
You may even decide that this way of creating stored procedures is preferable to writing them in SQL
code in all situations, and that wouldn’t be a bad decision. There are so many advantages, from addi-
tional capabilities, through simpler syntax, to easier debugging, that it’s difficult not to get a little bit
excited about this technique. The simpler coding is offset slightly by the additional steps required to
deploy CLR integration assemblies, but then those steps are hardly difficult. It takes only a few SQL
commands to get up and running, and the results are fantastic.
Summary
This chapter looked at CLR integration, which is a way to write .NET code that runs inside SQL Server.
You learned the basics, and moved on to experiment with .NET code to implement functions and stored
procedures. To summarize, you learned how:
❑ .NET features can extend the functionality available in SQL Server, and how writing various
database object in C# can simplify your development.
❑ CLR integration works, including how to enable CLR integration in SQL Server, and how to
load and remove .NET assemblies to and from a database. You also looked at the requirements
of CLR code, including what .NET assemblies are available to you by default, and what C# pro-
gramming elements to avoid (such as destructors).
❑ To register .NET types and methods for use in SQL Server.
❑ To use context connections to access the local database, and how to use the
SqlPipe class to
send data to the client. You also explored common features available to you from CLR inte-
grated code.
❑ To create scalar, table-valued, and aggregate functions. You looked at the code structures
required to implement the various function types and the attributes to control them, and you
learned how to register each function type and use it within SQL Server.
❑ To create stored procedures. You saw how to combine the power and flexibility of .NET code
with SQL stored procedures. This illustrated how complicated operations involving extensive
data access and logic are much easier to create with C# than with SQL.
This is the last chapter in this book, and now you are equipped with all the tools you need to create pow-
erful database applications using C# and SQL Server. Although you have been using Express products,
everything you have learned applies equally to the full versions of Visual Studio and SQL Server.
455
SQL Server CLR Integration
44063c11.qxd:WroxBeg 9/12/06 10:45 PM Page 455
Many subjects in this book, including CLR integration, have been presented as starting points for you.
You’ll find a wealth of information, both online and in other books, that will enable you to expand your
knowledge further. Getting a solid foundation in the fundamentals, and having at least basic exposure to
more complicated subjects such as CLR integration, will stand you in good stead and make it much eas-
ier for you to progress further.
I wish you all the best in your quest to write perfect database applications. Thank you for reading!
Exercises
1. Which of the following can you create using CLR integrated .NET code?
a. Views
b. Aggregate functions
c. User-defined types
d. Table types
e. Stored procedures
2. Outline the steps required to get .NET code running inside SQL Server.
3. How would you access data from CLR integrated code?
4. How would you send row data for a single row to client applications using SqlContext? Give
the code to send a row consisting of a GUID ID column called
MyTableId and an integer col-
umn called
MyAmount to the client (with any column values you wish).
5. What attribute would you use to define a class for use as an aggregate function? What property
of this attribute is mandatory, and how will it affect the code required for an aggregate function?
456
Chapter 11
44063c11.qxd:WroxBeg 9/12/06 10:45 PM Page 456
A
Installation
This appendix provides detailed, step-by-step instructions for installing all the programs you need
to try out the examples in this book:
❑ Microsoft .NET Framework 2.0
❑ Visual C# 2005 Express Edition
❑ SQL Server 2005 Express Edition
❑ SQL Server Management Studio Express
❑ Visual Web Developer 2005 Express Edition
If you’ve never installed a program, this might seem quite daunting but don’t worry — the
process is simple, especially because you’ll use default options so you won’t have to do any con-
figuration. And there’s more good news — all of these programs are free to use.
This appendix contains a separate section for each program. However, you won’t necessarily have
to install each program individually. If you install Visual C# 2005 Express Edition, .NET Framework
2.0 is installed automatically, and you can also choose to install SQL Server 2005 Express Edition (as
detailed later in the Visual C# section). If you already have Visual C# 2005 Express Edition installed
without SQL Server 2005 Express Edition, you can install SQL Server separately
There are two very important points to note before you begin:
❑ If you have any previous versions of SQL Server, Visual Studio, or the .NET Framework 2.0
installed on your computer, you must uninstall them first. To avoid problems, the uninstal-
lations must be performed in a specific order. See
/>vstudio/express/support/uninstall
for details.
❑ You must have the current version of the .NET Framework 2.0 installed before you can
install SQL Server 2005 Express Edition. To ensure that you have the correct version of the
.NET Framework 2.0 installed, follow the subset of instructions you need in the order that
they are listed in this appendix. If you already have the .NET Framework installed, you
can check which version it is by going to Control Panel and using the Add or Remove
Programs feature to examine the details of your installation.
44063ca.qxd:WroxBeg 9/12/06 3:55 PM Page 457
.NET Framework 2.0
For the purposes of this book, the easiest way to install .NET Framework 2.0 is to install Visual C# 2005
Express Edition. However, should you ever need to install the .NET Framework independently, go to
and follow the instructions you find there.
Visual C# 2005 Express Edition
To install Visual C# 2005 Express Edition, follow these steps:
1. Go to and click the link for Visual C# 2005
Express Edition. You’ll find a product overview and a feature tour as well as a Download Now
link.
2. Click Download Now. You’re reminded about uninstallation, and receive information about reg-
istration and a download link for the installation file,
vcssetup.exe.
3. Download the file and run it, or run it when prompted after you click the download link. You
may see a security warning — if you do, click Run. The files extract to a temporary folder and
then a dialog box appears, telling you that Setup is installing components. After the components
are installed, the setup wizard opens, as shown in Figure A-1.
4. Click Next. Accept the license agreement (see Figure A-2) to continue installation, and click Next
again.
5. Choose optional products: Microsoft MSDN 2005 Express Edition and SQL Server 2005 Express
Edition. Obviously SQL Server is required for this book, but it’s a good idea to select MSDN
2005 as well. (MSDN is Microsoft’s documentation for all its technologies. In this instance you
install only the relevant Visual C# and SQL Server information. You can access this information
online, but you’ll have faster access if you install it.) Click Next.
Figure A-1: The setup wizard
458
Appendix A
44063ca.qxd:WroxBeg 9/12/06 3:55 PM Page 458
Figure A-2: The license agreement
6. The Destination Folder page (see Figure A-3) asks you to select an install location. Select the
folder you want and click Install. (Figure A-3 shows a D:\ drive installation.)
7. The Download and Install Progress page (see Figure A-4) keeps you posted on the process. As
you can see, the current version of the .NET Framework is installed automatically.
Figure A-3: The Destination Folder page
459
Installation
44063ca.qxd:WroxBeg 9/12/06 3:55 PM Page 459
Figure A-4: The Download and Install Progress page
8. When the setup completes, you’re notified that installation was successful and that you must
register the software. The instructions onscreen tell you how to do this.
If you decide to register later (you have to register within 30 days), you can use the
Register Product option on the Help menu.
SQL Server Express
To download and install SQL Server 2005 Express Edition, follow these steps:
1. Go to and click the link for SQL Server
2005 Express Edition.
2. Click Download Now. You’re given a reminder about uninstallation, information about registra-
tion, and a selection of download options for SQL Server 2005 products. Under the Install SQL
Server 2005 Express Edition heading, click the Download link.
3. When the download completes, open sqlexpr.exe. You may see a security warning — if you
do, click Run. You have to accept the license agreement before you can proceed. Click Next.
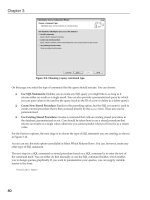
4. The Installing Prerequisites page tells you what components have to be installed prior to SQL
Server setup. An example is shown in Figure A-5.
Follow the instructions onscreen. You’re informed when the install has been successful.
5. Click Next to run a system configuration check. The results of the system check display, as
shown in Figure A-6.
460
Appendix A
44063ca.qxd:WroxBeg 9/12/06 3:55 PM Page 460
Figure A-5: The Installing Prerequisites page
Figure A-6: System configuration check results
6. Click Next. The installation continues. When installation is complete, a registration information
box automatically appears. (You don’t have to put in your full name if you don’t want to; a
single word will do.)
7. Click Next to go to the Feature Selection page (see Figure A-7). You can leave the default fea-
tures selected, but you may need to change the installation path according to the space on your
hard drive. Use the Disk Cost button to see how much space you have available. Click Next.
8. The authentication mode is automatically set to Windows Authentication, and you can leave it
as it is. Click Next.
461
Installation
44063ca.qxd:WroxBeg 9/12/06 3:55 PM Page 461
Figure A-7: Feature Selection page
9. All of the settings on the Error and Report Settings page are optional; you might decide you want
them but you don’t need them for this book. You’re ready to install SQL Server. Click Next.
10. The Ready to Install page shows you details of the components that will be installed. Click
Install. The Setup Progress page displays, as shown in Figure A-8.
Figure A-8: Setup Progress page
462
Appendix A
44063ca.qxd:WroxBeg 9/12/06 3:55 PM Page 462
11. When the installation is complete, click Next. The following page contains information about
Analysis Services, Reporting Services, Integration Services, Notification Services, and
Documentation and Samples. There is also a link to a summary log for the installation, and a
link to a Surface Area Configuration Tool that you can use to reduce the server surface area of
SQL. However, you can just click Finish and you’re done!
SQL Server Management Studio Express
To download and install SQL Server Management Studio Express, follow these steps:
1. Go to and click the link for SQL Server
2005 Express Edition. A product overview displays; scroll down the page to Free Management
Tool, and click the Download SQL Server Management Studio Express link.
2. Under the Install SQL Server Management Studio Express heading, click the Download link.
When the download is complete, open
SQLServer2005_SSMSEE.msi. You may see a security
warning — if you do, click Run. The Install Wizard appears, as shown in Figure A-9. Click Next.
Figure A-9: Install Wizard
3. The next page contains a license agreement, which you must accept to continue. Click Next.
Complete the registration information (you don’t have to put in your full name if you don’t
want to; a single word will do) and click Next. The Feature Selection page (see Figure A-10)
opens.
4. You don’t have to make any changes to how the feature is installed. However, you can use the
Disk Cost button in the Installation Path section to check that you have enough disk space for
installation. Click Next.
463
Installation
44063ca.qxd:WroxBeg 9/12/06 3:55 PM Page 463
Figure A-10: Feature Selection page
5. The Install the Program page opens. Click Install. It may take a couple of minutes but you will
see the progress of the installation, as shown in Figure A-11.
6. When the installation is complete, click Finish to exit.
Figure A-11: Installation progress
464
Appendix A
44063ca.qxd:WroxBeg 9/12/06 3:55 PM Page 464
Visual Web Developer 2005 Express Edition
To download and Install Visual Web Developer 2005 Express Edition, follow these steps:
1. Go to and click the link for Visual Web
Developer 2005 Express Edition. A product overview displays along with a feature tour and a
Download Now link. Click Download Now; you’re given a reminder about uninstallation,
information about registration, and a download link. Click the link.
2. When the download completes, run vwdsetup.exe. You may see a security warning — if you
do, click Run. A page appears telling you that the components are installing. Afterward, you
have to accept the license agreement to continue. Then, click Next.
3. The Destination Folder page (see Figure A-12) opens.
Figure A-12: The Destination Folder page
4. Click Install. The Download and Install Progress page, shown in Figure A-13, opens.
5. When the setup completes, you’re informed that the installation was successful and that you
must register the software. The instructions onscreen tell you how to do this.
If you decide to register later (you have to register within 30 days), you can use the
Register Product option on the Help menu.
Note the message saying that you can’t change the destination folder. This is
because Visual Web Developer has a dependency on C# Express so they must be
installed in the same location. If you don’t have enough space for Visual Web
Developer in the same location as C# Express, you’ll have to uninstall C# Express
and reinstall it in a location that has enough space for both.
465
Installation
44063ca.qxd:WroxBeg 9/12/06 3:55 PM Page 465
Figure A-13: Download and Install Progress page
To Finish
When you’ve installed all four programs, run Windows Update.
Help
I hope the installation process has gone smoothly and you now have all the programs you need.
However, sometimes installations do fail on the first attempt. This appendix does not offer advice about
possible problems because they are likely to be specific to the configuration of your computer. If you
have any problems, use the error messages you receive to look for advice on the Microsoft web site.
466
Appendix A
44063ca.qxd:WroxBeg 9/12/06 3:55 PM Page 466
B
Database Installation
This appendix contains instructions for downloading and installing the sample database used in
this book. You can choose between two methods of installation:
❑ Installing database files
❑ Executing a SQL script
Both methods are easy, and the main difference between them is that you can use the SQL script to
install the database on a remote server. However, there is one important point to note about using
the SQL script method — if you already have the sample database installed, executing this script
will overwrite it. This means that the database is returned to its original state and any changes
you’ve made are lost.
If you want to restore the database to its default state you can either execute the SQL script or you
can remove (or detach) your version of the database and reinstall the original version. You’ll find
information about how to detach the database at the end of the installation instructions.
Installing Database Files
1. In the downloadable code for this book are two files called FolktaleDB.mdf and
FolktaleDB_log.ldf. Copy these files to the default location for SQL Server databases.
If you didn’t change the default file path when you were installing SQL Server, the path
should be
C\Program Files\Microsoft SQL Server\MSSQL.1\MSSQL\Data.
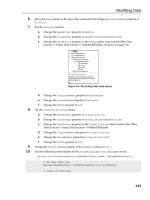
2. Open SQL Server Management Studio Express. Connect to your database server when
prompted. Right-click Databases in the Object Explorer window and select Attach, as
shown in Figure B-1.
3. On the Add Databases page, click Add. Navigate to the FolktaleDB.mdf file, and select
it, as shown in Figure B-2. (You don’t need to find or select the
FolktaleDB_log.ldf file
because that will be copied automatically with the
.mdf file.) Click OK.
44063cb.qxd:WroxBeg 9/12/06 3:55 PM Page 467
Figure B-1: Attaching a database file
Figure B-2: Locating database files
4. The Attach Databases page displays the name and details of the FolktaleDB database, as illus-
trated in Figure B-3. Click OK.
The database is attached and ready to use.
468
Appendix B
44063cb.qxd:WroxBeg 9/12/06 3:55 PM Page 468
Figure B-3: The Attach Databases page
Executing a SQL Script
1. In the downloadable code for this book is a file called CreateFolktaleDB.sql. You can down-
load it to any location on your computer and then simply double-click it.
2. The file opens in SQL Server Management Studio Express. Connect to your database server
when prompted. (Note that the Object Explorer window doesn’t open by default when you
open a script file using this method.)
3. If you haven’t installed SQL Server in the default location, change the file path in the SQL code.
The file path information is highlighted in the following code:
CREATE DATABASE [FolktaleDB] ON PRIMARY
( NAME = N’FolktaleDB’, FILENAME = N’C:\Program Files\Microsoft SQL Server\
MSSQL.1\MSSQL\Data\FolktaleDB.mdf’ , SIZE = 3072KB , MAXSIZE = UNLIMITED,
FILEGROWTH = 1024KB )
LOG ON
( NAME = N’FolktaleDB_log’, FILENAME = N’C:\Program Files\Microsoft SQL
Server\MSSQL.1\MSSQL\Data\FolktaleDB_log.ldf’ , SIZE = 1024KB , MAXSIZE =
2048GB , FILEGROWTH = 10%)
COLLATE Latin1_General_CI_AS
GO
469
Database Installation
44063cb.qxd:WroxBeg 9/12/06 3:55 PM Page 469
4. Click Execute on the toolbar. This may take a few moments. The results are shown in Figure B-4.
The database is installed and ready to use.
Figure B-4: Executing the SQL script
Detaching a Database
1. In the Object Explorer window, right-click the name of the database you want to detach. Select
Tasks ➪ Detach.
2. The Detach Databases page has the name of the database you’ve selected, as shown in Figure B-5.
Click OK.
3. The database is now detached. Note that this doesn’t delete the database files; they still exist in
the same location but they are no longer loaded into SQL Server.
This is all straightforward, so let’s hope you don’t run into any problems. However, if you do, look in
the MSDN documentation or go to
for assistance.
470
Appendix B
44063cb.qxd:WroxBeg 9/12/06 3:55 PM Page 470
Figure B-5: The Detach Database page
471
Database Installation
44063cb.qxd:WroxBeg 9/12/06 3:55 PM Page 471
44063cb.qxd:WroxBeg 9/12/06 3:55 PM Page 472
C
Answers to Exercises
Chapter 1
Exercise 1 Solution
False. Primary keys are a useful aspect of database tables, but it is not mandatory to have them.
Exercise 2 Solution
Answers a and d are actual joins. Answers b and c are made up, and e occurs only in carpentry.
Exercise 3 Solution
Transactions.
Exercise 4 Solution
a. Nothing — although it will delete every row in the MyTable table, which might not be
exactly what you intended.
b. This is a mix of insert statement syntax and update statement syntax. A correct insert
statement of this form would be:
INSERT INTO MyTable (Title, Amount) VALUES (‘Oysters’, 17)
While a correct update statement would be:
UPDATE MyTable SET Title = ‘Oysters’, Amount = 17 WHERE ItemId = 3
Exercise 5 Solution
False. To make up a set of rows, the data in an XML document would have to be formatted in a
way that mapped with table data, which might not always be the case. However, it is true that any
XML document could be added to a SQL database table, although this is only the case if the entire
document were added as a single column of a single row. It is also feasible that some process or
transformation could be applied to an XML document to extract row data from it and place it into
a table.
44063cc.qxd:WroxBeg 9/12/06 3:55 PM Page 473
Chapter 2
Exercise 1 Solution
DbConnection and SqlConnection.
Exercise 2 Solution
False. It is possible to access data, both to read and modify it, using just command and data reader
objects. In many circumstances, when performance is an issue and when you don’t need the full power
of the
DataSet class, this is the preferred way to do things.
Exercise 3 Solution
Answers b, c, and f are ADO.NET objects. Data joining and deleting is achieved by command objects,
and primary keys are represented by constraints.
Exercise 4 Solution
Because Visual C# Express is designed to work only with local database files. You might, however, use
SSMSE to configure more general DBMS features such as security.
Exercise 5 Solution
I hope not. A lot of controls are available for data binding — you can bind data to just about any prop-
erty of any control if you try hard enough. Yes, these controls are full of useful features, but at times they
won’t do what you want them to. You can, however, bind data to custom controls that you create using
the data-binding framework supplied by ADO.NET.
Exercise 6 Solution
They are stored in the web.config file. This centralized storage is good news — if you want to change
the connection for all the data-bound controls in a project, you have to change things in only one place,
rather than having to search for hard-coded connection strings throughout your code. It is also easy to
access this information from your applications — both in ASP.NET and C# code.
Chapter 3
Exercise 1 Solution
A connection string is a string that contains all the necessary information for a database, including the
location of the DBMS, the database to connect to, and authentication credentials.
Exercise 2 Solution
You can add only those queries that return no result or a single result, not queries that return row sets.
This applies to stored procedures that you might want to execute as well as SQL queries.
Exercise 3 Solution
Answer in downloadable chapter code.
474
Appendix C
44063cc.qxd:WroxBeg 9/12/06 3:55 PM Page 474
Exercise 4 Solution
To some extent, yes, although the result you get won’t always be what you want. Some types of data, in
particular long text fields, are unsuitable for display in small spaces such as the cells provided by
columns in a
DataGridView. It is possible to improve things here, but at times this can require fairly
extensive modifications to the functionality of the display, and quite a lot of custom code. This is not
really a problem for day-to-day use, however, and the fact that you can make these modifications is a
good thing — because it makes the control extremely flexible.
Chapter 4
Exercise 1 Solution
You can initialize data sources using either SQL statements or stored procedures.
Exercise 2 Solution
You should use the Copy If Newer option because you can quit the application and restart it to see if
changes have persisted.
Exercise 3 Solution
You would make changes in the following order:
1. Add new rows and update existing rows to TableA — but don’t delete any rows.
2. Add new rows and update existing rows to TableB — but don’t delete any rows.
3. Add new rows and update existing rows to TableC — but don’t delete any rows.
4. Make changes to TableD — additions, modifications, and deletions.
5. Delete rows from TableC.
6. Delete rows from TableB.
7. Delete rows from TableA.
Exercise 4 Solution
Answer in downloadable chapter code.
Exercise 5 Solution
You would handle the Form.FormClosing event.
Chapter 5
Exercise 1 Solution
Answers a and e are the only real reasons — security because the web and data servers can be secured
separately, and flexibility because it’s easy to move the database, change the database, and so on.
Answer b counts in favor of local database files. Answer c is irrelevant — performance will be more or
less the same in both situations, and is more likely to be affected by other factors. Answers d and f are
meaningless — they will work exactly the same in both scenarios.
475
Answers to Exercises
44063cc.qxd:WroxBeg 9/12/06 3:55 PM Page 475