Beginning C# 2008 Databases From Novice to Professional phần 5 potx
Bạn đang xem bản rút gọn của tài liệu. Xem và tải ngay bản đầy đủ của tài liệu tại đây (831.76 KB, 52 trang )
Figure 9-7. Administrative Tools: Data Sources (ODBC)
3. When the ODBC Data Source Administrator window opens, click the User DSN
tab and then click Add (see Figure 9-8).
Figure 9-8. ODBC Data Source Administrator dialog box
CHAPTER 9 ■ GETTING TO KNOW ADO.NET 179
9004ch09final.qxd 12/13/07 4:12 PM Page 179
4. The Create New Data Source wizard starts. Follow its instructions carefully! First,
select the SQL Server driver; second, click Finish (see Figure 9-9).
Figure 9-9. Create New Data Source wizard
5. The next window prompts for the data source name and server. Specify the values
for Name and Server as
NorthwindOdbc and .\sqlexpress, respectively, as shown
in Figure 9-10, and then click Next.
Figure 9-10. Specifying the data source name and SQL Server to connect to
CHAPTER 9 ■ GETTING TO KNOW ADO.NET180
9004ch09final.qxd 12/13/07 4:12 PM Page 180
6. Accept the defaults in the authentication window by clicking Next (see
Figure 9-11).
Figure 9-11. Specifying SQL Server authentication
7. In the next window, check the Change the default database to option, select the
Northwind database from the pr
ovided drop-down list, and click Next (see
Figure 9-12).
Figure 9-12. S
pecifying the default database
CHAPTER 9 ■ GETTING TO KNOW ADO.NET 181
9004ch09final.qxd 12/13/07 4:12 PM Page 181
8. In the next window, simply click Finish (see Figure 9-13).
Figure 9-13. Finishing DSN creation
9. A confirmation window appears, describing the new data source. Click Test Data
Source (see Figure 9-14).
Figure 9-14. Testing the Northwind data source connection
CHAPTER 9 ■ GETTING TO KNOW ADO.NET182
9004ch09final.qxd 12/13/07 4:12 PM Page 182
10. A window reporting a successful test should appear (see Figure 9-15). (If it doesn’t,
cancel your work and
carefully try again.) Click OK.
Figure 9-15. Connection to Northwind was successful.
11. When the confirmation window reappears, click OK. When the ODBC Data
Source Administrator window reappears, the new data source will be on the list
(see Figure 9-16). Click OK.
Figure 9-16. N
e
w data source appearing in the data source list
N
o
w y
ou hav
e y
our N
or
thwindO
dbc data source ready to work with. Next, you will
use it in code for setting up the
connection str
ing.
CHAPTER 9 ■ GETTING TO KNOW ADO.NET 183
9004ch09final.qxd 12/13/07 4:12 PM Page 183
Try It Out: Creating a Simple Console Application Using the
ODBC Data Provider
Let’s access Northwind with ODBC:
1. In Solution Explorer, add a new C# Console Application project named
OdbcProvider to the Chapter09 solution. Rename the
Program.cs file to
OdbcProvider.cs. In the code editor, replace the generated code with the
code in Listing 9-3, which shows the changes to Listing 9-1 in bold.
Listing 9-3. OdbcProvider.cs
using System;
using System.Data;
using System.Data.Odbc;
namespace Chapter04
{
class OdbcProvider
{
static void Main(string[] args)
{
// set up connection string
string connString = @"dsn=northwindodbc";
// set up query string
string sql = @"
select
*
from
employees
";
// declare connection and data reader variables
OdbcConnection conn = null;
OdbcDataReader reader = null;
try
{
// open connection
conn = new OdbcConnection(connString);
conn.Open();
CHAPTER 9 ■ GETTING TO KNOW ADO.NET184
9004ch09final.qxd 12/13/07 4:12 PM Page 184
// execute the query
OdbcCommand cmd = new OdbcCommand(sql, conn);
reader = cmd.ExecuteReader();
// display output header
Console.WriteLine(
"This program demonstrates the use of "
+ "the ODBC Data Provider."
);
Console.WriteLine(
"Querying database {0} with query {1}\n"
, conn.Database
, cmd.CommandText
);
Console.WriteLine("First Name\tLast Name\n");
// process the result set
while(reader.Read()) {
Console.WriteLine(
"{0} | {1}"
, reader["FirstName"].ToString().PadLeft(10)
, reader[1].ToString().PadLeft(10)
);
}
}
catch (Exception e)
{
Console.WriteLine("Error: " + e);
}
finally
{
// close connection
reader.Close();
conn.Close();
}
}
}
}
CHAPTER 9 ■ GETTING TO KNOW ADO.NET 185
9004ch09final.qxd 12/13/07 4:12 PM Page 185
2. Make this project the startup program by right-clicking the project name in
Solution Explorer and then clicking Set as StartUp Project as shown earlier in the
Figure 9-4.
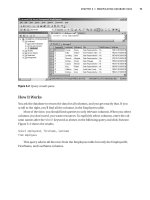
3. Run the application with Ctrl+F5. The results should appear as in Figure 9-17.
Figure 9-17. Accessing Northwind via ODBC.
How It Works
Once you create a DSN, the rest is easy. You simply change Sql to Odbc in the class names
(and, of course, the output header), just as you did to modify the program to work with
OLE DB. The biggest change, and the only one that really deserves attention, is to the
connection string.
// set up connection string
string connString = @"dsn=northwindodbc";
The ODBC connection string isn’t limited only to the DSN, but it doesn’t allow blanks
or newlines anywhere in the string.
■Tip Each data provider has its own rules regarding both the parameters and syntax of its connection
string. Consult the documentation for the provider you’re using when coding connection strings. Connection
strings can be ver
y complicated. We don’t cover the details here, but documentation for connection strings
is included with the description of the
ConnectionString property for the connection class for each data
provider
.
CHAPTER 9 ■ GETTING TO KNOW ADO.NET186
9004ch09final.qxd 12/13/07 4:12 PM Page 186
Now that you’ve played with all the data providers that access SQL Server (the SQL
Server CE data provider is beyond the scope of this book), let’s make sure you clearly
understand what a data provider is and how different data providers can be used to
access data.
Data Providers Are APIs
The .NET Framework data providers, sophisticated as they are (and you’ll learn plenty
about exploiting their sophistication later), are simply APIs for accessing data sources,
most often relational databases. (ADO.NET is essentially one big API of which data
providers are a major part.)
Newcomers to ADO.NET are often understandably confused by the Microsoft
documentation. They read about
Connection, Command, DataReader, and other ADO.NET
objects, but they see no classes named
Connection, Command, or DataReader in any of the
ADO.NET namespaces. The reason is that data provider classes implement
interfaces in
the
System.Data namespace. These interfaces define the data provider methods of the
ADO.NET API.
The key concept is simple. A data provider, such as
System.Data.SqlClient, consists of
classes whose methods provide a uniform way of accessing a specific kind of data source.
In this chapter, you used three different data providers (SQL Server, OLE DB, and ODBC)
to access the same SSE database. The only real difference in the code was the connection
string. Except for choosing the appropriate data provider, the rest of the programming
was effectively the same. This is true of all ADO.NET facilities, whatever kind of data
source you need to access.
The SQL Server data provider is optimized to access SQL Server and can’t be used for
any other DBMS. The OLE DB data provider can access any OLE DB data source—and
you used it without knowing anything about OLE DB (a major study in itself). The ODBC
data provider lets you use an even older data access technology, again without knowing
anything about it.
W
or
king at such an abstract level enabled you to do a lot more, a lot
mor
e quickly
, than y
ou could have otherwise.
ADO.NET is not only an efficient data access technology, but also an elegant one.
Data providers are only one aspect of it. The art of ADO.NET programming is founded
more on conceptualizing than on coding. First get a clear idea of what ADO.NET offers,
and then look for the right method in the right class to make the idea a reality.
Since conceptual clarity is so important, you can view (and refer to) connections,
commands, data readers, and other ADO.NET components primarily as abstractions
rather than merely objects used in database programs. If you concentrate on concepts,
learning when and how to use relevant objects and methods will be easy.
CHAPTER 9 ■ GETTING TO KNOW ADO.NET 187
9004ch09final.qxd 12/13/07 4:12 PM Page 187
Summary
In this chapter, you saw why ADO.NET was developed and how it supersedes other data
access technologies in .NET. We gave an overview of its architecture and then focused on
one of its core components, the data provider. You built three simple examples to prac-
tice basic data provider use and experience the uniform way data access code is written,
regardless of the data provider. Finally, we offered the opinion that conceptual clarity is
the key to understanding and using both data providers and the rest of the ADO.NET API.
Next, we’ll study the details of ADO.NET, starting with connections.
CHAPTER 9 ■ GETTING TO KNOW ADO.NET188
9004ch09final.qxd 12/13/07 4:12 PM Page 188
Making Connections
Before you can do anything useful with a database, you need to establish a session with
the database server. You do this with an object called a
connection, which is an instance
of a class that implements the
System.Data.IDbConnection interface for a specific data
provider. In this chapter, you’ll use various data providers to establish connections and
look at problems that may arise and how to solve them.
In this chapter, we’ll cover the following:
• Introducing data provider connection classes
• Connecting to SQL Server Express with
SqlConnection
• Improving your use of connection objects
• Connecting to SQL Server Express with
OleDbConnection
Introducing the Data Provider Connection Classes
As you saw in Chapter 9, each data provider has its own namespace. Each has a connec-
tion class that implements the
System.Data.IDbConnection interface. Table 10-1 summa-
rizes the data providers supplied by Microsoft.
Table 10-1. Data Provider Namespaces and Connection Classes
Data Provider Namespace Connection Class
ODBC System.Data.Odbc
OdbcConnection
OLE DB System.Data.OleDb
OleDbConnection
Or
acle
System.Data.OracleClient
OracleConnection
SQL Server System.Data.SqlClient SqlConnection
SQL Server CE System.Data.SqlServerCe SqlCeConnection
189
CHAPTER 10
9004ch10final.qxd 12/13/07 4:10 PM Page 189
As you can see, the names follow a convention, using Connection prefixed by an
identifier for the data provider. Since all connection classes implement
System.Data.
IDbConnection, the use of each one is similar. Each has additional members that provide
methods specific to a particular database. You used connections in Chapter 9. Let’s take a
closer look at one of them,
SqlConnection, in the namespace System.Data.SqlClient.
Connecting to SQL Server Express with
SqlConnection
In this example, you’ll again connect to the SQL Server connect to the SQL Server Express
(SSE) Northwind database.
Try It Out: Using SqlConnection
You’ll write a very simple program, just to open and check a connection.
1. In Visual Studio 2008, create a new Windows Console Application project named
Chapter10. When Solution Explorer opens, save the solution.
2. Rename the Chapter10 project ConnectionSQL. Rename the Program.cs file to
ConnectionSql.cs, and replace the generated code with the code in Listing 10-1.
Listing 10-1. ConnectionSql.cs
using System;
using System.Data;
using System.Data.SqlClient;
namespace Chapter10
{
class ConnectionSql
{
static void Main(string[] args)
{
// connection string
string connString = @"
server = .\sqlexpress;
integrated security = true;
";
CHAPTER 10 ■ MAKING CONNECTIONS190
9004ch10final.qxd 12/13/07 4:10 PM Page 190
// create connection
SqlConnection conn = new SqlConnection(connString);
try {
// open connection
conn.Open();
Console.WriteLine("Connection opened.");
}
catch (SqlException e) {
// display error
Console.WriteLine("Error: " + e);
}
finally {
// close connection
conn.Close();
Console.WriteLine("Connection closed.");
}
}
}
}
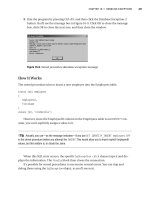
3. Run the application b
y pressing Ctrl+F5. If the connection is successful, you’ll see
the output in Figure 10-1.
Figure 10-1. Connecting and disconnecting
I
f the connection failed, y
ou
’ll see an error message as in Figure 10-2. (You can
get this b
y shutting do
wn SSE first, with
net stop mssql$sqlexpress enter
ed at
a
command pr
ompt. I
f you try this, remember to restart it with
net start
mssql$sqlexpress.)
CHAPTER 10 ■ MAKING CONNECTIONS 191
9004ch10final.qxd 12/13/07 4:10 PM Page 191
Figure 10-2. Error if connection failed while connecting to SQL Server
Don’t worry about the specifics of this message right now. Connections often fail for
reasons that have nothing to do with your code. It may be because a server isn’t started,
as in this case, or because a password is wr
ong, or some other configuration problem
exists. You’ll soon look at common problems in establishing database connections.
How It Works
Let’s examine the code in Listing 10-1 to understand the steps in the connection process.
First, you specify the ADO.NET and the SQL Server data provider namespaces, so you can
use the simple names of their members.
using System;
using System.Data;
using System.Data.SqlClient;
Then y
ou cr
eate a connection str
ing. A
connection string consists of par
ameters—in
other wor
ds
,
key=value pairs separ
ated b
y semicolons—that specify connection infor
ma
-
tion. Although some par
ameters ar
e v
alid for all data pr
o
viders, each data provider has
specific par
ameters it will accept, so it
’
s impor
tant to know what parameters are valid in a
connection str
ing for the data pr
o
vider y
ou’re using.
// connection string
string connString = @"
server = .\sqlexpress;
integrated security = true;
";
CHAPTER 10 ■ MAKING CONNECTIONS192
9004ch10final.qxd 12/13/07 4:10 PM Page 192
Let’s briefly examine each of the connection string parameters in this example. The
server parameter specifies the SQL Server instance to which you want to connect.
server = .\sqlexpress;
In this statement, . (dot) represents the local server, and the name followed by the \
(slash) represents the instance name running on the database server. So here you have an
instance of SQL Server Express named sqlexpress running on the local server.
■Tip (local) is an alternative to the . (dot) to specify the local machine, so .\sqlexpress can be
replaced with (local)\sqlexpress.
The next clause indicates that you should use Windows Authentication (i.e., any valid
logged-on Windows user can log on to SSE).
integrated security = true;
You could alternatively have used sspi instead of true, as they both have the same
effect. O
ther parameters are available. You’ll use one later to specify the database to
which you want to connect.
Next you create a connection (a
SqlConnection object), passing it the connection
string. This doesn’t create a database session. It simply creates the object you’ll use later
to open a session.
// create connection
SqlConnection conn = new SqlConnection(connString);
Now you have a connection, but you still need to establish a session with the data-
base by calling the
Open method on the connection. If the attempt to open a session fails,
an exception will be thrown, so you use a
try statement to enable exception handling.
You display a message after calling
Open, but this line will be executed only if the connec-
tion was successfully opened.
try {
// open connection
conn.Open();
Console.WriteLine("Connection opened.");
}
At this stage in the code, you’d normally issue a query or perform some other data-
base operation over the open connection. However, we’ll save that for later chapters and
concentrate here on just connecting.
CHAPTER 10 ■ MAKING CONNECTIONS 193
9004ch10final.qxd 12/13/07 4:10 PM Page 193
Next comes an exception handler in case the Open() fails.
c
atch (SqlException e) {
/
/ display error
C
onsole.WriteLine("Error: " + e);
}
Each data provider has a specific exception class for its error handling; SqlException
is the class for the SQL Server data provider. Specific information about database errors is
available from the exception, but here you’re just displaying its raw contents.
When you’re finished with the database, you call
Close() to terminate the session
and then print a message to show that
Close() was called.
finally {
// close connection
conn.Close();
Console.WriteLine("Connection closed.");
}
You call Close() within the finally block to ensure it always gets called.
■Note Establishing connections (database sessions) is relatively expensive. They use resources on both
the client and the server. Although connections may eventually get closed through garbage collection or by
timing out, leaving one open when it’s no longer needed is a bad practice. Too many open connections can
slow a server down or prevent new connections from being made.
Note that you can call Close() on a closed connection, and no exception will be
thrown. So, your message would have been displayed if the connection had been closed
earlier or even if it had never been opened. See Figure 10-2, where the connection failed
but the close message is still displayed.
In one typical case, multiple calls to both
Open() and Close() make sense. ADO.NET
supports disconnected processing of data, even when the connection to the data
provider has been closed. The pattern looks like this:
try
{
conn.Open(); // open connection
//
// online processing (e.g., queries) here
//
conn.Close(); // close connection
CHAPTER 10 ■ MAKING CONNECTIONS194
9004ch10final.qxd 12/13/07 4:10 PM Page 194
//
// offline processing here
//
conn.Open(); // reopen connection
//
// online processing(e.g., INSERT/UPDATE/DELETE) here
//
conn.Close(); // reclose connection
}
finally
{
// close connection
conn.Close();
}
The finally block still calls Close(), calling it unnecessarily if no exceptions are
encountered, but this isn’t a problem or expensive, and it ensures the connection will be
closed. Although many programmers hold connections open until program termination,
this is usually wasteful in terms of server resources. With
connection pooling, opening
and closing a connection as needed is actually more efficient than opening it once and
for all.
That’s it! You’re finished with the first connection example. However, since you saw
a possible error, let’s look at typical causes of connection errors.
Debugging Connections to SQL Server
Writing the C# code to use a connection is usually the easy part of getting a connec-
tion to work. Problems often lie not in the code, but rather in a mismatch in the
connection parameters between the client (your C# program) and the database server.
All appropriate connection parameters must be used and must have correct values.
Even experienced database professionals often have problems getting a connection
to work the first time.
More parameters are available than the ones shown here, but you get the idea. A
corollary of Murphy’s Law applies to connections: If several things can go wrong, surely
one of them will. Your goal is to check both sides of the connection to make sure all of
your assumptions are correct and that everything the client program specifies is matched
correctly on the server.
Often the solution is on the server side. If the SQL Server instance isn’t running, the
client will be trying to connect to a server that doesn’t exist. If Windows Authentication
isn’t used and the user name and password on the client don’t match the name and pass-
word of a user authorized to access the SQL Server instance, the connection will be
CHAPTER 10 ■ MAKING CONNECTIONS 195
9004ch10final.qxd 12/13/07 4:10 PM Page 195
rejected. If the database requested in the connection doesn’t exist, an error will occur. If
the client’s network information doesn’t match the server’s, the server may not receive
the client’s connection request, or the server response may not reach the client.
For connection problems, using the debugger to locate the line of code where the
error occurs usually doesn’t help—the problem almost always occurs on the call to
the
Open method. The question is, why? You need to look at the error message.
A typical error is as follows:
Unhandled Exception: System.ArgumentException: Keyword not supported
The cause for this is either using an invalid parameter or value or misspelling a
parameter or value in your connection string. Make sure you’ve entered what you really
mean to enter.
Figure 10-2 earlier showed probably the most common message when trying to con-
nect to SQL Server. In this case, most likely SQL Server simply isn’t running. Restart the
SSE service with
net start mssql$sqlexpress.
Other possible causes of this message are as follows:
• The SQL Server instance name is incorrect. For example, you used
.\sqlexpress,
but SSE was installed with a different name. It’s also possible that SSE was installed
as the default instance (with no instance name) or is on another machine (see the
next section); correct the instance name if this is the case.
• SSE hasn’t been installed—go back to Chapter 1 and follow the instructions there
for installing SSE.
• A security problem exists—your Windows login and password aren’t valid on the
server. This is unlikely to be the problem when connecting to a local SSE instance,
but it might happen in trying to connect to a SQL Server instance on another server.
• A hardware problem exists—again unlikely if you’re trying to connect to a server
on the same machine
.
Security and Passwords in SqlConnection
Ther
e ar
e
two kinds of user authentication in SSE.
The pr
eferred way is to use Windows
A
uthentication (integr
ated secur
ity), as y
ou do when follo
wing the examples in this book.
SQL S
er
v
er uses y
our
Windows login to access the instance. Your Windows login must
exist on the machine wher
e SQL S
er
v
er is r
unning, and your login must be authorized to
access the SQL S
er
v
er instance or be a member of a user gr
oup that has access
.
If y
ou don
’
t include the
Integrated Security = true (or Integrated Security = sspi)
parameter in the connection str
ing, the connection defaults to SQL S
er
ver security,
which uses a separ
ate login and passwor
d within
SQL S
erver.
CHAPTER 10 ■ MAKING CONNECTIONS196
9004ch10final.qxd 12/13/07 4:10 PM Page 196
How to Use SQL Server Security
If you really did intend to use SQL Server security because that’s how your company or
department has set up access to your SQL Server (perhaps because some clients are non-
Microsoft), you need to specify a user name and password in the connection string, as
shown here:
thisConnection.ConnectionString = @"
server = .\sqlexpress;
user id = sa;
password = x1y2z3
";
The sa user name is the default system administrator account for SQL Server. If a
specific user has been set up, such as
george or payroll, specify that name. The password
for
sa is set when SQL Server is installed. If the user name you use has no password, you
can omit the password clause entirely or specify an empty password, as follows:
password =;
However, a blank password is bad practice and should be avoided, even in a test
envir
onment.
Connection String Parameters for SqlConnection
Table 10-2 summarizes the basic parameters for the SQL Server data provider connection
string.
CHAPTER 10 ■ MAKING CONNECTIONS 197
Table 10-2. SQL Server Data Provider Connection String Parameters
Name Alias Default Value Allowed Values Description
Application Name .Net SqlClient Any string Name of
Data Provider application
AttachDBFileName extended properties, None Any path Full path of an
Initial File Name attachable
database file
Connect Timeout Connection Timeout 15 0–32767 Seconds to wait
to connect
Data Source Server, Address, Addr, None Server name or Name of the
Network Address network address target SQL Server
instance
Continued
9004ch10final.qxd 12/13/07 4:10 PM Page 197
Table 10-2. Continued
Name Alias Default Value Allowed Values Description
Encrypt false true, false, yes, Whether to use
no SSL encryption
Initial Catalog Database None Any database that Database name
exists on server
Integrated Security Trusted_Connection false true, false, yes, Authentication
no, sspi mode
Network Library Net dbmssocn dbnmpntw, Network .dll
dbmsrpcn,
dbmsadsn,
dbmsgnet,
dbmslpcn,
dbmsspxn,
dbmssocn
Packet Size 8192 Multiple of 512 Network packet
size in bytes
Password PWD None Any string Password if not
using Windows
Authentication
Persist Security Info false true, false, yes, Whether sensi-
no tive information
should be passed
back after
connecting
User ID UID None User name if not
using Windows
Authentication
Workstation ID Local com- Any string Workstation
puter name connecting to
SQL Server
CHAPTER 10 ■ MAKING CONNECTIONS198
The Alias column in Table 10-2 gives alternate parameter names. For example, you
can specify the server using any of the following:
data source = .\sqlexpress
server = .\sqlexpress
address = .\sqlexpress
addr = .\sqlexpress
network address = .\sqlexpress
9004ch10final.qxd 12/13/07 4:10 PM Page 198
Connection Pooling
One low-level detail that’s worth noting—even though you shouldn’t change it—is con-
nection pooling
. Recall that creating connections is expensive in terms of memory and
time. With pooling, a closed connection isn’t immediately destroyed but is kept in mem-
ory in a pool of unused connections. If a new connection request comes in that matches
the properties of one of the unused connections in the pool, the unused connection is
used for the new database session.
Creating a totally new connection over the network can take seconds, whereas
reusing a pooled connection can happen in milliseconds; it’s much faster to use
pooled connections. The connection string has parameters that can change the size
of the connection pool or even turn off connection pooling. The default values (for
example, connection pooling is on by default) are appropriate for the vast majority
of applications.
Improving Your Use of Connection Objects
The code in the first sample program was trivial, so you could concentrate on how con-
nections work. Let’s enhance it a bit.
Using the Connection String in the Connection Constructor
In the ConnectionSql project, you created the connection and specified the connection
string in separate steps. Since you always have to specify a connection string, you can
use an overloaded version of the constructor that takes the connection string as an
ar
gument.
// create connection
SqlConnection conn = new SqlConnection(@"
server = (local)\sqlexpress;
integrated security = sspi;
");
This constructor sets the ConnectionString property when creating the SqlConnection
object. You will try it in the next examples and use it in later chapters.
Displaying Connection Information
Connections hav
e
sev
eral properties that provide information about the connection.
Most of these pr
oper
ties are read-only, since their purpose is to display rather than set
information. (
Y
ou set connection values in the connection string.) These properties are
CHAPTER 10 ■ MAKING CONNECTIONS 199
9004ch10final.qxd 12/13/07 4:10 PM Page 199
often useful when debugging, to verify that the connection properties are what you
expect them to be.
Here, we’ll describe the connection properties common to most data providers.
Try It Out: Displaying Connection Information
In this example, you’ll see how to write a program to display connection information.
1. Add a C# Console Application project named ConnectionDisplay to the Chapter10
solution.
2. Rename Program.cs to ConnectionDisplay.cs. When prompted to rename all refer-
ences to
Program, you can click either Yes or No. Replace the code with that in
Listing 10-2.
Listing 10-2. ConnectionDisplay.cs
using System;
using System.Data;
using System.Data.SqlClient;
namespace Chapter10
{
class ConnectionDisplay
{
static void Main()
{
// create connection
SqlConnection conn = new SqlConnection(@"
server = .\sqlexpress;
user id=administrator;
integrated security = true;
");
try
{
// open connection
conn.Open();
Console.WriteLine("Connection opened.");
CHAPTER 10 ■ MAKING CONNECTIONS200
9004ch10final.qxd 12/13/07 4:10 PM Page 200
// display connection properties
Console.WriteLine("Connection Properties:");
Console.WriteLine(
"\tConnection String: {0}",
conn.ConnectionString);
Console.WriteLine(
"\tDatabase: {0}",
conn.Database);
Console.WriteLine(
"\tDataSource: {0}",
conn.DataSource);
Console.WriteLine(
"\tServerVersion: {0}",
conn.ServerVersion);
Console.WriteLine(
"\tState: {0}",
conn.State);
Console.WriteLine(
"\tWorkstationId: {0}",
conn.WorkstationId);
}
catch (SqlException e)
{
// display error
Console.WriteLine("Error: " + e);
}
finally
{
// close connection
conn.Close();
Console.WriteLine("Connection closed.");
}
}
}
}
3. Make ConnectionDisplay the startup project, and run it by pressing Ctrl+F5. If the
connection is successful, you’ll see output like that shown in Figure 10-3.
CHAPTER 10 ■ MAKING CONNECTIONS 201
9004ch10final.qxd 12/13/07 4:10 PM Page 201
Figure 10-3. Displaying connection information
How It
Works
The ConnectionString property can be both read and written. Here you just display it.
Console.WriteLine(
"\tConnection String: {0}",
conn.ConnectionString);
You can see the value you assign to it, including the whitespace, in the verbatim
string.
What’s the point? Well, it’s handy when debugging connections to verify that the
connection string really contains the values you thought you assigned. F
or example, if
you’re trying out different connection options, you may have different connection string
parameters in the program. You may have commented out one, intending to use it later,
but forgot about it. Displaying the
ConnectionString property helps to see whether a
parameter is missing.
The next statement displays the
Database property. Since each SQL Server instance
has several databases, this property shows which one you’re initially using when you
connect.
Console.WriteLine(
"\tDatabase: {0}",
conn.Database);
In this program, it displays
Database: master
CHAPTER 10 ■ MAKING CONNECTIONS202
9004ch10final.qxd 12/13/07 4:10 PM Page 202
since you didn’t specify a database in the connection string, so you were connected to the
SQL Server’s default database master. If you wanted to connect to the Northwind data-
base, you’d need to specify the
Database parameter, for example:
// connection string
string connString = new SqlConnection(@"
server = .\sqlexpress;
integrated security = true;
database = northwind
";
You can also change the default database from the master database to some other
database, say, AdventureWorks, by executing the following statement:
exec sp_defaultdb 'sa','adventureworks'
Again, this is a handy property to display for debugging purposes. If you get an error
saying that a particular table doesn’t exist, often the problem isn’t that the table doesn’t
exist but that it isn’t in the database to which you’re connected. Displaying the
Database
property helps you to find that kind of error quickly.
■Tip If you specify a database in the connection string that doesn’t exist on the server, you may see the
following error message: “System.Data.SqlClient.SqlException: Cannot open database ‘database’ requested
by the login. The login failed.”
You can change the database currently used on a connection with the ChangeDatabase
method.
The next statement displays the
DataSource property, which gives the server instance
name for SQL Server database connections.
Console.WriteLine(
"\tDataSource: {0}",
conn.DataSource);
This displays the same SQL Server instance name you’ve used in all the examples so
far.
DataSource: .\sqlexpress
The utility of this, again, is mainly for debugging purposes.
CHAPTER 10 ■ MAKING CONNECTIONS 203
9004ch10final.qxd 12/13/07 4:10 PM Page 203