Beginning SQL Server 2008 for Developers From Novice to Professional phần 5 ppt
Bạn đang xem bản rút gọn của tài liệu. Xem và tải ngay bản đầy đủ của tài liệu tại đây (1.6 MB, 45 trang )
CHAPTER 6 ■ CREATING INDEXES AND DATABASE DIAGRAMMING
155
Primary and Foreign Keys
One important use of indexes is on referential constraints within a table. If you recall from Chapter 3,
a referential constraint is where you’ve indicated that through the use of a key, certain actions are
constrained depending on what data exists. To give a quick example of a referential constraint, say
you have a customer who owns banking products. A referential constraint would prevent the
customer’s record from being deleted while those products existed.
SQL Server does not automatically create indexes on your foreign keys. However, as the foreign
key column values need to be identified by SQL Server when joining to the parent table, it is almost
always recommended that an index be created on the columns of the foreign key.
Finding Specific Records
Ideal candidates for indexes are columns that allow SQL Server to quickly identify the appropriate
rows. In Chapter 8, we’ll meet the WHERE clause of a query. This clause lists certain columns in your
table and is used to limit the number of rows returned from a query. The columns used in the WHERE
clause of your most common queries make excellent choices for an index. So, for example, if you
wanted to find a customer’s order for a specific order number, an index based on customer_id and
order_number would be perfect, as all the information needed to locate a requested row in the table
would be contained in the index.
If finding specific records is going to make up part of the way the application works, then do look
at this scenario as an area for an index to be created.
Using Covering Indexes
As mentioned earlier, when you insert or update a record, any data in a column that is included in an
index is stored not only in the table, but also in the indexes for nonclustered indexes. From finding an
entry in an index, SQL Server then moves to the table to locate and retrieve the record. However,
if the necessary information is held within the index, then there is no need to go to the table and
retrieve the record, providing much speedier data access.
For example, consider the ShareDetails.Shares table in the ApressFinancial database. Suppose
that you wanted to find out the description, current price, and ticker ID of a share. If an index was
placed on the ShareId column, knowing that this is an identifier column and therefore unique, you
would ask SQL Server to find a record using the ID supplied. It would then take the details from the
index of where the data is located and move to that data area. If, however, there was an index with all
of the columns defined, then SQL Server would be able to retrieve the description ticker and price
details in the index action. It would not be necessary to move to the data area. This is called a covered
index, since the index covers every column in the table for data retrieval.
Looking for a Range of Information
An index can be just as useful for finding one record as it can be for searching for a range of records. For
example, say you wish to find a list of cities in Florida with names between Orlando and St. Petersburg in
alphabetical order. You could put an index on the city name, and SQL Server would go to the index
location of Orlando and then read forward from there an index row at a time, until it reached the
item after St. Petersburg, where it would then stop. Because SQL Server knows that an index is on
this column and that the data will be sorted by city name, this makes it ideal for building an index on
a city name column.
It should be noted that SQL Server indexes are not useful when attempting to search for characters
embedded in a body of text. For example, suppose you want to find every author in a publisher’s
database whose last name contains the letters “ab.” This type of query does not provide a means of
Dewson_958-7C06.fm Page 155 Thursday, July 3, 2008 1:56 PM
156
CHAPTER 6
■ CREATING INDEXES AND DATABASE DIAGRAMMING
determining where in the index tree to start and stop searching for appropriate values. The only way
SQL Server can determine which rows are valid for this query is to examine every row within the table.
Depending on the amount of data within the table, this can be a slow process. If you have a require-
ment to perform this sort of wildcard text searching, you should take a look at the SQL Server full-text
feature, as this will provide better performance for such queries.
Keeping the Data in Order
As previously stated, a clustered index actually keeps the data in the table in a specific order. When
you specify a column (or multiple columns) as a clustered index, upon inserting a record, SQL Server
will place that record in a physical position to keep the records in the correct ascending or descending
order that corresponds to the order defined in the index. To explain this a bit further, if you have a
clustered index on customer numbers; and the data currently has customer numbers 10, 6, 4, 7, 2,
and 5; then SQL Server will physically store the data in the following order: 2, 4, 5, 6, 7, 10. If a process
then adds in a customer number 9, it will be physically inserted between 7 and 10, which may mean
that the record for customer number 10 needs to move physically. Therefore, if you have defined a
clustered index on a column or a set of columns where data insertions cause the clustered index
to be reordered, this will greatly affect your insert performance. SQL Server does provide a way to
reduce the reordering impact by allowing a fill factor to be specified when an index is created. I will
discuss the fill factor shortly; however, this option allows you to define how much of an index leaf
will be filled before a new leaf is created. Think of an index leaf as your index card for each cabinet.
You know that more items are going to come in, and a few of these may you’ll need to add to an index
card for that cabinet. You try to estimate how many items you’ll need to add, so you leave space on
that card to add them on. You’re then trying to avoid having to create a new index card.
Determining What Makes a Bad Index
Now that you know what makes a good index, let’s investigate what makes a bad index. There are
several “gotchas” to be aware of:
• Using unsuitable columns
•Choosing unsuitable data
• Including too many columns
• Including too few records in the table
Using Unsuitable Columns
If a column isn’t used by a query to locate a row within a table, then there is a good chance that the
column won’t need to be indexed, unless it is combined with another column to create a covering
index, as described earlier. If this is the case, the index will still add overhead to the data-modification
operations but will not produce any performance benefit to the data-retrieval operations.
Choosing Unsuitable Data
Indexes work best when the data contained in the index columns is highly selective between rows.
The optimal index is one created on a column that has a unique value for every row within a table,
such as a primary key. If a query requests a row based on a value within this column, SQL Server can
quickly navigate the index structure and identify the single row that matches the query predicate.
However, if the selectivity of the data in the index columns is poor, the effectiveness of the index
will be reduced. For example, if an index is created on a column that contains only three distinct
Dewson_958-7C06.fm Page 156 Thursday, July 3, 2008 1:56 PM
CHAPTER 6 ■ CREATING INDEXES AND DATABASE DIAGRAMMING
157
values, the index will be able to reduce the number of rows to just a third of the total before applying
other methods to identify the exact row. In this instance, SQL Server would probably ignore the index
anyway and find that reading the data table instead would be faster. Therefore, when deciding on
appropriate index columns, you should examine the data selectivity to estimate the effectiveness of
the index.
Including Too Many Columns
The more columns there are in an index, the more data writing has to take place when a process
completes an update or an insertion of data. Although these updates to the index data take a very
short amount of time in SQL Server 2008, they can add up. Therefore, each index that is added to
a table will incur extra processing overhead, so it is recommended that you create the minimum
number of indexes needed to give your data-retrieval operations acceptable performance.
Including Too Few Records in the Table
From a data-performance viewpoint, there is absolutely no need to place an index on a table that has
only one row. SQL Server will find the record at the first request, without the need of an index, because it
will use a table scan. That said, you may wish to include a primary key that can then be used to enforce
data integrity.
This statement also holds true when a table has only a handful of records. Again, there is no
reason to place an index on these tables. The reason for this is that SQL Server would go to the index,
use its engine to make several reads of the data to find the correct record, and then move directly to
that record using the record pointer from the index to retrieve the information. Several actions are
involved in this process, as well as passing data between different components within SQL Server.
When you execute a query, SQL Server will determine whether it’s more efficient to use the indexes
defined for the table to locate the necessary rows or to simply perform a table scan and look at every
row within the table.
Reviewing Your Indexes for Performance
Every so often, it’s necessary for you as an administrator or a developer to review the indexes built
on your table to ensure that yesterday’s good index is not today’s bad index. When a solution is built,
what is perceived to be a good index in development may not be so good in production—for example,
the users may be performing one task more times than expected. Therefore, it is highly advisable
that you set up tasks that constantly review your indexes and how they are performing. This can be
completed within SQL Server via its index-tuning tool, the Database Tuning Advisor (DTA).
The DTA looks at your database and a workload file holding a representative amount of infor-
mation that will be processed, and uses the information it gleans from these to figure out what indexes
to place within the database and where improvements can be made. At this point in the book, I haven’t
actually covered working with data, so going through the use of this tool will just lead to confusion.
This powerful and advanced tool should be used only by experienced SQL Server 2008 developers or
database administrators.
Getting the indexes right is crucial to your SQL Server database running in an optimal fashion.
Spend time thinking about the indexes, try to get them right, and then review them at regular inter-
vals. Review clustering, uniqueness, and especially the columns contained within indexes so that
you ensure the data is retrieved as quickly as possible. Finally, also ensure that the order of the columns
within the index will reduce the number of reads that SQL Server has to do to find the data. An index
where the columns defined are FirstName, LastName, and Department might be better defined as
Department, FirstName, and LastName if the greatest number of queries is based on finding someone
Dewson_958-7C06.fm Page 157 Thursday, July 3, 2008 1:56 PM
158
CHAPTER 6
■ CREATING INDEXES AND DATABASE DIAGRAMMING
within a specific department or listing employees of a department. The difference between these two
indexes is that in the first, SQL Server would probably need to perform a table scan to find the relevant
records. Compare that with the second example, where SQL Server would search the index until it
found the right department, and then just continue to return rows from the index until the depart-
ment changed. As you can see, the second involves much less work.
Creating an Index
Now that you know what an index is and you have an understanding of the various types of indexes,
let’s proceed to create some in SQL Server. There are many different ways to create indexes within
SQL Server, as you might expect. Those various methods are the focus of this section of the chapter,
starting with how to use the table designer in SQL Server Management Studio.
The first index we’ll place into the database will be on the CustomerId field within the
CustomerDetails.Customers table.
Creating an Index with the Table Designer
As you may recall from the previous chapter, when the CustomerId column is set up, SQL Server will
automatically generate the data within this field whenever a new record is inserted into this table.
This data will never alter, as it uses the IDENTITY function for the column. Thus, the CustomerId
column will be updated automatically whenever a customer is added. An application written in C#,
for example, could be used as the user front end for updating the remaining areas of the customer’s
data, and it could also display specific customer details, but it would not know that the CustomerId
requires incrementing for each new record, and it would not know the value to start from.
The first index created will be used to find the record to update with a customer’s information.
The application will have found the customer using a combination of name and address, but it is still
possible to have multiple records with the same details. For example, you may have John J. Doe and
his son, John J. Doe, who are both living at the same address. Once you have those details displayed
on the screen, how will the computer program know which John J. Doe to use when it comes to
completing an update?
Instead of looking for the customer by first name, last name, and address, the application will
know the CustomerId and use this to find the record within SQL Server. When completing the initial
search, the CustomerId will be returned as part of the set of values, so when the user selects the appro-
priate John J. Doe, the application will know the appropriate CustomerId. SQL Server will use this
value to specifically locate the record to update. In the following exercise, we’ll add this index to the
CustomerDetails.Customers table.
Try It Out: Creating an Index Graphically
1. Ensure that SQL Server Management Studio is running and that you have expanded the nodes in the tree view so
that you can see the Tables node within the ApressFinancial database.
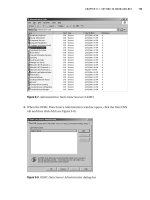
2. Find the first table that the index is to be added to (i.e., the CustomerDetails.Customers table). Right-click
and select Design. This will bring you into the table designer. Right-click and select Manage Indexes and Keys
(see Figure 6-1).
Figure 6-1. The Manage Indexes and Keys button
Dewson_958-7C06.fm Page 158 Thursday, July 3, 2008 1:56 PM
CHAPTER 6 ■ CREATING INDEXES AND DATABASE DIAGRAMMING
159
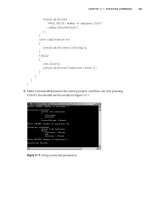
3. The index-creation screen will appear. The screen will look similar to Figure 6-2. Notice that there is a Primary
Key already defined. You created this in Chapter 5; in Figure 5-24, you saw the Save dialog when creating a rela-
tionship. We defined the Customers.CustomerDetails table as the primary key table, and the table had no
primary key, so SQL Server created one for us. Click the Add button to create a new index and to set the index’s
properties.
The fields in this dialog box are prepopulated, but you are able to change the necessary fields and options that
you might wish to use. However, no matter what indexes have been created already, the initial column chosen for
the index will always be the first column defined in the table.
Figure 6-2. The Indexes/Keys dialog
4. The first area to change is the name of the index. Notice that in the (Name) text box, SQL Server has created a
possible value for you. The name is prefixed with IX_, which is a good naming system to use. It is also good to
keep the name of the table and then a useful suffix, such as the name of the column. In this case, the index will
be called IX_Customers_CustomerId. It might also be good to place something in the description. However,
index names should be self-explanatory, so there really shouldn’t be a need for a description.
5. SQL Server has, in this instance, correctly selected CustomerId as the column that will make up the index.
Also, it has selected that the index will be ascending. For this example, the default sort order is appropriate. The
sort order of the index column is useful when creating an index on the columns that will be used in an ORDER BY
clause of a query when there are multiple columns with differing sort orders. If the sort order of the columns
within the index matches the sort order of those columns specified in the ORDER BY clause, SQL Server may be
able to avoid performing an internal sort, resulting in improved query performance.
■Tip If an index is only one column, SQL Server can read the index just as fast in a forward direction as it
can backward.
6. As indicated earlier when defining the tables, SQL Server generates the value of the CustomerId column to be
the next number in a sequence when a record is added, as this column uses the IDENTITY functionality. This
value can’t be altered within the table, as the option for creating your own identity values has not been switched
on, so taking these two items of information and putting them together, you should be able to deduce that this
value will be unique. Therefore, change the Is Unique option to Yes.
Dewson_958-7C06.fm Page 159 Thursday, July 3, 2008 1:56 PM
160
CHAPTER 6
■ CREATING INDEXES AND DATABASE DIAGRAMMING
7. The final part of creating the index is to look at the Create As Clustered option, which will be set to No (see Figure 6-3).
Although this key meets a number of criteria that would mean it was an ideal candidate for a clustered index,
such as a high degree of uniqueness and the ability to be used in a range within a query, it’s rare to access this
table initially by a customer ID. It’s more likely that this table will be accessed on the customer checking
account AccountNumber held in this table. Finally, the order of the records inserted into SQL Server won’t
change. And if you scroll down the screen, the Re-compute Statistics for This Index option should remain No.
■Note If this were a production environment or if you were creating a system in a development environment to
move to a production environment, then you would need to take a couple of other considerations into account. You
would need to alter the Filegroup or Partition scheme so that indexes were placed on a different file group, as we
discussed earlier. Another area to note is the Fill Factor. I will talk about this at the end of the exercise.
Figure 6-3. The clustering option in the Indexes/Keys dialog
8. Click Close and then close the table modification, answering Yes when you are asked if you wish to save the
changes. This will add the index to the database.
Building an index in Management Studio is a straightforward procedure, as you have just seen. Although this is the first
index that you have created yourself, it took only a few moments, and there were just a couple of areas where you had to
do any reasonable amount of decision making. We will cover those areas now.
Choosing the name of the index and the columns to include is easy and is not worth dwelling on. You should know which
columns to include from the discussions at the start of the chapter, where we examined the basics of building indexes.
The first major decision you need to make is determining whether a column carries unique values. The column chosen for
our first index is an identity column which, if you recall, is a column that cannot have data entered into it by any SQL command,
as the data entered in to this column is completed automatically by SQL Server itself. Also, in an identity column, by default no two
rows can have the same value. However, there is no automation to stop any attempt to create duplicate keys. Therefore, there
is still a need to inform SQL Server that the index will be unique.
Moving on to the Create As Clustered setting, the data in this table would be best held in CustomerId order. This is
because each record that is inserted will have a higher CustomerId number than the previous record. Therefore, each
time a record is added, it will be added to the end of the table, removing the need for a clustered index. As with the Is
Unique option, the Create As Clustered option doesn’t need to be selected.
Dewson_958-7C06.fm Page 160 Thursday, July 3, 2008 1:56 PM
CHAPTER 6 ■ CREATING INDEXES AND DATABASE DIAGRAMMING
161
Moving to Fill Factor, this tells SQL Server how much of a page should be filled with index data before SQL Server starts a
new page of data to continue with the index. In an index such as this, it would be better to make the fill factor a high per-
centage, such as 95, as there won’t be much movement in having to shuffle index entries, because the data will remain static.
Finally, the Re-compute Statistics option defines whether SQL Server automatically recomputes the statistics on the index
when data is modified.
Indexes and Statistics
When retrieving data, SQL Server obviously has to make some decisions as to the best way to get to
that data and return it to the query requesting it. Even if an index has been created on a set of columns,
SQL Server may determine that it is better and faster to use another method to retrieve the data—
through a table scan, perhaps. Or maybe there are a couple of indexes that could be chosen to retrieve
the same data. No matter what the scenario, SQL Server has to have some basis of information on
which to make sensible and accurate choices. This is where statistics come in.
SQL Server keeps statistics on each column contained within an index. These statistics are
updated over a period of time and over a number of inserts or modifications. The specifics of how all
of this works in the background, and how SQL Server keeps the statistics up to date, is an advanced
topic. What you need to know is that if you alter or build an index on a table that has data in it, and
you don’t let SQL Server update the statistics on the table, then SQL Server could be using inaccurate
information when it is trying to decide how to retrieve the data. It could even mean that the index
change you thought would improve performance has in fact made the performance much slower.
That said, it is not always prudent to let SQL Server recompute statistics automatically. SQL Server
will do the updates when it feels they are required. This may happen at a busy time of processing; you
have no control over when it will happen. However, if SQL Server does update the statistics, the
query that caused the update to start will not be impacted, as the statistics will be updated asynchro-
nously if the AUTO_UPDATE_STATISTICS_ASYNC option is switched on.
It may be more efficient to manually update the statistics via a scheduled job and keep all statistic
building off. This is what you quite often see within production environments that have a number of
inserts and modifications to the data.
The CREATE INDEX Syntax
Creating an index using T-SQL is a lot easier than creating a table. In this section, we’ll look only at
indexes on tables, although there is an object within SQL Server called a view that can also be indexed.
The full syntax for creating an index is not listed here, although you can find it within Books
Online once you progress in your SQL Server knowledge. A reduced version will be sufficient while
you are learning SQL Server 2008. Most of your indexes will use the following version:
CREATE [UNIQUE] [CLUSTERED|NONCLUSTERED]
INDEX index_name
ON table (column [ASC|DESC] [ , n ] )
[WITH {IGNORE_DUP_KEY|DROP_EXISTING|SORT_IN_TEMPDB}]
[ON filegroup ]
Let’s go through each point one by one so that the options in this cut-down version are clear:
• CREATE: Required. This keyword informs SQL Server that you will be building a new object.
• UNIQUE: Optional. If used, this option will inform SQL Server that the columns listed in the
index will bring back a single unique row. This is enforced by SQL Server when attempting to
insert a duplicate row, as an error message will be returned.
Dewson_958-7C06.fm Page 161 Thursday, July 3, 2008 1:56 PM
162
CHAPTER 6
■ CREATING INDEXES AND DATABASE DIAGRAMMING
• CLUSTERED or NONCLUSTERED: Optional. If neither CLUSTERED nor NONCLUSTERED is explicitly listed,
the index will be created as NONCLUSTERED.
• INDEX: Required. This informs SQL Server that the new object will be an index.
• index_name: Required. This is the name of the index being built. This name must be unique for
the table, and it is advisable to keep this name unique for the database, using the naming
method of IX_table_column discussed earlier.
• ON table: Required. This is the name of the table with which the index is associated. Only one
table can be named.
• column: Required. This is the name of the column(s) in the table that we wish to include in the
index. This is a comma-separated list.
• ASC: Optional (default). If neither ASC nor DESC is mentioned, then ASC is assumed. ASC informs
SQL Server that it should store the column named in ascending sequence.
• DESC: Optional. This informs SQL Server that the column is to be stored in descending order.
• WITH: Optional. It is, however, required if any of the following options have to be used:
• IGNORE_DUP_KEY: This option is only available when the index is defined as UNIQUE. If this
option has not been used earlier, then it is not available to you. I’ll explain this further in a
moment.
• DROP_EXISTING: This option is used if there is an existing index of the same name within the
database. It will then drop the index before re-creating it. This is useful for performance if
you are not actually changing any columns within the index. More on this in a moment.
• SORT_IN_TEMPDB: When building an index where there is already data within the table, it
may be advisable, if the table is a large table, to get the data sorted for the index within the
temporary database, tempdb, as mentioned in Chapter 3. Use this option if you have a large
table, or if tempdb is on a different hard disk from your database. This option may speed up
the building of the index, as SQL Server can simultaneously read from the disk device where
the table is located and write to the disk device where tempdb is located.
• ON: Optional. This option is, however, required if you are going to specify a file group. It is not
required if you wish the index to be built on the PRIMARY file group.
• filegroup: This is the name of the file group on which the index should be stored. At the moment,
there is only one file group set up: PRIMARY. PRIMARY is a reserved word and is required to be
surrounded by square brackets, [ ], if used.
Two options need further clarification: IGNORE_DUP_KEY and DROP_EXISTING. We’ll look at both in
the sections that follow.
IGNORE_DUP_KEY
If you have an index defined as UNIQUE, then no matter how hard you try, you cannot add a new row
whose values in the index columns match the values of any current row. However, there are two
actions that you can perform, depending on this setting within an index.
When performing multirow inserts, if the IGNORE_DUP_KEY option is specified, then no error will
be generated within SQL Server if some of the rows being inserted violate the unique index. Only a
warning message will be issued. The rows that violated the unique index are not inserted, although
all other rows are inserted successfully.
Dewson_958-7C06.fm Page 162 Thursday, July 3, 2008 1:56 PM
CHAPTER 6 ■ CREATING INDEXES AND DATABASE DIAGRAMMING
163
When performing multirow inserts, if the IGNORE_DUP_KEY option is omitted, then an error
message will be generated within SQL Server if some of the rows violate the unique index. The batch
will be rolled back, and no rows will be inserted into the table.
■Caution The system variable called @@ERROR can be tested after every SQL Server action to see if there has
been an error in any item of work or through another error-handling command called Try/Catch. If there has been
an error, some sort of error handling within the batch will usually be performed. If you have IGNORE_DUP_KEY, then
no error will be produced when there is an attempt to insert a duplicate row, and the batch will run as if everything
had been inserted. So, be warned: it may look like everything has worked, but in fact some rows were not inserted!
DROP_EXISTING
When data is being inserted and modified, there will be times when an index bloats to a less than
ideal state. Just as an Access database may need to be compacted, indexes within SQL Server also
need to be compacted sometimes. Compacting the index will speed up performance and reclaim
disk space by removing fragmentation of the index. To compact an index, you re-create the index
without actually modifying the columns or, in fact, starting from scratch and having to rebuild the
whole index and visit every row within the table.
The DROP_EXISTING clause provides enhanced performance when rebuilding a clustered index
compared to a DROP INDEX command followed by a CREATE INDEX command. Nonclustered indexes
will be rebuilt every time the clustered index for a table is rebuilt if the columns are included in the
clustered index. The name of the clustered index must also remain the same, as must the sort order
and the partition the index is built on. Finally, the uniqueness attribute must not change. So, if you
drop a clustered index and then re-create it, the existing nonclustered indexes will be rebuilt twice
(if they are to be rebuilt): once from the drop and once from the creation. Keep this in mind, as it is
crucial if you are working in a time-critical batch window. With the size of table and indexes created,
it may only be possible to re-create a clustered index on a weekend.
DROP_EXISTING also allows an existing index to be rebuilt by explicitly dropping and re-creating
the index. This is particularly useful for rebuilding primary key indexes. As other tables may refer-
ence a primary key, it may be necessary to drop all foreign keys in these other tables prior to dropping
the primary key. By specifying the DROP_EXISTING clause, SQL Server will rebuild the index without
affecting the primary key constraint.
Creating an Index in Query Editor: Template
Not surprisingly, there is a template within Query Editor that you can use as a basis for creating an
index. We’ll look at this process first, before we build an index natively in Query Editor, as this creates the
basis of the SQL syntax for the creation of the index.
Try It Out: Using a Query Editor Template to Build an Index
1. Ensure that Template Explorer is open (press Ctrl+Alt+T or select View ➤ Template Explorer). Navigate to the
Index node and expand it. Select the Create Index Basic node and double-click (see Figure 6-4).
Dewson_958-7C06.fm Page 163 Thursday, July 3, 2008 1:56 PM
164
CHAPTER 6
■ CREATING INDEXES AND DATABASE DIAGRAMMING
Figure 6-4. Selecting the Create Index Basic node
2. A new editor will open with the following code in it. The template that is installed is based on the AdventureWorks
example. As you saw in the previous chapter, you can create new templates or modify this one.
=============================================
Create index basic template
=============================================
USE <database_name, sysname, AdventureWorks>
GO
CREATE INDEX <index_name, sysname, ind_test>
ON <schema_name, sysname, Person>.<table_name, sysname, Address>
(
<column_name1, sysname, PostalCode>
)
GO
3. Alter the template by either changing the code or using the Specify Values for Template Parameters option, which
will make the index creating easier. The button should be on the SQL Editor toolbar (see Figure 6-5).
Figure 6-5. The Specify Values for Template Parameters button
4. Change the database to the example database, name the index (in this case, it has been named after the table),
set schema_name to CustomerDetails, table_name to CustomerProducts, and column_name1 to
CustomerId (see Figure 6-6). Then click OK.
5. The code now looks as follows:
USE ApressFinancial
GO
CREATE INDEX IX_CustomerProducts
ON CustomerDetails.CustomerProducts
(
CustomerId
)
GO
Dewson_958-7C06.fm Page 164 Thursday, July 3, 2008 1:56 PM
CHAPTER 6 ■ CREATING INDEXES AND DATABASE DIAGRAMMING
165
Figure 6-6. The Specify Values for Template Parameters dialog
6. Execute the code by pressing F5 or Ctrl+E, or clicking the Execute toolbar button. You should then see the
following success message:
Command(s) completed successfully.
7. Now that you’ve completed the process, you’ll want to check that the index has actually been created as expected.
From within Object Explorer, click the Refresh button on the Object Explorer toolbar or select the Refresh option
from the right-click context menu. Navigate to the CustomerDetails.CustomerProducts table and expand
the Indexes node. This provides you with instant, but limited, information about this index. You can see its name
and that it is neither unique nor clustered (see Figure 6-7).
Figure 6-7. Index for CustomerProducts
8. You can see a different perspective of the index if you highlight the index, right-click, and select Properties.
Figure 6-8 shows you a layout that offers not only a graphical version of the index, but also a list of many other
potential options.
Dewson_958-7C06.fm Page 165 Thursday, July 3, 2008 1:56 PM
166
CHAPTER 6
■ CREATING INDEXES AND DATABASE DIAGRAMMING
Figure 6-8. The Index Properties dialog
9. The most interesting tab to view once you have data within the table or once you are in production is the Frag-
mentation tab. As data is modified, indexes are also modified. Similar to a hard drive, an index will also suffer
from fragmentation of the data within the index. This will slow down your index, and, as mentioned earlier in this
chapter, it is important that you continue to check on your indexes to ensure their best possible speed and per-
formance. It is possible to correct the fragmentation while users are still using the system. You can do this by
ticking the Reorganize Index box shown at the bottom of Figure 6-9. For a slightly more detailed view, highlight
the index in Object Explorer, right-click to bring up the submenu, and select Reorganize.
The final way to create an index is by coding the whole index by hand in a Query Editor window, which we will look at in
the next section.
Dewson_958-7C06.fm Page 166 Thursday, July 3, 2008 1:56 PM
CHAPTER 6 ■ CREATING INDEXES AND DATABASE DIAGRAMMING
167
Figure 6-9. Examining index fragmentation
Creating an Index in Query Editor: SQL Code
In the following exercise, we will create two indexes and a primary key within a Query Editor pane.
This will allow us in the next section to build a foreign key between the two tables, TransactionDetails.
Transactions and TransactionDetails.TransactionTypes. The code will also demonstrate how to
build T-SQL defining options for the index presented during the CREATE INDEX syntax discussion earlier.
■Note The code discussion in the following exercise is broken out into three parts before the code execution, in
order to make it simpler to follow.
Dewson_958-7C06.fm Page 167 Thursday, July 3, 2008 1:56 PM
168
CHAPTER 6
■ CREATING INDEXES AND DATABASE DIAGRAMMING
Try It Out: Creating an Index with Query Editor
1. Enter the following code into an empty pane of Query Editor. The first index you will be creating in this section is
a uniquely clustered index on the TransactionDetails.TransactionTypes table.
USE ApressFinancial
GO
CREATE UNIQUE CLUSTERED INDEX IX_TransactionTypes
ON TransactionDetails.TransactionTypes
(
TransactionTypeId ASC )
WITH (STATISTICS_NORECOMPUTE = OFF, SORT_IN_TEMPDB = OFF,
DROP_EXISTING = OFF, IGNORE_DUP_KEY = OFF, ONLINE = OFF,
ALLOW_ROW_LOCKS = ON, ALLOW_PAGE_LOCKS = OFF)
ON [PRIMARY]
GO
2. The second index you’ll create is a nonclustered index on the TransactionDetails.Transactions table
based on the TransactionType column. You won’t make this index clustered, as it would be better to consider
either CustomerId or DateEntered as clustered columns.
CREATE NONCLUSTERED INDEX IX_Transactions_TType
ON TransactionDetails.Transactions
(
TransactionType ASC)
WITH (STATISTICS_NORECOMPUTE = OFF, SORT_IN_TEMPDB = OFF,
DROP_EXISTING = OFF, IGNORE_DUP_KEY = OFF, ONLINE = OFF,
ALLOW_ROW_LOCKS = ON, ALLOW_PAGE_LOCKS = OFF)
ON [PRIMARY]
GO
3. The final action is to add a primary key to the TransactionDetails.TransactionTypes table. You do this
through an ALTER TABLE statement:
ALTER TABLE TransactionDetails.TransactionTypes
ADD CONSTRAINT
PK_TransactionTypes PRIMARY KEY NONCLUSTERED
(
TransactionTypeId
)
WITH (STATISTICS_NORECOMPUTE = OFF, IGNORE_DUP_KEY = OFF,
ALLOW_ROW_LOCKS = ON, ALLOW_PAGE_LOCKS = ON)
ON [PRIMARY]
GO
4. You can now execute the preceding code by pressing F5 or Ctrl+E, or clicking the Execute toolbar button. You
should then see the following success message:
The command(s) completed successfully.
As noted, two different indexes are created in this example. The first one is a unique clustered index, based on the identity
column of the TransactionDetails.TransactionTypes table. This column was chosen because we will be linking
Dewson_958-7C06.fm Page 168 Thursday, July 3, 2008 1:56 PM
CHAPTER 6 ■ CREATING INDEXES AND DATABASE DIAGRAMMING
169
to this table using the TransactionType column. Rarely, if ever, will we link on any other column within this table. The
overhead is microscopic, though, due to the few records we will be entering, and it is therefore not really a concern. It also
allows us to see where to place the keyword within the example.
The second index, built on the TransactionDetails.Transactions table, cannot be a unique index; there will be
multiple entries of the same value because there are multiple transactions for the same type. However, it is still possible
to make this index clustered. Changing the transaction type on a transaction will be rare, or, if we had a full audit trail built
within our system, we may “ban” such an action. The only way to change a transaction type around this ban would be to
cancel the entry, record the cancel action, and create a new entry. However, a clustered index on transaction types will not
give us much of a gain in performance, as there will be few queries of data based on transaction type alone. As mentioned
earlier, there are better choices for clustering.
What is interesting about this example is that two indexes are created in one execution—albeit in two batch transactions—
whereas in the previous examples, only one index was created at a time. Notice the keyword GO between the two CREATE
statements creating the index; each index creation has to be completed on its own, without any other SQL statements
included. If you need to create more than one index, but you would prefer to build them at the same time, then this may
be the solution you need. (Please see Chapter 8 for details on transactions.)
An area we have not yet covered is what happens if you try to create an index twice using the same index name. The pre-
ceding indexes have already been created, but if you run the query again, SQL Server will produce error messages informing you
that the index already exists. You should see messages like the following:
Msg 1913, Level 16, State 1, Line 1
The operation failed because an index or statistics with name
'IX_TransactionTypes'
already exists on table 'TransactionDetails.TransactionTypes'.
Msg 1913, Level 16, State 1, Line 1
The operation failed because an index or statistics with name
'IX_Transactions_TType' already exists on table
'TransactionDetails.Transactions'.
Msg 1779, Level 16, State 0, Line 1
Table 'TransactionDetails.TransactionTypes' already has a primary key
defined on it.
Msg 1750, Level 16, State 0, Line 1
Could not create constraint. See previous errors.
Even if you alter the contents of the index and include different columns but still use the same name, it is not possible to
create another index with the same name as an existing one.
In the last part of the example, we altered the table so that we could add a primary key. There are different types of
CONSTRAINTS that can be defined for a table: column constraints are used for default values, as you saw in the previous
chapter, but constraints are also used for primary and foreign keys.
Once again, a couple of new areas were covered in this section, but you now have the informa-
tion you need to be able to create the most common indexes. Indexes need a lot less coding than
tables and can be created quickly and easily. However, if you are adding a new index to an existing
table that has a substantial amount of information, adding this new index could take a few minutes
to complete, depending on the scenario. It is possible to add indexes while the system is being used
and the table or clustered indexes are being updated. This is only available in SQL Server Enterprise
Edition, by specifying the index action with the REBUILD WITH (ONLINE = ON) option. Take care when
using this option. If anybody tries to access the relevant table while the index is being built, SQL Server
will not recognize the index until it has been built, and when working out the best way to access the
data, it will ignore this index.
Dewson_958-7C06.fm Page 169 Thursday, July 3, 2008 1:56 PM
170
CHAPTER 6
■ CREATING INDEXES AND DATABASE DIAGRAMMING
If you are creating the index after removing it for rebuilding statistics, for example, problems
may arise if you don’t use the ONLINE = ON option. With this option ON, SQL Server will allow access
to the table to add or modify data. However, if it is set to OFF, then all actions against the table will
have to wait until the index is re-created. This will mean that any part of your system that requires
access to the table that the index is being built on will pause while the index is being generated.
Therefore, if you are rebuilding an index with the database available, you have to decide which of the
two problems that may arise is acceptable.
Dropping an Index
There will be times when an index is redundant and should be removed (i.e., dropped) from a table.
Dropping an index is simply a case of executing the DROP INDEX statement, followed by the table
name and the index name. Keep in mind that for every index that exists, processing time is required
to keep that index up to date for every data modification. Therefore, when an index has been created
using the same columns, or when an index is no longer providing speedy data access and is therefore
being ignored by SQL Server, it should be dropped.
■Note If the index is used by a primary key or unique constraint, you cannot drop it directly. In this case, you must
use the DROP CONSTRAINT command. The removal of this constraint will also remove the index from the table.
Try It Out: Dropping an Index in Query Editor
1. If you want to drop the index created in the last section, all you need to do is execute the following code. This will
remove the index from SQL Server and also remove any statistics associated with it.
USE ApressFinancial
GO
DROP INDEX IX_TransactionTypes ON TransactionDetails.TransactionTypes
2. After execution, you should see that everything executed correctly:
Command(s) completed successfully.
3. Don’t forget to re-create the index by running the following code:
CREATE UNIQUE CLUSTERED INDEX IX_TransactionTypes
ON TransactionDetails.TransactionTypes
(
TransactionTypeId ASC
) WITH (STATISTICS_NORECOMPUTE = OFF, SORT_IN_TEMPDB = OFF,
DROP_EXISTING = OFF, IGNORE_DUP_KEY = OFF, ONLINE = OFF,
ALLOW_ROW_LOCKS = ON, ALLOW_PAGE_LOCKS = OFF)
ON [PRIMARY]
GO
In the next section, we’ll examine what’s needed to alter an index.
Dewson_958-7C06.fm Page 170 Thursday, July 3, 2008 1:56 PM
CHAPTER 6 ■ CREATING INDEXES AND DATABASE DIAGRAMMING
171
Altering an Index in Query Editor
Unlike with a table, it is not possible to use an ALTER command to change the columns contained in
an index. To do this, you first have to drop the index and then re-create it. The DROP command will
physically remove the index from the table; therefore, you should ensure that you know what the
contents of the index are before you drop the index, if you want to re-create a similar index.
■Note In Management Studio, you can add and remove columns from an index’s definition without dropping and
re-creating the index, as this is all done for you behind the scenes.
This next exercise demonstrates the steps you need to take to remove an index and then re-create
it. You’ll learn how to do all of this in two steps, rather than the expected three steps.
Try It Out: Altering an Index in Query Editor
1. First, you want to create an index to retrieve the price of a specific share at a set point in time. The following
index will do just that, as you are querying the data using the share ID and the date you want the price for (don’t
run this code):
USE ApressFinancial
GO
CREATE UNIQUE CLUSTERED INDEX IX_SharePrices
ON ShareDetails.SharePrices
(
ShareId ASC,
PriceDate ASC
) WITH (STATISTICS_NORECOMPUTE = OFF, SORT_IN_TEMPDB = OFF,
DROP_EXISTING = OFF, IGNORE_DUP_KEY = OFF, ONLINE = OFF,
ALLOW_ROW_LOCKS = ON, ALLOW_PAGE_LOCKS = OFF)
ON [PRIMARY]
GO
2. However, it would be better to have the PriceDate descending, so that the latest price is at the top, because
asking for this information is a query. By including this column, SQL Server would read only one row rather than
an increasing number as more prices were created. It would also be advantageous to include the Price itself to
avoid a second read to retrieve that column of information from the clustered index.
■Note Remember, clustered indexes hold the data, not pointers to the data. However, in this instance, without
the Price column, a second read would be performed.
CREATE UNIQUE CLUSTERED INDEX IX_SharePrices
ON ShareDetails.SharePrices
(
ShareId ASC,
PriceDate DESC,
Price
Dewson_958-7C06.fm Page 171 Thursday, July 3, 2008 1:56 PM
172
CHAPTER 6
■ CREATING INDEXES AND DATABASE DIAGRAMMING
) WITH (STATISTICS_NORECOMPUTE = OFF, SORT_IN_TEMPDB = OFF,
DROP_EXISTING = OFF, IGNORE_DUP_KEY = OFF, ONLINE = OFF,
ALLOW_ROW_LOCKS = ON, ALLOW_PAGE_LOCKS =
OFF, DROP_EXISTING = OFF) ON [PRIMARY]
■Note If you did accidentally run the first set of code, change to DROP_EXISTING = ON.
3. Now execute the code using your chosen method, and you should see the following results:
The command(s) completed successfully.
By using the DROP_EXISTING clause of the CREATE INDEX command, you can then perform the modification in one
execution rather than two. This will drop the index and re-create it.
■Note Take care when building indexes. It is possible to use the same columns in the same order more than
once, thus creating the same index twice, but under two different index names. This is a waste of time and will place
unnecessary overhead on SQL Server. However, when including key column(s) from a clustered index in a nonclus-
tered index, because the row pointer is actually the clustered index key, SQL is smart enough not to store the
information twice in the nonclustered index, and you can explicitly define the order of the clustered index keys as
they are used in the nonclustered index.
There are more indexes to build, but we’ll take a look at these later.
When an Index Does Not Exist
As the amount of data in your database expands, expansion may occur in areas that are unexpected.
The application originally built with your database could have extensions, so your original database
design and index decisions may not still be 100% correct. The underlying problem is that queries are
happening within your database against data for which a suitable index doesn’t exist.
When SQL Server accesses data, it uses its query optimizer to generate what is termed a query
plan. A query plan is a plan of actions that SQL Server uses to perform the query you have built against
the data. The query plan could consist of several steps that SQL Server performs to execute your
query and produce the results you require. You will see an overview of query plans when I discuss
advanced T-SQL in Chapter 12. When you look at a query plan, you’ll need to decide which is the best
index to use to perform the query filtration.
Diagramming the Database
Now that the database has been built, the tables have been created, the indexes have been inserted,
and relationships link some of the tables, it’s time to start documenting. To help with this, SQL
Server offers us the database diagram tool, which is the topic of this section.
Dewson_958-7C06.fm Page 172 Thursday, July 3, 2008 1:56 PM
CHAPTER 6 ■ CREATING INDEXES AND DATABASE DIAGRAMMING
173
One of the most tedious aspects of creating documentation is often the task of documenting
tables and showing how they relate to one another in a diagram. Done manually, such work is
tedious indeed, and the results are difficult to keep up to date. A database diagram tool, however, can
do the work very quickly and simply, with one caveat: if more than one person is using the database
diagram tool on the same database, and there are two sets of changes to be applied to the same table,
the person who saves his or her changes last will be the person who creates the final table layout. In
other words, the people who save before the last person will lose their changes. Therefore, I advise
that you develop a database solution using the diagramming tool only on single-developer applica-
tions. At all other times, use it as a tool for understanding the database.
As you developed tables within your database, hopefully you will have commented the columns and
tables as you have gone along to say what each column and table is. This is a major part of documentation
anyway, although a database-naming convention should make your solution self-documenting to an
extent. Provided that you comment columns and tables at the start, it will be less of a chore to add in
further comments when you add new columns. If you do have comments on each of your columns
within a table, then this will help overall with the documentation shown within the diagram.
This said, SQL Server’s database diagram feature is more than just a documentation aid. This
tool provides us with the ability to develop and maintain database solutions. It is perhaps not always
the quickest method of building a solution, but it is one that allows the entire solution to be completed
in one place. Alternatively, you can use it to build up sections of a database into separate diagrams,
breaking the whole solution into more manageable parts, rather than switching between nodes in
Management Studio.
Database Diagramming Basics
In the book so far, with the creation of databases, tables, indexes, and relationships, as much documen-
tation as SQL Server will allow should have so far been maintained. However, there is no documentation
demonstrating how the tables relate to one another within the database. This is where the database
diagram comes to the forefront.
A database diagram is a useful and easy tool to build simple but effective documentation on
these aspects. You build the diagram yourself, and you control what you want to see within the diagram.
When you get to a large database solution, you may want diagrams for sections of the database that
deal with specific aspects of the system, or perhaps you want to build a diagram showing information
about process flows. Although there are other external tools to do this, none is built into SQL Server
that can allow diagrams to be kept instantly up to date.
A diagram will only show tables, columns within those tables, and the relationships between
tables in a bare form. You will also see a yellow “key,” which denotes a primary key on the table where
one has been defined, but that is all the information displayed. It is possible to define the informa-
tion that is to be displayed about the columns in the table, whether it is just the column name or
more in-depth information, such as a column’s data type and length, comments, and so on. However, to
display more than just the bare essentials, a little bit of work is required.
Although the diagram shows the physical and logical attributes of the database that is being
built or has been built, it also allows developers and administrators to see exactly what is included
with the database at a glance and how the database fits together.
In the next section, we’ll delve a bit deeper into what the SQL Server database diagram is all about.
The SQL Server Database Diagram Tool
Management Studio’s database diagram tool aids in the building of diagrams that detail aspects of
the database that a developer wishes to see. Although it is a simple and straightforward tool, and it’s
not as powerful as some other tools on the market for building database diagrams, it is perfect for
SQL Server.
Dewson_958-7C06.fm Page 173 Thursday, July 3, 2008 1:56 PM
174
CHAPTER 6
■ CREATING INDEXES AND DATABASE DIAGRAMMING
For example, one of the market leaders in database design tools is a product called ERWin.
ERWin is a powerful database utility that not only builds diagrams of databases, but also provides
data dictionary language output, which can be used to build database solutions. Through links such
as OLE DB data providers, these tools can interact directly with databases and so can be used as a
front end for creating databases. They can also, at the same time, keep the created source in align-
ment and under control from a change control perspective, not only ensuring that the code exists
within the database, but also issuing a command to create a new database quickly, if necessary. An
example of where this might be useful is when you’re creating a new test database. If you want to go
further than the SQL Server database diagram tool provides (you’ll learn about the tool’s boundaries
in this chapter), then you should be looking at more powerful tools, which can cost a great deal of money.
SQL Server’s database diagram utility offers more than just the ability to create diagrams. As
mentioned earlier, it can also be used as a front end for building database solutions. Through this
utility, SQL Server allows you to add and modify tables, build relationships, add indexes, and do
much more. Any changes built in the tool are held in memory until they are committed using a save
command within the tool. However, there are limitations to its overall usefulness.
First of all, the biggest restriction of any diagram-based database tool comes down to the amount
of screen space available to view the diagram. As soon as your database solution consists of more
than a handful of tables, you will find yourself scrolling around the diagram, trying to find the table
you are looking for.
Second, you cannot add stored procedures, schemas, users, views, or any object that is not a table.
Other products allow you to include these objects, or they may even build some of them for you.
Finally, for the moment, when altering any of the information you can change within this tool,
you are usually using the same dialogs and screens as you would in Management Studio.
As you will see as you go through the chapter, the database diagram tool is quite powerful in
what it can achieve, but there are some areas of concern that you have to be aware of when working
with diagrams. Keep in mind that the database diagram tool is holding all the changes in memory
until you actually save the diagram.
For example, if you have a database diagram open, and a table within that diagram is deleted
outside of the diagram, perhaps in Query Editor or Management Studio by yourself or another valid
user ID, then one of two things can happen. First, if you have unsaved changes to the deleted table,
saving your diagram will re-create the table, but don’t forget that through the earlier deletion, all the
data will be removed. If, however, you have no changes pending to that table, then the table will not
be re-created. When you come to reopen the diagram, the table will have been removed.
With several developers working on the database at once, any changes made from the diagram-
ming tool of your Management Studio will not be reflected in any other developer’s diagram until his
changes are saved and his diagrams are refreshed. If you have multiple diagrams open, and you alter
a table and insert or remove a column, then this will reflect immediately in all the open diagrams
within your own Management Studio only. Don’t forget this is an in-memory process, so this process
can’t reflect on anyone else’s diagrams until the changes are saved and the diagrams are refreshed.
Also, if you remove an object in your diagram, when you then save the diagram, the object will
be removed and any changes completed by others will be lost. Effectively, the last person who closes
his or her diagram wins!
To summarize, if you use the database diagram tool, use it with care. Because many of the processes
are in memory, you could inadvertently cause problems.
Dewson_958-7C06.fm Page 174 Thursday, July 3, 2008 1:56 PM
CHAPTER 6 ■ CREATING INDEXES AND DATABASE DIAGRAMMING
175
The Default Database Diagram
Although it’s not mandatory, I do feel every SQL Server database solution should have a default data-
base diagram built into it so that any developer—new or experienced—can instantly see how the
database being inspected fits together.
A default database diagram should include every table and every relationship that is held for
that database. Unlike other diagrams that may take a more sectionalized view of things, the default
database diagram should be all-encompassing.
As mentioned earlier, it is imperative that you keep this diagram up to date. You will notice this
statement repeated a few times in this chapter. Don’t use the default diagram as the source of devel-
opment for your database solution. The default diagram includes all the tables, which means that if
you’re using the database diagram tool for development, you are potentially logically locking out all
other users from touching any other table as part of their development, in case their changes are lost.
Only update the diagram with tables and relationships once they have been inserted in the database.
We’ll look at this in more detail later when we discuss the dangers of using the database diagram tool
as a source of development.
Now that you know what diagrams are and what the tool is, it’s time to create the first diagram
for this database.
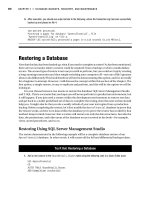
Try It Out: Creating a Database Diagram
1. Ensure that SQL Server Management Studio is running and that the ApressFinancial database is expanded
so that you see the Database Diagrams and Tables nodes. Select the Database Diagrams node and then right-
click. Choose Install Diagram support (see Figure 6-10).
Figure 6-10. Creating a new database diagram
2. If this is the first diagram you are creating for the database, you’ll need to install support objects. Without them,
you cannot create the diagram, so click Yes at the next dialog prompt (see Figure 6-11).
Figure 6-11. Installing diagramming support
3. The first screen you’ll see when creating the diagram is the Add Table dialog (see Figure 6-12). Select all of the
tables listed, as you want to use all the tables in your diagram, and then click Add. This will “empty” the screen.
Click Close.
Dewson_958-7C06.fm Page 175 Thursday, July 3, 2008 1:56 PM
176
CHAPTER 6
■ CREATING INDEXES AND DATABASE DIAGRAMMING
Figure 6-12. Selecting tables
4. After a few moments, you will be returned to Management Studio, but with the database diagram now built. The
diagram will not show all the tables at this point and will be very large. You can reduce the size through the Size
combo box in the diagramming toolbar, as shown in Figure 6-13.
Figure 6-13. The Size combo box
5. You’ll then see a diagram similar to that shown in Figure 6-14. (Don’t be surprised if the layout is different, though.)
Figure 6-14. Tables with relationships built so far
That’s all there is to building a basic diagram.
Dewson_958-7C06.fm Page 176 Thursday, July 3, 2008 1:56 PM
CHAPTER 6 ■ CREATING INDEXES AND DATABASE DIAGRAMMING
177
The Database Diagram Toolbar
Let’s next take a look at the toolbar and how each of the buttons works within the diagram. The
whole toolbar is shown in Figure 6-15.
Figure 6-15. Database diagram toolbar
The first button is the New Table button, as shown in the following image. You click this button to
create a new table within the database designer, which is a similar process to that shown in Chapter 5.
The difference is that you need to use the Properties window for each column rather than have the
properties at the bottom of the table designer.
When building the diagram, you selected every table. If you hadn’t done so and you wanted to
add a table added since you created the diagram, clicking the Add Table button (see the following
image) would bring up the Add Table dialog shown earlier to add in any missing tables.
The Add Related Tables button, shown next, adds tables related to the selected table in the designer.
It is also possible to delete a table from a database from the designer using the following button.
If you just wish to remove the database from the diagram rather than the database, then you can
use the next button to accomplish this. You would use this button, for example, if a table no longer
formed part of the “view” the database diagram was built for.
Any changes made to the database within the designer can be saved as a script. Use the following
Generate Change Script button to accomplish this.
Dewson_958-7C06.fm Page 177 Thursday, July 3, 2008 1:56 PM
178
CHAPTER 6
■ CREATING INDEXES AND DATABASE DIAGRAMMING
If you wish to set a column to be the primary key, select the relevant column within a table and
click the Set Primary Key button (shown next).
It is possible to create a place within the diagram to put ad hoc text. Use the following New Text
Annotation button to do this.
Each table displayed is set to a standard layout. It is possible to change this to a different
predefined layout or to create your own custom view. The following Table View button enables you
to change the layout or create your own custom version.
Relationships that exist between tables will, by default, show as a line. However, it is possible to
show the name of the relationship as a label by clicking the following button.
Diagrams are ideal methods of documenting the database. Diagrams can be printed for meet-
ings, discussions about future development, and so on. The following button shows the page breaks
in pages that will be printed.
Page breaks in diagrams remain as they were first set up until they are recalculated. You are able
to view the page breaks, arrange your tables accordingly, and then recalculate the page breaks based
on the new layout. Clicking the following button will do this recalculation for you.
Dewson_958-7C06.fm Page 178 Thursday, July 3, 2008 1:56 PM
CHAPTER 6 ■ CREATING INDEXES AND DATABASE DIAGRAMMING
179
Tables can be expanded or shrunk manually, but when you select one or more tables using the
Ctrl button, click the relevant tables, and then click the following button, you can resize the tables to
a uniform size.
It is possible, by clicking the following button, to rearrange tables that have been selected and
let SQL Server make the arrangement choices.
It is possible to rearrange the tables shown in the diagram. SQL Server will do its best to get the
best layout for the tables and relationships when you click the following button. This button is only
enabled when tables are selected.
In Chapter 5, you saw how to build a relationship between two tables. The button you use to do
this appears next. This button brings up the same dialog as you saw in that chapter. This button is
the same as the previous button, but is available all the time.
You have already come across the remaining buttons in the previous chapter.
Summary
We’ve covered yet another major building block in creating a SQL Server solution. The last few chap-
ters have shown you how to store data, and in this chapter, you’ve learned about indexes and how to
use them to quickly and efficiently retrieve the data stored in the table.
There are many types of indexes, and choosing the right one at the right time to complete the
right job is quite an art. This chapter has taken you through the steps to decide which columns will
make an efficient index, and then build those columns in the right type of index to make the most of
the information.
This chapter also covered database diagramming. Database diagrams should initially be thought of
as a form of documentation. Keep in mind, though, that the database diagram tool may expand in
future versions of SQL Server to become much more sophisticated and powerful than it is now—
although even now it is quite a powerful utility.
■Tip Remember, those who save last, save the changes.
Don’t be caught off guard by the fact that changes in the diagram are not applied until the
diagram is saved, and that your changes could overwrite another’s changes. If you’re using the data-
base diagram tool for development in any sort of multiuser environment, take the greatest of care
when completing updates (in fact, try to avoid them altogether). Unless you split your database solu-
tion into multiple diagrams, with any table being found in at most one diagram, don’t use the
database designer as a development tool.
Dewson_958-7C06.fm Page 179 Thursday, July 3, 2008 1:56 PM