adobe InDesign CS5 Bible for dummies PHẦN 3 ppsx
Bạn đang xem bản rút gọn của tài liệu. Xem và tải ngay bản đầy đủ của tài liệu tại đây (1.13 MB, 46 trang )
71
Chapter 4: Discovering How Pages and Layers Work
and placement of all the objects in a document is an ugly chore — one you
want to avoid at all costs. However, should the unthinkable happen — you
have to modify the size, orientation, or margins of a document that is par-
tially or completely finished — InDesign can automatically resize and reposi-
tion objects when you change its basic layout.
For example, maybe you created a magazine for an American audience that
subsequently needs to be converted for publication in Europe. Most news-
letters in the United States use letter-sized pages (8
1
⁄2 × 11 inches), while in
Europe the standard page size for such publications is A4 (210 × 297 mm),
which is slightly narrower and slightly taller than U.S. letter size. Of course,
you have to change color to colour, apartment to flat, and so on, but you also
have to both squeeze (horizontally) and stretch (vertically) every item on
every page to accommodate the A4 page’s dimensions.
Using the Layout Adjustment command
The Layout Adjustment command (Layout➪Layout Adjustment) gives you
the option of turning this chore over to InDesign, which automatically adjusts
object shape and position according to the new page size, column guides,
and margins.
The Layout Adjustment dialog box lets you turn layout adjustment on or off
and specify the rules used to adjust objects when you change page size or
orientation, margins, or columns. To adjust a layout, follow these steps:
1. Choose Layout➪Layout Adjustment to display the Layout Adjustment
dialog box.
2. Select the Enable Layout Adjustment option to turn on the feature;
deselect it to turn it off.
3. In the Snap Zone field, type the distance within which an object edge
will automatically snap to a guideline when layout adjustment is
performed.
4. Select the Allow Graphics and Groups to Resize option if you want
InDesign to resize objects when layout adjustment is performed.
If you don’t select this option, InDesign will move objects but not resize
them (the preferred option, so you don’t get awkward sizes).
5. Select the Allow Ruler Guides to Move option if you want InDesign to
adjust the position of ruler guides proportionally according to a new
page size.
Generally, ruler guides are placed relative to the margins and page
edges, so you probably want to select this option.
09_614495-ch04.indd 7109_614495-ch04.indd 71 4/2/10 1:25 PM4/2/10 1:25 PM
72
Part II: Document Essentials
6. Select the Ignore Ruler Guide Alignments option if you want InDesign
to ignore ruler guides when adjusting the position of objects during
layout adjustment.
If you think that objects might snap to ruler guides that you don’t want
them to snap to during layout adjustment, select this option. If selected,
InDesign will still snap object edges to other margin and column guides.
7. Select the Ignore Object and Layer Locks option to let InDesign move
locked objects (either objects locked directly via Object➪Lock [Ô+L or
Ctrl+L] or objects that reside on a locked layer).
Otherwise, locked objects aren’t adjusted.
8. When you’re done, click OK to close the dialog box.
The Layout Adjustment feature works best when you don’t have much work
for it to do. Otherwise, it usually creates more work than it saves. For exam-
ple, the switch from a U.S. letter-sized page to an A4-sized page is a relatively
minor change, and the layout adjustments will probably be barely noticeable.
But if you decide to change a tabloid-sized poster into a business card in mid-
stream, well, you’re probably better off starting over.
Here are a few things to keep in mind if you decide to use InDesign’s Layout
Adjustment feature:
✓ If you change page size, the margin widths (the distance between the left
and right margins and the page edges) remain the same.
✓ If you change page size, column guides and ruler guides are repositioned
proportionally to the new size.
✓ If you change the number of columns, column guides are added or
removed accordingly.
✓ If an object edge is aligned with a guideline before layout adjustment, it
remains aligned with the guideline after adjustment. If two or more edges
of an object are aligned with guidelines, the object is resized so that the
edges remain aligned with the guidelines after layout adjustment.
✓ If you change the page size, objects are moved so that they’re in the
same relative position on the new page.
✓ If you used margin, column, and ruler guides to place objects on pages,
layout adjustment will be more effective than if you placed objects or
ruler guides randomly on pages.
✓ Check for text reflow when you modify a document’s page size, margins,
or column guides. Decreasing a document’s page size can cause text to
overflow a text frame whose dimensions have been reduced.
09_614495-ch04.indd 7209_614495-ch04.indd 72 4/2/10 1:25 PM4/2/10 1:25 PM
73
Chapter 4: Discovering How Pages and Layers Work
✓ Check everything in your document after the adjustment is complete. Take
the time to look over every page of your document. You never know what
InDesign has actually done until you see it with your own eyes.
If you decide to enable layout adjustment for a particular publication, you may
want to begin by using the Save As command (File➪Save As [Shift+Ô+S or
Ctrl+Shift+S]) to create a copy. That way, if you ever need to revert back to the
original version, you can simply open the original document.
Using the Page tool
You can quickly make several adjustments to pages using the Pages tool. When
selected, the Control panel changes to offer the tools shown in Figure 4-5.
These tools are available elsewhere in InDesign — typically in the Layout menu
or the Pages panel — so their availability in the Control panel is really just a
convenience.
With the Page tool selected, select one or more pages in your document or in
the Pages panel, and then choose an option from the Control panel:
✓ Change the Y coordinate to move the selected pages up or down relative
to the others in the spread. You might do this to align a half-height page
to the bottom of the adjacent page rather than to the top or middle, for
example.
You can also drag a page up or down using the mouse to change its Y
coordinate. If multiple pages are selected, dragging the mouse moves
only the first selected page.
✓ Change the page size by selecting a different size from the unnamed
pop-up menu at center (the current page size is shown).
✓ Change the page orientation by clicking the Landscape or Portrait iconic
button (the current orientation’s button will be highlighted).
When using these Control panel adjustments, you can also control how the
pages’ objects are handled as the pages are adjusted:
✓ If selected, the Enable Layout Adjustment option moves and resizes
objects to the new page size and/or orientation, as explained in the
“Adjusting Page Layouts and Objects” section, earlier in this chapter.
✓ If selected, the Show Master Page Overlay option displays the master page
over the adjusted pages so you can see the differences between them.
✓ If selected, the Objects Move with Page option moves the pages’ objects
if you adjust the page’s Y coordinate.
09_614495-ch04.indd 7309_614495-ch04.indd 73 4/2/10 1:25 PM4/2/10 1:25 PM
74
Part II: Document Essentials
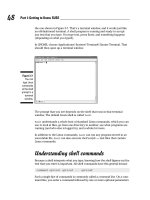
Figure 4-5:
The Control
panel when
the Page
tool is
selected,
and a docu-
ment whose
second
page is
repositioned.
Using Layers
If you’ve ever seen a series of clear plastic overlays in presentations, under-
standing layers is easy. In one of those old overhead presentations, the
teacher may choose to start with one overlay containing a graphic, add
another overlay with descriptive text, and then add a third overlay con-
taining a chart. Each overlay contained distinct content, but you could see
through each one to the others to get the entire message. InDesign’s layers
are somewhat like these overlays, letting you isolate content on slices of a
document. You can then show and hide layers, lock objects on layers, rear-
range layers, and more.
You can use layers in the following situations (and in many others):
✓ A project with a high-resolution background image: For example, a
background such as a texture may take a long time to redraw. You can
hide that layer while designing other elements, and then show it occa-
sionally to see how it works with the rest of the design.
✓ A document that you produce in several versions: For example, a pro-
duce ad may have different prices for different cities, or a clothing cata-
log may feature different coats depending on the climate in each area.
You can place the content that changes on separate layers, and then
print the layers you need.
✓ A project that includes objects you don’t want to print: If you want to
suppress printout of objects for any reason, the only way you can do
it is to place them on a layer and hide the layer. You can have a layer
that’s used for nothing but adding editorial and design comments, which
can be deleted when the document is final. (Even though InDesign sup-
ports nonprinting notes, they can be inserted only into text, so having a
design-comments layer is still useful to be able to make annotations for
frames, images, and other nontextual elements.)
09_614495-ch04.indd 7409_614495-ch04.indd 74 4/2/10 1:25 PM4/2/10 1:25 PM
75
Chapter 4: Discovering How Pages and Layers Work
✓ A publication that is translated into several languages: Depending on
the layout, you can place all the common objects on one layer and then
create a different layer for each language’s text. Changes to the common
objects need to happen only once — unlike creating copies of the origi-
nal document and flowing the translated text into the copies, which
you’d need to do for each language’s version.
✓ To ensure folios and the like are never overprinted: By placing stan-
dard elements, such as folios (the document’s page numbers, running
headings, and so on), on their own layer, they’re uppermost in the layer
stack. This order ensures that they’re never accidentally obscured by
other objects.
✓ To help text print properly over transparent elements: Layers are also
useful to isolate text above other objects with transparency effects. This
isolation avoids text rasterizing (conversion to a bitmapped graphic)
during output to plate or film — something that can make the text qual-
ity look poor.
Layer basics
Each document contains a default layer, Layer 1, which contains all your
objects until you create and select a new layer. Objects on the default
layer — and any other layer for that matter — follow the standard stacking
order of InDesign. (What’s the stacking order? Well, the first object you create
is the backmost, the last one you create is the frontmost, and all the other
objects fall somewhere in between. This order is how InDesign knows what to
do with overlapping objects.)
Like the clear plastic overlays, the order of the layers also affects the stacking
order of the objects. Objects on the bottom layer are behind other objects,
and objects on the top layer are in front of other objects. For example, for a
business card, the Default layer would contain the business card’s standard
graphics and the main text. An additional layer would contain a different set of
contact information — in separate text frames — for a different person. Each
new person would have his information on his own new layer. Each layer has
its own color, and frames will display in that color if frame edges are visible.
(Choose View➪Extras➪Show Frame Edges [Control+Ô+H or Ctrl+H.])
Although people often compare layers to plastic overlays, one big difference
exists: Layers aren’t specific to individual pages. Each layer encompasses the
entire document, which doesn’t make much difference when you’re working
on a one-page ad but makes a significant difference when it comes to a 16-page
newsletter. When you create layers and place objects on them, you must con-
sider all the pages in the document.
The Layers panel (choose Window➪Layers [F7]) is your gateway to creating
and manipulating layers (see Figure 4-6).
09_614495-ch04.indd 7509_614495-ch04.indd 75 4/2/10 1:25 PM4/2/10 1:25 PM
76
Part II: Document Essentials
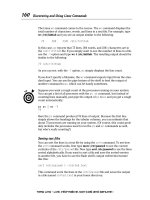
Figure 4-6:
The Layers
panel and
its flyout
menu.
Object icon
(indicates the
selected object)
Delete Selected Layers
Layer icon (indicates the layer the object is on)
Create New Layer
Pen icon (indicates the active layer)
Eye icon (indicates visible layers and objects)
Lock icon (indicates locked layers and objects)
Working with layers
Each document contains a default layer, Layer 1, that contains all the objects
you place on master pages and document pages. You can create as many
layers as you need. After you create a new layer, it’s activated automatically
so that you can begin working on it.
Creating a layer
The Layers panel (choose Window➪Layers [F7]) provides several methods
for creating new layers. It doesn’t matter which document page is displayed
when you create a layer because the layer encompasses all the pages in the
document. To create a layer, do one of the following:
✓ To create a new layer on top of all existing layers, click the New Layer
button on the Layers panel to open the New Layer dialog box. The layer
receives the default name of Layer x.
09_614495-ch04.indd 7609_614495-ch04.indd 76 4/2/10 1:25 PM4/2/10 1:25 PM
77
Chapter 4: Discovering How Pages and Layers Work
✓ To create a layer above the selected layer, Ô+click or Ctrl+click the
New Layer button. The layer receives the default name of Layer x.
✓ To create a new layer on top of all existing layers but customize its
name and identifying color, Option+click or Alt+click the New Layer
iconic button, or choose New Layer from the Layers panel’s flyout menu.
Use the New Layer dialog box to specify options for the layer.
Customizing layers
You can customize the name, identifying color, guides, and lock status of
objects on a new or existing layer. If you choose to customize the layer
when you create it (by Option+clicking or Alt+clicking the New Layer iconic
button or by choosing New Layer from the Layers panel’s flyout menu), the
New Layer dialog box appears. If you choose to customize an existing layer,
double-click it to display the Layer Options dialog box. (You can also choose
Layer Options for Layer Name from the flyout menu on the Layers panel.)
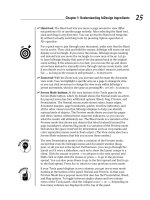
Whether you’re using the New Layer dialog box shown in Figure 4-7 or the
nearly identical Layer Options dialog box, the options all work the same:
✓ Name field: Type a descriptive name for the layer. For example, if you’re
using layers for multilingual publishing, you might have a United States
English layer, a French layer, and a German layer. If you’re using layers
to hide background objects while you’re working, you might have a
Background Objects layer.
✓ Color pop-up menu: Choose a color from the menu. A layer’s color helps
you identify which layer an object is on. The color appears to the left of
the layer name in the Layers panel and appears on each object on that
layer. The color is applied to frame edges, selection handles, bounding
boxes, text ports, and text wraps. By default, InDesign applies a different
color to each new layer, but you can customize it to something meaning-
ful for your document and workflow.
✓ Show Layer check box: Selected by default, this control lets you specify
whether objects on a layer display on-screen. Hidden layers also don’t
print. The Show Layer option has the same effect as clicking the eye icon
on the Layers panel.
✓ Lock Layer check box: Deselected by default, this option lets you con-
trol whether objects on a layer can be edited. You can lock a layer that
contains boilerplate text or a complex drawing that you don’t want
altered. Locking and unlocking layers is easy, so you can lock one layer
while focusing on another and then unlock it. Select Lock Layer if you
don’t want to be able to select items and modify them. For example, in
09_614495-ch04.indd 7709_614495-ch04.indd 77 4/2/10 1:25 PM4/2/10 1:25 PM
78
Part II: Document Essentials
a document containing multiple versions of text on different layers, you
can lock the layer containing background images and other objects that
stay the same. The Lock Layer option has the same effect as clicking the
lock icon on the Layers panel. The Layers panel’s flyout menu contains
additional locking options to, for example, unlock all layers and lock all
layers except the active one.
When you lock an object to a page (by choosing Object➪Lock [Ô+L or
Ctrl+L]), the object’s position stays locked regardless of its layer’s lock
status.
✓ Print Layer check box: Selected by default, this option lets you control
whether the layer prints or exports to PDF. You can use this option for a
layer containing design comments, for example. (In previous versions of
InDesign, deselecting Show Layer also prevented the layer from printing.
That remains true, but now you can control whether unhidden layers
print or not as well.) You can also override whether nonprinting layers
print in the Print dialog box, as explained in Chapter 22.
✓ Suppress Text Wrap When Layer Is Hidden check box: Deselected by
default, this option prevents text wrapping around the layer’s objects
when the layer is hidden. Be sure to select this option when you use
multiple layers for variations of the same content, such as multilingual
text or different contacts for business cards. Otherwise, your layer’s text
can’t display because it’s wrapping around a hidden layer with an object
of the same size in the same place.
✓ Show Guides check box: This check box lets you control the display
of guides that were created while the selected layer was active. When
selected, as it is by default, you can create guides while any layer is
active and view those guides on any layer. When deselected, you can’t
create guides. Any guides you create while that layer is active aren’t
displayed, but you can still see guides that you created while other
layers were active. Note that when guides are hidden entirely (choose
View➪Grids & Guides➪Hide Guides or Ô+; [semicolon] or Ctrl+; [semi-
colon]), this command has no apparent effect.
✓ Lock Guides check box: This option works similarly to Show Guides in
that it affects only the guides that you created while the layer is active.
When deselected, as it is by default, you can move guides on any layer
for which Lock Guides is deselected. When selected, you can’t move
guides created while that layer was active. You can, however, move
guides on other layers for which Lock Guides is deselected. Note that
when all guides are locked (choose View➪Grids & Guides➪Lock Guides
or Option+Ô+; [semicolon] or press Ctrl+Alt+; [semicolon]), this com-
mand has no apparent effect.
09_614495-ch04.indd 7809_614495-ch04.indd 78 4/2/10 1:25 PM4/2/10 1:25 PM
79
Chapter 4: Discovering How Pages and Layers Work
You can select multiple layers and customize them all at once. However,
because each layer must have a different name, the Name field isn’t available
in the Layer Options dialog box when multiple layers are selected.
Working with objects on layers
Whether you’re designing a magazine template from the ground up or modi-
fying an existing ad, you can isolate specific types of objects on layers. You
can create objects on a layer, move objects to a layer, or copy objects to a
layer.
The active layer is the one on which you’re creating objects — whether
you’re using tools, importing text or graphics, clicking and dragging objects
in from a library, or pasting objects from other layers or other documents. A
pen icon to the right of a layer’s name means it’s the active layer. Although
more than one layer can be selected at a time, only one can be active. To
switch the active layer to another layer, click to the right of the layer name
that you want to be active; the pen icon moves, making that the new active
layer. Keep in mind that to activate a layer, it must be visible.
InDesign CS5’s Layers panel now works like Illustrator’s and Photoshop’s: You
can hide and reveal the objects on each layer, as well as hide and reveal the
individual objects within a group on each layer. Thus, you can also lock indi-
vidual items and rearrange the stacking order of objects within a layer (see
Chapter 10).
To see the objects (including groups) in a layer, or the objects within a
group, click the reveal control (the right-facing triangle icon to the left of the
layer name). It turns into the hide control (the down-pointing triangle icon),
which if clicked hides the layer’s or group’s objects and turns back into the
reveal control.
You can change the default names assigned to groups and objects by clicking
the name in the Layers panel, waiting for a second, clicking it again, and then
entering your preferred name.
Selecting objects on layers
Regardless of the active layer, you can select, move, and modify objects on
any visible, unlocked layer. You can even select objects on different layers
and manipulate them.
The Layers panel (choose Window➪Layers [F7]) helps you work with
selected objects in the following ways:
09_614495-ch04.indd 7909_614495-ch04.indd 79 4/2/10 1:25 PM4/2/10 1:25 PM
80
Part II: Document Essentials
✓ To determine which layer an object belongs to, match the color on its
bounding box to the color that appears to the left of a layer name.
✓ To determine which layers contain active objects, look to the right of
the layer names. A small square — the layer icon — to the right of a
layer name indicates that you have selected an object on that layer.
Another small square — the object icon — to the right of an object name
indicates that you have selected that specific object.
✓ To select all the objects on a layer, Option+click or Alt+click the layer’s
name in the Layers panel. The layer must be active, unlocked, and vis-
ible. (Likewise, Option+click or Alt+click an object within a group to
select all the objects in that group.)
To select master-page objects as well as document-page objects on a layer,
you need to Option+Shift+click or Alt+Shift+click the layer name.
Placing objects on layers
To place objects on a layer, the layer must be active as indicated by the pen
icon. Anything you copy, import, or create in InDesign goes on the active
layer.
When you create objects on master pages, they’re placed on the default layer
and are therefore behind other objects on document pages. To create objects
on master pages that are in front of other objects, place the objects on a dif-
ferent layer while the master page is displayed.
You can cut and paste objects from one page to another, but have the objects
remain on their original layer — without concern about the active layer.
To do so, be sure the Paste Remembers Layers check box is selected in the
Layers panel’s flyout menu before choosing Edit➪Paste (Ô+V or Ctrl+V).
Moving objects to different layers
When an object is on a layer, it isn’t stuck there. You can copy and paste
objects to selected layers, or you can move them by using the Layers panel.
When you move an object to a layer, it’s placed in front of all other objects
on a layer. To select multiple objects, remember to Shift+click them and then
move them in one of the following ways:
✓ Paste objects on a different layer. First cut or copy objects to the
Clipboard. Activate the layer on which you want to put the objects and
then use the Paste command (by choosing Edit➪Paste [Ô+V or Ctrl+V]).
This method works well for moving objects that are currently on a vari-
ety of layers.
09_614495-ch04.indd 8009_614495-ch04.indd 80 4/2/10 1:25 PM4/2/10 1:25 PM
81
Chapter 4: Discovering How Pages and Layers Work
✓ Move objects to a different layer. Click and drag the object icon for the
selected objects (to the right of a layer’s name) to another layer. When
you use this method, it doesn’t matter which layer is active. However,
you can’t move objects from several different layers to the same layer
using this method. (If you select multiple objects that reside on differ-
ent layers, dragging the box moves only objects that reside on the first
layer on which you selected an object.) Also, you can’t move individual
objects within a group to another layer; you have to move the group
instead.
✓ Move objects to a hidden or locked layer. Press Ô or Ctrl while you
click and drag the selected objects’ object icon.
✓ Copy rather than move objects to a different layer. Press Option or Alt
while you click and drag the selected objects’ object icon.
✓ Copy objects to a hidden or locked layer. Press Option+Ô or Ctrl+Alt
while you drag the selected objects’ object icon.
Manipulating entire layers
In addition to working on objects and their layer positions, you can also
select and manipulate entire layers. These changes affect all the objects on
the layer — for example, if you hide a layer, all its objects are hidden; if you
move a layer up, all its objects appear in front of objects on lower layers.
Functions that affect an entire layer include hiding, locking, rearranging,
merging, and deleting. You work on entire layers in the Layers panel.
The active layer containing the pen icon is always selected. You can extend
the selection to include other layers the same way you multiple-select objects:
Shift+click for a continuous selection and Ô+click or Ctrl+click for a noncon-
tiguous selection.
When working with the Layers panel, InDesign CS5 gives you much richer con-
trol when manipulating layers than the groups and objects within them. In the
Layers panel, you can simply hide/unhide, lock/unlock, and change the stack-
ing order for objects, as well as move objects to other layers.
Rearranging layers
Each layer has its own front-to-back stacking order, with the first object you
create on the layer being its backmost object. You can modify the stacking
order of objects on a single layer by using the Arrange commands on the
Object menu. (New to InDesign CS5, you can also drag the objects within and
among layers in the Layers panel.) Objects are further stacked according to
the order in which the layers are listed in the Layers panel. The layer at the
09_614495-ch04.indd 8109_614495-ch04.indd 81 4/2/10 1:25 PM4/2/10 1:25 PM
82
Part II: Document Essentials
top of the list contains the front-most objects, and the layer at the bottom of
the list contains the back-most objects.
If you find that all the objects on one layer need to be in front of all the
objects on another layer, you can move that layer up or down in the list. In
fact, you can move all currently selected layers up or down, even if the selec-
tion is noncontiguous. To move layers, click the selection and drag it up or
down. When you move layers, remember that layers are document-wide, so
you’re actually changing the stacking order of objects on all the pages.
Combining layers
When you’re just discovering the power of layers, you can create a document
that is unnecessarily complex (for example, you may have put each object on
a different layer and realized that the document has become too difficult to
work with). The good news is that you can also merge all the layers in a docu-
ment to flatten it to a single layer. To flatten all layers, follow these steps:
1. Select the target layer (the layer where you want all the objects to
end up) by clicking it.
2. Select the source layers (the layers that contain the objects you want
to move) in addition to the target layer.
3. Shift+click or Ô+click or Ctrl+click to add the source layers to the
selection.
Make sure that the target layer contains the pen icon and that the target
and source layers are all selected.
4. Choose Merge Layers from the Layers panel’s flyout menu.
All objects on the source layers are moved to the target layer, and the
source layers are deleted.
When you merge layers, the stacking order of objects doesn’t change, so the
design looks the same, but with one notable exception: If you created objects
on a layer while a master page was displayed, those objects go to the back of
the stacking order with the regular master-page objects.
Deleting layers
If you carefully isolate portions of a document on different layers and then
find that you don’t need those portions of the document, you can delete the
layer. For example, if you have a United States English and an International
English layer and you decide that you can’t afford to print the different ver-
sions, you can delete the unneeded layer. You can also simplify a document
by deleting layers that you don’t end up using.
09_614495-ch04.indd 8209_614495-ch04.indd 82 4/2/10 1:25 PM4/2/10 1:25 PM
83
Chapter 4: Discovering How Pages and Layers Work
When you delete layers, all the objects on the layer throughout the document
are deleted.
Using the Layers panel, you can delete selected layers in the following ways:
✓ Click and drag the selection to the Delete Selected Layers iconic button.
✓ Click the Delete Selected Layers iconic button. The currently selected
layers are deleted.
✓ Choose Delete Layer from the Layers panel’s flyout menu.
If any of the layers contain objects, a warning reminds you that they’ll be
deleted. And, of course, the ubiquitous Undo command (choose Edit➪Undo
[Ô+Z or Ctrl+Z]) lets you recover from accidental deletions.
To remove all layers that don’t contain objects, choose Delete Unused Layers
from the Layers panel’s flyout menu.
09_614495-ch04.indd 8309_614495-ch04.indd 83 4/2/10 1:25 PM4/2/10 1:25 PM
84
Part II: Document Essentials
09_614495-ch04.indd 8409_614495-ch04.indd 84 4/2/10 1:25 PM4/2/10 1:25 PM
Chapter 5
The Joys of Reuse
In This Chapter
▶ Working with templates
▶ Using master pages
▶ Organizing with libraries
▶ Working with snippets
U
nless you enjoy continually reinventing the wheel, you’ll want to take
full advantage of the features that InDesign offers to help you work
more productively. After you make some important decisions about elements
in your document that will repeat, page after page, in the same spot (such as
page numbers, graphics, headers and footers, and so on), you want to set up
mechanisms that make the process simple.
Fewer activities in life are less rewarding than doing the same job over and
over, and publishing is no exception. Fortunately, InDesign includes some
valuable features that let you automate repetitive tasks. In this chapter, I
focus on three of them: templates, master pages, and libraries.
Building and Using Templates
A template is a prebuilt InDesign document that you use as the starting point
for creating multiple versions of the same design or publication. For example,
if you create a monthly newsletter that uses the same basic layout for each
issue, but with different graphics and text, you begin by creating a template
that contains all the elements that are the same in every issue — placeholder
frames for the graphics and text, guidelines, and so on.
10_614495-ch05.indd 8510_614495-ch05.indd 85 4/2/10 1:24 PM4/2/10 1:24 PM
86
Part II: Document Essentials
Creating templates
Creating a template is very similar to creating a document. You create char-
acter, paragraph, and object styles, master pages, repeating elements (for
example, page numbers), and so on. The only thing you don’t add to a tem-
plate is actual content.
Most often, you create a template after building the first iteration of a docu-
ment. After you have that document set up the way you like, you simply strip
out the content (that first issue’s stories and graphics in your newsletter
example) and save it as a template.
Here are the steps for creating a template:
1. Choose File➪Save As (Shift+Ô+S or Ctrl+Shift+S) to display the Save
As dialog box.
2. Choose a folder and specify a name for the file.
3. Choose InDesign CS5 Template in the Format pop-up menu (Mac) or
Save As Type pop-up menu (Windows).
4. Click Save to close the Save As dialog box and save the template.
If you’re designing a template that will be used by others, you may want to
add a layer of instructions. When you’re ready to print a document based on
the template, simply hide the annotation layer. (See Chapter 4 for more infor-
mation about working with layers.)
If you didn’t know better, you might think that a template is exactly the same
as a regular InDesign document. It is, with one major exception: A template
is a bit more difficult to override. When you open a template, InDesign actu-
ally opens a copy and provides that copy a default name (Untitled-1,
Untitled-2, and so on). The first time you choose File➪Save (Ô+S or
Ctrl+S), the Save As dialog box appears, so you can give it a real name.
Modifying templates
As you use a template over time, you may discover that you forgot to include
something — perhaps a paragraph style, a repeating element on a particular
master page, or an entire master page. To modify a template, you have two
options:
✓ Open it as a normal file, make your changes, and then choose File➪Save
As (Shift+Ô+S or Ctrl+Shift+S) to save it again as a template (using the
same name to overwrite the original template). To open a file as a
10_614495-ch05.indd 8610_614495-ch05.indd 86 4/2/10 1:24 PM4/2/10 1:24 PM
87
Chapter 5: The Joys of Reuse
normal file, be sure that Open Normal (Mac) or Normal (Windows) —
the default option — is selected at the bottom of the Open a File
dialog box.
✓ Open it as an original file (see Chapter 3), make your changes, and then
choose File➪Save (Ô+S or Ctrl+S) to save it again as a template. To open
a file as an original file, be sure that Open Original (Mac) or Original
(Windows) is selected at the bottom of the Open a File dialog box.
Forgetting to select this option is easy, so most people end up using the
preceding technique to resave the template.
Creating documents from templates
You can easily create a document from a template: Just open a template file
and save it with a new name, making sure that InDesign CS5 Document — the
default option — is selected in the Format pop-up menu (Mac) or Save As
Type pop-up menu (Windows). Work on your document and continue to save
changes normally.
Building and Using Master Pages
A master page is a preconstructed page layout that you can use to create new
pages — it’s the starting point for document pages. Typically, master pages
contain text and graphic elements, such as page numbers, headers, foot-
ers, and so on, which appear on all pages of a publication. Master pages also
include guidelines that indicate page edges, column boundaries, and margins,
as well as other manually created guidelines to aid page designers in placing
objects. By placing items on master pages, you save yourself the repetitive
work of placing the same items one by one on each and every document page.
Don’t confuse master pages with templates. Think of a master page for use
within a document; with master pages, you can apply consistent formatting
to document pages when desired, and you can have multiple master pages
in a document so that you can easily format different kinds of pages. By con-
trast, a template is simply a document that, when you save it, you must pro-
vide a new name. Templates contain document pages, master pages, color
swatches, style sheets — the entire file. You use templates for documents
you want to reuse as a whole, such as each month’s edition of a newsletter or
each new title in a book series.
It may surprise you to know that every InDesign document you create already
contains a master page, called A-Master. Whether you use the default
master page or create and use additional master pages depends on what kind
10_614495-ch05.indd 8710_614495-ch05.indd 87 4/2/10 1:24 PM4/2/10 1:24 PM
88
Part II: Document Essentials
of document you want to create. If it’s a single-page document, such as a flier
or an ad, you don’t need master pages at all, so you can just ignore them.
However, if you want to create a document with multiple pages — a brochure
or booklet, for example — master pages save time and help ensure consistent
design.
Creating a new master page
When you’re ready to create a new master page, here’s what you do:
1. If the Pages panel isn’t displayed, choose Windows➪Pages (Ô+F12 or
Ctrl+F12).
The Pages panel is covered in more detail in Chapter 4.
2. From the Pages panel’s flyout menu, choose New Master.
You can also hold Option+Ô or Ctrl+Alt and click the Create New Page
iconic button at the bottom of the panel. The New Master dialog box
appears.
3. In the Prefix field, specify a one-character prefix to attach to the front
of the master page name and display on associated document page
icons in the Pages panel.
The default will be a capital letter, such as A.
4. In the Name field, give your new master page a name.
It’s a good idea to use a descriptive name, such as Title Page.
5. To base the new master page (the child) on another master page (the
parent), choose the parent master page from the Based on Master
pop-up menu.
6. In the Number of Pages field, enter the number of pages you want to
include in the master spread.
For a document with a single-page design, enter 1; if the document will
have facing pages, enter 2.
7. Click OK to save the page and close the dialog box.
Your new master page appears in the document window. The name of the
master page appears in the Page Number field in the bottom-left corner of the
document window. To make changes to a master page’s attributes, simply click
its icon at the top of the Pages panel, choose Master Options from the panel’s
flyout menu, and then change settings in the Master Options dialog box.
Note that you can move master pages to be at the bottom of the Pages panel —
rather than at the top — by choosing Panel Options from the flyout menu and
enabling the Pages on Top option.
10_614495-ch05.indd 8810_614495-ch05.indd 88 4/2/10 1:24 PM4/2/10 1:24 PM
89
Chapter 5: The Joys of Reuse
When you’re building a master page, you should think more about the overall
structure of the page than about details. Keep the following in mind:
✓ To build a document with facing pages, create facing-page master
spreads. The facing pages are somewhat like mirror images of each
other. Typically, the left-hand master page is for even-numbered docu-
ment pages, and the right-hand master page is for odd-numbered
document pages.
✓ To have page numbers automatically appear on document pages, add
a page number character on each page of your master spreads by draw-
ing a text frame with the Type tool where you want the page number to
appear and then choosing Type➪Insert Special Character➪Markers➪
Current Page Number (Option+Ô+N or Ctrl+Alt+N). The prefix of the
master page (A, B, C, and so on) appears on the master page, but the
actual page number is what appears on document pages. Don’t forget to
format the page number on the master page so that page numbers will
look the way you want them to in the document.
✓ Specify master page margins and columns by first making sure that
the page is displayed in the document window and then choosing
Layout➪Margins and Columns. The Margins and Columns dialog box
is displayed. The controls in this dialog box let you specify the posi-
tion of the margins, the number of columns, and the gutter width (space
between columns).
You can place additional guidelines on a master page — as many custom
guidelines as you want (see Chapter 10.)
Basing one master page on another
Some publications benefit from having more than one master page. If you’re
building a document with several pages that are somewhat similar in design,
it’s a good idea to start with one master page and then use it as a basis for
additional master pages.
For example, if the brochure you’re working on uses both two-column and
three-column page layouts, you can create the two-column master spread
first. (Be sure to include all repeating page elements.) You can then create
the three-column master page spread, basing it on the two-column master,
and simply specify different column formats. The child master page will be
identical to the parent except for the number of columns. If you later change
an element on the original master page, the change will apply automatically
to the child master page.
When you create a new master page, the New Master dialog box provides the
option to base it on an existing master page. To help you keep things straight,
10_614495-ch05.indd 8910_614495-ch05.indd 89 4/2/10 1:24 PM4/2/10 1:24 PM
90
Part II: Document Essentials
when you base a master page on another master page, InDesign displays the
prefix of the parent page on the icon of the child page.
If you base a master spread on another master spread, you can still modify the
master objects (that is, the objects inherited from the parent master) on the
child master page. As with regular document pages, you have to Shift+Ô+click
or Ctrl+Shift+click the object inherited from a parent master to release it
before you can edit it on a child master.
Basing a master spread on a document spread
You may be talented enough to create an effective spread, one that is so
handsome that you want to create a master page from it to use on future
documents. Simply highlight the spread by clicking the page numbers below
the relevant page icons in the Pages panel and choose Save as Master from
the Pages panel’s flyout menu. The new master is assigned a default name
and prefix. To change any of its attributes, click its name in the Pages panel
and then choose Master Options from the flyout menu.
Duplicating a master spread
Create a copy of a master spread by selecting its icon and then choosing
Duplicate Master Spread from the Pages panel’s flyout menu or simply by
dragging its icon onto the Create New Page button at the bottom of the panel.
Note that if you duplicate a master spread, the duplicate loses any parent/
child relationships.
Importing a master page
Sometimes, another document has a master page that you’d like to use
in your current layout. InDesign lets you import those master pages: Just
choose Load Master Pages from the Pages panel’s flyout menu, select the
source document in the dialog box that appears, and click Open. InDesign
will import all master pages from that document into your current one.
(Sorry, there’s no way to select specific master pages.)
If any of the imported master pages have the same name as your current doc-
ument’s master pages (such as the default name A-Master), a dialog box will
appear giving you the choice of replacing the current master pages with the
imported ones that use the same name or of renaming the imported master
pages, so you keep what you have and add the imported ones. InDesign does
the renaming for you.
Note that InDesign will also alert you if the imported master pages use dif-
ferent dimensions than the current document’s pages. It won’t adjust the
imported pages, so some items may appear off the page if the imported
master page has larger dimensions than the current document.
10_614495-ch05.indd 9010_614495-ch05.indd 90 4/2/10 1:24 PM4/2/10 1:24 PM
91
Chapter 5: The Joys of Reuse
Deleting a master page
To delete a master page, select its name and then choose Delete Master Page
from the Pages panel’s flyout menu. You can also drag the master icon to the
Delete Pages iconic button at the bottom of the Pages panel.
So what happens when you delete a master page on which document pages
are based? Don’t worry — your document pages are unchanged, though they
no longer have a master page. (In the Pages panel, the page icons won’t dis-
play the letter of a master page in their upper outside corners.)
You can remove a master page from a specific document page without remov-
ing the master page from your document (and thus other pages) by applying
the [None] master page to the document page using the process described in
the next section.
Applying a master page
to document pages
After you build a master page, you can apply it to new or existing document
pages. (See Chapter 4 for information about adding and removing document
pages.) For documents with facing pages, you can apply both pages of a
master spread to both pages of the document spread, or you can apply one
page of a master spread to one page of the document spread. For example,
you can apply a master page with a two-column format to the left-hand page
of a document spread and apply a master page with a three-column format to
the right-hand page.
To apply a master page to a document page, select the name or icon of the
master page in the top part of the Pages panel and then drag it onto the icon
of the document page you want to format. When the target document page
is highlighted (framed in a black rectangle, as shown in the left side of Figure
5-1), release the mouse button. If both document pages are highlighted, and
if you’re applying a master page to the document, both sides of the master
spread are applied to the document spread.
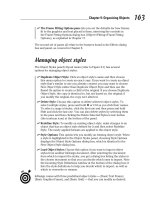
Figure 5-1 shows these techniques: At upper left, I am applying a single page
of a master spread to a document page using the mouse. At upper right, I
am applying both pages of a master spread to a document spread using the
mouse. At bottom, I’m using the Apply Master dialog box to apply a master
page to selected pages.
10_614495-ch05.indd 9110_614495-ch05.indd 91 4/2/10 1:24 PM4/2/10 1:24 PM
92
Part II: Document Essentials
Figure 5-1:
Top left:
Applying
master
pages to
document
pages.
Top right:
Applying
master
spreads to
document
spreads.
Bottom:
The Apply
Master
dialog box.
You can also apply a master page to the currently displayed pages by choos-
ing Layout➪Pages➪Apply Master to Pages.
Changing master items on document pages
As you work on a document page that’s based on a master, you may find that
you need to change, move, or delete a master object. Any change you make
to a master object on a local page is referred to as a local override.
Whenever you remove a master object from a document page, you sever the
object’s relationship to the master-page object for that document page only.
If you subsequently move or modify the object on the master page, it won’t
affect the deleted object on the document page — it remains deleted on that
particular document page.
The Show/Hide Master Items command in the Pages panel’s flyout menu lets
you show or hide master objects on document pages.
To change a master object on a document page, you must first select it,
which can be a bit tricky. To select a master object on a document page, hold
down Shift+Ô or Ctrl+Shift when you click the object with one of the selec-
tion tools. (You can also Shift+Ô+drag or Ctrl+Shift+drag to select multiple
master objects within the selection marquee.) After you select a master
10_614495-ch05.indd 9210_614495-ch05.indd 92 4/2/10 1:24 PM4/2/10 1:24 PM
93
Chapter 5: The Joys of Reuse
object on a document page, you can modify it just as you would objects that
aren’t part of a master page.
If you modify one or more master objects on a document page and then
decide you want to revert to using the original master objects, you can
remove the local overrides. To do so, display the document page that con-
tains the master objects you’ve modified, select the objects, and then choose
Remove Selected Local Overrides from the Pages panel’s flyout menu. If
no objects are selected, the command name changes to Remove All Local
Overrides. If the selected spread doesn’t have any modified master objects,
the command isn’t available.
Sometimes, you don’t want people to have the capability to override a master
page object. InDesign gives you a way to block such overrides: With the master
page open and any objects selected that you don’t want to be overridden,
deselect Allow Master Item Overrides on Selection in the Pages panel’s flyout
menu. With this option deselected, someone else won’t be able to override the
selected master page objects on any document pages using them — unless,
of course, the person reselects the Allow Master Item Overrides on Selections
option.
Building and Using Libraries
An InDesign library is a file — similar in some ways to a document file —
where you can store individual objects (graphics, text, and so on), groups
and nested objects, ruler guides, and grids (see Chapter 10). After an item is
in a library, every time you need a copy, you simply drag it out of the library.
Creating a library
Creating a library is easy. Follow these steps:
1. Choose File➪New➪Library.
The New Library dialog box appears, with essentially the same options
as the Save As dialog box (see Chapter 3).
2. Choose a location in which to save the library.
3. Give the library a name.
4. Click OK.
10_614495-ch05.indd 9310_614495-ch05.indd 93 4/2/10 1:24 PM4/2/10 1:24 PM
94
Part II: Document Essentials
You can create as many libraries as you want and store them wherever is
most convenient, including on a networked server so that other InDesign
users can share them. You can also open libraries created on a Mac from a
Windows computer, and vice versa.
Right after you create a new library, you see an empty library panel group.
Each library that you create or open will appear as its own panel within that
panel group, with its name displayed in its tab, as shown in Figure 5-2. To add
items to the library, you simply drag them to the desired panel.
Here is an explanation of some of the controls and commands shown in
Figure 5-2:
✓ The numbers in the lower-left corner of the panel indicate the number
of items currently displayed in the pane and the number of items in the
library.
✓ The Library Item Information iconic button displays the Item
Information dialog box, as does the Library Item flyout menu option.
Here, you can give each library item a name, a type (for example, image
or text), and a description. Later, you can search for library items based
on these attributes.
✓ The Show Library Subset iconic button displays a dialog box that lets
you locate and display items that meet certain search criteria, as does
the Show Subset flyout menu option.
✓ The Delete Library Item iconic button lets you delete highlighted items
in the library, as does the Delete Item(s) flyout menu option.
Figure 5-2:
A library
and its fly-
out menu.
Library Item Information
Show Library Subset
Lew Library Item
Delete Selected Library Items
10_614495-ch05.indd 9410_614495-ch05.indd 94 4/2/10 1:24 PM4/2/10 1:24 PM
95
Chapter 5: The Joys of Reuse
Putting items into a library
You can place individual items, such as text and graphics frames, into a
library. You can also place multiple selected objects, groups, nested frames,
ruler guides, guidelines, and all items on a document page.
To add items to a library:
✓ Select one or more items and then drag them into an open library panel.
(Open an existing library by choosing File➪Open [Ô+O or Ctrl+O].)
✓ Select one or more items and then choose Add Item from the flyout
menu of an open Library panel.
✓ Choose Add All Items on Page from the flyout menu of an open Library
panel to add all items on the current page or spread as one library item.
Why you’ll love snippets
InDesign has a neat option called snippets
that lets you take pieces of your document
and create a file that other InDesign users can
bring into their documents, preserving all for-
matting and effects applied to them. Snippets in
InDesign CS4 and CS5 have the filename exten-
sion .idms; snippets in InDesign CS3 have the
filename extension .inds — InDesign CS5
can work with both types.
Snippets are sort of like libraries, with a key
exception: Each snippet is a separate file, so
they’re not as easy or as convenient as librar-
ies when you have lots of document pieces that
you want to share or make available for reuse.
So snippets are best for sharing specific ele-
ments on an as-needed basis, whereas libraries
are better for having, well, a library of standard,
shared elements. For example, a snippet is a
great way to give another designer a specific
element, such as a masthead or a formatted
photo, for use in her own documents — espe-
cially by e-mail, because snippets are easily
shared as file attachments. By contrast, a
library is meant to keep in one place a bunch of
objects you intend to use over and over again.
The process of creating snippets is easy: Select
the objects and drag them outside your docu-
ment window onto the Mac or Windows desktop
or into a folder. InDesign automatically creates
the snippet file containing those objects and
their formatting. You can also select the objects
you want to make the snippet from and choose
File➪Export (Ô+E or Ctrl+E); choose InDesign
Snippet from the Format pop-up menu (Mac) or
Save As Type pop-up menu (Windows), select
the destination folder, and then click Save.
You can then send that snippet to other users
on storage drives, via e-mail, or over the net-
work — like any other file.
To use the snippet in another document, just
drag the snippet into your document window.
That’s it!
10_614495-ch05.indd 9510_614495-ch05.indd 95 4/2/10 1:24 PM4/2/10 1:24 PM