Adobe Photoshop CS2 Photographers’ Guide phần 8 ppt
Bạn đang xem bản rút gọn của tài liệu. Xem và tải ngay bản đầy đủ của tài liệu tại đây (3.72 MB, 39 trang )
This is the simplest kind of filtering possible, because the values being modified
are already stored as numbers, from 0 to 255 for each of the three color channels,
plus gray. A single mathematical algorithm can be applied to each pixel to pro-
duce the filtered image. If you want an inside look at how filters work, check out
Figure 8.4, Photoshop’s “blank” filter, which goes by the name Custom, and is
located in the Other submenu of the Filter menu.
Chapter 8 ■ Using Photoshop CS’s Filters 253
Figure 8.4 Photoshop’s
Custom filter shows how filters
look at individual pixels in an
image.
The center box represents the pixel being examined. When processing an image
or selection, Photoshop will look at each pixel in turn, then adjust the values of
the pixels that surround it, based on the numbers in the boxes that ring the tar-
get pixel. That part is simple. Knowing what numbers to plug in to achieve a par-
ticular effect is difficult. Fortunately, unless you’re a filter fanatic, you’ll rarely have
to resort to that (although the Custom filter is fun to play with). Instead, you can
put Photoshop’s built-in filters to work to achieve the looks you want.
Some filters may remove pixels entirely, change their contrast (thus blurring or
sharpening an image), or shift them around in an image in relation to others that
remain in place, creating some degree of distortion. The programs that make up
filters can be very simple and require no user input, or extremely complex and bris-
tle with dialog boxes, slider controls, buttons, preview windows, and other features.
What makes Photoshop’s filters so versatile is the fact that they don’t have to be
part of Photoshop’s basic code. Photoshop includes a programming interface that
lets it talk to external programs like filters, which need only to plug in at the appro-
priate places in the interface. Plug-ins are a brilliant concept, even if the idea was
not original to Adobe, having been adapted from a facility in the Digital
Darkroom program marketed by Silicon Beach. All Adobe had to do to provide
the same capabilities was build certain “hooks” into Photoshop, bits of program
code that allowed Photoshop itself to temporarily turn over control to an outside
module, which could then work with and manipulate the pixels within currently
open images.
Upgrading, adding, or removing a filter is as easy as deleting the old filter file and
dragging a new one into the Plug-ins folder of your application. The next time
you start Photoshop or another image editor, the application “builds” itself by
looking for available modules, such as filters. Any suitable plug-ins automatically
are added to the Filters or File > Import menus.
What Kinds of Filters Are Available?
The plug-ins available for Photoshop fall into several broad categories:
■ Image Enhancement filters. I use this term for filters that improve the
appearance of images without making basic changes in the content of the
images. You have to apply the term “basic changes” loosely, since some of these
can make dramatic modifications. Sharpen, Unsharp Mask, Dust and
Scratches, and similar filters are all image enhancement plug-ins. Blur filters
are also image enhancement filters: There are many images that can be
improved through a little judicious blurring. This kind of filter can be applied
to an entire image, or just a portion that you have selected.
■ Attenuating filters. I borrowed this word from the photographic world to
describe filters that act like a piece of glass or other substance placed between
the image and your eye, superimposing the texture or surface of the object on
your picture. Think of a piece of frosted glass, translucent scrap of canvas fab-
ric, or a grainy sheet of photographic film. These, or any of dozens of other
filters, including most Noise and Texturizing filters, can add a texture or dis-
tort your image in predictable ways. Attenuating filters may be applied to a
whole image, or just a selection.
■ Distortion filters. These filters actually move pixels from one place in an
image to another, providing mild to severe distortion. Filters that map your
image to a sphere, immerse it in a whirlpool, or pinch, ripple, twirl, or shear
bits here and there can provide distortion to some or all of an image.
■ Pixelation filters. Adobe’s own terminology is good enough for me to use in
referring to a group of filters that add texture or surface changes, much like
attenuating filters, but take into account the size, color, contrast, or other char-
acteristic of the pixels underneath. These include Photoshop’s own Crystallize,
Color Halftone, Fragment, and Mezzotint filters. The Pointillize or Facet fil-
ters, for example, don’t simply overlay a particular texture—the appearance
of each altered pixel incorporates the underlying image.
■ Rendering filters. Again, Adobe’s terminology is a good way to describe fil-
ters that create something out of nothing, in the way that a 3D rendering pro-
gram “creates” a shaded model of an object from a wire-frame skeleton. These
filters may or may not use part of the underlying image in working their
Adobe Photoshop CS2: Photographers’ Guide254
magic: Photoshop’s Clouds filter creates random puffy clouds in the selected
area, while Difference Clouds inverts part of the image to produce a similar
effect. Lens Flare and Lighting Effects generate lighting out of thin air, while
the Chrome filter produces Terminator 2-like surfaces.
■ Contrast-enhancing filters. Many filters operate on the differences in con-
trast that exist at the boundary of two colors in an image. Sharpening and
blurring filters are types of filters that do this, but I’ve lumped them into the
Image Enhancement category. Other contrast-enhancing filters are used to
produce special effects. By increasing the brightness of the lighter color or
tone, and decreasing the brightness of the darker color or tone, the contrast
is increased. Since these boundaries mark some sort of edge in the image, con-
trast-enhancing filters tend to make edges sharper. The effect is different from
pure sharpening filters, which also use contrast enhancement. Filters in this
category include all varieties of filters with names like Find Edges, Glowing
Edges, Accented Edges, Poster Edges, Ink Outlines, and even most Emboss
and Bas Relief filters.
■ Other filters and plug-ins. You’ll find many more different add-ons that
don’t fit exactly into one of the categories above, or which overlap several of
them, such as the color-correcting Photo Filter plug-in.
The About Plug-in option in the Help menu will show you what filters have been
loaded by Photoshop. You don’t have to wend your way through nested menus to
view this list.
Using Filters
I’ll explain how to use particular filters as we go along, but there are some general
tips that apply to nearly all filters that we’ll be working with. To apply a filter, fol-
low these steps:
Choosing the Portion of an Image to
Apply a Filter To
You don’t have to apply a filter to an entire image or layer; many times you’ll want
to use the filter only with a portion of the image. Use any of the selection tools,
including the Marquee, Lasso, Magic Wand, or one of Photoshop’s advanced tools,
such as Select > Color Range or Quick Mask mode.
It’s often smart to copy the entire image to a duplicate layer (Layer > Duplicate)
and make your selection on a copy. You can play around with different filter effects
without modifying your original image. If you don’t select a portion of an image,
the filter will be applied to the entire image. Because it can take anywhere from a
Chapter 8 ■ Using Photoshop CS’s Filters 255
split second to a few seconds (or much longer), depending on the speed of your
computer, the amount of RAM you have, and the size of your image/selection,
you may want to work with a representative section of the image first before apply-
ing the filter to the whole thing.
Selecting the Filter
Some filters, such as Sharpen > Sharpen and Sharpen > Sharpen More,
are known as single-step filters and operate immediately. They have no
parameters to select, and thus offer less control over their effects. Other
filters cause a dialog box to pop up with controls you’ll need to adjust.
Most will also include a preview window you can use to get an idea of
what your filter will do when applied to a selected portion of an image.
You’ll find this useful to make broad changes in parameters, but I think
it’s still a good idea to select a somewhat larger area of an image and
apply the filter to that on a duplicate layer. A basic “old style” filter dia-
log box is shown in Figure 8.5. I’ll show you Photoshop CS’s “new style”
Filter Gallery, with additional options, later in this chapter.
Applying the Filter
Click on OK to apply the filter. If you have a very large image (say, 10MB or
more), a slow computer, or a complex filter, find something to do. This might be
a good time to set up your laptop on your desktop and get some work done. Even
filter/image combinations that do magical things in less than a minute seem ter-
ribly slow when you’re sitting there staring at the screen. If you’ve marked the Beep
When Done box in the Preferences > General dialog box, Photoshop will chirp
when it’s finished with its calculations.
Adobe Photoshop CS2: Photographers’ Guide256
Figure 8.5 A typical filter dialog box
looks like this.
FADING FILTER EFFECTS
You can use the Fade command (Shift + Ctrl/Command + F) to reduce the amount
of a filter’s effects, moving a slider from 0 to 100 percent to adjust how much of a
filter’s modifications should be applied to your image, layer, or selection. However,
I find that I have more options when I apply a filter to a duplicate layer. I can vary
the amount of the filtration by changing the opacity of the filtered layer so it
blends in with the unmodified layer underneath. I can selectively erase parts of the
filtered layer so the filtration is applied only to portions of the image. I can use
Photoshop’s Mode controls to merge the filtered and unfiltered layers in creative
ways. Fade is handy, but it’s a fast and less versatile way of modifying a filter’s
effects.
When the filter is finished, be careful not to do anything else (for example, move
the selection) until you’ve decided whether or not the effect is the one you want.
Although Photoshop has multiple levels of Undo, you’ll save effort any time you
can avoid using the Edit > Step Backward (Alt/Option + Ctrl/Command + Z)
command multiple times. That way, if you totally hate the result, you can quickly
press Ctrl/Command + Z and try again.
Saving the Image or a Snapshot
When you’re really, really certain that the effect is what you want, save the file
under another name (use File > Save As and click the Save A Copy box if you
want). Only flatten the layers to merge the effect with your main image when
you’re convinced you have the look you want. Some day, you’ll be glad you saved
a copy of the file when you change your mind about being really, really certain.
Photoshop CS’s Filter Gallery
The last version of Photoshop CS introduced the Filter Gallery, which has been
optimized in CS2. Not all filters in the Photoshop repertoire are included in the
Gallery. The roughly four dozen filters that are included have a new look that’s
compatible with the Filter Gallery interface. You’ll find them in the Artistic, Brush
Strokes, Distort, Sketch, Stylize, and Texture categories. Not all the filters in those
general categories are included in the Filter Gallery. For example, the Stylize cat-
egory, which includes 9 different filters, is represented in the Filter Gallery only
by Glowing Edges. Other filters, found in the Pixelate, Render, Blur, Sharpen, and
other categories are not included and use the familiar pre-Photoshop CS dialog
box. With each new release of Photoshop, expect additional filters to join the
gallery.
The only disadvantage to the Filter Gallery is that the first time you load it in a
particular session, it can take a long time for the dialog box to appear. Subsequent
appearances can be much quicker if you have lots of memory. I have 2GB of RAM
in my computer and devote 60 percent of it to Photoshop (Edit > Preferences >
Memory & Image Cache), so Photoshop is usually able to store the Filter Gallery
in memory. (With Mac OS X, you’ll find this setting at Photoshop > Preferences
> Memory & Image Cache. Photoshop usually selects 50 percent as the memory
allocation.)
There are several advantages to the Filter Gallery. These include:
■ Extra large preview area. This is shown at left in Figure 8.6. This generous,
zoomable preview lets you view the effects you’ve applied with the Filter
Gallery before you commit to them.
Chapter 8 ■ Using Photoshop CS’s Filters 257
■ Multiple applications of the same filter. You can apply the same filter sev-
eral times and view the results in the preview window before committing to
the special effect by clicking the OK button. Of course, you always could
apply a filter repeatedly in Photoshop, but it was necessary to exit the filter
dialog box and then repeat the action. If you decided you’d added too much
of a good thing, you had to use the Undo option to cancel your last action
(or two).
■ Apply multiple filters. The Filter Gallery lets you apply several different fil-
ters in any order you want, using your choice of settings, before committing
to a specific set of effects.
■ Change the order and settings of filters. If you decide you want to apply a
certain Texture filter before adding an Artistic filter into the mix (rather than
vice-versa), you can do that.
Filter Gallery Basics
The best way to learn how to use this versatile tool is to jump right in and begin
working with it. If you want to use the same image I’m going to play with, find
the catbottle picture on the website (www.courseptr.com/downloads) for this
book. The original picture is shown in Figure 8.7. Then follow the series of steps
I’m going to outline in this section.
Adobe Photoshop CS2: Photographers’ Guide258
Figure 8.6 The Filter Gallery
has a new look and new
features that plug-in users will
love.
Prepping the Image
First, why not apply some of the techniques you’ve learned in this
book to make the image even more suitable for some filter magic?
1. Choose Image > Adjustments > Shadow/Highlights to pro-
duce the dialog box shown in Figure 8.8. Click the Show
More Options box so you’ll see the full toolkit.
2. To lighten the shadows, the Shadows sliders should be set to
Amount: 50 percent; Tonal Width: 50 percent; Radius: 30
pixels.
3. To darken the highlights, the Highlights sliders should be set
to Amount: 25 percent; Tonal Width: 50 percent; Radius:
30 pixels.
4. Set the Color Corrections slider to 45 percent and watch the
bottle become a deeper blue.
5. Click on OK to apply the change. The image will now look
like Figure 8.9.
Chapter 8 ■ Using Photoshop CS’s Filters 259
Figure 8.7 We’re going to work with this photo.
Figure 8.9 The modified image looks like this.
Figure 8.8 Use the Shadow/Highlights
command first to prep the image.
Accessing the Filter Gallery
The easiest way to access the Filter Gallery is to choose Filter > Filter Gallery. The
Gallery dialog box shown in Figure 8.10 appears. (If you choose one of the filters
included in the gallery from the Filter menu, the Filter Gallery also pops up.) If
not all the filters in the gallery are visible, click the button to the left of the OK
button. There are several components to work with. These include:
■ The Preview window. At the bottom of the window are plus/minus buttons
you can click to zoom in and out, an activity indicator that shows the progress
of the filter as it is applied, and scroll bars (at both bottom and right side) you
can use to view all of an image that won’t fit in the preview window.
■ Categories/Thumbnails. In the middle of the Filter Gallery is a list of filter
categories that can display thumbnails of each filter available. The triangle
next to each category name points toward the category when that folder is
closed, and points downward when you open the category to display the fil-
ters it contains. You can show or hide all the filters in a category folder, and
scroll through them.
■ Controls. Each filter’s controls, including sliders and buttons, appear to the
right of the filter category list when a particular filter is selected. There is also
a drop-down list you can use to scroll through an alphabetized listing of every
filter in the Gallery.
Adobe Photoshop CS2: Photographers’ Guide260
Figure 8.10 Anatomy of the
Filter Gallery.
List of filters
Preview Window
Controls
Thumbnails
Applied filters
Categories
Delete effect layer
New Effect Layer
Zoom controls
Progress indicator
■ Applied Filters. At the lower-right corner of the Filter Gallery is a list of the
filters that have been applied in this Gallery session.
■ Sizing Controls. As with many PC and Mac dialog boxes, you can enlarge
the box to provide more room for previews, lists, and other features without
scrolling.
Applying the First Filter
Let’s jump right in and apply a filter to see how the Gallery works. Just follow
these steps:
1. With the Filter Gallery visible, click the Zoom buttons until the catbottle
image fills the preview area.
2. Open the Artistic folder in the categories/thumbnails area.
3. Select the Poster Edges filter, with the default settings. Photoshop applies the
filter, and Poster Edges appears in the list of applied filters in the lower-right
corner of the Filter Gallery.
4. Notice the Eyeball icon in the right-hand column of the applied filters area.
Click the Eyeball to make the Poster Edges effect you’ve applied invisible. That
will return the image to its original appearance.
5. If you decide you don’t want to use Poster Edges, just click on a different fil-
ter. The original filter’s effects will be removed and replaced by those of the
new filter.
6. Note that you can show or hide the Poster Edges effect with the Eyeball, and
change the settings of the effect at any time, up until you click the OK but-
ton to apply the modifications. The image will look like Figure 8.11.
Applying Another Filter
This is where the Filter Gallery gets very cool. You can add a second or third
filter effect, view each of the effects separately or in any combination you
choose, and modify any of their settings independently. Follow these steps to see
for yourself:
1. To add an effect layer, click the New Effect Layer icon at the bottom left of
the applied filters area. A new effect layer appears, listed above the Poster
Edges effect (because the new effect will be applied “on top” of the original
filter).
2. Open the Brush Strokes category and click the Sprayed Strokes thumbnail.
Photoshop will add the Brush Strokes effect to the effect achieved by the
Poster Edges filter. The image will look like Figure 8.12.
3. Repeat Steps 1 and 2 to add another filter effect of your choice.
Chapter 8 ■ Using Photoshop CS’s Filters 261
Adobe Photoshop CS2: Photographers’ Guide262
Figure 8.11 With one filter
applied, the image looks like
this.
Figure 8.12 You can change
the layer order of effects and
turn them on or off.
Now you have two or three filter effects applied using the Filter Gallery. Here
are some of the things you can do before clicking OK to apply the effects you’ve
chosen:
■ To view any of the filter layers individually or in combination, click the
Eyeball icons to show or hide a particular filter effect.
■ When you click in an effect’s layer, you can change the settings for that effect.
■ Drag a layer from one position in the stack to place it “above” another effect,
so that it will be applied after the effects below it have been applied.
■ If you decide you don’t want to use an effect, select that layer and click the
Trash icon at the lower right of the dialog box.
That’s about all there is to using the Filter Gallery. With any luck, Adobe will add
more filters to the Gallery in the next release of Photoshop.
Reproducing Photographic Filters in Photoshop
I’m going to divide the rest of this chapter into two parts. This next section will
show you how to reproduce some of the most common photographic filters
in Photoshop, whether the technique uses Photoshop’s own filters or not. The
section that follows this one will deal exclusively with using Photoshop’s built-in
filters.
Polarizing Filters
Polarizing filters can provide richer and more vibrant colors while reducing some
of the glare that infects many photos taken in bright daylight. Polarizing filters
work in much the same way as polarized sunglasses. Figure 8.13 is a simplified
illustration that may help you understand how polarizing filters work.
In this figure, sunlight strikes all the shiny parts of the convertible (glass windows,
the shiny plastic wheelcovers and trim, and so forth), although for simplicity I’m
showing only the glare off the rear wheelcover. The light bounces off in many dif-
ferent directions. As you probably know, light moves in waves, and in this case the
waves vibrate at many different angles; some side to side, some up-and-down, oth-
ers at diagonal angles. It’s difficult to illustrate this, but I think you know what
I’m saying. Some of this hodgepodge of light strikes the lens of your camera, pro-
ducing glare and reduced contrast.
A polarizing filter contains what you can think of as a tiny set of parallel louvers
which filter out all the light waves except for those vibrating in a direction paral-
lel to the louvers. Again, this is difficult to demonstrate in two dimensions, but
you can see the net result in Figure 8.14. All the light waves are blocked except
Chapter 8 ■ Using Photoshop CS’s Filters 263
Adobe Photoshop CS2: Photographers’ Guide264
Figure 8.13 Light bouncing
from shiny surfaces scatters in
all directions.
Figure 8.14 A polarizing
filter allows only the light
waves that are vibrating in a
single direction to pass
through.
Sun
Light scatter
Camera lens
Sun
Light scatter
Polarizing filter
Camera lens
for those vibrating from side to side (imagine them moving from side to side in
the illustration) so they can pass through the horizontal louvers. The polarizer
blocks all the scattered light.
A polarizing filter consists of two rings; one is attached to the lens, while the outer
ring rotates the polarizing glass. This lets you change the angle of the louvers and
selectively filter out different light waves. With a single lens reflex (SLR) camera
(which lets you view through the same lens that takes the picture), you can rotate
the ring until the effect you want is visible. Blue sky and water, which can con-
tain high amounts of scattered light, can be made darker and more vibrant. You
can also reduce or eliminate reflections from windows and other nonmetallic sur-
faces. The most dramatic changes can be produced when the sun is low in the sky
and located off to your left or right shoulder.
As you might expect, polarizers work best with SLR cameras that let you preview
the effect. If you’re using a non-SLR digital camera, you may want to use the LCD
viewfinder instead of the optical finder when making your adjustments.
Simulating a polarizer in Photoshop is tricky, because there is no easy way to
replace information that is obscured by glare. Figure 8.15 shows a photo (at top)
that’s marred by unwanted reflections off the car windows. In this case, I was able
Chapter 8 ■ Using Photoshop CS’s Filters 265
Figure 8.15 The unwanted
reflections shown in the top
image can be removed in
Photoshop even without
resorting to a polarizing filter.
Figure 8.16 Add Calligraphic
Brushes to your Brushes Palette.
to select the area of the glass that had the most glare, and reduce the brightness
and contrast to bring that area back to the same level as the rest of the window.
In other cases, you may have to use the Clone Stamp or Healing Brush tools to
copy parts of the image that are glare-free over parts that have reflections. Then,
you can adjust the overall brightness and contrast of the image to resemble what
the image would look like if you had been able to use a polarizer filter.
Cross-Screen
Cross-screen filters are simple add-ons that let you make the specular highlights
of an object sparkle, while providing a little bit of diffusion. My first cross-screen
was a piece of tight-mesh window screen inside a set of empty Series 7 filter
adapter rings. Later, filter manufacturers came out with glass versions of these with
cross-hatch lines etched in the glass. Cross-screen filters work great with jewelry
and other naturally sparkly items. Photoshop can easily duplicate this effect while
giving you much greater control over the size and placement of your starbursts.
Just follow these steps, using the Watch photo included on the website, or your
own picture.
1. First create a cross-shaped star to add to your image. You can simply draw a
star shape on a transparent layer, or do as I did by following the next couple
steps.
2. Click the Brush tool in the Tool Palette, or press B to activate it.
3. In the Options bar, click the Fly-out menu and select Calligraphic Brushes
from the drop-down list, as shown in Figure 8.16. A dialog box will appear
asking if you want to replace your current brushes or append these new
brushes to your current set. Choose Append.
4. Select the 28-pixel calligraphic vertical stroke, and use it to draw one ray of
the star on a transparent layer in black. Draw another vertical ray directly
underneath it.
5. Use the Lasso selection tool to select the two rays and then choose Edit >
Transform > Rotate 90 Degrees Clockwise. The rays will now be horizontal.
6. Use the same brush to create another pair of vertical rays at right angles to the
first two.
7. Choose Filter > Stylize > Emboss to give the star a 3D texture, as shown in
Figure 8.17.
Adobe Photoshop CS2: Photographers’ Guide266
Figure 8.18 Use Color
Dodge mode to merge the star
layer with the rest of the
image.
9. Copy the star and apply it to several places on your image in a separate trans-
parent layer.
10. Choose the Color Dodge mode for this transparent layer from the Layer
Palette, as you can see in Figure 8.18.
11. Use Image > Adjustments > Brightness/Contrast to make the star as bright or
as dark as you want for your particular image.
12. With the star layer still active, choose Filter > Blur More. This enhances the
blurry star effect. Your finished image should look like Figure 8.19.
Chapter 8 ■ Using Photoshop CS’s Filters 267
Figure 8.17 The Emboss
filter gives the star a 3D
texture.
CREATE A STAR-SHAPED BRUSH
You can also create a brush shaped like the star you just created. Select it with the
Lasso tool, choose Edit > Define Brush, and give the new brush a name. Hence-
forth, anytime you want to add this star to an image, use the brush you just made.
8. Although you can use the star shape as-is, you may want to rotate it 45 degrees
(Edit > Transform > Rotate), and reduce it to a size more appropriate to the
object you’ll be adding cross-stars to. (Use Edit > Transform > Resize.)
Split Filter
Split filters are nothing more than glass filters divided into two halves, each a dif-
ferent color. You see these used a lot in still photography to give the sky and ground
an eerie look, and cinematographers use them extensively to create a moody atmos-
phere. Creating your own split filter in Photoshop is easy. Just follow these steps.
1. In a new, empty document create two transparent layers.
2. Choose the Gradient tool from the Tool Palette.
3. Select Linear Gradient from the Option bar, and choose the Foreground to
Transparent gradient from the drop-down list, as shown in Figure 8.20.
4. Select your two colors as the foreground and background colors, using your
favorite method (the Eyedropper tool in the Swatches Palette works for me).
Adobe Photoshop CS2: Photographers’ Guide268
Figure 8.19 The finished
image with artificial “stars”
looks like this.
5. Drag from the top to the bottom of one of the transparent layers, holding
down the Shift key to make sure you drag in a straight line. This applies the
foreground color as a gradient in that layer.
6. Press X to swap the foreground and background colors.
7. Drag from the bottom to the top in the other transparent layer to create the
lower half of your split filter.
8. Choose Layer > Merge Visible to combine these two layers.
9. Save your split-filter document so you can use it as you want.
10. To use the “filter,” copy the filter layer and paste it into the image you want
to use it with, resizing so the filter covers the entire image. Use the Darken or
Multiply layer modes to merge the filter layer with the underlying image with-
out completely obscuring it. Figure 8.21 shows one typical result.
Chapter 8 ■ Using Photoshop CS’s Filters 269
Figure 8.20 Use two
gradients to create a split-filter
effect in Photoshop.
Modifying Images with Photoshop’s Filters
Photoshop’s own filters offer a wealth of special effects you can apply to your pho-
tographs. Other than the Photo Filters, they may not resemble the filter effects
you can get with conventional glass or gelatin filters, but that’s the whole point.
Photoshop lets you go beyond the limits of both film and digital cameras to cre-
ate entirely new looks. This section will explore some of the things you can do
with Photoshop’s own filters.
The section will not cover every one of the 100+ Photoshop filters. Many of the
filters, such as the Sharpen, Blur, Grain, and Lens Flare filters were covered in
other chapters. Quite a few other filters, such as the Offset filter, do things that
aren’t particularly useful from a photographic standpoint, but which are consum-
mately handy for other applications, such as creating seamless backgrounds for
web pages. Instead, in this section we’ll look at the best of the rest. I won’t stick
rigidly to Photoshop’s filter menu hierarchy, either. Filters that provide painterly
effects will be grouped together, while those that add textures or drawing effects
will be bundled among their own.
Adobe Photoshop CS2: Photographers’ Guide270
Figure 8.21 The split-filter
effect can add a moody look
like this.
I’ve found that the easiest way to compare filter effects is to compare the same
image as it is transmogrified by a variety of different filters, so the examples in this
section will use the same basic image, shown in Figure 8.22, in our examples. I
have to warn you that not all filters look good with human subjects.
Chapter 8 ■ Using Photoshop CS’s Filters 271
Figure 8.22 This picture is
our starting point for the filters
that follow.
Painting Filters
If you want to create pictures that look like they were painted, Photoshop offers
some great filters. You can get brush strokes without ever touching a brush. You’ll
find these filters in Photoshop’s Artistic, Brush Strokes, and Sketch submenus in
particular. Digital effects applied with these filters can produce results in seconds
that can’t easily be achieved by an artist equipped with brush, paints, and tradi-
tional tools. It’s also fairly easy to generate effects that are strongly reminiscent of
the styles of “real” artists, using a group of filters found in the Pixelate and Stylize
menus of Photoshop.
These kinds of filters all have one thing in common: They reduce the amount of
information in an image by combining or moving pixels. Some overlay an image
with a texture or pattern, while other plug-ins group similar colors together or
transform groups of hues into new tones. The result is an image that has been soft-
ened, broken up, selectively increased in contrast, or otherwise “pixelated.”
At first glance, these filters seem to have turned a photograph into a painting.
Instead of the harsh reality of the original image, we have a softer, more organic
picture that appears to have been created, rather than captured.
Just as the crystal clarity of video productions adds realism to documentaries and
intimacy to videotaped stage plays or situation comedies, original photographs
look real to us. For romantic stories and fantasy images, motion picture film pro-
vides a softer look with a feeling of distance, much like digital processing of still
images. Would Star Wars or Forrest Gump have been as effective if originated on
video, even though both contain digital effects? Do your hyper-realistic original
photos qualify as portraits?
Of course, both kinds of images have their place. Painting-oriented filters are excel-
lent for portraits, figure studies, or landscapes in which fine detail is not as impor-
tant as general form, colors, or groups of shapes. Indeed, brushstrokes or other
textures can mask defects, disguise or diminish distracting portions of an image,
and create artful images from so-so photographs. That’s especially true when the
original image was too sharp, or, paradoxically, not sharp enough. Filters can tone
down excessive detail while masking the lack of it.
You’ll want to select your subjects for painting filters carefully. Pictures of older
men and women may not look right when you blur all those hard-won wrinkles
and character lines. Teenagers of both sexes, on the other hand, may prize the
improvement to their complexions. Judicious application of a painting filter can
add some softness to a glamour portrait, too.
Keep in mind that painting filters mimic, but do not duplicate the efforts of an
artist. In real paintings, each brush stroke is carefully applied with exactly the right
size, shape, and direction needed to provide a particular bit of detail. Years of expe-
rience and a good dose of artistic vision tell the artist where and how to put down
those strokes.
A filter, in contrast, can base its operation only on algorithms built into it by the
programmer. A skilled software designer can take advantage of variables such as
lightness, darkness, contrast, and so forth to produce the illusion that an organic
human, and not a silicon simulacrum, is behind the effect. You can further
enhance the image by using your own judgment in applying parameters and
choosing which sections of the picture are to be processed by a filter. However,
you won’t exactly duplicate the efforts of an artist with one of these plug-ins.
Adobe Photoshop CS2: Photographers’ Guide272
Craquelure
Professional photographers pay big bucks to have their photo labs give portraits
an “old masters” look by cracking the surface as if it were a painting that had
started to age. Paints used in ancient times weren’t stable, as they were egg whites,
clay, and plants used as pigment and used a protective varnish layer that tended
to crack. Pro photographers sometimes have this texture applied to their photo-
graphs to give them an Old Masters patina. You can achieve a similar effect, which
adds a nice 3D look, using the Craquelure filter.
Your controls can specify the crack spacing, depth, and brightness. You can adjust
the spacing to produce a mixture of cracks and image area, and modify the depth
and brightness settings to create deeper or shallower cracks.
Dark Strokes
The Dark Strokes filter reduces the number of tones in the image through a pos-
terization-like effect that combines similar tones in an unusual way. Instead of
grouping similar colors together, Dark Strokes makes dark tones darker and light
tones lighter, increasing contrast, while rendering the image with diagonal brush
strokes. Short strokes are used for dark tones and longer strokes for light tones.
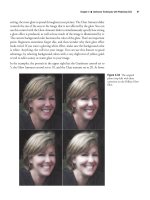
Figure 8.23 shows the Craquelure and Dark Strokes filters applied to the portrait
image.
Chapter 8 ■ Using Photoshop CS’s Filters 273
Figure 8.23 Craquelure (left) and Dark Strokes (right).
Dry Brush
The Dry Brush filter mimics a natural-media effect, that of stroking a canvas with
a brush that’s almost devoid of paint. It doesn’t obscure as much detail as other
painting-style filters, but retains a distinct painting look. As it posterizes your
image, Dry Brush produces more distinct banding than Dry Strokes, combining
all similar colors in a particular area. Adjust the size of the brush to produce dif-
ferent effects.
Paint Daubs
This Brush Strokes filter includes a selection of brush types and sizes, and sharp-
ness controls. You can select from Simple, Light Rough, Dark Rough, Wide Sharp,
Wide Blurry, or Sparkle Brush types. Figure 8.24 shows the Dry Brush and Paint
Daubs filters in action.
Adobe Photoshop CS2: Photographers’ Guide274
Figure 8.24 Dry Brush (left) and Paint Daubs (right).
Fresco
Traditional fresco is a technique in which water colors are applied to wet plaster
and allowed to dry, forming a permanent image on the wall or other structure con-
taining the plaster. If you’re an artist-type, and can work fast, fresco is a great way
to produce murals using short, jabby strokes. If you’re a photographer, you’ll want
to use the Fresco filter to create a smeary effect. This filter is otherwise quite sim-
ilar to Dry Brush.
Poster Edges
This filter transforms your image into a poster by converting full-color or grayscale
images into reduced color versions by combining similar colors into bands of a
single hue, like the Photoshop Posterize command. However, Poster Edges out-
lines all the prominent edges with black, giving the photo a hand-drawn look.
Of course, the original non-electronic poster effect was created to allow simulat-
ing continuous tone images without actually using detailed halftones. The broad
bands of color could each be printed on a separate run through a sheet-fed press
at a relatively low cost. Posters were often created in this way for circuses, plays,
and, later, motion pictures. Even when halftoning was a common and inexpen-
sive process, poster printing techniques were an economical way to produce very
large posters on thick stocks.
Poster Edges gives you three controls, allowing you to adjust the relative thickness
of the black lines used to outline the edges, and specify their darkness or inten-
sity. A third slider lets you specify the number of tones used to produce the effect.
Figure 8.25 shows the Fresco and Poster Edges filter effects.
Chapter 8 ■ Using Photoshop CS’s Filters 275
Figure 8.25 Fresco (left) and Poster Edges (right).
Spatter
The Spatter filter creates an airbrush-like painterly effect. You can use it to soften
portrait or landscape subjects. Its controls include a Spray Radius slider, which
adjusts the number of pixels covered by the spray of the airbrush, and a
Smoothness control, which modifies the evenness of the effect.
Watercolor
Watercolors produce great pastel effects because their water-soluble pigments are
not as opaque as oils or acrylics, and they tend to soak into the paper, producing
a soft, diffused effect. It’s a good plug-in for landscapes, female portrait subjects,
or any image which can be improved with a soft look. While you can select the
amount of brush detail, Watercolor doesn’t work well with detailed strokes. Figure
8.26 shows the Spatter and Watercolor filters at work.
Adobe Photoshop CS2: Photographers’ Guide276
Figure 8.26 Spatter (left) and Watercolor (right).
Angled Strokes
Angled Strokes paints your image using diagonal strokes in one direction for the
dark tones, and diagonal strokes going in the other direction to represent the light
tones in an image.
With high resolution files, the effects may not be as noticeable unless you either
reduce the size of the image to 25 to 50 percent of its original size before apply-
ing the filter (scale it back up when you’re finished) or use a high sharpness set-
ting. This filter can be applied to primary subjects, but also makes a good tool for
creating artsy background textures.
Palette Knife
This filter applies irregular gobs of color to your image. The Stroke Size slider
adjusts the size of the digital knife you’re using. The Stroke Detail control can be
used to specify how much of the detail in your original image is retained. The
Softness control increases or decreases the roughness of the edges of the palette
strokes.
While you can use this filter alone, it works well with other plug-ins, as a first step
to reduce the amount of detail before you apply a second filter, such as Watercolor
or Grain. Textures, particularly canvas, can add to the painterly effect of this fil-
ter. Figure 8.27 shows the Angled Strokes and Palette Knife filters.
Chapter 8 ■ Using Photoshop CS’s Filters 277
Figure 8.27 Angled Strokes (left) and Palette Knife (right).