Adobe Photoshop CS4 for Photographers phần 3 pps
Bạn đang xem bản rút gọn của tài liệu. Xem và tải ngay bản đầy đủ của tài liệu tại đây (9 MB, 71 trang )
Martin Evening
Adobe Photoshop CS4 for Photographers
116
Type preferences
Lastly, we come to the Type preferences (Figure 2.30),
which are mainly of importance to graphics users rather
than photographers. We could all do with smart quotes I
guess, but the smart quotes referred to here are a preference
for whether the text tool uses vertical quotation marks or
rounded ones that are inverted at the beginning and end of a
sentence. The ‘ Show Asian Text Options’ is there for Asian
users, to enable the Chinese, Japanese and Korean text
options in the Character panel. The ‘Show Font Names in
English’ option will be of more signifi cance to non-English
language users, as it will allow them the option to display
the font names in English, as an alternative to their own
native language. The ‘Enable Missing Glyph Protection’
option will switch on automatic font substitution for any
missing glyph fonts (those swirly graphic font characters).
The Type tool Options panel also provides a
WYSIWYG menu listing of all the available fonts when
you mouse down on the Font Family menu (see Figure
2.29). The Font Preview Size menu will determine the font
sizes used when displaying this list; this menu item should
not be confused with the UI Font Size preference that is in
the General preferences section.
Figure 2.30
The Type preferences.
Figure 2.29
Photoshop presents the font lists
using a WYSIWYG menu listing.
Type tool initialization
When you select the type tool for the fi rst
time during a Photoshop session, there
will be a brief pause in which Photoshop
initializes the type tool engine. You may
notice that if the type tool was selected
when you last closed Photoshop, the
initialization process happens during the
startup cycle.
117
Camera Raw Image
Processing
Chapter 3
I
n the 12 years that I have been writing this series of
books, the photography industry has changed out
of all recognition. When I fi rst began writing about
Photoshop, most photographers were shooting with
fi lm cameras, getting their pictures scanned, and only a
few professionals were shooting with high-end digital
cameras. In the last few years the number of photographers
who shoot digitally has grown to the point where the
photographers who shoot fi lm are now in the minority. I
therefore reckon that the vast majority of photographers
reading this book will be working with pictures that have
been shot using a digital SLR or high-end digital camera
that is capable of capturing fi les in a raw format that can be
read by the Adobe Camera Raw plug-in. This is why I have
devoted a whole chapter (and more) to discussing Camera
Raw image editing.
Martin Evening
Adobe Photoshop CS4 for Photographers
118
Camera Raw advantages
Although Camera Raw started out as an image processor
exclusively for raw fi les, it has, since version 4.0, been
capable of processing any RGB image that is in a JPEG or
TIFF fi le format. This means that you can use Camera Raw
to process any image that has been captured by a digital
camera, or any photograph that has been scanned by a
fi lm scanner and saved as an RGB TIFF or JPEG. Camera
Raw allows you to work non-destructively, and anything
you do to process an image in Camera Raw is saved as an
instruction edit and the pixels in the original fi le are never
altered. In this respect, Camera Raw treats your master
fi les as if they were your negatives and you can use Camera
Raw to process an image in any way that you like without
ever altering the original.
The new Camera Raw workfl ow
When Camera Raw fi rst came out it was regarded as a
convenient tool for processing raw format images, without
having to leave Photoshop. The early versions of Camera
Raw had excellent controls for applying basic tone and
color adjustments, but Camera Raw could never on its own
match the sophistication of Photoshop. Because of this,
photographers would typically follow the Camera Raw
workfl ow steps described below in Figure 3.1. They would
use Camera Raw to do all the ‘heavy lifting’ work such as
➯ Set the White point
➯ Set the highlight and shadow clipping points
➯ Adjust the Brightness and Contrast
➯ Adjust the color saturation
➯ Compensate for chromatic aberrations and vignetting
➯ Apply basic Sharpening and Noise Reduction
➯ Apply a Camera Calibration fi ne-tuned adjustment
➯ Apply a crop
➯ Open images in Photoshop for further image editing
Figure 3.1
Camera Raw 1 offered a limited but useful range of image adjustments,
and this list remained unchanged through to version 3.0 of the plug-in.
Camera Raw 4.1
In 2008 Adobe did something rather
unusual: they released the Camera Raw 4.1
update for Photoshop’s Camera Raw plug-
in shortly after the launch of Photoshop
CS3. This was remarkable for two reasons.
Adobe don’t usually update the feature
spec for Photoshop in between new
versions of the program coming out, but
also because it marked a new turning point
in the way digital photographers were
able to work with Photoshop. With the
4.1 update, Adobe refi ned the sharpening
and noise reduction processing so that it
now makes even more sense to carry out
all your pre-image edit adjustments using
Camera Raw.
119
Camera Raw image processing
Chapter 3
Adobe Photoshop Lightroom
The Adobe Photoshop Lightroom program
is designed as a raw processor and image
management program for photographers.
As mentioned in the text, it uses the exact
same Adobe Camera Raw color engine that
is used in Photoshop CS4, which means
that raw fi les that have been adjusted in
Lightroom can also be read and opened
via Photoshop. However, Lightroom has
the advantage of offering a full range of
workfl ow modules designed to let you edit
and manage raw images all the way from
the camera import stage through to print
and web output.
There is no differentiation made
between a raw or non-raw fi le other than
how the default settings are applied when
a photo is fi rst imported. When you
choose to open a Lightroom imported,
non-raw fi le (a JPEG, TIFF or maximum
compatibility PSD) into Photoshop,
Lightroom offers you the choice to apply
or not apply Lightroom edited image
adjustments.
adjusting the White point, Exposure and Contrast and from
there output the picture to Photoshop, which is where they
would to carry out the remaining image editing.
Camera Raw 5 in Photoshop CS4 offers much more
extensive image editing capabilities (such as localized
adjustments) and it is now possible to replicate in Camera
Raw the things that would normally have been done only
in Photoshop. The net result of all this is that you can (and
should) use Camera Raw as your fi rst port of call when
preparing any photographic image for editing in Photoshop.
Let’s be clear, Camera Raw does not replace Photoshop.
It simply enhances the workfl ow and offers a better set of
tools to work with in the early stages of an image editing
workfl ow. Add to this what I mentioned earlier about being
able to work with JPEG and TIFF images, and you can see
that Camera Raw is a logical place for any image to begin
its journey through Photoshop.
If you look at the suggested workfl ow listed in Figure
3.2 you will see that Camera Raw 5 now has all the tools
you need to optimize and enhance a photograph.
➯ Set the White point
➯ Set the highlight and shadow clipping points
➯ Compensate for missing highlight detail using Recovery
➯ Compensate for hidden shadow detail using Fill Light
➯ Make basic Brightness and Contrast adjustments
➯ Boost the midtone contrast (Clarity)
➯ Fine-tune the tone curve contrast
➯ Fine-tune the color saturation/vibrance plus HSL color
➯ Compensate for chromatic aberrations and vignetting
➯ Retouch spots using a clone or heal brush
➯ Make localized adjustments (brush or graduated fi lter)
➯ Full capture Sharpening and Noise Reduction
➯ Apply a Camera Calibration fi ne-tuned adjustment
➯ Apply a crop
➯ Open images in Photoshop for further image editing
Figure 3.2
Camera Raw 5 has now extended the list of things that can be done to
an image at the Camera Raw editing stage.
Martin Evening
Adobe Photoshop CS4 for Photographers
120
It can also be argued that if you use Camera Raw to edit
your photographs, this will replace the need for Photoshop
adjustments such as Levels, Curves and Hue/Saturation.
To some extent this is true but, as you will read later in
Chapter 5, these Photoshop adjustment tools are still
relevant for fi ne-tuning images that have been output from
Camera Raw, especially when you want to edit your photos
directly or apply certain kinds of image effects that require
the use of adjustment layers or additional image layers.
Does the order matter?
When you edit an image in Camera Raw it does not matter
which order you apply the adjustments in. The lists shown
in Figures 3.1 and 3.2 are presented as just one possible
Camera Raw workfl ow. So for example you could refer
to the list of steps in Figure 3.2, start by applying the
crop and work your way through the remainder of the list
backwards. However, you are normally advised to start
with the major adjustments, such as setting the White point
and Exposure in the Basic panel fi rst before going on to
fi ne-tune the image using the other controls.
Raw capture
If you are shooting with a professional back, digital SLR,
or an advanced compact digital camera, you will almost
certainly have the capability to shoot using the camera’s
raw format mode. The advantages of shooting in raw as
opposed to JPEG mode are not always well understood.
If you shoot using JPEG, the fi les are compressed by
varying amounts and this fi le compression will enable you
to fi t more captures on a single card. Some photographers
assume that shooting in raw mode simply provides you
with uncompressed images without JPEG artifacts, but
there are some more important reasons why capturing in
raw mode is better than shooting with JPEG. The main
benefi t is the fl exibility this gives you. The raw fi le is like a
digital negative, waiting to be interpreted any way you like.
It does not matter about the color space or white balance
setting that was used at the time of capture, since these
Raw is the negative
You can liken capturing in raw mode
to shooting with negative fi lm, and the
great thing about negative fi lm is that it
doesn’t matter if someone makes a bad
print, because you can always make an
improved print from the original negative.
When you shoot raw, you are recording
a master fi le that contains all the color
information that was captured at the time
of shooting. To carry the analogy further,
shooting in JPEG mode is like taking your
fi lm to a high street photo lab, throwing
away the negatives and then making scans
from the prints. If you shoot using JPEG,
the camera is deciding automatically at
the time of shooting how to set the white
balance and the tonal corrections, often
clipping the highlights and shadow detail
in the process
.
Camera Raw support
Camera Raw has kept pace with nearly
all the latest raw camera formats in the
compact range and digital SLR market,
but only supports a few of the higher-end
cameras such as the Leaf systems and
latest Hasselblad H2 and H3 cameras
(which also support the DNG format).
121
Camera Raw image processing
Chapter 3
can all be set later in the raw processing. The only thing
you have to concern yourself with is the ISO setting and
camera exposure. But this advantage can also be seen by
some as its biggest drawback since the Camera Raw stage
will add to the overall image processing, meaning more
time spent working on the images and an increase in the
capture fi le size and download times. For these reasons,
news photographers and others will fi nd that JPEG capture
is preferable for them.
JPEG capture
When you shoot in JPEG mode, your options are more
limited since the camera’s on-board computer makes its
own automated decisions about how to optimize for tone,
color, noise and sharpness. This means that you have to
make sure that the camera settings are absolutely correct
for things like the white balance and exposure. There is
some room for manoeuvre when editing JPEGs, but not
as much as you get when editing raw fi les. In JPEG mode,
your camera will be able to fi t more captures onto a card,
and this will depend obviously on the capture fi le size and
compression settings used. But it is worth noting that at the
highest quality setting, JPEG capture fi les are sometimes
not that much smaller than those stored using the native
raw format. What you will fi nd is that the length of the
burst capture rate is greater when shooting in JPEG mode
and for some photographers, such as those who cover
sports events, speed is everything.
Editing JPEGs and TIFFs in Camera Raw
Not everyone has been keen on using Camera Raw
to open non-raw images. However, the Camera Raw
processing tools are so powerful and intuitive to use that
why shouldn’t they be available to work on images other
than raw fi les? The idea of applying further Camera Raw
processing may seem redundant in the case of JPEGs
but, despite these concerns, Camera Raw does happen to
be a good JPEG image editor. So from one point of view
Camera Raw can be seen as offering the best of all worlds,
Figure 3.3
The camera’s on-board processor
is used to generate the low resolution JPEG
preview image that appears in the LCD screen.
The histogram is also based on the JPEG preview
and is therefore a poor indicator of the true
exposure potential of a raw capture image.
Discarded image data
When you shoot using JPEG or TIFF, the
camera is immediately discarding up to
88% of the image information captured
by the sensor. This is not as alarming
as it sounds because, as you know from
experience, you don’t always get a bad
photograph from a JPEG capture. But
consider the alternative of what happens
if you shoot using a raw mode capture.
The raw fi le is saved to the memory card
without being altered by the camera. This
allows you to work with all 100% of the
image data captured by the sensor.
Martin Evening
Adobe Photoshop CS4 for Photographers
122
but it can also be seen as a major source of confusion (is it
a raw editor or what?)
Perhaps the biggest problem so far has been the
implementation rather than the principle of non-raw
Camera Raw editing. Earlier in Chapter 2, I made the
point that opening JPEGs and TIFFs via Camera Raw was
made unnecessarily complex in Photoshop CS3, but this
issue has now been resolved in CS4 and the Camera Raw
fi le opening behavior for non-raw fi les is much easier to
confi gure and anticipate (see page 101 for the full details).
On the other hand, if you look at the Lightroom
program I think you will fi nd that the use of Camera Raw
processing on non-raw images works very well. I’ll be
explaining the Lightroom approach to non-raw editing a
little later but it has to be said that the process of editing
non-raw fi les in Lightroom is much easier to get to grips
with, since Lightroom manages to process JPEGs quite
seamlessly (see sidebar on page 119).
Alternative Raw processors
While I may personally take the view that Camera Raw
is a powerful raw processor, there are now a lot of other
alternative raw processing programs photographers can
choose from. Some camera manufacturers supply their own
brand of raw processing programs which either come free
with the camera or you are encouraged to buy separately.
Other notable programs include Capture One which is
favored by a lot of professional shooters and Apple’s
Aperture which can be seen as a rival for Adobe’s own
Lightroom program. If you are using some other program
to process your raw images and are happy with the results
you are getting then that’s fi ne. Even so, I would say that
the core message of this chapter still applies, which is to
use the raw processing stage to optimize an image so that
you can rely less on using Photoshop’s own adjustment
tools to process the photograph afterwards. Overall it
makes good sense to take advantage of the non-destructive
processing in Camera Raw to freely interpret the raw
capture data in ways that you can’t using Photoshop alone.
From light to digital
The CCD or CMOS chip in your camera
converts the light hitting the sensor into
a digital image. In order to digitize the
information, the signal must be processed
through an analog-to-digital converter
(ADC). The ADC measures the amount of
light hitting the sensor at each photosite
and converts the analog signal into a binary
form. At this point, the raw data simply
consists of image brightness information
coming from the camera sensor. The raw
data must then be converted somehow and
the raw conversion method used can make
a huge difference to the quality of the fi nal
image output. Most cameras will have an
on-board microprocessor that is able to
convert the raw data into a readable image
fi le, which in most cases will be in a JPEG
type format. The quality of a digital image
is primarily dependent on the lens optics
used to take the photograph, the recording
capabilities of the CCD or CMOS chip, and
the analog-to-digital converter. But it is the
raw conversion process that matters most. If
you choose to process the raw data on your
computer instead, you have much greater
control than is the case if you had let your
camera automatically guess which are the
best raw conversion settings to use.
Third-party raw converters
The other software programs that can read
and convert the raw camera data include:
Bibble: www.bibblelabs.com, FotoStation:
www.fotostation.com, Apple’s Aperture,
Capture One from Phase One and of
course now
, Adobe Photoshop Lightroom.
123
Camera Raw image processing
Chapter 3
A basic Camera Raw/Photoshop workfl ow
The standard Camera Raw workfl ow should be kept quite
simple. Select the photo you wish to edit and double-
click the thumbnail in Bridge to open it in Camera Raw.
Or, you can use the
Cr Lr
shortcut to open in
Camera Raw via Bridge (this is discussed later on
page 144). In the example that’s shown over the next few
pages, I mainly used the Basic panel controls to adjust
the white balance, the shadow and highlight clipping,
and the tone contrast. These adjustments can be used to
produce a well-balanced color master image that can then
be edited in Photoshop, where layers and fi lters can be
added as necessary. Any special effects or black and white
conversions are best applied at the end in the form of an
undoable adjustment layer, as shown in Step 5.
1
In this fi rst step I opened a window in Bridge, selected a raw photo that I wished to
edit and double-clicked on the highlighted thumbnail to open it via Camera Raw in
Photoshop.
Martin Evening
Adobe Photoshop CS4 for Photographers
124
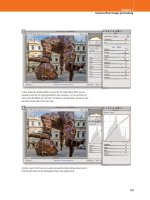
3
You can use the panel controls on the right to optimize the tone color and contrast,
and improve the look of the photograph. Once you are happy with the way the image
is looking, click the Open Image button to continue editing in Photoshop.
2
This shows the photograph opened up via the Camera Raw dialog hosted by
Photoshop using just the Camera Raw Auto settings.
125
Camera Raw image processing
Chapter 3
5
In this step I added a black and white adjustment layer to the top of the layer stack.
This allowed me to preserve the color data in the retouched image and retain the
ability to switch the conversion on or off.
4
The Open Image button renders a pixel image version of the raw fi le that can then
be edited in Photoshop using all the tools that Photoshop has to offer.
Martin Evening
Adobe Photoshop CS4 for Photographers
126
A Lightroom/Photoshop workfl ow
This workfl ow applies to Lightroom users only and I have
included it here in order to illustrate an alternative approach
to including Camera Raw style processing in a Photoshop
workfl ow. In this example you can see how Camera Raw
adjustments are applied at the beginning stage to optimize
the master image. An Edit copy is opened in Photoshop and
when the retouching is complete you can use the Develop
controls in Lightroom to further edit the image, such as the
grayscale conversion that was applied here.
1
The Lightroom/Photoshop workfl ow starts off more or less the same as the Camera
Raw/Photoshop workfl ow. Select a photo from the Lightroom Catalog, go to the
Develop module (shown here) and apply some basic image adjustments to optimize
the tones and colors. When you want to take the photo into Photoshop, go to the
Photo menu and choose Edit in
➯
Edit in Adobe Photoshop CS4 (Ce Le).
This will open the selected master photo in Photoshop as a pixel image copy of the
original master, ready for you to edit. When you save the image, this will add the copy
photo to the catalog (in the same folder location) and add an ‘-Edit’ suffi x to the fi le
name.
The Photoshop sandwich
I like to describe this particular workfl ow
as using Photoshop as a ‘sandwich
fi ller’ for Lightroom. This is because the
Develop controls in Lightroom are used
at the beginning, Photoshop is then
used to edit an Edit-copy pixel version of
the master, and the Develop controls in
Lightroom are used again at the end to add
the fi nishing touches.
127
Camera Raw image processing
Chapter 3
2
As before, you can use Photoshop to edit the Edit-copy pixel image, working here
on the Edit-copy version that was rendered from Lightroom.
3
As the image is edited in Photoshop and saved, the Lightroom preview is updated.
In Lightroom, you can apply post-Photoshop edit adjustments in the Develop
module. One can therefore use Lightroom to colorize an image or convert to black
and white, rather than add an extra adjustment layer in Photoshop.
Martin Evening
Adobe Photoshop CS4 for Photographers
128
Camera Raw support
Camera Raw won’t ‘offi cially’ interpret the raw fi les from
every digital camera, but over 175 different raw formats
are now supported, and Adobe is committed to providing
intermittent free Camera Raw updates that will always
include any new camera fi le interpreters as they become
available. This generally happens about once every three
months and sometimes sooner if a signifi cant new camera
is released. It is probably no coincidence that Thomas
Knoll, who is a Canon EOS 1Ds user, always happens to
have a new Camera Raw update for the 1Ds soon after a
new model comes out! Camera Raw updates don’t usually
include new features, although the Camera Raw 4.1 update
for Photoshop CS3 was unique in that it offered a whole
new refi ned approach to image sharpening. There is always
a chance this might happen again with CS4 but, for the
most part, Camera Raw updates are provided to offer
additional camera support and/or improved integration
with Lightroom. For example, the Camera Raw 4.5 update
was released so that Photoshop CS3 users could read raw
fi les that have been edited in Lightroom 2.
Now understand that while not all raw camera fi le
formats are supported, this is in no way the fault of Adobe.
Certain camera manufacturers have in the past done things
like encrypt the white balance data, which makes it diffi cult
for anyone but themselves to decode the raw image data.
DNG compatibility
The DNG fi le format is an open standard fi le format for
raw camera fi les. DNG is a fi le format that was devised by
Adobe and there are already a few cameras (most noticeably
the Hasselblad H3) that can shoot directly to DNG; plus
there are now quite a few raw processor programs that
can read DNG; including Camera Raw and Lightroom of
course. Basically, DNG fi les can be read and edited just
like any other proprietary raw fi le format and it is generally
regarded as a safer fi le format to use for archiving your
digital master fi les. For more about the DNG format refer to
pages 228–230 at the end of this chapter.
Forward compatibility for raw fi les
Adobe’s policy is to provide ongoing
Camera Raw support throughout the life
of a particular Photoshop product. This
means if you bought Photoshop CS3,
you would have been provided with free
Camera Raw updates, up until version 4.5.
Once a new Photoshop program comes
out, Camera Raw support is continued for
those new customers only. Consequently,
you are obliged to upgrade your version of
Photoshop if you wish to take advantage
of the support offered for new cameras.
However, you won’t be completely blocked
off from doing so. If you refer to the end
of this chapter you can read about the free
DNG Converter program that is always
released at the same time as any Camera
Raw updates. What you can do is to use
DNG Converter to convert any supported
raw camera format fi le to DNG. When you
do this, the DNG fi le can then be read by
any previous version of Camera Raw.
129
Camera Raw image processing
Chapter 3
Figure 3.4
Here is a typical studio setup
where I have an iMac computer stationed close
to the actual shooting area, ready to process
the captured images from the shoot. With the
setup shown here I can either import camera
card images via a Firewire card reader or shoot
tethered.
Getting raw images into Photoshop
There was a time, not so long ago, when one would
simply scan a few photographs, put them in a folder and
double-click to open them up in Photoshop. These days
most photographers are working with large numbers of
images and it is therefore important to be able to import
and manage those images effi ciently. When Photoshop 7
came along Adobe introduced the File Browser, which
was like an alternative open dialog interface incorporated
within Photoshop that offered a superior way to manage
your images, allowing you to preview and manage multiple
images at once. The File Browser was superseded by the
Bridge program in Photoshop CS2. As image browser
programs go, Bridge’s main advantage is that you have
ready access to Photoshop to open up single or multiple
images and apply batch operations directly from within
the program. If you compare Bridge with other browser
programs, it has enough basic functionality to suit most
photographers’ needs, although it has to be said that Bridge
has yet to provide the full functionality that professional
photographers have come to rely on in other programs,
such as those dedicated to the task of managing large
numbers of photographs (like Lightroom or Aperture).
Image ingestion
The fi rst thing we should look at is how to get images from
the camera and on to the computer ready to be worked on.
This process is sometimes referred to as ‘image ingestion’,
which is not a particularly elegant phrase but is how some
like to describe the process.
Bridge features a Photo Downloader utility program that
makes the downloading process much easier to carry out
than was the case in earlier versions of Bridge, and over the
next few pages I have outlined all the steps that are required
when working with the Photo Downloader. For comparison
purposes I have followed this up with an example of how to
use the Adobe Photoshop Lightroom program, because this
is the method I normally use when bringing photographs
into the computer for Photoshop editing.
Martin Evening
Adobe Photoshop CS4 for Photographers
130
Importing images via Photo Downloader
1
The process begins by inserting a camera card into the computer via a Firewire or
USB 2.0 card reader. The card should then mount on the desktop or appear in the My
Computer window as a new mounted volume.
Figure 3.5
The subfolder naming options.
2
Now launch Bridge CS4 and choose File
➯
Get Photos from Camera This will
open the Photo Downloader dialog shown here, where you can start by selecting
where to download the fi les from (in this instance, the EOS_Digital camera card).
Next, choose a location to download the photos to. Here, I selected the Pictures
folder. I then selected ‘Custom Name’ from the Create Subfolder(s) menu (see Figure
3.5) and typed in a name for the shoot import (this name is appended to the Location
setting to complete the fi le path). If the ‘Delete Original Files’ option is checked,
Photo Downloader will give you the option to delete the fi les from the camera card
once they have been successfully downloaded to the computer. I then checked the
Save Copies to: option and clicked on the Choose button to locate a backup folder
to save the fi les to.
131
Camera Raw image processing
Chapter 3
3
Lets review the Photo Downloader settings that have been applied so far. The
camera card contained the images I wished to import and the Photo Downloader
settings have so far been confi gured to copy these fi les to the primary disk location
(which in this instance would be the computer hard drive), and at the same time
make a backup copy of all the images to a secondary location (in this case, a backup
hard drive). With the setup shown here, I was able to use Photo Downloader to make
renamed copies of the fi les to the principal drive/folder location and, if desired,
convert the fi les to DNG as I did so. With this type of confi guration I will end up with
two copies of each image imported and stored on the computer system.
Copy to main import folder location
Copy to backup folder location
Backup insurance
Your camera fi les are vulnerable to loss
for as long as they remain in one location
only, especially if they only exist on the
camera card, which can easily get lost or
the data might be corrupted. This is why
it is always a good idea to get the camera
fi les off the card and safely stored on a
computer hard drive as soon as possible.
Not only that, it is also a good idea to make
a backup of the camera fi les as you do so.
Note that Bridge will apply the settings
setup in the Photo Downloader to the fi les
that are copied to the main folder location.
But, the fi les copied to the backup location
will be plain clone copies of the original
camera fi les. The backup copy fi les will not
be renamed (as are the main import fi les).
This is a good thing because should you
make a mistake during the rename process
you always retain a backup version of
the fi les just as they were named when
captured by the camera. Basically, backup
fi les are like an insurance policy against
both a drive failure as well as any fi le
renaming mix-ups.
Martin Evening
Adobe Photoshop CS4 for Photographers
132
4
If you click on the Advanced dialog button in the bottom left corner (see Step 2)
you will show an expanded version of the Photo Downloader dialog. This will allow
you to see a grid preview of the images on the card you are about to import from.
You can now decide which images will be imported by clicking on the thumbnail
checkboxes to select or deselect individual photos. You can also use the Check All
and Uncheck All buttons in the bottom left of the dialog to select or deselect all the
thumbnails at once.
The Rename Files section lets you choose a renaming scheme from the list
of options shown in Figure 3.6. Which you should choose will depend on what
works best for you, and this is a topic I will explore in greater detail in the Image
Management chapter. In this example I chose to rename using the shoot date
followed by a custom shoot name. You can see how the renaming will work by
inspecting the Example fi lename above, where you will note that the imported fi les are
automatically renumbered starting from the start number entered here. If you check
‘Preserve Current Filename in XMP’, this will give you the option to use the Batch
Rename feature in Bridge to recover the original fi lename at a later date.
The Advanced Options will let you decide what happens to the imported images
after they have been renamed. You will most likely want to check the Open Adobe
Bridge option so that Bridge displays the image download folder contents as the
images are being imported.
In the Apply Metadata section you can choose a pre-saved metadata template
(see Chapter 11) and enter your author name and copyright information. This data
will then be automatically embedded as metadata in the fi les as they are imported.
Figure 3.6
Here are the options for the
Rename Files menu, highlighted in the dialog
above.
133
Camera Raw image processing
Chapter 3
5
If the Convert to DNG option is selected, this can be used to convert raw images to
the DNG fi le format as they are imported. For some people it can be useful to carry
out the conversion straight away, but be warned that this will add to the time it takes
to import all the photos. If you click on the Settings button (next to the Convert to
DNG option in Photo Downloader) this will open the DNG Conversion Settings dialog
shown here. If you select the Medium size JPEG Preview option, this will generate
a standard size preview for the imported pictures – there is no point in generating
a full size preview just yet since you may well be changing the camera raw settings
soon anyway, so to get reasonably fast imports it is better to choose ‘Medium Size’.
Check the Compressed option if you would like smaller fi le sizes (note that this uses
lossless compression and does not risk degrading the image quality). In the Image
Conversion Method section I suggest you don’t choose ‘Convert to Linear Image’, but
choose ‘Preserve Raw Image’ as this will keep the raw data in the DNG in its original
state. And lastly, you can choose to embed the original raw data (along with the
DNG data) in the DNG fi le, but I would advise against this unless you really need to
preserve the proprietary raw fi le.
6
After I clicked on the Get Photos button in the Photo Downloader dialog, the images
started to download from the card to the disk location specifi ed in the Save Options.
The Progress dialog shows you how the download process is proceeding.
Converting to DNG
To read more about converting proprietary
raw fi les to DNG and the conversion
settings shown here, please refer to pages
228–230 at the end of this chapter.
Martin Evening
Adobe Photoshop CS4 for Photographers
134
7
Because the ‘Open Adobe Bridge’ option had been selected, once all the photos
were downloaded Bridge opened a new window to display the imported photos that
were now in the main download images folder.
8
Also, because the ‘Delete Original Files’ option was selected, the above warning
dialog appeared once the downloads to the primary destination folder (and backup
folder) were complete. This step conveniently clears the camera card of all the images
that were stored on it and prepares it for reuse in the camera. Be warned that this step
bypasses any opportunity to confi rm if you really want to delete these fi les. Once you
click ‘Yes’, the fi les will be permanently deleted from the card. When I put a card back
in the camera I usually reformat it anyway before shooting a fresh batch of photos to
that card (see sidebar ‘Deleting camera card fi les’).
Deleting camera card fi les
It isn’t actually necessary to delete the
fi les from the camera card fi rst, because
formatting a card in the camera will delete
everything that is on the card anyway.
Formatting the card is good housekeeping
practice as this will help guard against
future fi le corruptions occurring with
the card. However, I fi nd that if I am in
the midst of a busy shoot it is preferable
to get into a routine of deleting the fi les
before you put the card back in the
camera. Otherwise I am always left with
the nagging doubt: ‘have I downloaded all
the fi les on this card yet? Is it really safe to
delete everything on this card?’
135
Camera Raw image processing
Chapter 3
Tethered shoot imports
There is no direct support for tethered shooting in Bridge
CS4, but if Bridge were able to do so it would have to
offer tethered support for all the cameras that Camera Raw
already supports. Enabling full tethered shoot functionality
is diffi cult enough to do for one camera let alone several
hundred, which is why some software programs, such as
Capture One and Bibble, that do offer tethered shooting,
only do so with a range of popular digital SLR cameras.
For some people this is justifi cation enough for spending
the extra money to shoot tethered.
However, it is possible to shoot in tethered mode
with Bridge, but it all depends on the capabilities of your
camera and whether it has a suitable connection socket and
software that will allow you to download fi les directly to a
computer. Many cameras (especially digital SLR cameras)
will most likely come with some kind of software that
allows you to hook your camera up to the computer via
a Firewire or USB 2 cable (Figure 3.7). If you are able
to download fi les directly to the computer then Bridge
can monitor that folder, and this will give you a next best
solution to a dedicated software program that is designed to
operate in tethered mode.
The only drawback to shooting tethered is that the
camera must be wired up to the computer and you don’t
have the complete freedom to wander around with the
camera. If you have a wireless communication device then
it may be possible to shoot in a direct import mode to the
computer, without the hassle of a cable but, at the time of
writing, wireless shooting isn’t particularly speedy when
shooting raw fi les with a typical digital SLR.
Over the next few pages I have described a method
for shooting in tethered mode with a Canon EOS camera,
using the Canon EOS Utility program that ships with most
of the Canon EOS digital cameras. This program lets you
download camera fi les as they are captured, to a designated
watched folder. Nikon owners will fi nd that Nikon Capture
includes a Camera Control component that allows you to
do the same thing as the Canon software and establishes
Figure 3.7
Here is a photograph of me at work
in the studio, shooting in tethered mode.
Which utility?
One of the problems with the Canon
system is the way the utility programs have
been named and updated with succeeding
generations of cameras. First of all there
was EOS Viewer Utility, and now EOS
Utility, which have both interacted with a
program called EOS Capture. On top of
this you also have to make sure that you
are using the correct version of ‘utility’
software for the camera type you are
using. It would help if there were just one
program that was updated to work with all
Canon cameras.
Which transfer protocol?
Nikon and Canon systems both offer FTP
and PTP transfer protocols. Make sure
you select the right one, as failure to do
so can result in an inability to get tethered
shooting to work.
Martin Evening
Adobe Photoshop CS4 for Photographers
136
1
To begin with, make sure the camera is tethered to the computer correctly and is
switched on, then launch EOS utility and click the Preferences button (circled) to open
the preferences shown in Step 2 below.
2
In the Destination Folder section, click on the Browse button and select a
destination folder that the camera captures will be downloaded to. This could be
an existing folder, or a new folder, such as the ‘Watched folder’ selected here.
Meanwhile, in the Linked Software section, set the ‘Software to link to’ as ‘None’.
a watched folder to download the images to. The latest
version of Nikon Capture supports all the D Series cameras
as well as the Nikon Coolpix 8700. Alternatively, you
might want to consider buying Bibble Pro 4.10 software
from Bibble Labs (www.bibblelabs.com). Bibble Pro costs
a lot less than Nik
on Capture. It enables tethered shooting
with a wide v
ariety of digital cameras and, again, allows
you to establish a watched folder for the downloaded
images, which you can monitor using Bridge CS4.
137
Camera Raw image processing
Chapter 3
3
You will also need to set up a fi le renaming scheme. You could carry out the fi le
renaming in Bridge afterwards, but establishing this beforehand will save time and
help reduce the risk of error when it’s applied automatically as the fi les are captured.
In this example, I selected the Shooting Date+Prefi x+Number fi le naming scheme and
set the start count number to ‘1’.
4
I clicked OK to the Camera Settings in Step 3 and then clicked on the Camera
Settings/Remote shooting option that the cursor is pointing to in Step 1. This will
open the Camera control window shown here, where you can confi gure the camera
settings remotely. As soon as this window appears you are ready to start shooting.
Auto-renumbering
When you select a numbering option in the
File Name section, the numbering will keep
on auto-updating until such time as you
change the fi le prefi x name. This is useful
to know because it means that if you were
to lose a camera connection or switch the
camera off between shoots, the EOS Utility
program will know to continue the fi le
renaming of the import fi les from the last
number used.
Lightroom confl icts
If you are also running Lightroom, the
one thing to watch out for here is that
the Watched folder you select in Step 2
does not confl ict with any Watched folder
that might currently be monitored by
Lightroom. If this is the case, then you will
need to disable the auto-import feature in
Lightroom fi rst before using it to import
photos that can be viewed via Bridge.
Remote shooting controls
As soon as the Camera control window
appears you know that you have
succeeded in establishing a tethered
connection and are ready to start shooting.
This can be done by pressing the shutter
on the camera or, alternatively, you can
use the EOS Capture utility to capture
the photos remotely from the computer
by clicking on the large round button
(circled). You can also use this window
to adjust the camera settings by selecting
any of the status items in the window and
use the left or right keyboard arrow keys to
cycle between the various mode options or
decrease or increase the settings.
Martin Evening
Adobe Photoshop CS4 for Photographers
138
5
As you start shooting, the EOS utility will enable the import of the camera
fi les directly into the Watched folder you selected in Step 1 and rename them (as
confi gured in Step 2). All you need to do now is point Bridge at the same Watched
folder as was confi gured in the EOS Utility preferences and you’ll see the pictures
appear in Bridge directly. Of course, if you are shooting continuously in the studio or
location with such a setup, then you will most likely wish to see the newest pictures
appear fi rst at the top of the content area in the Bridge window. To do this, go to the
View menu and check if the Ascending Order item in the Sort menu is deselected
(as shown in the screen shot on the left). Do this and the fi les will now be sorted in
reverse order with the most recent appearing fi rst.
When you have fi nished shooting in tethered mode, you will either need to move
the fi les out of the watched folder or give it a new name. The main thing to be aware
of here is that every time you start a new shoot, you will either want to choose a
new job folder to download the photos to, or move the fi les from this folder to a new
location and make sure that the Watched folder you are linking to has been emptied.
139
Camera Raw image processing
Chapter 3
Figure 3.8
In this table I have compared the features available using some of
the various methods that are available when importing camera images into the
computer. As you can see, there is no one perfect solution out there that will let you
do everything.
Importing images via other programs
Figure 3.8 highlights some of the various methods that can
be used for importing images. There is no one program
that can do everything perfectly, but of these I would say
that Capture One is the only program capable of ticking all
the essential boxes (as long as your camera is supported).
ImageIngester is a great little utility that can provide a fast
and robust import workfl ow, and the standard version for
Mac and PC is currently available to download for free.
Ever since Adobe Photoshop Lightroom made its fi rst
appearance as a beta product, I have been using Lightroom
in the studio and on location and now use it all the time
to import images from cards as well as when shooting
in tethered mode. I have now stopped using Bridge
completely at the import stage. Although Lightroom is a
separate program that would need to be bought separately,
I thought I should at least show you the workfl ow I now
prefer using when I wish to import new photos into the
computer.
ImageIngester™ program
The ImageIngester™ program designed by
Marc Rochkind is aimed at photographers
who shoot digitally, use a raw workfl ow,
and need to ingest hundreds of images
from a typical shoot. You can download the
basic ImageIngester program for free from
the following link: www.basepath.com/
Imag
eIng
ester/
An ImageIngester Pro version is on the
cards, b
ut at the time of
writing I cannot
confi rm if this will be sold as a product.
* In these instances, tethered shooting is only
possible if done in conjunction with a camera
manufacturer’s import software.
Figure 3.8
In this table I have compared the features available using some of
* In these instances tethered shooting is only
Direct
integration
with
Bridge
File
renaming
Full auto
renumbering
Secondary
backup of
data
Convert
to DNG
Import
settings
saved for
concurrent
imports
Tethered
shooting
Preview and
pre-selection
of import
fi les
Photo Downloader
✗ ✗ ✗ ✗✗✗ ✗
Tethered shooting via Bridge
✗✗
*
DNG Converter
✗✗ ✗✗
Lightroom Import Photos
✗ ✗ ✗✗✗ ✗
Lightroom Auto Import
✗✗ ✗✗
*
Image Ingester Standard
✗ ✗ ✗✗✗
Capture One
✗ ✗ ✗✗✗ ✗
Martin Evening
Adobe Photoshop CS4 for Photographers
140
Lightroom imports
One of the main reasons I have adopted Lightroom as my
program of choice for importing and managing the photos
in my image library is because I need a program that is
dedicated to the management of images. With Lightroom,
photos have to be explicitly imported into the Lightroom
catalog before you can work on them but, once they are
there, they are easier to manage and recall. With Bridge
you do have immediate access to browse the entire contents
of your computer, but the trade-off here is that because you
can browse everything this doesn’t always make it so easy
to locate the photos you are specifi cally looking for.
In the Import Photos dialog you have similar options
to those found in Photo Downloader, such as the ability to
make backups, rename the fi les and apply basic metadata
information. But in addition to this you have the option
to apply develop settings and add custom keywords on
import. You can also use Import Photos to report suspected
duplicate fi les and prevent these from being reimported.
This can be useful if you happen to reuse a card and forgot
to delete the photos that were downloaded previously.
After the fi les have been imported into Lightroom, the
imported images will appear listed in the Folders panel of
the Library module, which displays all the images that have
been imported so far into Lightroom using the same disk
volume and hierarchy structure as the folders that are found
in the system folder organization (see Step 4 on page 143).
Moving fi les or folders in Lightroom is like moving fi les or
folders at the system level or via Bridge, except you must
use Lightroom to do the moving otherwise you’ll end up
with broken links. One of the main features of Lightroom is
that master fi les are always preserved as the original fi les,
and Develop module edits in Lightroom are applied in the
form of metadata instructions (just like Camera Raw). To
open pictures from Lightroom into Photoshop, you need
to create an Edit copy of the master either with or without
Lightroom adjustments and edit it in Photoshop, just as you
would when opening a fi le from Bridge. The Edit-copy fi les
are then saved back to the folder they came from and added
to the Lightroom catalog.
Bridge versus Lightroom
In earlier editions of this book, I suggested
how you could use the File Browser
(which then became Bridge) as one way
to bring your photos into Photoshop.
Unfortunately, Bridge CS3 didn’t really
manage to offer much in the way of
additional benefi ts, while Lightroom
1.0 steamed ahead in offering a much
improved workfl ow for photographers. The
good news is that Bridge CS4 has now
regained some of its focus and managed
to overcome a few of the pitfalls that were
initially there in CS3. For example, the
Bridge 2.1 update managed to resolve the
auto-renumbering problem, which means
that the Photo Downloader is now up to
the task of importing photos without you
having to constantly monitor the import
settings as you do so.
The main thing to note here is that
Bridge is a File Browser, while Lightroom
is a dedicated cataloging program. The
times that I fi nd Bridge most useful are
when I am working on a project like this
book and have hundreds of fi les to manage
that are stored in specifi c book folders.
The times when I fi nd Lightroom useful is
when I wish to source the master original
fi les. The Lightroom cataloging features
allow me to search and navigate these
much quicker.